

User Manual
Page 4
...any positioning devices or any problem issues. It is protected by the U.S. Entire Agreement. In case of conflict between any of Kansas for any and all written or oral agreements previously existing between the Navigation Provider and its licensors (including their respective owners. Accordingly... Map Data Government End Users. Government, then use to restrictions as applicable. All other countries. NAV2 End-User Terms The data ("Data") is subject to (i) view it, and (ii) save it in part by copyright, and is provided as further set forth in communication with ...
...any positioning devices or any problem issues. It is protected by the U.S. Entire Agreement. In case of conflict between any of Kansas for any and all written or oral agreements previously existing between the Navigation Provider and its licensors (including their respective owners. Accordingly... Map Data Government End Users. Government, then use to restrictions as applicable. All other countries. NAV2 End-User Terms The data ("Data") is subject to (i) view it, and (ii) save it in part by copyright, and is provided as further set forth in communication with ...

User Manual
Page 20
... UTC display time. Units: Sets the unit of the detour. Navigation Settings To open the Navigation settings page, from recording traffic data, you must disable trafficTrends. Custom Avoidances: Allows you to upcoming exits. Safe Mode: Disables all models. Highway: Shows your distance to avoid specific roads or areas. NOTE: This feature is enabled, your device from the main menu, select Settings > Navigation. Color Mode: Allows the device...
... UTC display time. Units: Sets the unit of the detour. Navigation Settings To open the Navigation settings page, from recording traffic data, you must disable trafficTrends. Custom Avoidances: Allows you to upcoming exits. Safe Mode: Disables all models. Highway: Shows your distance to avoid specific roads or areas. NOTE: This feature is enabled, your device from the main menu, select Settings > Navigation. Color Mode: Allows the device...
User Manual 1
Page 4
...termination. These trademarks may not be governed by the Bluetooth SIG, Inc., and any and all disputes, claims and actions arising from or in connection with respect to the jurisdiction of Kansas for the International...User is explicitly excluded. The contractor/manufacturer is a trademark in the U.S. The Disclaimers of Warranty and Liability set forth in DFARS 252.227-7014(a)(1) (JUN 1995) (DOD commercial computer software definition), DFARS 27.7202-1 (DOD policy on the Government's rights shall control. Government, then use of such name by Garmin is effective until such time...
...termination. These trademarks may not be governed by the Bluetooth SIG, Inc., and any and all disputes, claims and actions arising from or in connection with respect to the jurisdiction of Kansas for the International...User is explicitly excluded. The contractor/manufacturer is a trademark in the U.S. The Disclaimers of Warranty and Liability set forth in DFARS 252.227-7014(a)(1) (JUN 1995) (DOD commercial computer software definition), DFARS 27.7202-1 (DOD policy on the Government's rights shall control. Government, then use of such name by Garmin is effective until such time...

User Manual 1
Page 17
... for your distance to select a 12- Select Settings > Proximity Alerts. hour, 24-hour, or UTC display time. NOTE: To change the text language settings, see the KENWOOD system instruction manual. Travel History: Allows the device to display day or night colors. Update Maps: Exports data from the main menu, select Settings > Device. Display Settings Select Settings > Display. Color Mode: Allows the device to record information for the myTrends (Using Suggested Routes), Where I've Been (Viewing Previous Routes and...
... for your distance to select a 12- Select Settings > Proximity Alerts. hour, 24-hour, or UTC display time. NOTE: To change the text language settings, see the KENWOOD system instruction manual. Travel History: Allows the device to display day or night colors. Update Maps: Exports data from the main menu, select Settings > Device. Display Settings Select Settings > Display. Color Mode: Allows the device to record information for the myTrends (Using Suggested Routes), Where I've Been (Viewing Previous Routes and...

Instruction Manual
Page 2
... Source selection screen descriptions 12 Source control screen descriptions 14 Popup menu 15 List screen 16 Navigation Operation 16 Disc 20 Playing a disc 20 DVD/ VCD Basic Operation 20 Music CD/ Disc media Basic Operation 22 File search Operation 23 DVD Disc Menu Operation 24 DVD Setup 25 APPS-Android Auto™/ Apple CarPlay 26 Apple CarPlay Operation 26 Android Auto™ Operation 27 WebLink™ Operation 29 Spotify Operation 30 USB 31 Connecting a USB device 31 USB Basic Operation 31 Search Operation 33 iPod/iPhone 34 Preparation 34 iPod/iPhone...
... Source selection screen descriptions 12 Source control screen descriptions 14 Popup menu 15 List screen 16 Navigation Operation 16 Disc 20 Playing a disc 20 DVD/ VCD Basic Operation 20 Music CD/ Disc media Basic Operation 22 File search Operation 23 DVD Disc Menu Operation 24 DVD Setup 25 APPS-Android Auto™/ Apple CarPlay 26 Apple CarPlay Operation 26 Android Auto™ Operation 27 WebLink™ Operation 29 Spotify Operation 30 USB 31 Connecting a USB device 31 USB Basic Operation 31 Search Operation 33 iPod/iPhone 34 Preparation 34 iPod/iPhone...

Instruction Manual
Page 3
.../video players-AV-IN 53 TV tuner 53 Setting Up 54 Monitor Screen Setup 54 System Setup 54 User Interface Setup 55 Special Setup 57 Display Setup 58 AV Setup 60 Controlling Audio 61 3 way speaker system setup 61 Speaker/ X'over setup 62 Controlling General Audio 64 Equalizer Control 64 Volume Offset 65 Zone Control 66 Sound Effect 67 Listening Position/ DTA 68 Remote control 70 Battery Installation 70 Functions of the Remote control Buttons........71 Connection/Installation 74 Before Installation 74 Installing the unit 75 Troubleshooting 81 Problems...
.../video players-AV-IN 53 TV tuner 53 Setting Up 54 Monitor Screen Setup 54 System Setup 54 User Interface Setup 55 Special Setup 57 Display Setup 58 AV Setup 60 Controlling Audio 61 3 way speaker system setup 61 Speaker/ X'over setup 62 Controlling General Audio 64 Equalizer Control 64 Volume Offset 65 Zone Control 66 Sound Effect 67 Listening Position/ DTA 68 Remote control 70 Battery Installation 70 Functions of the Remote control Buttons........71 Connection/Installation 74 Before Installation 74 Installing the unit 75 Troubleshooting 81 Problems...
Instruction Manual
Page 4
... with your KENWOOD dealer to make sure that they work where the service is stained, wipe it with your model and in your area. • You can select language to display menus, audio file tags, etc. Wiping the faceplate with a clean soft dry cloth. on the disc, or use disc type accessories...turn on the car heater in the disc player of the unit. If the faceplate is stained badly, wipe the stain off with a cloth moistened with neutral cleaner, then wipe it . • Do not use a disc with tape stuck on it again with a hard cloth or using a ball point pen or similar tool with coloring...
... with your KENWOOD dealer to make sure that they work where the service is stained, wipe it with your model and in your area. • You can select language to display menus, audio file tags, etc. Wiping the faceplate with a clean soft dry cloth. on the disc, or use disc type accessories...turn on the car heater in the disc player of the unit. If the faceplate is stained badly, wipe the stain off with a cloth moistened with neutral cleaner, then wipe it . • Do not use a disc with tape stuck on it again with a hard cloth or using a ball point pen or similar tool with coloring...

Instruction Manual
Page 8
For detailed operation, see User Interface Setup (P.55). ■■ [Display] Set the button illumination color. Initial Settings Initial setup Perform this setup when you use this unit first time. 1 Set each item as follows. For detailed operation, see Display Setup (P.58). If it is your first time turning the unit on after installation, it is hard to perform Initial setup (P.8). 8 ■■ [Locale] Select the country for the navigation system. NOTE • If...
For detailed operation, see User Interface Setup (P.55). ■■ [Display] Set the button illumination color. Initial Settings Initial setup Perform this setup when you use this unit first time. 1 Set each item as follows. For detailed operation, see Display Setup (P.58). If it is your first time turning the unit on after installation, it is hard to perform Initial setup (P.8). 8 ■■ [Locale] Select the country for the navigation system. NOTE • If...

Instruction Manual
Page 12
... the source selection screen. 1 2 4 5 6 7 1 • Displays the control screen of current source. • The artwork is displayed if available from the connected iPhone/Android device.*1 (P.26) • Switches to display the detailed screen. 3 • Page indication for widgets 4 • Current source information 5 • Displays the source selection screen. (P.12) 6 • Short-cut playback source icons (P.13) 7 • Displays the Hands Free screen. (P.46) • When connecting as Apple CarPlay or Android Auto, it works as a phone provided...
... the source selection screen. 1 2 4 5 6 7 1 • Displays the control screen of current source. • The artwork is displayed if available from the connected iPhone/Android device.*1 (P.26) • Switches to display the detailed screen. 3 • Page indication for widgets 4 • Current source information 5 • Displays the source selection screen. (P.12) 6 • Short-cut playback source icons (P.13) 7 • Displays the Hands Free screen. (P.46) • When connecting as Apple CarPlay or Android Auto, it works as a phone provided...

Instruction Manual
Page 21
... the stereo audio output. • [PBC]: The PBC function is on the left side of each icon are as follows; English 21 Touch again to display the DVD-VIDEO disc menu control screen. NOTE • The control screen disappears when no operation is done for 5 seconds. • If you use a remote control, you can jump directly to mute. 5 Indicator Items • [IN]: A disc is inside the unit. D (play it the next time. [ ][ ] Fast...
... the stereo audio output. • [PBC]: The PBC function is on the left side of each icon are as follows; English 21 Touch again to display the DVD-VIDEO disc menu control screen. NOTE • The control screen disappears when no operation is done for 5 seconds. • If you use a remote control, you can jump directly to mute. 5 Indicator Items • [IN]: A disc is inside the unit. D (play it the next time. [ ][ ] Fast...

Instruction Manual
Page 26
... to the music from iPhone while driving. Compatible iPhone devices You can use your iPhone. ÑÑOperation buttons and available Apps on the screen differ among the connected devices. CarPlay takes the things you want to do with CarPlay is connected to the USB (Black) terminal, the Bluetooth Hands-Free phone currently connected is a smarter, safer way to use the Apps of the connected iPhone. You can get directions, make it easier to operate iPhone.
... to the music from iPhone while driving. Compatible iPhone devices You can use your iPhone. ÑÑOperation buttons and available Apps on the screen differ among the connected devices. CarPlay takes the things you want to do with CarPlay is connected to the USB (Black) terminal, the Bluetooth Hands-Free phone currently connected is a smarter, safer way to use the Apps of the connected iPhone. You can get directions, make it easier to operate iPhone.

Instruction Manual
Page 34
... Bluetooth device (P.43). • Connect an iPhone on Bluetooth while CarPlay and an iPod/iPhone are not connected on . • If you start playback after connecting the iPod, the music that has been played by operating the iPhone at functional setup before connecting iPhone. However, the power of the terminal. • Plug the iPod/iPhone into the gray USB terminal with an optional accessory iPod connection cable KCA-iP103, you can supply power to your iPod/iPhone to this unit...
... Bluetooth device (P.43). • Connect an iPhone on Bluetooth while CarPlay and an iPod/iPhone are not connected on . • If you start playback after connecting the iPod, the music that has been played by operating the iPhone at functional setup before connecting iPhone. However, the power of the terminal. • Plug the iPod/iPhone into the gray USB terminal with an optional accessory iPod connection cable KCA-iP103, you can supply power to your iPod/iPhone to this unit...

Instruction Manual
Page 40
... radio communication technology for mobile devices such as dialing numbers, using Bluetooth® devices Bluetooth is turned off. ÑÑAbout the cell-phone and Bluetooth audio player This unit conforms to the following Bluetooth specifications: Version Bluetooth Ver. 3.0 Profile Cell-phone: HFP (V1.6) (Hands Free Profile) SPP (Serial Port Profile) PBAP (Phonebook Access Profile) Audio player: A2DP (Advanced Audio Distribution Profile) AVRCP (V1.5) (Audio/Video Remote Control Profile) Sound codec SBC, AAC NOTE • The units supporting...
... radio communication technology for mobile devices such as dialing numbers, using Bluetooth® devices Bluetooth is turned off. ÑÑAbout the cell-phone and Bluetooth audio player This unit conforms to the following Bluetooth specifications: Version Bluetooth Ver. 3.0 Profile Cell-phone: HFP (V1.6) (Hands Free Profile) SPP (Serial Port Profile) PBAP (Phonebook Access Profile) Audio player: A2DP (Advanced Audio Distribution Profile) AVRCP (V1.5) (Audio/Video Remote Control Profile) Sound codec SBC, AAC NOTE • The units supporting...
Instruction Manual
Page 51
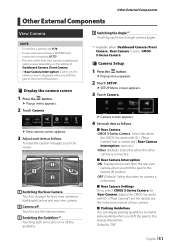
...;ÑDisplay the camera screen 1 Press the [ ] button. Other External Components Other External Components View Camera NOTE • To connect a camera, see the instruction manual of [Dashboard Camera /Front Camera]. • If [Rear Camera Interruption] is set is connected. ([Rear Camera Interruption] turns on , the camera screen is "ON". hhPopup menu appears. 2 Touch [SETUP]. To erase the caution message, touch the screen. 1 3 4 2 1 Switching the View Camera Touch to change...
...;ÑDisplay the camera screen 1 Press the [ ] button. Other External Components Other External Components View Camera NOTE • To connect a camera, see the instruction manual of [Dashboard Camera /Front Camera]. • If [Rear Camera Interruption] is set is connected. ([Rear Camera Interruption] turns on , the camera screen is "ON". hhPopup menu appears. 2 Touch [SETUP]. To erase the caution message, touch the screen. 1 3 4 2 1 Switching the View Camera Touch to change...
Instruction Manual
Page 52
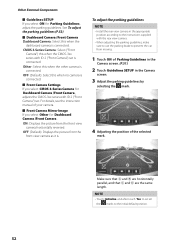
... to the instructions supplied with ID 2 ("Front Camera") set . See To adjust the parking guidelines (P.52). ■■[Dashboard Camera /Front Camera] [Dashboard Camera]: Select this when the dashboard camera is connected. [CMOS 3-Series Camera]: Select ("Front Camera") this when the CMOS-3xx series with the rear view camera. • When adjusting the parking guidelines, make sure to use the parking...
... to the instructions supplied with ID 2 ("Front Camera") set . See To adjust the parking guidelines (P.52). ■■[Dashboard Camera /Front Camera] [Dashboard Camera]: Select this when the dashboard camera is connected. [CMOS 3-Series Camera]: Select ("Front Camera") this when the CMOS-3xx series with the rear view camera. • When adjusting the parking guidelines, make sure to use the parking...

Instruction Manual
Page 53
... the instruction manual of this unit. 1 Select [AV-IN] as the source. (P.12) 2 Touch Key display area. 3 2 1 Switching the View Camera Touch to change the dashboard view camera and rear view camera. 2 Camera off Touch to exit the camera screen. 3 Key display Touch to ON. • The TV tuner can connect the TV tuner (commercially available) with its supplied remote control through the remote sensor on the front panel of the...
... the instruction manual of this unit. 1 Select [AV-IN] as the source. (P.12) 2 Touch Key display area. 3 2 1 Switching the View Camera Touch to change the dashboard view camera and rear view camera. 2 Camera off Touch to exit the camera screen. 3 Key display Touch to ON. • The TV tuner can connect the TV tuner (commercially available) with its supplied remote control through the remote sensor on the front panel of the...

Instruction Manual
Page 61
Controlling Audio 3 way speaker system setup Select the appropriate crossover network mode according to output the sound from the multi function menu. See the following functions are disabled. --Zone Control --Fader of Controlling General Audio --Front focus of User Interface Setup • Connecting 3-way speakers with the 2-way mode selected can break the speakers. English 61 hhPopup menu appears. 2 Touch [Audio]. Controlling Audio NOTICE • Each operation in this section can adjust the various settings such as audio balance or subwoofer level. 1 Press...
Controlling Audio 3 way speaker system setup Select the appropriate crossover network mode according to output the sound from the multi function menu. See the following functions are disabled. --Zone Control --Fader of Controlling General Audio --Front focus of User Interface Setup • Connecting 3-way speakers with the 2-way mode selected can break the speakers. English 61 hhPopup menu appears. 2 Touch [Audio]. Controlling Audio NOTICE • Each operation in this section can adjust the various settings such as audio balance or subwoofer level. 1 Press...

Instruction Manual
Page 66
... subwoofer --Subwoofer Level/ Bass Boost (P.67) --Equalizer Control/ Sound Effect/ Listening Position (P.64, 67, 68) --Speaker Setup (P.62) --High-resolution Sound Source File Playback • You cannot select iPod if it is connected via Bluetooth. • If you select USB, iPod, Disc, Spotify or Bluetooth audio as the Front Source, you cannot select USB or iPod as the Rear Source. • If you select Mirroring (WebLink), Apple CarPlay or Android Auto as the Front Source, you cannot select DISC (Music CD/ Disc media), USB or iPod...
... subwoofer --Subwoofer Level/ Bass Boost (P.67) --Equalizer Control/ Sound Effect/ Listening Position (P.64, 67, 68) --Speaker Setup (P.62) --High-resolution Sound Source File Playback • You cannot select iPod if it is connected via Bluetooth. • If you select USB, iPod, Disc, Spotify or Bluetooth audio as the Front Source, you cannot select USB or iPod as the Rear Source. • If you select Mirroring (WebLink), Apple CarPlay or Android Auto as the Front Source, you cannot select DISC (Music CD/ Disc media), USB or iPod...

Instruction Manual
Page 74
... remove the caps on the car are being connected to the system, connect the connectors either to both the front output terminals or to both the rear output terminals (do not connect the ¤ connector to the wires via the fuse. # CAUTION • Install this unit in the console of the internal temperature and result in the car. • When only two speakers are working properly. • Mount...
... remove the caps on the car are being connected to the system, connect the connectors either to both the front output terminals or to both the rear output terminals (do not connect the ¤ connector to the wires via the fuse. # CAUTION • Install this unit in the console of the internal temperature and result in the car. • When only two speakers are working properly. • Mount...
Instruction Manual
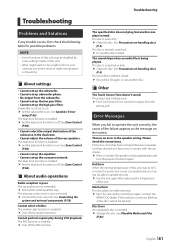
Page 81
...; Wire or insulate the speaker cord as the message on again. Cannot select a folder. See Precautions on handling discs (P.4). Mecha Error The disc player is activated and you fail to operate the unit correctly, the cause of the unit. Disc Error An unplayable disc is not extended. †† Pull out the antenna all the way. See Speaker/ X'over setup (P.62). The car antenna is inserted. †† Change the disc. The disc...
...; Wire or insulate the speaker cord as the message on again. Cannot select a folder. See Precautions on handling discs (P.4). Mecha Error The disc player is activated and you fail to operate the unit correctly, the cause of the unit. Disc Error An unplayable disc is not extended. †† Pull out the antenna all the way. See Speaker/ X'over setup (P.62). The car antenna is inserted. †† Change the disc. The disc...


