
Instruction Manual
Page 3
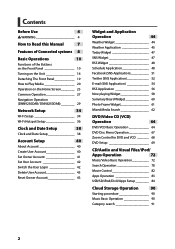
... Widget 61 Mixed Media Search 62 DVD/Video CD (VCD) Operation 64 DVD/VCD Basic Operation 64 DVD Disc Menu Operation 67 Zoom Control for DVD and VCD________ 68 DVD Setup 69 CD/Audio and Visual Files/iPod/ Apps Operation 72 Music/Video Basic Operation___________ 72 Search Operation 78 Movie Control 82 Apps Operation 83 USB/SD/iPod/DivX/Apps Setup_________ 84 Cloud Storage Operation 90 Starting procedure 90 Music Basic Operation 90 Category search 91 2
... Widget 61 Mixed Media Search 62 DVD/Video CD (VCD) Operation 64 DVD/VCD Basic Operation 64 DVD Disc Menu Operation 67 Zoom Control for DVD and VCD________ 68 DVD Setup 69 CD/Audio and Visual Files/iPod/ Apps Operation 72 Music/Video Basic Operation___________ 72 Search Operation 78 Movie Control 82 Apps Operation 83 USB/SD/iPod/DivX/Apps Setup_________ 84 Cloud Storage Operation 90 Starting procedure 90 Music Basic Operation 90 Category search 91 2
Instruction Manual
Page 4
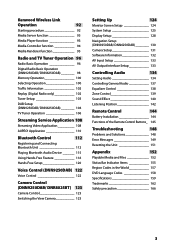
... AV Input Setup 133 AV Output Interface Setup 133 Controlling Audio 134 Setting Audio 134 Controlling General Audio 137 Equalizer Control 138 Zone Control 139 Sound Effect 140 Listening Position 142 Remote Control 144 Battery Installation 144 Functions of the Remote Control Buttons__ 145 Troubleshooting 148 Problems and Solutions 148 Error Messages 149 Resetting the Unit 151 Appendix 152 Playable Media and Files 152 Status Bar Indicator Items 155 Region Codes in the World 157 DVD Language Codes 158 Specifications...
... AV Input Setup 133 AV Output Interface Setup 133 Controlling Audio 134 Setting Audio 134 Controlling General Audio 137 Equalizer Control 138 Zone Control 139 Sound Effect 140 Listening Position 142 Remote Control 144 Battery Installation 144 Functions of the Remote Control Buttons__ 145 Troubleshooting 148 Problems and Solutions 148 Error Messages 149 Resetting the Unit 151 Appendix 152 Playable Media and Files 152 Status Bar Indicator Items 155 Region Codes in the World 157 DVD Language Codes 158 Specifications...
Instruction Manual
Page 5
... used . • This unit can select language to play. This unit may affect its mechanical parts. In such a situation, remove the disc and wait for any extended period. • If you experience problems during installation, consult your Kenwood dealer. ÑÑPrecautions on using this unit • When you turn on the car heater in cold weather, dew or condensation may not allow discs to display menus, audio...
... used . • This unit can select language to play. This unit may affect its mechanical parts. In such a situation, remove the disc and wait for any extended period. • If you experience problems during installation, consult your Kenwood dealer. ÑÑPrecautions on using this unit • When you turn on the car heater in cold weather, dew or condensation may not allow discs to display menus, audio...

Instruction Manual
Page 12
... User interface (P.125). 11 Adjusts volume. 3 Remote Sensor Receives the remote control signal. 4 NAV • Displays the navigation screen. (DNN9250DAB) • Pressing for 1 second turns the screen off.* APPS • Displays the APPS screen . (DNR8025BT) • Pressing for 1 second turns the screen off.* 5 MENU • Displays the option menu screen. • Pressing for 1 second switches AV out sources. 6 HOME • Displays the Home screen (P.23). • Pressing for 1 second turns the power off. • When the power...
... User interface (P.125). 11 Adjusts volume. 3 Remote Sensor Receives the remote control signal. 4 NAV • Displays the navigation screen. (DNN9250DAB) • Pressing for 1 second turns the screen off.* APPS • Displays the APPS screen . (DNR8025BT) • Pressing for 1 second turns the screen off.* 5 MENU • Displays the option menu screen. • Pressing for 1 second switches AV out sources. 6 HOME • Displays the Home screen (P.23). • Pressing for 1 second turns the power off. • When the power...
Instruction Manual
Page 73
... music of Bluetooth Audio source (P.115) F HOME 6 −−Bluetooth profile: A2DP −−Bluetooth profile: AVRCP • When connecting with this unit. NOTE • Set the remote controller mode switch to AUD mode before starting operation, see Switching the operation mode (P.145). • To connect the Android device with this unit, the cable (sold separately) and the profile which your Android device supports are necessary as follows: D A To listen music and watch video with Lightning connector device...
... music of Bluetooth Audio source (P.115) F HOME 6 −−Bluetooth profile: A2DP −−Bluetooth profile: AVRCP • When connecting with this unit. NOTE • Set the remote controller mode switch to AUD mode before starting operation, see Switching the operation mode (P.145). • To connect the Android device with this unit, the cable (sold separately) and the profile which your Android device supports are necessary as follows: D A To listen music and watch video with Lightning connector device...
Instruction Manual
Page 87
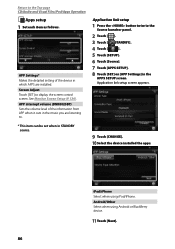
... to the Source launcher panel. 2 Touch [ ]. 3 Touch [ STANDBY]. 4 Touch [ ]. 5 Touch [SETUP]. 6 Touch [Source]. 7 Touch [APPS SETUP]. 8 Touch [SET] on [APP Settings] in STANDBY source. 9 Touch [CHANGE]. 10 Select the device installed the apps. Android/Other Select when using iPod/iPhone. Screen Adjust Touch [SET] to the Top page CD/Audio and Visual Files/iPod/Apps Operation ÑÑApps setup 1 Set each item as follows. Return to display the screen control screen. See Monitor Screen Setup (P.124). iPod/iPhone Select when using Android or...
... to the Source launcher panel. 2 Touch [ ]. 3 Touch [ STANDBY]. 4 Touch [ ]. 5 Touch [SETUP]. 6 Touch [Source]. 7 Touch [APPS SETUP]. 8 Touch [SET] on [APP Settings] in STANDBY source. 9 Touch [CHANGE]. 10 Select the device installed the apps. Android/Other Select when using iPod/iPhone. Screen Adjust Touch [SET] to the Top page CD/Audio and Visual Files/iPod/Apps Operation ÑÑApps setup 1 Set each item as follows. Return to display the screen control screen. See Monitor Screen Setup (P.124). iPod/iPhone Select when using Android or...

Instruction Manual
Page 98
... frequency location. 8 Sub function/ List switching key Touch to store the current station into the preset memory. [ ] Displays the list of preset stations or services. In tuner mode, tuned program information will be displayed. ÑÑMulti function menu The functions of frequency switching can be changed. Touch for 2 seconds to display "Sub function menu" (7 in this area. • Switches the band: Touch [AM] or [FM]. • Tunes in the following functions can be performed by setting program type. For details, see Selecting Operation...
... frequency location. 8 Sub function/ List switching key Touch to store the current station into the preset memory. [ ] Displays the list of preset stations or services. In tuner mode, tuned program information will be displayed. ÑÑMulti function menu The functions of frequency switching can be changed. Touch for 2 seconds to display "Sub function menu" (7 in this area. • Switches the band: Touch [AM] or [FM]. • Tunes in the following functions can be performed by setting program type. For details, see Selecting Operation...
Instruction Manual
Page 105
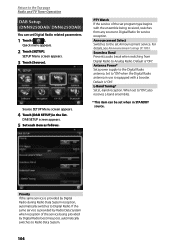
... service being received, switches from Digital Radio to the Digital Radio antenna. DAB SETUP screen appears. 5 Set each item as follows. For details, see Announcement setup (P.105). L-Band Tuning* Sets L-band reception. If the same service is provided by Radio Data System when reception of the set program type begins with a booster. Seamless Band Prevents audio break when switching from any source to Digital Radio for service reception. Antenna Power* Sets power supply to Analog Radio...
... service being received, switches from Digital Radio to the Digital Radio antenna. DAB SETUP screen appears. 5 Set each item as follows. For details, see Announcement setup (P.105). L-Band Tuning* Sets L-band reception. If the same service is provided by Radio Data System when reception of the set program type begins with a booster. Seamless Band Prevents audio break when switching from any source to Digital Radio for service reception. Antenna Power* Sets power supply to Analog Radio...
Instruction Manual
Page 113
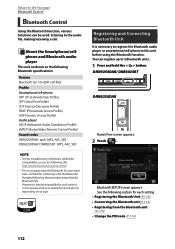
... each setting. • Registering the Bluetooth Unit (P.113) • Connecting the Bluetooth unit (P.113) • Registering from the Bluetooth unit (P.114) • Change the PIN code (P.114) 112 See the following the procedure prescribed by Bluetooth SIG. Registering and Connecting Bluetooth Unit It is necessary to register the Bluetooth audio player or smartphone/cell-phone to this unit before using the Bluetooth function. Bluetooth SETUP screen appears. Return to the Top page Bluetooth Control ññ Bluetooth Control Using the Bluetooth function, various functions...
... each setting. • Registering the Bluetooth Unit (P.113) • Connecting the Bluetooth unit (P.113) • Registering from the Bluetooth unit (P.114) • Change the PIN code (P.114) 112 See the following the procedure prescribed by Bluetooth SIG. Registering and Connecting Bluetooth Unit It is necessary to register the Bluetooth audio player or smartphone/cell-phone to this unit before using the Bluetooth function. Bluetooth SETUP screen appears. Return to the Top page Bluetooth Control ññ Bluetooth Control Using the Bluetooth function, various functions...
Instruction Manual
Page 128
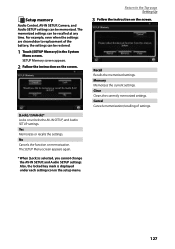
... displayed under each setting icon in the System Menu screen. Memory Memorizes the current settings. Clear Clears the currently memorized settings. Also, the locked key mark is selected, you cannot change the AV-IN SETUP, and Audio SETUP settings. Cancel Cancels memorization/recalling of the battery, the settings can be restored. 1 Touch [SETUP Memory] in the setup menu. ÑÑSetup memory Audio Control, AV-IN SETUP, Camera, and Audio SETUP settings can be recalled at any time...
... displayed under each setting icon in the System Menu screen. Memory Memorizes the current settings. Clear Clears the currently memorized settings. Also, the locked key mark is selected, you cannot change the AV-IN SETUP, and Audio SETUP settings. Cancel Cancels memorization/recalling of the battery, the settings can be restored. 1 Touch [SETUP Memory] in the setup menu. ÑÑSetup memory Audio Control, AV-IN SETUP, Camera, and Audio SETUP settings can be recalled at any time...
Instruction Manual
Page 149
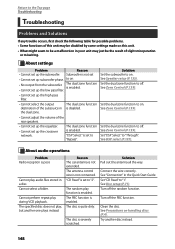
... plays instead. The dual zone function is not set • Cannot set up the subwoofer. See Zone Control (P.139). • Cannot adjust the volume of the rear speakers. • Cannot set up the equalizer. • Cannot set up the high pass filter. • Cannot select the output destination of slight misoperation or miswiring. ÑÑAbout settings Problem Reason • Cannot set up the crossover network. See Disc setup (P.71). Subwoofer...
... plays instead. The dual zone function is not set • Cannot set up the subwoofer. See Zone Control (P.139). • Cannot adjust the volume of the rear speakers. • Cannot set up the equalizer. • Cannot set up the high pass filter. • Cannot select the output destination of slight misoperation or miswiring. ÑÑAbout settings Problem Reason • Cannot set up the crossover network. See Disc setup (P.71). Subwoofer...
Instruction Manual
Page 157
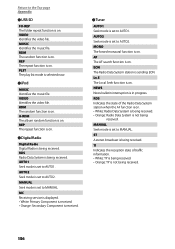
... is on. MUSIC Identifies the music file. A-RDM The album random function is set to MANUAL. MC Receiving service is displayed. • White: Primary Component is received. • Orange: Secondary Component is received. ööTuner AUTO1 Seek mode is on. ST A stereo broadcast is on. REP The repeat function is being received. AUTO2 Seek mode is sending EON. EON The Radio Data System station is set to MANUAL. RDS...
... is on. MUSIC Identifies the music file. A-RDM The album random function is set to MANUAL. MC Receiving service is displayed. • White: Primary Component is received. • Orange: Secondary Component is received. ööTuner AUTO1 Seek mode is on. ST A stereo broadcast is on. REP The repeat function is being received. AUTO2 Seek mode is sending EON. EON The Radio Data System station is set to MANUAL. RDS...
Quick Start Guide
Page 3
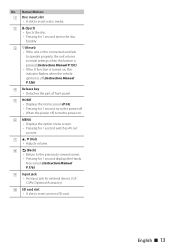
... etc. on the disc, or use a disc with tape stuck on the lens may not correctly play discs which do not operate the monitor using this unit • When you purchase optional accessories, check with your Kenwood dealer to make sure that they work where the service is not supported by any broadcasting station. ÑÑProtecting the monitor To protect the monitor from this unit, pull them...
... etc. on the disc, or use a disc with tape stuck on the lens may not correctly play discs which do not operate the monitor using this unit • When you purchase optional accessories, check with your Kenwood dealer to make sure that they work where the service is not supported by any broadcasting station. ÑÑProtecting the monitor To protect the monitor from this unit, pull them...
Quick Start Guide
Page 8
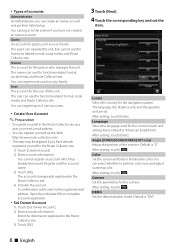
... this unit. After setting, touch [Enter]. Color Set the screen and button illumination color. Default is "0". User The account for guests such as a user, you need a mail address. • You can register yourself via the Web. The language, the distance unit, and the gasoline unit are set the item. Angle (DNN9250DAB/DNR8025BT only) Adjust the position of the monitor. Owner The account for the control screen and setting items...
... this unit. After setting, touch [Enter]. Color Set the screen and button illumination color. Default is "0". User The account for guests such as a user, you need a mail address. • You can register yourself via the Web. The language, the distance unit, and the gasoline unit are set the item. Angle (DNN9250DAB/DNR8025BT only) Adjust the position of the monitor. Owner The account for the control screen and setting items...
Quick Start Guide
Page 13
... for 1 second turns the power off. • When the power off, turns the power on. 6 MENU • Displays the option menu screen. • Pressing for external device. (CAC3AV; English ñ 13 No. Optional Accessory) p SD card slot • A slot to the previously viewed screen. • Pressing for 1 second displays the Hands Free screen (Instruction Manual P.116). 9 Input jack • An input jack for 1 second switches AV out sources. 7 R, S (Vol) • Adjusts volume. 8 6 (Back...
... for 1 second turns the power off. • When the power off, turns the power on. 6 MENU • Displays the option menu screen. • Pressing for external device. (CAC3AV; English ñ 13 No. Optional Accessory) p SD card slot • A slot to the previously viewed screen. • Pressing for 1 second displays the Hands Free screen (Instruction Manual P.116). 9 Input jack • An input jack for 1 second switches AV out sources. 7 R, S (Vol) • Adjusts volume. 8 6 (Back...
Quick Start Guide
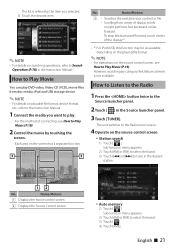
Page 21
... Play Music (P.19). 2 Control the movie by category/link/album artwork is refined by the item you want to play DVD video, Video CD (VCD), movie files from center of display to select the band. 3) Touch [ ]. 4) Touch [AME]. The list is not available. Sub function menu appears. 2) Touch [AM] or [FM] to select the band. 3) Touch [4] or [¢] to tune in the Source launcher panel. 3 Touch [TUNER]. Sub function menu...
... Play Music (P.19). 2 Control the movie by category/link/album artwork is refined by the item you want to play DVD video, Video CD (VCD), movie files from center of display to select the band. 3) Touch [ ]. 4) Touch [AME]. The list is not available. Sub function menu appears. 2) Touch [AM] or [FM] to select the band. 3) Touch [4] or [¢] to tune in the Source launcher panel. 3 Touch [TUNER]. Sub function menu...
Quick Start Guide
Page 22
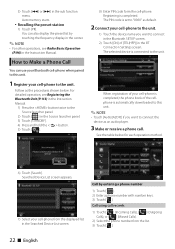
...). 2) Select the phone number from the displayed list in the sub function menu. Call using call . For detailed operation, see Radio Basic Operation (P.96) in the Instruction Manual. The selected device is completed. Call by touching the frequency display in the center. ✎✎NOTE • For other operations, see Registering the Bluetooth Unit (P.113) in the Instruction Manual. 1) Press the button twice to the unit. The PIN code is automatically downloaded to this unit. 1 Register your cell-phone...
...). 2) Select the phone number from the displayed list in the sub function menu. Call using call . For detailed operation, see Radio Basic Operation (P.96) in the Instruction Manual. The selected device is completed. Call by touching the frequency display in the center. ✎✎NOTE • For other operations, see Registering the Bluetooth Unit (P.113) in the Instruction Manual. 1) Press the button twice to the unit. The PIN code is automatically downloaded to this unit. 1 Register your cell-phone...
Quick Start Guide
Page 23
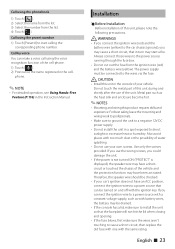
... the protection function may start calling the corresponding phone number. Do not touch the metal part of this unit in turn may have been activated. Metal part such as with the same rating. Always connect those wires to cause a short circuit, then replace the old fuse with one with battery wires, the battery may be drained. • If the console has a lid, make sure to install the unit so...
... the protection function may start calling the corresponding phone number. Do not touch the metal part of this unit in turn may have been activated. Metal part such as with the same rating. Always connect those wires to cause a short circuit, then replace the old fuse with one with battery wires, the battery may be drained. • If the console has a lid, make sure to install the unit so...
Quick Start Guide
Page 29
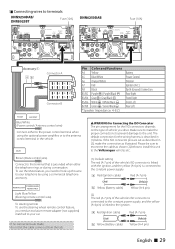
.... If the ISO connector pins are made, do not let the cable come out from the tab. (1): Default setting The red (A-7 pin) of vehicle you drive. STEERING WHEEL REMOTE CONT REMOTE INPUT Light Blue/Yellow (Steering remote control wire) To steering remote To use the Mute feature, you need to hook up this unit to the antenna control terminal in (1) below to install this wire to your telephone by using the optional power amplifier, or to the...
.... If the ISO connector pins are made, do not let the cable come out from the tab. (1): Default setting The red (A-7 pin) of vehicle you drive. STEERING WHEEL REMOTE CONT REMOTE INPUT Light Blue/Yellow (Steering remote control wire) To steering remote To use the Mute feature, you need to hook up this unit to the antenna control terminal in (1) below to install this wire to your telephone by using the optional power amplifier, or to the...
Quick Start Guide
Page 31
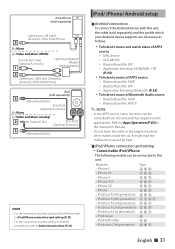
...;Connectable iPod/iPhone The following models can be connected to this unit. iPod/iPhone (sold separately) Lightning to USB Cable (accessory of the iPod/iPhone) 3 B: Music A: Video and Music (HDMI) KCA-HD100 (1.8m) (Optional Accessory) 1 Lightning Digital AV Adapter (sold separately) 3 Lightning to USB Cable (Charging) (accessory of the iPod/iPhone) iPod (sold separately) and the profile which your Android device supports are necessary as follows: To listen to music of APPS source -- Bluetooth...
...;Connectable iPod/iPhone The following models can be connected to this unit. iPod/iPhone (sold separately) Lightning to USB Cable (accessory of the iPod/iPhone) 3 B: Music A: Video and Music (HDMI) KCA-HD100 (1.8m) (Optional Accessory) 1 Lightning Digital AV Adapter (sold separately) 3 Lightning to USB Cable (Charging) (accessory of the iPod/iPhone) iPod (sold separately) and the profile which your Android device supports are necessary as follows: To listen to music of APPS source -- Bluetooth...


