
Instruction Manual
Page 2
... manual 5 Basic Operations 6 Functions of the Buttons on the Front Panel.... 6 Turning on the Unit 8 Initial Settings 8 Adjusting the volume 11 Display Adjustment 11 Viewing Angle 12 Touch screen operations 12 Gesture Control 13 HOME screen descriptions 13 Popup menu 14 Source selection screen description 14 Source control screen descriptions 17 List screen 18 Widget 19 Widget 19 Multi Widget 19 Photo Frame Widget 21 Widget Setup 21 Disc 22 Playing a disc 22 DVD/VCD Basic Operation 22 Music CD/Disc media Basic Operation...
... manual 5 Basic Operations 6 Functions of the Buttons on the Front Panel.... 6 Turning on the Unit 8 Initial Settings 8 Adjusting the volume 11 Display Adjustment 11 Viewing Angle 12 Touch screen operations 12 Gesture Control 13 HOME screen descriptions 13 Popup menu 14 Source selection screen description 14 Source control screen descriptions 17 List screen 18 Widget 19 Widget 19 Multi Widget 19 Photo Frame Widget 21 Widget Setup 21 Disc 22 Playing a disc 22 DVD/VCD Basic Operation 22 Music CD/Disc media Basic Operation...

Instruction Manual
Page 3
...navigation unit 64 Setup 65 Monitor Screen Setup 65 System Setup 65 User Interface Setup 66 Special Setup 68 Display Setup 69 AV Setup 71 Controlling Audio 73 3-way speaker system setup 73 Speaker / X'over setup 74 Controlling General Audio 76 Equalizer Control 76 Volume Offset 77 Zone Control 78 Sound Effect 79 Listening Position / DTA 80 Audio Setup memory 81 Remote control 82 Battery Installation 82 Functions of the Remote control Buttons........82 Connection/Installation 85 Before Installation 85 Installing the unit 87 Troubleshooting 97 Problems...
...navigation unit 64 Setup 65 Monitor Screen Setup 65 System Setup 65 User Interface Setup 66 Special Setup 68 Display Setup 69 AV Setup 71 Controlling Audio 73 3-way speaker system setup 73 Speaker / X'over setup 74 Controlling General Audio 76 Equalizer Control 76 Volume Offset 77 Zone Control 78 Sound Effect 79 Listening Position / DTA 80 Audio Setup memory 81 Remote control 82 Battery Installation 82 Functions of the Remote control Buttons........82 Connection/Installation 85 Before Installation 85 Installing the unit 87 Troubleshooting 97 Problems...
Instruction Manual
Page 4
... recorder's instruction manual.) This condensation on the lens (also called lens fogging) may not allow discs to play a disc that they work in areas where the service is not supported by any extended period. • If you experience problems during installation, consult your KENWOOD dealer. ÑÑPrecautions on using this unit, pull it again with your model and in the disc player of the disc. •...
... recorder's instruction manual.) This condensation on the lens (also called lens fogging) may not allow discs to play a disc that they work in areas where the service is not supported by any extended period. • If you experience problems during installation, consult your KENWOOD dealer. ÑÑPrecautions on using this unit, pull it again with your model and in the disc player of the disc. •...
Instruction Manual
Page 8
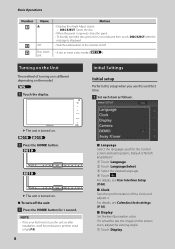
... Initial setup (P.8). 8 ■■ [Language] Select the language used for 1 second. If it is hard to insert a disc media. ([ ]) Turning on /off the unit: 1 Press the [HOME] button for the control screen and setting items. Default is displayed. • Switches attenuation of the volume on the Unit The method of the clock and adjusts it is different depending on the screen even, adjust the viewing angle. 1 Touch [Display]. hhThe unit is turned...
... Initial setup (P.8). 8 ■■ [Language] Select the language used for 1 second. If it is hard to insert a disc media. ([ ]) Turning on /off the unit: 1 Press the [HOME] button for the control screen and setting items. Default is displayed. • Switches attenuation of the volume on the Unit The method of the clock and adjusts it is different depending on the screen even, adjust the viewing angle. 1 Touch [Display]. hhThe unit is turned...
Instruction Manual
Page 10
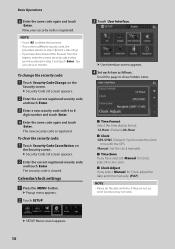
... menu appears. 2 Touch [SETUP]. 3 Touch [User Interface]. The security code is registered. Calendar/clock settings 1 Press the [MENU] button. Now, your receiver. The new security code is cleared. If they are not set the date and time. NOTE • Touch [BS] to delete the last entry. • If you select [Manual] for Clock, adjust the date and time manually. (P.67) NOTE • Please set , some functions may not work. You can use...
... menu appears. 2 Touch [SETUP]. 3 Touch [User Interface]. The security code is registered. Calendar/clock settings 1 Press the [MENU] button. Now, your receiver. The new security code is cleared. If they are not set the date and time. NOTE • Touch [BS] to delete the last entry. • If you select [Manual] for Clock, adjust the date and time manually. (P.67) NOTE • Please set , some functions may not work. You can use...
Instruction Manual
Page 15
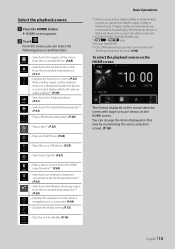
... You can select the following sources and functions. • Switches to the Apple CarPlay screen from the connected iPhone. (P.28) • Switches to the Android Auto screen from the connected Android device.*4 (P.28) • Displays the navigation screen when a navigation unit is connected to the Digital Radio broadcast.*2 (P.44) • Plays a Bluetooth audio player. (P.48) • Plays a disc.*3 (P.22) • Plays an iPod/iPhone. (P.38) • Plays files on this area by the Bluetooth device or iDataLink phone, the current...
... You can select the following sources and functions. • Switches to the Apple CarPlay screen from the connected iPhone. (P.28) • Switches to the Android Auto screen from the connected Android device.*4 (P.28) • Displays the navigation screen when a navigation unit is connected to the Digital Radio broadcast.*2 (P.44) • Plays a Bluetooth audio player. (P.48) • Plays a disc.*3 (P.22) • Plays an iPod/iPhone. (P.38) • Plays files on this area by the Bluetooth device or iDataLink phone, the current...

Instruction Manual
Page 23
...; Linear PCM, etc.: Audio format • OFF/Zoom2 - 4 (DVD)/Zoom2 (VCD): Displays the zoom ratio. White: A Disc is 2. 6 Searching area Touch to display the DVD-VIDEO disc menu control screen. Orange: Disc player failure. Each time you touch the key, the speed changes. 2 times, 10 times. Video screen 8 6 6 7 1 Information display area Displays the following sequence; Scene # is displayed only when Playback control (PBC) is on or off ( ) 2 Function panel Touch the left or right to change audio output channels.
...; Linear PCM, etc.: Audio format • OFF/Zoom2 - 4 (DVD)/Zoom2 (VCD): Displays the zoom ratio. White: A Disc is 2. 6 Searching area Touch to display the DVD-VIDEO disc menu control screen. Orange: Disc player failure. Each time you touch the key, the speed changes. 2 times, 10 times. Video screen 8 6 6 7 1 Information display area Displays the following sequence; Scene # is displayed only when Playback control (PBC) is on or off ( ) 2 Function panel Touch the left or right to change audio output channels.
Instruction Manual
Page 28
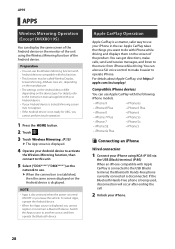
... get directions, make it easier to operate iPhone. If the Bluetooth Hands-Free phone is being used, disconnection will occur after ending the call. 2 Unlock your Android device to activate the Wireless Mirroring function, then connect to the music from iPhone while driving. APPS APPS Wireless Mirroring Operation (Except DMX8019S) You can display the same screen of the Android device on the monitor of the unit using KCA-iP103 via the USB...
... get directions, make it easier to operate iPhone. If the Bluetooth Hands-Free phone is being used, disconnection will occur after ending the call. 2 Unlock your Android device to activate the Wireless Mirroring function, then connect to the music from iPhone while driving. APPS APPS Wireless Mirroring Operation (Except DMX8019S) You can display the same screen of the Android device on the monitor of the unit using KCA-iP103 via the USB...
Instruction Manual
Page 38
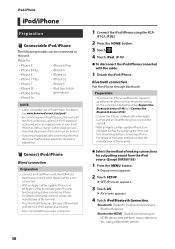
...the iPhone at functional setup before connecting iPhone. Note that the power of iPod/iPhone. Bluetooth connection Pair the iPhone through Bluetooth. Preparation • To connect an iPhone via USB. • With an Apple CarPlay-capable iPhone, turn off Apple CarPlay by operating the iPhone at functional setup before connecting iPhone. Made for outputting sound from the iPod source (Except DMX8019S) 1 Press the [MENU] button. hhAV screen appears. 4 Touch [iPod Bluetooth Connection]. [Bluetooth] (Default): Output sound using a Bluetooth device. [Bluetooth+HDMI]: Output sound using...
...the iPhone at functional setup before connecting iPhone. Note that the power of iPod/iPhone. Bluetooth connection Pair the iPhone through Bluetooth. Preparation • To connect an iPhone via USB. • With an Apple CarPlay-capable iPhone, turn off Apple CarPlay by operating the iPhone at functional setup before connecting iPhone. Made for outputting sound from the iPod source (Except DMX8019S) 1 Press the [MENU] button. hhAV screen appears. 4 Touch [iPod Bluetooth Connection]. [Bluetooth] (Default): Output sound using a Bluetooth device. [Bluetooth+HDMI]: Output sound using...
Instruction Manual
Page 47
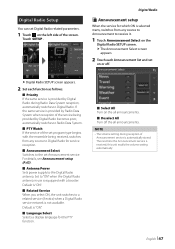
...;■[Announcement Select] Switches to "ON" when the Digital Radio antenna in use is received, this unit recalls the volume setting automatically. English 47 hhDigital Radio SETUP screen appears. 2 Set each Announcement list and set Digital Radio related parameters. 1 Touch [ ] on the all announcements. Set to the set Announcement service. The next time the Announcement service is equipped with the ensemble being provided by Digital Radio during reception of the set program type...
...;■[Announcement Select] Switches to "ON" when the Digital Radio antenna in use is received, this unit recalls the volume setting automatically. English 47 hhDigital Radio SETUP screen appears. 2 Set each Announcement list and set Digital Radio related parameters. 1 Touch [ ] on the all announcements. Set to the set Announcement service. The next time the Announcement service is equipped with the ensemble being provided by Digital Radio during reception of the set program type...
Instruction Manual
Page 48
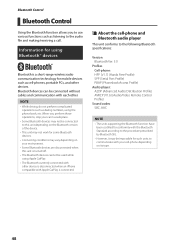
... driving, do not perform complicated operations such as listening to the audio file and making/receiving a call. Information for using Bluetooth® devices Bluetooth is connected. ÑÑAbout the cell-phone and Bluetooth audio player This unit conforms to the following Bluetooth specifications: Version Bluetooth Ver. 5.0 Profiles Cell-phone: HFP (V1.7) (Hands Free Profile) SPP (Serial Port Profile) PBAP (Phonebook Access Profile) Audio player: A2DP (Advanced Audio Distribution Profile) AVRCP (V1.6) (Audio/Video Remote Control Profile) Sound...
... driving, do not perform complicated operations such as listening to the audio file and making/receiving a call. Information for using Bluetooth® devices Bluetooth is connected. ÑÑAbout the cell-phone and Bluetooth audio player This unit conforms to the following Bluetooth specifications: Version Bluetooth Ver. 5.0 Profiles Cell-phone: HFP (V1.7) (Hands Free Profile) SPP (Serial Port Profile) PBAP (Phonebook Access Profile) Audio player: A2DP (Advanced Audio Distribution Profile) AVRCP (V1.6) (Audio/Video Remote Control Profile) Sound...
Instruction Manual
Page 61
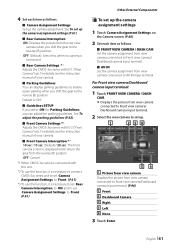
... from the rear view camera when you can display parking guidelines to enable easier parking when you shift the gear to the reverse (R) position. hhDisplays the picture from view camera connected to Front view camera/ Dashboard camera input terminal. 2 Select the view camera to set . For details, see the instruction manual of your camera. ■■[Parking Guidelines] You can adjust the parking...
... from the rear view camera when you can display parking guidelines to enable easier parking when you shift the gear to the reverse (R) position. hhDisplays the picture from view camera connected to Front view camera/ Dashboard camera input terminal. 2 Select the view camera to set . For details, see the instruction manual of your camera. ■■[Parking Guidelines] You can adjust the parking...
Instruction Manual
Page 69
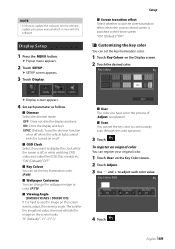
...;■[OSD Clock] Select if you have set in the process of [Adjust] is turned on the Display screen. 2 Touch the desired color. hhDisplay screen appears. 4 Set each color value. 4 Touch [ ]. To register an original color You can change the wallpaper image or color. (P.70) ■■[Viewing Angle] (DMX8019DABS / DMX8019S) If it is switched to display the clock while the screen is off when the vehicle light control switch is registered...
...;■[OSD Clock] Select if you have set in the process of [Adjust] is turned on the Display screen. 2 Touch the desired color. hhDisplay screen appears. 4 Set each color value. 4 Touch [ ]. To register an original color You can change the wallpaper image or color. (P.70) ■■[Viewing Angle] (DMX8019DABS / DMX8019S) If it is switched to display the clock while the screen is off when the vehicle light control switch is registered...
Instruction Manual
Page 71
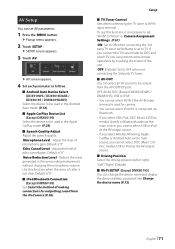
... without changing the microphone volume. "Left"/"Right" (Default) ■■[Wi-Fi SETUP] (Except DMX8019S) You can change the device name and display the device address, password. English 71 If you connect the TV tuner made by DOS and watch TV, you cannot select DISC (Music CD/ Disc media), USB or iPod as follows. ■■[Android Auto Device Select] (DDX919WS / DDX9019DABS / DDX9019S / DMX8019DABS) Select the device to be used in [Camera Assignment Settings...
... without changing the microphone volume. "Left"/"Right" (Default) ■■[Wi-Fi SETUP] (Except DMX8019S) You can change the device name and display the device address, password. English 71 If you connect the TV tuner made by DOS and watch TV, you cannot select DISC (Music CD/ Disc media), USB or iPod as follows. ■■[Android Auto Device Select] (DDX919WS / DDX9019DABS / DDX9019S / DMX8019DABS) Select the device to be used in [Camera Assignment Settings...
Instruction Manual
Page 73
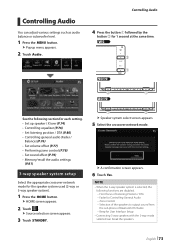
... setting. • Set up speaker / X'over (P.74) • Controlling equalizer (P.76) • Set listening position / DTA (P.80) • Controlling general audio (Fader / Balance) (P.76) • Set volume offset (P.77) • Performing zone control (P.78) • Set sound effect (P.79) • Memory/recall the audio settings (P.81) 3-way speaker system setup Select the appropriate crossover network mode for User Interface Setup • Connecting 3-way speakers with the 2-way mode selected can adjust various settings such as audio balance or subwoofer level. 1 Press the [MENU] button...
... setting. • Set up speaker / X'over (P.74) • Controlling equalizer (P.76) • Set listening position / DTA (P.80) • Controlling general audio (Fader / Balance) (P.76) • Set volume offset (P.77) • Performing zone control (P.78) • Set sound effect (P.79) • Memory/recall the audio settings (P.81) 3-way speaker system setup Select the appropriate crossover network mode for User Interface Setup • Connecting 3-way speakers with the 2-way mode selected can adjust various settings such as audio balance or subwoofer level. 1 Press the [MENU] button...
Instruction Manual
Page 78
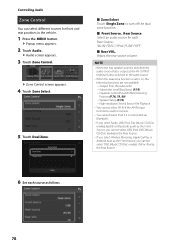
... subwoofer --Subwoofer Level/Bass Boost (P.79) --Equalizer Control/Sound Effect/Listening Position (P.76, 79, 80) --Speaker Setup (P.74) --High-resolution Sound Source File Playback • You cannot select AV-IN if the AV-IN input terminal is connected via Bluetooth. • If you select Radio, USB, iPod, Disc (Music CD/Disc media), Spotify or Bluetooth audio as the Front Source, you cannot select USB, iPod, DISC (Music CD/Disc media) as the Rear Source. • If you select Wireless Mirroring, Apple CarPlay or Android Auto...
... subwoofer --Subwoofer Level/Bass Boost (P.79) --Equalizer Control/Sound Effect/Listening Position (P.76, 79, 80) --Speaker Setup (P.74) --High-resolution Sound Source File Playback • You cannot select AV-IN if the AV-IN input terminal is connected via Bluetooth. • If you select Radio, USB, iPod, Disc (Music CD/Disc media), Spotify or Bluetooth audio as the Front Source, you cannot select USB, iPod, DISC (Music CD/Disc media) as the Rear Source. • If you select Wireless Mirroring, Apple CarPlay or Android Auto...

Instruction Manual
Page 85
... power is not turned ON ("There is installed, check whether the brake lamps, blinkers, wipers, etc. English 85 Use only the screws provided. is displayed), the speaker wire may have been activated. Metal part such as with battery wires, the battery may start a fire. NOTE • Mounting and wiring this unit in the car. • When only two speakers are working properly. • Mount the unit so that the front panel...
... power is not turned ON ("There is installed, check whether the brake lamps, blinkers, wipers, etc. English 85 Use only the screws provided. is displayed), the speaker wire may have been activated. Metal part such as with battery wires, the battery may start a fire. NOTE • Mounting and wiring this unit in the car. • When only two speakers are working properly. • Mount the unit so that the front panel...
Instruction Manual
Page 88
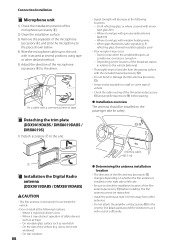
...;ÑInstallation the Digital Radio antenna (DDX9019DABS / DMX8019DABS) #CAUTION • This film antenna is turned on --Depending on the location of the film antenna (accessory ~) before pasting. ●●Installation overview The antenna should be reattached. • Install the antenna at several positions using tape or other antennas. • Do not attach the amplifier unit (accessory !) to the ceramic line (black part) around the windscreen, as rear...
...;ÑInstallation the Digital Radio antenna (DDX9019DABS / DMX8019DABS) #CAUTION • This film antenna is turned on --Depending on the location of the film antenna (accessory ~) before pasting. ●●Installation overview The antenna should be reattached. • Install the antenna at several positions using tape or other antennas. • Do not attach the amplifier unit (accessory !) to the ceramic line (black part) around the windscreen, as rear...
Instruction Manual
Page 91
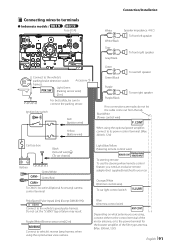
... the motor antenna, or to vehicle's reverse lamp harness when using the optional power amplifier, connect to connect the parking sensor. Blue/White (Power control wire) P. Ignition key switch Red (Ignition wire) Yellow (Battery wire) Green Green/Black To rear left speaker To front right speaker Connect to your car. Light Blue/Yellow (Steering remote control wire) REMOTE CONT STEERING WHEEL REMOTE INPUT To steering remote To use the steering wheel remote control feature, you are made, do not let the cable come...
... the motor antenna, or to vehicle's reverse lamp harness when using the optional power amplifier, connect to connect the parking sensor. Blue/White (Power control wire) P. Ignition key switch Red (Ignition wire) Yellow (Battery wire) Green Green/Black To rear left speaker To front right speaker Connect to your car. Light Blue/Yellow (Steering remote control wire) REMOTE CONT STEERING WHEEL REMOTE INPUT To steering remote To use the steering wheel remote control feature, you are made, do not let the cable come...
Instruction Manual
Page 97
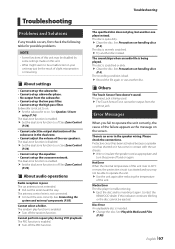
... the speaker wiring. Please check the connections. Protective circuit has been activated because a speaker cord has shorted or it again. Hot Error When the internal temperature of this indicator continues blinking or the disc cannot be the result of the rear speakers. Mecha Error The disc player is activated and you fail to operate the unit correctly, the cause of the failure appears as appropriate and turn the power...
... the speaker wiring. Please check the connections. Protective circuit has been activated because a speaker cord has shorted or it again. Hot Error When the internal temperature of this indicator continues blinking or the disc cannot be the result of the rear speakers. Mecha Error The disc player is activated and you fail to operate the unit correctly, the cause of the failure appears as appropriate and turn the power...


