
Instruction Manual
Page 2
... manual 5 Basic Operations 6 Functions of the Buttons on the Front Panel.... 6 Turning on the Unit 8 Initial Settings 8 Adjusting the volume 11 Display Adjustment 11 Viewing Angle 12 Touch screen operations 12 Gesture Control 13 HOME screen descriptions 13 Popup menu 14 Source selection screen description 14 Source control screen descriptions 17 List screen 18 Widget 19 Widget 19 Multi Widget 19 Photo Frame Widget 21 Widget Setup 21 Disc 22 Playing a disc 22 DVD/VCD Basic Operation 22 Music CD/Disc media Basic Operation...
... manual 5 Basic Operations 6 Functions of the Buttons on the Front Panel.... 6 Turning on the Unit 8 Initial Settings 8 Adjusting the volume 11 Display Adjustment 11 Viewing Angle 12 Touch screen operations 12 Gesture Control 13 HOME screen descriptions 13 Popup menu 14 Source selection screen description 14 Source control screen descriptions 17 List screen 18 Widget 19 Widget 19 Multi Widget 19 Photo Frame Widget 21 Widget Setup 21 Disc 22 Playing a disc 22 DVD/VCD Basic Operation 22 Music CD/Disc media Basic Operation...

Instruction Manual
Page 3
...navigation unit 64 Setup 65 Monitor Screen Setup 65 System Setup 65 User Interface Setup 66 Special Setup 68 Display Setup 69 AV Setup 71 Controlling Audio 73 3-way speaker system setup 73 Speaker / X'over setup 74 Controlling General Audio 76 Equalizer Control 76 Volume Offset 77 Zone Control 78 Sound Effect 79 Listening Position / DTA 80 Audio Setup memory 81 Remote control 82 Battery Installation 82 Functions of the Remote control Buttons........82 Connection/Installation 85 Before Installation 85 Installing the unit 87 Troubleshooting 97 Problems...
...navigation unit 64 Setup 65 Monitor Screen Setup 65 System Setup 65 User Interface Setup 66 Special Setup 68 Display Setup 69 AV Setup 71 Controlling Audio 73 3-way speaker system setup 73 Speaker / X'over setup 74 Controlling General Audio 76 Equalizer Control 76 Volume Offset 77 Zone Control 78 Sound Effect 79 Listening Position / DTA 80 Audio Setup memory 81 Remote control 82 Battery Installation 82 Functions of the Remote control Buttons........82 Connection/Installation 85 Before Installation 85 Installing the unit 87 Troubleshooting 97 Problems...
Instruction Manual
Page 4
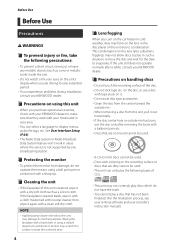
... removing a disc from damage, do not have the mark. • You cannot play a disc that has not been finalized. (For the finalization process, see your writing software and your recorder's instruction manual.) NOTE • Applying spray cleaner directly to display menus, audio file tags, etc. See User Interface Setup (P.66). • The Radio Data System or Radio Broadcast Data System feature won't work with...
... removing a disc from damage, do not have the mark. • You cannot play a disc that has not been finalized. (For the finalization process, see your writing software and your recorder's instruction manual.) NOTE • Applying spray cleaner directly to display menus, audio file tags, etc. See User Interface Setup (P.66). • The Radio Data System or Radio Broadcast Data System feature won't work with...
Instruction Manual
Page 8
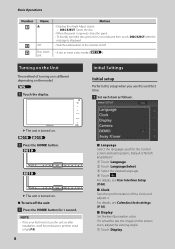
... installation, it for 2 seconds and then touch [DISC EJECT] after the message is displayed. • Switches attenuation of the volume on/off. • A slot to insert a disc media. ([ ]) Turning on the Unit The method of the clock and adjusts it is hard to perform Initial setup (P.8). 8 ■■ [Language] Select the language used for 1 second. Basic Operations Number Name 7 G 8 ATT 9 Disc insert slot Motion • Displays the Angle Adjust screen. --[DISC EJECT]: Ejects the disc...
... installation, it for 2 seconds and then touch [DISC EJECT] after the message is displayed. • Switches attenuation of the volume on/off. • A slot to insert a disc media. ([ ]) Turning on the Unit The method of the clock and adjusts it is hard to perform Initial setup (P.8). 8 ■■ [Language] Select the language used for 1 second. Basic Operations Number Name 7 G 8 ATT 9 Disc insert slot Motion • Displays the Angle Adjust screen. --[DISC EJECT]: Ejects the disc...
Instruction Manual
Page 10
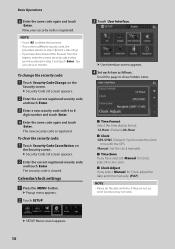
... and time. The security code is cleared. To change the security code: 1 Touch [Security Code Change] on the Security screen. To clear the security code: 1 Touch [Security Code Cancellation] on the Security screen. hhPopup menu appears. 2 Touch [SETUP]. 3 Touch [User Interface]. hhUser Interface screen appears. 4 Set each item as that you have selected [Manual] for Clock, adjust the date and time manually. (P.67) NOTE • Please set , some functions may not work. Basic Operations 6 Enter...
... and time. The security code is cleared. To change the security code: 1 Touch [Security Code Change] on the Security screen. To clear the security code: 1 Touch [Security Code Cancellation] on the Security screen. hhPopup menu appears. 2 Touch [SETUP]. 3 Touch [User Interface]. hhUser Interface screen appears. 4 Set each item as that you have selected [Manual] for Clock, adjust the date and time manually. (P.67) NOTE • Please set , some functions may not work. Basic Operations 6 Enter...
Instruction Manual
Page 15
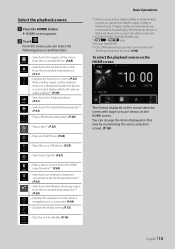
...-Free phone is connected, displays Bluetooth pairing waiting dialog.*1 (P.49) • Switches to the Radio broadcast. (P.41) • Switches to the Android Auto screen from the connected Android device.*4 (P.28) • Displays the navigation screen when a navigation unit is connected to the AV-IN input terminal for visual. (P.93) To select the playback source on the HOME screen The 4 items displayed on the source selection screen with large icons are connected during talking by customizing the source selection screen...
...-Free phone is connected, displays Bluetooth pairing waiting dialog.*1 (P.49) • Switches to the Radio broadcast. (P.41) • Switches to the Android Auto screen from the connected Android device.*4 (P.28) • Displays the navigation screen when a navigation unit is connected to the AV-IN input terminal for visual. (P.93) To select the playback source on the HOME screen The 4 items displayed on the source selection screen with large icons are connected during talking by customizing the source selection screen...

Instruction Manual
Page 23
... to change audio output channels. This function can drag the circle left side of current playing position. Fast-forwards or fast-backward the disc. See DVD Disc Menu Operation (P.26). • [PBC] (VCD only): Touch to display the DVD-VIDEO disc menu control screen. White: A Disc is 2. 6 Searching area Touch to search for the previous/next content. Each time you touch the key, repeat modes are as follows: D (play it next time. DVD: Title...
... to change audio output channels. This function can drag the circle left side of current playing position. Fast-forwards or fast-backward the disc. See DVD Disc Menu Operation (P.26). • [PBC] (VCD only): Touch to display the DVD-VIDEO disc menu control screen. White: A Disc is 2. 6 Searching area Touch to search for the previous/next content. Each time you touch the key, repeat modes are as follows: D (play it next time. DVD: Title...
Instruction Manual
Page 28
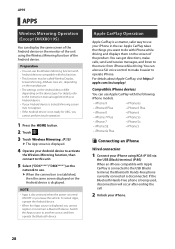
... source, and then operate the Bluetooth device. If the Bluetooth Hands-Free phone is being used, disconnection will occur after ending the call. 2 Unlock your Android device to activate the Wireless Mirroring function, then connect to the music from iPhone while driving. You can also use . Preparation • You can use the Wireless Mirroring function with Android devices compatible with this unit. 5 Select ("DDX****"/"DMX****") as the network to use Siri voice control to make...
... source, and then operate the Bluetooth device. If the Bluetooth Hands-Free phone is being used, disconnection will occur after ending the call. 2 Unlock your Android device to activate the Wireless Mirroring function, then connect to the music from iPhone while driving. You can also use . Preparation • You can use the Wireless Mirroring function with Android devices compatible with this unit. 5 Select ("DDX****"/"DMX****") as the network to use Siri voice control to make...
Instruction Manual
Page 38
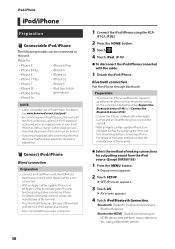
... • Latest compatible list of the terminal. • Plug the iPod/iPhone into the gray USB terminal with the cable: 1 Detach the iPod/iPhone. using an HDMI device and perform music selection, etc. For details, see www.kenwood.com/cs/ce/ipod/. • By connecting your iPod/ iPhone as well as charge it as a Bluetooth device and do the profile setting for the connection beforehand. hhPopup menu appears. 2 Touch [SETUP]. hhSETUP screen appears. 3 Touch...
... • Latest compatible list of the terminal. • Plug the iPod/iPhone into the gray USB terminal with the cable: 1 Detach the iPod/iPhone. using an HDMI device and perform music selection, etc. For details, see www.kenwood.com/cs/ce/ipod/. • By connecting your iPod/ iPhone as well as charge it as a Bluetooth device and do the profile setting for the connection beforehand. hhPopup menu appears. 2 Touch [SETUP]. hhSETUP screen appears. 3 Touch...
Instruction Manual
Page 47
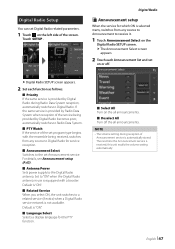
...] If the service of the screen. NOTE • The volume setting during Radio Data System reception, automatically switches to the Digital Radio antenna. For details, see Announcement setup (P.47). ■■[Antenna Power] Sets power supply to Digital Radio. Default is "ON". ■■[Related Service] When you select ON, the unit switches to "ON" when the Digital Radio antenna in use is not available. The next time the Announcement service is automatically...
...] If the service of the screen. NOTE • The volume setting during Radio Data System reception, automatically switches to the Digital Radio antenna. For details, see Announcement setup (P.47). ■■[Antenna Power] Sets power supply to Digital Radio. Default is "ON". ■■[Related Service] When you select ON, the unit switches to "ON" when the Digital Radio antenna in use is not available. The next time the Announcement service is automatically...
Instruction Manual
Page 48
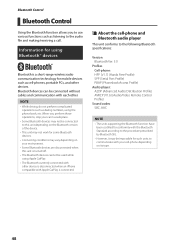
... the audio file and making/receiving a call. Bluetooth Control Bluetooth Control Using the Bluetooth function allows you perform these operations, stop your car in a safe place. • Some Bluetooth devices may not be connected to this unit depending on the Bluetooth version of the device. • This unit may not work for some Bluetooth devices. • Connecting conditions may vary depending on your cell-phone depending on its type. 48 Bluetooth devices can be used while using the phone book...
... the audio file and making/receiving a call. Bluetooth Control Bluetooth Control Using the Bluetooth function allows you perform these operations, stop your car in a safe place. • Some Bluetooth devices may not be connected to this unit depending on the Bluetooth version of the device. • This unit may not work for some Bluetooth devices. • Connecting conditions may vary depending on your cell-phone depending on its type. 48 Bluetooth devices can be used while using the phone book...
Instruction Manual
Page 61
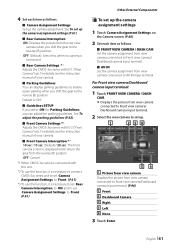
...: 1 Touch [FRONT VIEW CAMERA / DASH CAM]. English 61 hhDisplays the picture from view camera connected to Front view camera/ Dashboard camera input terminal. 2 Select the view camera to set up the camera assignment settings (P.61). ■■[Rear Camera Interruption] [ON]: Displays the picture from the rear view camera when you shift the gear to the reverse (R) position. For details, see the instruction manual of your...
...: 1 Touch [FRONT VIEW CAMERA / DASH CAM]. English 61 hhDisplays the picture from view camera connected to Front view camera/ Dashboard camera input terminal. 2 Select the view camera to set up the camera assignment settings (P.61). ■■[Rear Camera Interruption] [ON]: Displays the picture from the rear view camera when you shift the gear to the reverse (R) position. For details, see the instruction manual of your...
Instruction Manual
Page 69
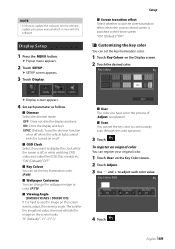
... the screen evenly, adjust the viewing angle. hhSETUP screen appears. 3 Touch [Display]. Display Setup 1 Press the [MENU] button. Setup ■■[Screen transition effect] Select whether to use the screen transition effect when the source control screen is registered. ■■ [Scan] You can change the wallpaper image or color. (P.70) ■■[Viewing Angle] (DMX8019DABS / DMX8019S) If it is off . ■■[OSD Clock] Select if you have set the key color to...
... the screen evenly, adjust the viewing angle. hhSETUP screen appears. 3 Touch [Display]. Display Setup 1 Press the [MENU] button. Setup ■■[Screen transition effect] Select whether to use the screen transition effect when the source control screen is registered. ■■ [Scan] You can change the wallpaper image or color. (P.70) ■■[Viewing Angle] (DMX8019DABS / DMX8019S) If it is off . ■■[OSD Clock] Select if you have set the key color to...
Instruction Manual
Page 71
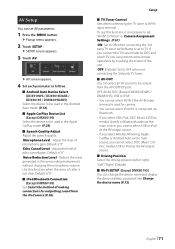
... Adjust] Adjust the speech quality. [Microphone Level] : Adjust the level of caller is set AV parameters. 1 Press the [MENU] button. To use this function when the voice of microphone gain. AV Setup You can change the device name and display the device address, password. AV-IN Name is not clear. Default is connected via Bluetooth. • If you select USB, iPod, DISC (Music CD/Disc media), Spotify or Bluetooth audio as the main source, you cannot select USB or iPod...
... Adjust] Adjust the speech quality. [Microphone Level] : Adjust the level of caller is set AV parameters. 1 Press the [MENU] button. To use this function when the voice of microphone gain. AV Setup You can change the device name and display the device address, password. AV-IN Name is not clear. Default is connected via Bluetooth. • If you select USB, iPod, DISC (Music CD/Disc media), Spotify or Bluetooth audio as the main source, you cannot select USB or iPod...
Instruction Manual
Page 73
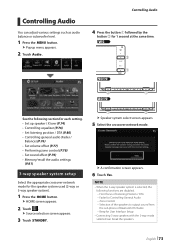
...Set up speaker / X'over (P.74) • Controlling equalizer (P.76) • Set listening position / DTA (P.80) • Controlling general audio (Fader / Balance) (P.76) • Set volume offset (P.77) • Performing zone control (P.78) • Set sound effect (P.79) • Memory/recall the audio settings (P.81) 3-way speaker system setup Select the appropriate crossover network mode for User Interface Setup • Connecting 3-way speakers with the 2-way mode selected can adjust various settings such as audio balance or subwoofer level. 1 Press the [MENU] button. Controlling Audio...
...Set up speaker / X'over (P.74) • Controlling equalizer (P.76) • Set listening position / DTA (P.80) • Controlling general audio (Fader / Balance) (P.76) • Set volume offset (P.77) • Performing zone control (P.78) • Set sound effect (P.79) • Memory/recall the audio settings (P.81) 3-way speaker system setup Select the appropriate crossover network mode for User Interface Setup • Connecting 3-way speakers with the 2-way mode selected can adjust various settings such as audio balance or subwoofer level. 1 Press the [MENU] button. Controlling Audio...
Instruction Manual
Page 78
... subwoofer --Subwoofer Level/Bass Boost (P.79) --Equalizer Control/Sound Effect/Listening Position (P.76, 79, 80) --Speaker Setup (P.74) --High-resolution Sound Source File Playback • You cannot select AV-IN if the AV-IN input terminal is connected via Bluetooth. • If you select Radio, USB, iPod, Disc (Music CD/Disc media), Spotify or Bluetooth audio as the Front Source, you cannot select USB, iPod, DISC (Music CD/Disc media) as the Rear Source. • If you select Wireless Mirroring, Apple CarPlay or Android Auto...
... subwoofer --Subwoofer Level/Bass Boost (P.79) --Equalizer Control/Sound Effect/Listening Position (P.76, 79, 80) --Speaker Setup (P.74) --High-resolution Sound Source File Playback • You cannot select AV-IN if the AV-IN input terminal is connected via Bluetooth. • If you select Radio, USB, iPod, Disc (Music CD/Disc media), Spotify or Bluetooth audio as the Front Source, you cannot select USB, iPod, DISC (Music CD/Disc media) as the Rear Source. • If you select Wireless Mirroring, Apple CarPlay or Android Auto...

Instruction Manual
Page 85
... to any metal part in the car. • When only two speakers are working properly. • Mount the unit so that can be turned on and off with the ignition key. Use only the screws provided. Always connect those wires to the wires via the fuse. # CAUTION • Install this unit in malfunction. Therefore, the speaker wire should be connected to the power source running through the fuse box. •...
... to any metal part in the car. • When only two speakers are working properly. • Mount the unit so that can be turned on and off with the ignition key. Use only the screws provided. Always connect those wires to the wires via the fuse. # CAUTION • Install this unit in malfunction. Therefore, the speaker wire should be connected to the power source running through the fuse box. •...
Instruction Manual
Page 88
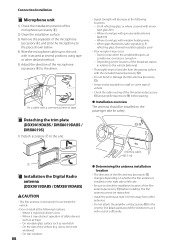
... 4). 2) Clean the installation surface. 3) Remove the separator of the microphone (accessory 4), and stick the microphone to the place shown below. 4) Wire the microphone cable up to the unit with it secured at several positions using tape or other antennas. • Do not attach the amplifier unit (accessory !) to the ceramic line (black part) around the windscreen, as rear hatch --On the...
... 4). 2) Clean the installation surface. 3) Remove the separator of the microphone (accessory 4), and stick the microphone to the place shown below. 4) Wire the microphone cable up to the unit with it secured at several positions using tape or other antennas. • Do not attach the amplifier unit (accessory !) to the ceramic line (black part) around the windscreen, as rear hatch --On the...
Instruction Manual
Page 91
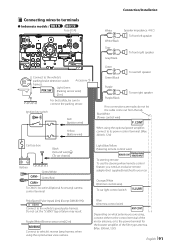
... to your car. Light Blue/Yellow (Steering remote control wire) REMOTE CONT STEERING WHEEL REMOTE INPUT To steering remote To use the steering wheel remote control feature, you are made, do not let the cable come out from the tab. Ignition key switch Red (Ignition wire) Yellow (Battery wire) Green Green/Black To rear left speaker To front right speaker Connect to the vehicle's parking brake detection switch Accessory 1 harness. Connection/Installation ÑÑConnecting wires to terminals...
... to your car. Light Blue/Yellow (Steering remote control wire) REMOTE CONT STEERING WHEEL REMOTE INPUT To steering remote To use the steering wheel remote control feature, you are made, do not let the cable come out from the tab. Ignition key switch Red (Ignition wire) Yellow (Battery wire) Green Green/Black To rear left speaker To front right speaker Connect to the vehicle's parking brake detection switch Accessory 1 harness. Connection/Installation ÑÑConnecting wires to terminals...
Instruction Manual
Page 97
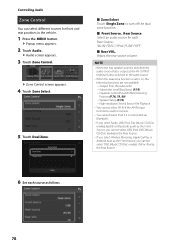
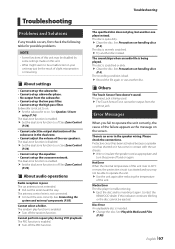
... protection circuit is not set up the equalizer. • Cannot set to on. †† Set the subwoofer to on. English 97 Subwoofer is activated and you fail to operate the unit correctly, the cause of the failure appears as appropriate and turn the power off and on handling discs (P.4). See Zone Control (P.78). • Cannot select the output destination of the subsource in the speaker wiring. See Connecting...
... protection circuit is not set up the equalizer. • Cannot set to on. †† Set the subwoofer to on. English 97 Subwoofer is activated and you fail to operate the unit correctly, the cause of the failure appears as appropriate and turn the power off and on handling discs (P.4). See Zone Control (P.78). • Cannot select the output destination of the subsource in the speaker wiring. See Connecting...


