Instruction Manual
Page 3
...Panel Color Coordinate 74 Screen Adjustment 75 Registering Bluetooth Unit 75 Registering Bluetooth Unit PIN Code 77 Bluetooth Unit Connection 77 AV Input Setup 78 AV Interface Setup 78 Navigation Setup 79 DSP Bypass Control 80 Speaker Setup 80 Car Type (DTA) Setup 82 Channel Level 83 DVD Setup 84 DVD Language Setup 84 DVD Parental Level Setup 85 Disc Setup 86 USB Setup 86 iPod Setup 87 SIRIUS Parental Code Setup 87 SIRIUS Parental Lock Setup 88 SIRIUS Parental Lock Channel Select 89 TV Setup 90 Audio Control Audio Control Menu Audio Control Equalizer...
...Panel Color Coordinate 74 Screen Adjustment 75 Registering Bluetooth Unit 75 Registering Bluetooth Unit PIN Code 77 Bluetooth Unit Connection 77 AV Input Setup 78 AV Interface Setup 78 Navigation Setup 79 DSP Bypass Control 80 Speaker Setup 80 Car Type (DTA) Setup 82 Channel Level 83 DVD Setup 84 DVD Language Setup 84 DVD Parental Level Setup 85 Disc Setup 86 USB Setup 86 iPod Setup 87 SIRIUS Parental Code Setup 87 SIRIUS Parental Lock Setup 88 SIRIUS Parental Lock Channel Select 89 TV Setup 90 Audio Control Audio Control Menu Audio Control Equalizer...
Instruction Manual
Page 4
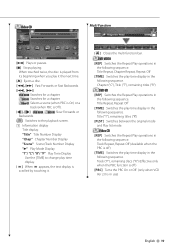
... . Make sure to touch until the memory number appears. Source Control Screen Switches to the source control screen to use various functions. 1 Display the Source Control Screen See . 2 Operation on the Source Control screen 1 [FM] Switches to the FM1/2/3 band. [AM] Switches to provide clear explanations of the instruction. 4 DNX9140/DDX814/DDX8034BT [CRSC] FM Turns the CRSC function On or Off. [SEEK] Switches the Seek mode. Use the [SEEK] to explain its operations. "AUTO2" Tunes in stations in a station. The displays and panels shown in a station...
... . Make sure to touch until the memory number appears. Source Control Screen Switches to the source control screen to use various functions. 1 Display the Source Control Screen See . 2 Operation on the Source Control screen 1 [FM] Switches to the FM1/2/3 band. [AM] Switches to provide clear explanations of the instruction. 4 DNX9140/DDX814/DDX8034BT [CRSC] FM Turns the CRSC function On or Off. [SEEK] Switches the Seek mode. Use the [SEEK] to explain its operations. "AUTO2" Tunes in stations in a station. The displays and panels shown in a station...
Instruction Manual
Page 6
... the unit is turned on after pressing the Reset button, the Initial SETUP screen is not supported by any extended period. This product includes a non-replaceable lamp that conform to make sure that are not round cannot be used • Discs that are dirty cannot be displayed. • The RDS or RBDS feature won't work with the USB device installed can only play . Please recycle in the disc player...
... the unit is turned on after pressing the Reset button, the Initial SETUP screen is not supported by any extended period. This product includes a non-replaceable lamp that conform to make sure that are not round cannot be used • Discs that are dirty cannot be displayed. • The RDS or RBDS feature won't work with the USB device installed can only play . Please recycle in the disc player...

Instruction Manual
Page 8
... will display a correct title, etc. • When the iPod is connected to this unit by connecting an iPod/iPhone (commercial product) with • iPhone • iPhone 3G • Update iPod/iPhone software to this unit. Navigation units that has been played by SIRIUS and XM. About Satellite Radio tuner This unit supports Satellite Radio tuners which 8 DNX9140/DDX814/DDX8034BT have no compensation for connection. HD Radio that you connect an HD Radio, Tuner features of the audio files used for flash memories and digital audio players...
... will display a correct title, etc. • When the iPod is connected to this unit by connecting an iPod/iPhone (commercial product) with • iPhone • iPhone 3G • Update iPod/iPhone software to this unit. Navigation units that has been played by SIRIUS and XM. About Satellite Radio tuner This unit supports Satellite Radio tuners which 8 DNX9140/DDX814/DDX8034BT have no compensation for connection. HD Radio that you connect an HD Radio, Tuner features of the audio files used for flash memories and digital audio players...
Instruction Manual
Page 19
"Title" Title Number Display "Chap" Chapter Number Display "Scene" Scene/Track Number Display "3" Play Mode Display "T"/ "C"/ "R"/ "P" Play Time Display Use the [TIME] to change play time display. [ ] When appears, the text display is off ) [PBC] Turns the PBC On or Off. (only when VCD Ver 2.0 is Off ). [ ], [ ] DVD-VIDEO, DVD-VR Slow Forwards or Backwards. [ ] Switches to the playback screen. 1 Information display Title display. DVD-VR Searches for a chapter. Track Repeat, Repeat Off (Available when the PBC is scrolled...
"Title" Title Number Display "Chap" Chapter Number Display "Scene" Scene/Track Number Display "3" Play Mode Display "T"/ "C"/ "R"/ "P" Play Time Display Use the [TIME] to change play time display. [ ] When appears, the text display is off ) [PBC] Turns the PBC On or Off. (only when VCD Ver 2.0 is Off ). [ ], [ ] DVD-VIDEO, DVD-VR Slow Forwards or Backwards. [ ] Switches to the playback screen. 1 Information display Title display. DVD-VR Searches for a chapter. Track Repeat, Repeat Off (Available when the PBC is scrolled...

Instruction Manual
Page 30
... Switches the Seek mode. Source Control Screen Switches to the source control screen to use various functions. 1 Display the Source Control Screen See (page 14). 2 Operation on memory. Display Setting "AUTO1" Tunes in memory one after another. "MANU" Switches to change the frequency. [List] Display the Tuner Preset List screen. (page 31). 1 Information display Selects the Program Service Name, Title & Artist name, Station Name, Radio Text Plus, or Radio Text. Radio Listening Various control screens appear in the Tuner Source mode. • Set the remote controller mode switch to "AUD" mode...
... Switches the Seek mode. Source Control Screen Switches to the source control screen to use various functions. 1 Display the Source Control Screen See (page 14). 2 Operation on memory. Display Setting "AUTO1" Tunes in memory one after another. "MANU" Switches to change the frequency. [List] Display the Tuner Preset List screen. (page 31). 1 Information display Selects the Program Service Name, Title & Artist name, Station Name, Radio Text Plus, or Radio Text. Radio Listening Various control screens appear in the Tuner Source mode. • Set the remote controller mode switch to "AUD" mode...

Instruction Manual
Page 39
...). 2 Operation on memory. Displays the ID number when Channel 0 is necessary.) • This document uses the SIRIUS display as an example. "SEEK2" Selects channels in a channel. Source Control Screen Switches to control screen to [P6] buttons appear, you touch the button. The mode is scrolled by specifying the desired category. For memory of channel stations, see (page 40). Use the [SEEK] to connect the XM tuner, an XM interface Box KCA-XM100V (optional accessory) is selected. Display Setting "SEEK1" Tunes channels...
...). 2 Operation on memory. Displays the ID number when Channel 0 is necessary.) • This document uses the SIRIUS display as an example. "SEEK2" Selects channels in a channel. Source Control Screen Switches to control screen to [P6] buttons appear, you touch the button. The mode is scrolled by specifying the desired category. For memory of channel stations, see (page 40). Use the [SEEK] to connect the XM tuner, an XM interface Box KCA-XM100V (optional accessory) is selected. Display Setting "SEEK1" Tunes channels...
Instruction Manual
Page 42
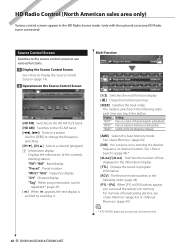
... use various functions. 1 Display the Source Control Screen See (page 14). 2 Operation on memory. "MANU" Switches to change the frequency switching. [CH ∞], [CH 5] Selects a channel (program). 1 Information display Displays the information of broadcasting stations, see (page 43) or (page 43). ⁄ • * KTC-HR300 (optional accessory) connected only. 42 DNX9140/DDX814/DDX8034BT See (page 44).* [4Line]/ [2Line] Switches the number of lines displayed in the Information Display. [TTL] Displays the tuned in program information. [RCV] The Receive mode switches...
... use various functions. 1 Display the Source Control Screen See (page 14). 2 Operation on memory. "MANU" Switches to change the frequency switching. [CH ∞], [CH 5] Selects a channel (program). 1 Information display Displays the information of broadcasting stations, see (page 43) or (page 43). ⁄ • * KTC-HR300 (optional accessory) connected only. 42 DNX9140/DDX814/DDX8034BT See (page 44).* [4Line]/ [2Line] Switches the number of lines displayed in the Information Display. [TTL] Displays the tuned in program information. [RCV] The Receive mode switches...

Instruction Manual
Page 52
... functions. 1 Display the Hands-Free Control screen TEL 2 Select a dialing method 1 DNX9140 1 Calls the displayed phone number. For information on the cell-phone. No status is different from those displayed on how to safety reasons. See (page 54). [Direct Number] Displays the Dialing Display screen. See (page 54). [BT SETUP] Displays the Bluetooth SETUP screen. (page 75) [TEL SETUP] Displays the Hands Free Setup screen. (page 55) ⁄ • While your car is displayed. [ ] Calls the displayed phone number. 52 DNX9140/DDX814...
... functions. 1 Display the Hands-Free Control screen TEL 2 Select a dialing method 1 DNX9140 1 Calls the displayed phone number. For information on the cell-phone. No status is different from those displayed on how to safety reasons. See (page 54). [Direct Number] Displays the Dialing Display screen. See (page 54). [BT SETUP] Displays the Bluetooth SETUP screen. (page 75) [TEL SETUP] Displays the Hands Free Setup screen. (page 55) ⁄ • While your car is displayed. [ ] Calls the displayed phone number. 52 DNX9140/DDX814...
Instruction Manual
Page 62
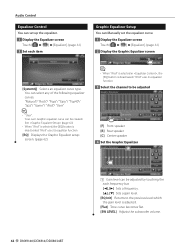
...EQ] button is adjusted. [Flat] Tone curve becomes flat. [SW LEVEL] Adjusts the subwoofer volume. You can Manually set the equalizer curve. 1 Display the Equalizer screen Touch Equalizer]. (page 61) 2 Display the Graphic Equalizer screen [SystemQ] Selects an equalizer curve type. "iPod" uses its equalizer function. 3 Select the channel to the previous level which the gain level is deactivated. Audio Control Equalizer Control You can set up the equalizer. 1 Display the Equalizer screen Touch Equalizer]. (page 61) 2 Set each frequency bar. [2], [3] Sets a frequency. [5], [∞] Sets...
...EQ] button is adjusted. [Flat] Tone curve becomes flat. [SW LEVEL] Adjusts the subwoofer volume. You can Manually set the equalizer curve. 1 Display the Equalizer screen Touch Equalizer]. (page 61) 2 Display the Graphic Equalizer screen [SystemQ] Selects an equalizer curve type. "iPod" uses its equalizer function. 3 Select the channel to the previous level which the gain level is deactivated. Audio Control Equalizer Control You can set up the equalizer. 1 Display the Equalizer screen Touch Equalizer]. (page 61) 2 Set each frequency bar. [2], [3] Sets a frequency. [5], [∞] Sets...

Instruction Manual
Page 64
... be set for each source. [Dimension Control] Sets the surround position by adjusting the front and rear volume balance. [Center Width Control] Sets the vocal image position by adjusting the right and left vocal volume level. [Panorama Mode] Turns the Panorama mode On or Off. ⁄ • You cannot use the during playback of the following sound fields. If you select another Dolby PLII mode, the sound is NOT output from rear speakers when...
... be set for each source. [Dimension Control] Sets the surround position by adjusting the front and rear volume balance. [Center Width Control] Sets the vocal image position by adjusting the right and left vocal volume level. [Panorama Mode] Turns the Panorama mode On or Off. ⁄ • You cannot use the during playback of the following sound fields. If you select another Dolby PLII mode, the sound is NOT output from rear speakers when...
Instruction Manual
Page 66
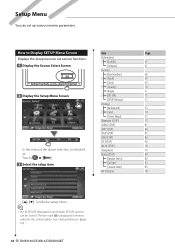
...[Speaker Select] 80 3 Select the setup item [Car Type] 82 [Channel Level] 83 [AV Interface] 78 [5], [∞] Scrolls the setup menu. ⁄ • [AV-IN SETUP], [Navigation] and [Audio SETUP] options can set various functions. [Information] [DivX(R)] 67 1 Display the Source Select Screen [Software] 67 [System] [User Interface] 68 SRC [Touch] 69 [Clock] 69 [Security] 70 [Angle] 71 2 Display the Setup Menu Screen [EXT SW] 71 [SETUP Memory] 72 [Display] [Background] 73 [Color] 74 [Screen Adjust] 75 [Bluetooth SETUP] 75 [SIRIUS SETUP] 87 [DVD SETUP...
...[Speaker Select] 80 3 Select the setup item [Car Type] 82 [Channel Level] 83 [AV Interface] 78 [5], [∞] Scrolls the setup menu. ⁄ • [AV-IN SETUP], [Navigation] and [Audio SETUP] options can set various functions. [Information] [DivX(R)] 67 1 Display the Source Select Screen [Software] 67 [System] [User Interface] 68 SRC [Touch] 69 [Clock] 69 [Security] 70 [Angle] 71 2 Display the Setup Menu Screen [EXT SW] 71 [SETUP Memory] 72 [Display] [Background] 73 [Color] 74 [Screen Adjust] 75 [Bluetooth SETUP] 75 [SIRIUS SETUP] 87 [DVD SETUP...
Instruction Manual
Page 75
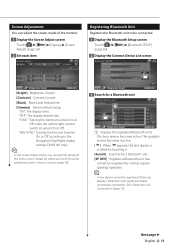
... 5 Bluetooth units registered. "SYNC": Turning the Dimmer function On or Off when the vehicle light control switch is scrolled by touching it. [Search] Searches for a Bluetooth unit. [SP DEV] Registers a Bluetooth unit that cannot be registered by normal register (pairing) operation. ⁄ • A new device cannot be connected. 1 Display the Bluetooth Setup screen Touch [ ] > [ (page 66) ] > [Bluetooth SETUP]. 2 Display the Connect Device List screen [Bright] Brightness Control [Contrast] Contrast Control [Black] Black Level Adjustment [Dimmer] Dimmer Mode Setup "ON": The display...
... 5 Bluetooth units registered. "SYNC": Turning the Dimmer function On or Off when the vehicle light control switch is scrolled by touching it. [Search] Searches for a Bluetooth unit. [SP DEV] Registers a Bluetooth unit that cannot be registered by normal register (pairing) operation. ⁄ • A new device cannot be connected. 1 Display the Bluetooth Setup screen Touch [ ] > [ (page 66) ] > [Bluetooth SETUP]. 2 Display the Connect Device List screen [Bright] Brightness Control [Contrast] Contrast Control [Black] Black Level Adjustment [Dimmer] Dimmer Mode Setup "ON": The display...

Instruction Manual
Page 76
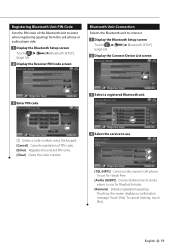
... models. 1 Display the Special Device List screen 1 Displays the searched Bluetooth unit. [Search] Searches for a Bluetooth unit. [Cancel] Cancels searching of and complete the registration (pairing) 76 DNX9140/DDX814/DDX8034BT This button will not be registered. 4 Go through the procedure of Bluetooth unit. 5 Enter PIN code 2 Select a model name 1 1 Enters a code number using the keypad. [Enter] Confirms the entered PIN code. Setup Menu 4 Select the Bluetooth unit to register ⁄ • Only models in error by normal registration method, by selecting...
... models. 1 Display the Special Device List screen 1 Displays the searched Bluetooth unit. [Search] Searches for a Bluetooth unit. [Cancel] Cancels searching of and complete the registration (pairing) 76 DNX9140/DDX814/DDX8034BT This button will not be registered. 4 Go through the procedure of Bluetooth unit. 5 Enter PIN code 2 Select a model name 1 1 Enters a code number using the keypad. [Enter] Confirms the entered PIN code. Setup Menu 4 Select the Bluetooth unit to register ⁄ • Only models in error by normal registration method, by selecting...
Instruction Manual
Page 77
...Display the Receiver PIN Code screen Bluetooth Unit Connection Selects the Bluetooth unit to connect. 1 Display the Bluetooth Setup screen Touch [ ] > [ (page 66) ] > [Bluetooth SETUP]. 2 Display the Connect Device List screen 3 Enter PIN code 1 3 Select a registered Bluetooth unit 1 Enters a code number using the keypad. [Cancel] Cancels registration of PIN code. [Enter] Registers the entered PIN code. [Clear] Clears the code number. 4 Select the service to use [TEL (HFP)] Connects/disconnects cell-phone to use for Hands Free. [Audio (A2DP)] Connects/disconnects Audio player to use...
...Display the Receiver PIN Code screen Bluetooth Unit Connection Selects the Bluetooth unit to connect. 1 Display the Bluetooth Setup screen Touch [ ] > [ (page 66) ] > [Bluetooth SETUP]. 2 Display the Connect Device List screen 3 Enter PIN code 1 3 Select a registered Bluetooth unit 1 Enters a code number using the keypad. [Cancel] Cancels registration of PIN code. [Enter] Registers the entered PIN code. [Clear] Clears the code number. 4 Select the service to use [TEL (HFP)] Connects/disconnects cell-phone to use for Hands Free. [Audio (A2DP)] Connects/disconnects Audio player to use...

Instruction Manual
Page 78
...] button for 5 seconds when updated. "OFF": Switches to the rear camera video display when "Reverse" gear is engaged. See (page 68). [R-CAM Mirror] You can flip the left and right in mirror image on the screen. ( "OFF") ⁄ • When in [iPod AV Interface Use] and three are displayed when not selected. [AV-OUT] Selects an AV source to be set to DVD. 78 DNX9140/DDX814...
...] button for 5 seconds when updated. "OFF": Switches to the rear camera video display when "Reverse" gear is engaged. See (page 68). [R-CAM Mirror] You can flip the left and right in mirror image on the screen. ( "OFF") ⁄ • When in [iPod AV Interface Use] and three are displayed when not selected. [AV-OUT] Selects an AV source to be set to DVD. 78 DNX9140/DDX814...

Instruction Manual
Page 80
... equalizer curve are set automatically. 1 2 3 4 1 Center speaker 2 Front speaker 3 Rear speaker 4 Subwoofer [Tweeter] You can set the tweeter when you are using a tweeter together with the front speakers, set automatically when you selected the speaker type. 80 DNX9140/DDX814/DDX8034BT If you are selecting front speakers. You can adjust the crossover setup that was set the tweeter to its size to get the best sound effects. 1 Display the Speaker Select screen Touch Audio SETUP] > [Speaker Select]. (page 66) 2 Select a speaker...
... equalizer curve are set automatically. 1 2 3 4 1 Center speaker 2 Front speaker 3 Rear speaker 4 Subwoofer [Tweeter] You can set the tweeter when you are using a tweeter together with the front speakers, set automatically when you selected the speaker type. 80 DNX9140/DDX814/DDX8034BT If you are selecting front speakers. You can adjust the crossover setup that was set the tweeter to its size to get the best sound effects. 1 Display the Speaker Select screen Touch Audio SETUP] > [Speaker Select]. (page 66) 2 Select a speaker...

Instruction Manual
Page 82
... Speaker] Sets the location of the rear speaker. "Door", "Rear Deck" "2nd Row", "3rd Row" (Minivan, Minivan (Long)) Car Type Adjust You can manually set the sound output timing of each channel) to adjust 1 2 3 4 1 Center speaker 2 Front speaker 3 Rear speaker 4 Subwoofer 82 DNX9140/DDX814/DDX8034BT "Door", "On Dash", "Under Dash" [Rear Speaker] Sets the location of the front speaker. Setup Menu Car Type (DTA) Setup You can setup the car type and speaker network, etc. 1 Display the Car Type Setup screen Touch [ ] > [ Type]. (page 66) ] > [Audio SETUP] > [Car 2 Setup the Car...
... Speaker] Sets the location of the rear speaker. "Door", "Rear Deck" "2nd Row", "3rd Row" (Minivan, Minivan (Long)) Car Type Adjust You can manually set the sound output timing of each channel) to adjust 1 2 3 4 1 Center speaker 2 Front speaker 3 Rear speaker 4 Subwoofer 82 DNX9140/DDX814/DDX8034BT "Door", "On Dash", "Under Dash" [Rear Speaker] Sets the location of the front speaker. Setup Menu Car Type (DTA) Setup You can setup the car type and speaker network, etc. 1 Display the Car Type Setup screen Touch [ ] > [ Type]. (page 66) ] > [Audio SETUP] > [Car 2 Setup the Car...

Instruction Manual
Page 85
DVD Parental Level Setup Sets a parental level. 1 Display the DVD Setup screen Touch DVD SETUP]. (page 66) 2 Display the Parental Level code number screen 5 Select a parental level and complete the setup 3 Enter the code number 1 Selects a parental level. ⁄ • If a disc has higher parental lock level, you need to enter the code number. • The parental lock level varies depending on a loaded disc. • If a disc has no parental lock, anybody can play it back even when you have set the parental lock...
DVD Parental Level Setup Sets a parental level. 1 Display the DVD Setup screen Touch DVD SETUP]. (page 66) 2 Display the Parental Level code number screen 5 Select a parental level and complete the setup 3 Enter the code number 1 Selects a parental level. ⁄ • If a disc has higher parental lock level, you need to enter the code number. • The parental lock level varies depending on a loaded disc. • If a disc has no parental lock, anybody can play it back even when you have set the parental lock...
Instruction Manual
Page 100
...) is set to STANDBY source. The specified disc does not play audio files. ▲ "CD Read" of the rear speakers. ▲ The Dual zone function is bad. ☞ Record the media again or use another disc instead. Troubleshooting Some functions of this unit. ! • Cannot set up the subwoofer. • Cannot set to "iPod". ☞ (page 62) ▲ The unit is enabled. ! Radio reception is poor. ✔ The car antenna is...
...) is set to STANDBY source. The specified disc does not play audio files. ▲ "CD Read" of the rear speakers. ▲ The Dual zone function is bad. ☞ Record the media again or use another disc instead. Troubleshooting Some functions of this unit. ! • Cannot set up the subwoofer. • Cannot set to "iPod". ☞ (page 62) ▲ The unit is enabled. ! Radio reception is poor. ✔ The car antenna is...


