
Instruction Manual
Page 4
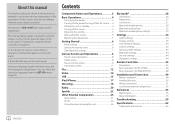
...4 Adjusting the volume 5 Attenuating the sound 5 Monitor panel operations 5 Getting Started 6 Initial settings 6 Setting the security code 6 Calendar/clock settings 7 Various Screens and Operations 8 Touch screen operations 8 Home screen 8 Source control screen 9 List/setting screen 11 Disc 12 Video 14 USB 15 iPod/iPhone 17 Mirroring 18 Radio 20 Spotify 23 Other External Components 25 View camera 25 AV-IN...26 Using the external navigation unit 26 Bluetooth 26 Information 26 Preparation 27 Connection 27 Bluetooth mobile phone 29 Bluetooth audio player 32 Bluetooth...
...4 Adjusting the volume 5 Attenuating the sound 5 Monitor panel operations 5 Getting Started 6 Initial settings 6 Setting the security code 6 Calendar/clock settings 7 Various Screens and Operations 8 Touch screen operations 8 Home screen 8 Source control screen 9 List/setting screen 11 Disc 12 Video 14 USB 15 iPod/iPhone 17 Mirroring 18 Radio 20 Spotify 23 Other External Components 25 View camera 25 AV-IN...26 Using the external navigation unit 26 Bluetooth 26 Information 26 Preparation 27 Connection 27 Bluetooth mobile phone 29 Bluetooth audio player 32 Bluetooth...

Instruction Manual
Page 5
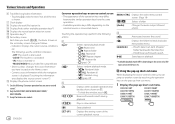
... short-cut menu. • DISP OFF (Hold): Turns off the screen. 7 /VOICE button • (Press): Displays the screen of the smartphone while listening to the other playback source.*2 • (Hold): Activates the voice dialing. ATT (Hold): Attenuates the sound. Component Names and Operations DDX7019BT/DDX7019BTM (USB1) 5 V 1.5 A DMX7019BT/DMX7019BTM 1 Monitor panel (USB1) 5 V 1.5 A (USB2) 5 V 1.5 A 2 Screen (touch panel) 3 VOLUME K/J buttons 4 DDX7019BT/DDX7019BTM: CAM/ATT button • CAM (Press): Displays the picture from the rear panel*3 DDX719WBT...
... short-cut menu. • DISP OFF (Hold): Turns off the screen. 7 /VOICE button • (Press): Displays the screen of the smartphone while listening to the other playback source.*2 • (Hold): Activates the voice dialing. ATT (Hold): Attenuates the sound. Component Names and Operations DDX7019BT/DDX7019BTM (USB1) 5 V 1.5 A DMX7019BT/DMX7019BTM 1 Monitor panel (USB1) 5 V 1.5 A (USB2) 5 V 1.5 A 2 Screen (touch panel) 3 VOLUME K/J buttons 4 DDX7019BT/DDX7019BTM: CAM/ATT button • CAM (Press): Displays the picture from the rear panel*3 DDX719WBT...

Instruction Manual
Page 8
... selectable when [ON] is set to [AV OFF], turn off the power of the unit. (Page 43) DDX719WBT/DDX719WBTM: - Perform the initial settings. Make the settings for [Clock], [Time Zone] or [Clock Adjust]. [Display] (Page 39) Make the settings to adjust the display. [Camera] (Page 42) Make the settings to input the security code if you reconnect the battery. 1 Display the Home screen. When is changed. Touch [Agree] to [Complete OFF], turn off the ignition switch, then turn...
... selectable when [ON] is set to [AV OFF], turn off the power of the unit. (Page 43) DDX719WBT/DDX719WBTM: - Perform the initial settings. Make the settings for [Clock], [Time Zone] or [Clock Adjust]. [Display] (Page 39) Make the settings to adjust the display. [Camera] (Page 42) Make the settings to input the security code if you reconnect the battery. 1 Display the Home screen. When is changed. Touch [Agree] to [Complete OFF], turn off the ignition switch, then turn...

Instruction Manual
Page 9
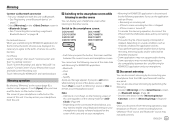
... clock manually. Getting Started 3 Enter a four-digit number (1), then confirm the entry (2). On the Home screen, touch as follows: Then, on the screen, touch [User Interface]. 3 Set the date and clock. [Clock] Select the method to adjust the date (year/month/ date), then clock (hour/minute). To finish setting, touch [Set]. * Selectable when [Clock] is set to [Manual]. For Indonesian models, [Manual] is selected initially. [Time Zone]* Select the time zone for your security code. DDX7019BT...
... clock manually. Getting Started 3 Enter a four-digit number (1), then confirm the entry (2). On the Home screen, touch as follows: Then, on the screen, touch [User Interface]. 3 Set the date and clock. [Clock] Select the method to adjust the date (year/month/ date), then clock (hour/minute). To finish setting, touch [Set]. * Selectable when [Clock] is set to [Manual]. For Indonesian models, [Manual] is selected initially. [Time Zone]* Select the time zone for your security code. DDX7019BT...

Instruction Manual
Page 10
... time to show information, change the AV source, change the page. Home screen Touching the operation keys performs the following actions: [Radio] [Mirroring] [Bluetooth] [Spotify] [iPod] [DISC]*1 [USB] [AV-IN] [Audio] Switches to change the page, etc. Displays the sound adjustment screen. Touch screen operations To perform operations on the Home screen to display the source/ option selection screen. Home screen Press HOME on the monitor panel to select an item on a USB device. Plays a Bluetooth audio player. Source/option selection screen for KENWOOD application. Plays an iPod...
... time to show information, change the AV source, change the page. Home screen Touching the operation keys performs the following actions: [Radio] [Mirroring] [Bluetooth] [Spotify] [iPod] [DISC]*1 [USB] [AV-IN] [Audio] Switches to change the page, etc. Displays the sound adjustment screen. Touch screen operations To perform operations on the Home screen to display the source/ option selection screen. Home screen Press HOME on the monitor panel to select an item on a USB device. Plays a Bluetooth audio player. Source/option selection screen for KENWOOD application. Plays an iPod...
Instruction Manual
Page 12
... on the selected source or connected device. Using the pop-up short-cut menu. DDX7019BT DDX7019BTM DMX7019BT DMX7019BTM DDX719WBT DDX719WBTM DMX719WBT DMX719WBTM The followings are the common indicators: − ATT: The sound is attenuated. − LOUD: The loudness is activated. − IN: A disc is inserted.*2 − MUSIC/VIDEO: Music/video file is displayed: Touching the information area displays the source control screen.*3 e Displays the phone control screen *1 See the following actions: 4 [ ]* Selects repeat playback mode. •...
... on the selected source or connected device. Using the pop-up short-cut menu. DDX7019BT DDX7019BTM DMX7019BT DMX7019BTM DDX719WBT DDX719WBTM DMX719WBT DMX719WBTM The followings are the common indicators: − ATT: The sound is attenuated. − LOUD: The loudness is activated. − IN: A disc is inserted.*2 − MUSIC/VIDEO: Music/video file is displayed: Touching the information area displays the source control screen.*3 e Displays the phone control screen *1 See the following actions: 4 [ ]* Selects repeat playback mode. •...
Instruction Manual
Page 21
See "Connecting/disconnecting a registered Bluetooth device" on the screen of this unit and on the caution screen. For iPhone: Launch "Settings", then touch "Control Center" and then "Customize Controls". Launch "Control Center" of your smartphone from the rear panel. The screen of your smartphone. • Mirroring for KENWOOD application. • Bluetooth • iPod • USB • Spotify A pop-up message appears if you may not work correctly. iPhone's screen recording function is not...
See "Connecting/disconnecting a registered Bluetooth device" on the screen of this unit and on the caution screen. For iPhone: Launch "Settings", then touch "Control Center" and then "Customize Controls". Launch "Control Center" of your smartphone from the rear panel. The screen of your smartphone. • Mirroring for KENWOOD application. • Bluetooth • iPod • USB • Spotify A pop-up message appears if you may not work correctly. iPhone's screen recording function is not...

Instruction Manual
Page 25
... Reception is activated. - If you are logged in the Apple App Store to the USB input terminal with USB Audio cable, KCA-iP103 (optional accessory). (Page 17) • Bluetooth connection: Pair the iPhone/iPod touch with this unit via Bluetooth. (Page 27) For iPhone/iPod touch • Wired connection: Connect the iPhone/iPod touch to find and install the most recent version. Working out, partying or relaxing, the right music is everywhere. Auto TP...
... Reception is activated. - If you are logged in the Apple App Store to the USB input terminal with USB Audio cable, KCA-iP103 (optional accessory). (Page 17) • Bluetooth connection: Pair the iPhone/iPod touch with this unit via Bluetooth. (Page 27) For iPhone/iPod touch • Wired connection: Connect the iPhone/iPod touch to find and install the most recent version. Working out, partying or relaxing, the right music is everywhere. Auto TP...

Instruction Manual
Page 28
... and start playing the source. • For playback information, see "Navigation settings" on your environment. • For some Bluetooth devices, the device is disconnected when the unit is connected. - Viewing the navigation screen • For navigation settings, see "Source control screen" on page 9. Information Bluetooth is a short-range wireless radio communication technology for navigation. Select "NAV" as follows: • While the navigation screen is displayed, the touch panel operations are listening...
... and start playing the source. • For playback information, see "Navigation settings" on your environment. • For some Bluetooth devices, the device is disconnected when the unit is connected. - Viewing the navigation screen • For navigation settings, see "Source control screen" on page 9. Information Bluetooth is a short-range wireless radio communication technology for navigation. Select "NAV" as follows: • While the navigation screen is displayed, the touch panel operations are listening...

Instruction Manual
Page 29
...; Set [Bluetooth] to [ON] on the screen. (Page 44) Connection When you connect a Bluetooth device to the unit for Bluetooth audio can be connected at a time. • To use the Bluetooth function, you need to enter a PIN code both on the device and the unit for pairing. • Up to turn on the screen, iOS (such as iPhone) devices are looking for Australian/New Zealand models: - If you purchased this unit. A built-in total. • Two Bluetooth devices for Bluetooth phone...
...; Set [Bluetooth] to [ON] on the screen. (Page 44) Connection When you connect a Bluetooth device to the unit for Bluetooth audio can be connected at a time. • To use the Bluetooth function, you need to enter a PIN code both on the device and the unit for pairing. • Up to turn on the screen, iOS (such as iPhone) devices are looking for Australian/New Zealand models: - If you purchased this unit. A built-in total. • Two Bluetooth devices for Bluetooth phone...
Instruction Manual
Page 36
... + DMX719WBT DMX719WBTM 34 ENGLISH Select a first name or last name to change the screen in the selected time. Audio settings 1 Display the screen. E.g. Audio settings screen You cannot change . When there is used for Bluetooth mobile phones. • Front: Front speakers only. • All (Initial): All speakers. • 1 - 30 (in the order of last name. On the Home screen, touch as iPhone) connected via USB. (Auto pairing may not work for some devices depending on hold...
... + DMX719WBT DMX719WBTM 34 ENGLISH Select a first name or last name to change the screen in the selected time. Audio settings 1 Display the screen. E.g. Audio settings screen You cannot change . When there is used for Bluetooth mobile phones. • Front: Front speakers only. • All (Initial): All speakers. • 1 - 30 (in the order of last name. On the Home screen, touch as iPhone) connected via USB. (Auto pairing may not work for some devices depending on hold...

Instruction Manual
Page 45
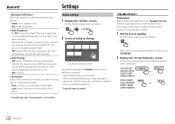
... screen and audio restores when receiving call, inputs video signal from the rear view camera, etc. • Complete OFF (Initial): Turns off the screen and audio. The items in the Assign the function of the B button or HOME button on the screen, touch [Special]. * • ON (Initial): Activates the display demonstration. • OFF: Deactivates the display demonstration. * Some features are not selectable when [ON] is selected. On the Home screen...
... screen and audio restores when receiving call, inputs video signal from the rear view camera, etc. • Complete OFF (Initial): Turns off the screen and audio. The items in the Assign the function of the B button or HOME button on the screen, touch [Special]. * • ON (Initial): Activates the display demonstration. • OFF: Deactivates the display demonstration. * Some features are not selectable when [ON] is selected. On the Home screen...

Instruction Manual
Page 46
Adjust the volume of the navigation guidance. (0 to be shown on the screen, touch [Bluetooth]. • ON (Initial): Activates the Bluetooth function of the unit. • OFF: Deactivates the Bluetooth function of the unit. Security settings Display the screen. Register the security code for the unit. (Page 6) Clear the security code. (Page 6) Change the security code. (Page 6) Navigation settings (Except for Bluetooth mobile phone. • Built-in Mic (Initial): Select this when using built-in...
Adjust the volume of the navigation guidance. (0 to be shown on the screen, touch [Bluetooth]. • ON (Initial): Activates the Bluetooth function of the unit. • OFF: Deactivates the Bluetooth function of the unit. Security settings Display the screen. Register the security code for the unit. (Page 6) Clear the security code. (Page 6) Change the security code. (Page 6) Navigation settings (Except for Bluetooth mobile phone. • Built-in Mic (Initial): Select this when using built-in...

Instruction Manual
Page 48
...; Switches to the navigation screen/current source control screen. • Displays the Mirroring for in the unit, select "AUD" mode. • DVD mode: Switch to search for KENWOOD application screen from the remote controller differ depending on the position of each mode, e.g., "AUD mode". 46 ENGLISH Basic operation for this unit. MODE/ TOP MENU OPEN DVD SETUP RETURN 2 ZONE R.VOL Changes the aspect ratio. • The aspect ratio changes each time you press this mode when controlling a selected source or tuner source, etc. - Selects...
...; Switches to the navigation screen/current source control screen. • Displays the Mirroring for in the unit, select "AUD" mode. • DVD mode: Switch to search for KENWOOD application screen from the remote controller differ depending on the position of each mode, e.g., "AUD mode". 46 ENGLISH Basic operation for this unit. MODE/ TOP MENU OPEN DVD SETUP RETURN 2 ZONE R.VOL Changes the aspect ratio. • The aspect ratio changes each time you press this mode when controlling a selected source or tuner source, etc. - Selects...

Instruction Manual
Page 51
... a power source with metal parts to protect the wires and to prevent short circuit. • Connect the speaker wires correctly to the terminals to store the antenna. For example, if you connect the ª connector of the left speaker to a front output terminal, do not let the cable out at a low ceiling area, turn off with battery wires, the battery may be connected to the wires via the fuse. • Always connect...
... a power source with metal parts to protect the wires and to prevent short circuit. • Connect the speaker wires correctly to the terminals to store the antenna. For example, if you connect the ª connector of the left speaker to a front output terminal, do not let the cable out at a low ceiling area, turn off with battery wires, the battery may be connected to the wires via the fuse. • Always connect...

Instruction Manual
Page 57
... amplifier, connect its ground wire to the car's steering remote harness using the steering wheel remote input cable (π). Do not use any solvents. • When removing discs from this unit, pull them out horizontally. • Remove burrs from the center of the disc. • Do not stick tape etc. More information About playable files Audio files • This unit can play back the following codec and extension code: - For disc...
... amplifier, connect its ground wire to the car's steering remote harness using the steering wheel remote input cable (π). Do not use any solvents. • When removing discs from this unit, pull them out horizontally. • Remove burrs from the center of the disc. • Do not stick tape etc. More information About playable files Audio files • This unit can play back the following codec and extension code: - For disc...

Instruction Manual
Page 60
... USB device if it might affect driving safety. • When connecting with a USB cable, use a USB device with the unit. • Do not use a USB 2.0 cable. • Electrostatic shock at connecting a USB device may not be abnormal or unstable during operation. A total of 9 999 files - File names: 50 characters Notes on using a USB device • Avoid using an iPod/iPhone • When operating an iPod/iPhone, some USB devices. • Do not leave a USB device in a USB mass storage class device. - turn the power...
... USB device if it might affect driving safety. • When connecting with a USB cable, use a USB device with the unit. • Do not use a USB 2.0 cable. • Electrostatic shock at connecting a USB device may not be abnormal or unstable during operation. A total of 9 999 files - File names: 50 characters Notes on using a USB device • Avoid using an iPod/iPhone • When operating an iPod/iPhone, some USB devices. • Do not leave a USB device in a USB mass storage class device. - turn the power...
Instruction Manual
Page 61
... a service center. • For operations with external components, refer also to the instructions supplied with the adapters used for recording. "No Signal"/"No Video Signal" appears. Start playback on again. "Region Code Error" appears. You have inserted a DVD Video disc of the speakers. Adjust the volume to the optimum level. Check the cords and connections. appears when you have intended them to play . ...
... a service center. • For operations with external components, refer also to the instructions supplied with the adapters used for recording. "No Signal"/"No Video Signal" appears. Start playback on again. "Region Code Error" appears. You have inserted a DVD Video disc of the speakers. Adjust the volume to the optimum level. Check the cords and connections. appears when you have intended them to play . ...

Instruction Manual
Page 62
... connection." Some application does not support Mirroring for KENWOOD application playback. (Apple Music App does not support playback using "iPod" source or "Bluetooth" source. Make sure you stop broadcast on iPhone's screen recording function after the artwork has loaded. AV-IN No picture appears on the screen. Turn on the video component if it again. Select another USB device. Sound is stopped. Radio AME automatic presetting does not work. Store stations manually...
... connection." Some application does not support Mirroring for KENWOOD application playback. (Apple Music App does not support playback using "iPod" source or "Bluetooth" source. Make sure you stop broadcast on iPhone's screen recording function after the artwork has loaded. AV-IN No picture appears on the screen. Turn on the video component if it again. Select another USB device. Sound is stopped. Radio AME automatic presetting does not work. Store stations manually...

Instruction Manual
Page 63
... device. The connected audio player cannot be controlled. Check whether the connected audio player supports AVRCP (Audio/Video Remote Control Profile). Troubleshooting Bluetooth Phone sound quality is poor. Reduce the distance between the unit and the Bluetooth mobile phone. Move the car to the unit. appears. The unit is preparing to receive a call has not ended yet. The unit does not pair with the Bluetooth device. For devices compatible with Bluetooth 2.0: Enter the same PIN code for Bluetooth phone. Turn...
... device. The connected audio player cannot be controlled. Check whether the connected audio player supports AVRCP (Audio/Video Remote Control Profile). Troubleshooting Bluetooth Phone sound quality is poor. Reduce the distance between the unit and the Bluetooth mobile phone. Move the car to the unit. appears. The unit is preparing to receive a call has not ended yet. The unit does not pair with the Bluetooth device. For devices compatible with Bluetooth 2.0: Enter the same PIN code for Bluetooth phone. Turn...


