
Instruction Manual
Page 4
... panel. You can select the indication language from the actual displays or panels. About this manual are mainly used to reset your unit 4 Turning on the power 4 Turning off the power 4 Putting the unit in this manual The displays and panels shown in standby 4 Turning off the screen 4 Adjusting the volume 4 Attenuating the sound 5 Getting Started 5 Initial settings 5 Registering a security code 6 Clock settings 6 Various Screens and Operations 7 Home screen 7 Source control screen 8 List/setting screen 9 Disc 10 Video 11 USB 13 Android 15 iPod/iPhone 15 Radio...
... panel. You can select the indication language from the actual displays or panels. About this manual are mainly used to reset your unit 4 Turning on the power 4 Turning off the power 4 Putting the unit in this manual The displays and panels shown in standby 4 Turning off the screen 4 Adjusting the volume 4 Attenuating the sound 5 Getting Started 5 Initial settings 5 Registering a security code 6 Clock settings 6 Various Screens and Operations 7 Home screen 7 Source control screen 8 List/setting screen 9 Disc 10 Video 11 USB 13 Android 15 iPod/iPhone 15 Radio...
Instruction Manual
Page 7
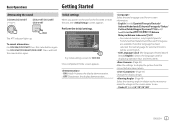
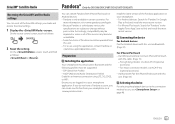
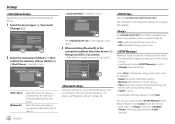
... DDX396/DDX376BT: Press the same button again. Initial Setup Demonstration Language Rear Camera User Customize Viewing Angle ON OFF English Enter Enter Enter Finish E.g. If another language has been selected, the text language for external monitors will be set to English. • GUI Language (Local (the language selected above) (Initial)/English): Selects the language used for the first time or reset the unit, the screen...
... DDX396/DDX376BT: Press the same button again. Initial Setup Demonstration Language Rear Camera User Customize Viewing Angle ON OFF English Enter Enter Enter Finish E.g. If another language has been selected, the text language for external monitors will be set to English. • GUI Language (Local (the language selected above) (Initial)/English): Selects the language used for the first time or reset the unit, the screen...
Instruction Manual
Page 9
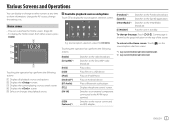
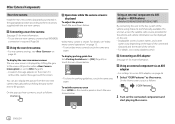
...input terminal. Plays a Bluetooth audio player. Switches to an external component connected to the Spotify application. Plays an Android device. Home screen • You can display or change to other screens, press HOME. Switches to the SiriusXM® radio broadcast. Plays a disc. Source/option selection screen for DDX396/DDX376BT/DDX276BT. Plays an iPod/iPhone. Displays the phone control screen. To return to the Home screen: Touch [ ] on the source/option selection screen. *1 Only for DDX396/DDX376BT/DDX276BT/DDX26BT. *2 Only for DDX396 Touching the operation...
...input terminal. Plays a Bluetooth audio player. Switches to an external component connected to the Spotify application. Plays an Android device. Home screen • You can display or change to other screens, press HOME. Switches to the SiriusXM® radio broadcast. Plays a disc. Source/option selection screen for DDX396/DDX376BT/DDX276BT. Plays an iPod/iPhone. Displays the phone control screen. To return to the Home screen: Touch [ ] on the source/option selection screen. *1 Only for DDX396/DDX376BT/DDX276BT/DDX26BT. *2 Only for DDX396 Touching the operation...
Instruction Manual
Page 18
... source control screen, touch as follows: 2 Make the settings. iPod Mode Artwork ON OFF • ON (Initial): Shows the artworks of the playing files. • OFF: Hides the artworks of iPod/iPhone. iPod/iPhone Radio Bluetooth connection Pair the iPod/iPhone with this unit via Bluetooth. (Page 33) Selecting the playback device via the connection method See on page 46 for iPod/iPhone playback 1 Display the screen. Playback operations Playback information and key operation • For playback information, see "Source control screen...
... source control screen, touch as follows: 2 Make the settings. iPod Mode Artwork ON OFF • ON (Initial): Shows the artworks of the playing files. • OFF: Hides the artworks of iPod/iPhone. iPod/iPhone Radio Bluetooth connection Pair the iPod/iPhone with this unit via Bluetooth. (Page 33) Selecting the playback device via the connection method See on page 46 for iPod/iPhone playback 1 Display the screen. Playback operations Playback information and key operation • For playback information, see "Source control screen...
Instruction Manual
Page 27
... . For 30-pin connector models: Use KCA-iP102 (optional accessory). • Via Bluetooth: Pair the iPhone/iPod touch with this unit. (Page 33) Selecting the device For selecting the playback device via Bluetooth. (Page 33) For iPhone/iPod touch • Via USB input terminal: Connect iPhone/iPod touch with this unit. • For issues using LTE, 3G, EDGE, or WiFi. Accordingly, compatibility may become unavailable. • Some functions of Pandora cannot be operated from your smartphone...
... . For 30-pin connector models: Use KCA-iP102 (optional accessory). • Via Bluetooth: Pair the iPhone/iPod touch with this unit. (Page 33) Selecting the device For selecting the playback device via Bluetooth. (Page 33) For iPhone/iPod touch • Via USB input terminal: Connect iPhone/iPod touch with this unit. • For issues using LTE, 3G, EDGE, or WiFi. Accordingly, compatibility may become unavailable. • Some functions of Pandora cannot be operated from your smartphone...

Instruction Manual
Page 32
... on page 8. For 30-pin connector models: Use KCA-iP102 (optional accessory). • Via Bluetooth: Pair the iPhone/iPod touch with the cable. (Page 15) - Connecting the device For Android devices Pair the Android device with this unit. (Page 33) Selecting the device For selecting the playback device via Bluetooth. (Page 33) For iPhone/iPod touch • Via USB input terminal: Connect iPhone/iPod touch with this unit via the connection method to find and install the most recent version...
... on page 8. For 30-pin connector models: Use KCA-iP102 (optional accessory). • Via Bluetooth: Pair the iPhone/iPod touch with the cable. (Page 15) - Connecting the device For Android devices Pair the Android device with this unit. (Page 33) Selecting the device For selecting the playback device via Bluetooth. (Page 33) For iPhone/iPod touch • Via USB input terminal: Connect iPhone/iPod touch with this unit via the connection method to find and install the most recent version...
Instruction Manual
Page 34
... the rear view camera manually without shifting the gear to the instructions supplied with the rear view camera. To display parking guide line Set to use the rear view camera, a reverse lead (REVERSE) connection is displayed To adjust the picture Touch the area shown below. On the Home screen, touch as follows: Operations while the camera screen is required. (Page 56) Using the rear view camera • For rear camera settings, see "Video menu control operations" on...
... the rear view camera manually without shifting the gear to the instructions supplied with the rear view camera. To display parking guide line Set to use the rear view camera, a reverse lead (REVERSE) connection is displayed To adjust the picture Touch the area shown below. On the Home screen, touch as follows: Operations while the camera screen is required. (Page 56) Using the rear view camera • For rear camera settings, see "Video menu control operations" on...
Instruction Manual
Page 35
... work for some Bluetooth devices. • Connecting conditions may vary depending on your environment. • For some Bluetooth devices, the device is disconnected when the unit is turned off. • If your car in total) Preparation Connect and install the microphone beforehand. Bluetooth devices can pair the device and the unit using the phone book, etc. Displays the control screen of the Bluetooth Hands Free function provided for Bluetooth audio can display the following items on the Bluetooth function of the device...
... work for some Bluetooth devices. • Connecting conditions may vary depending on your environment. • For some Bluetooth devices, the device is disconnected when the unit is turned off. • If your car in total) Preparation Connect and install the microphone beforehand. Bluetooth devices can pair the device and the unit using the phone book, etc. Displays the control screen of the Bluetooth Hands Free function provided for Bluetooth audio can display the following items on the Bluetooth function of the device...

Instruction Manual
Page 36
... Bluetooth device is compatible with Bluetooth 2.1, a pairing request is sent from the available device. 1 Search for the unit ("DDX3eX"/"DDX3"/ "DDX2"/"DDX4") from your Bluetooth device. 2 Confirm the request both on the screen, touch as follows: [System] : [Enter] On the screen, touch as follows: : [0000] 2 Change the PIN code. Bluetooth® Auto pairing When is set to [ON] (page 39), iOS (such as iPhone) devices are automatically paired when connected via USB...
... Bluetooth device is compatible with Bluetooth 2.1, a pairing request is sent from the available device. 1 Search for the unit ("DDX3eX"/"DDX3"/ "DDX2"/"DDX4") from your Bluetooth device. 2 Confirm the request both on the screen, touch as follows: [System] : [Enter] On the screen, touch as follows: : [0000] 2 Change the PIN code. Bluetooth® Auto pairing When is set to [ON] (page 39), iOS (such as iPhone) devices are automatically paired when connected via USB...

Instruction Manual
Page 40
Bluetooth® 1 Tag data* (current track title/artist name/album title) • Pressing [
Bluetooth® 1 Tag data* (current track title/artist name/album title) • Pressing [
Instruction Manual
Page 41
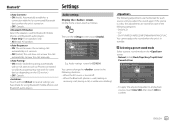
... Touch and hold [Enter] to reset all playback sources, touch [ALL SRC], then touch [OK] to all settings you adjust the sound again. On the Home screen, touch as iPhone) connected via USB. (Auto pairing may not work for using Bluetooth mobile phones and Bluetooth audio players. Answer the calls manually. • ON (Initial): Establishes pairing automatically with the last connected Bluetooth device when the unit is a disc, the adjustments are memorized for each of the...
... Touch and hold [Enter] to reset all playback sources, touch [ALL SRC], then touch [OK] to all settings you adjust the sound again. On the Home screen, touch as iPhone) connected via USB. (Auto pairing may not work for using Bluetooth mobile phones and Bluetooth audio players. Answer the calls manually. • ON (Initial): Establishes pairing automatically with the last connected Bluetooth device when the unit is a disc, the adjustments are memorized for each of the...
Instruction Manual
Page 48
... set to connect. • If the device is connected via the USB input terminal (cable from being changed. Touch [Lock] to the factory (initial) settings. • Cancel: Cancels. Smartphone Setup Initial Information Device Type Connection Type Device Name iPod / iPhone Bluetooth Device Name Device Type Select iPod / iPhone Android / Other Change 2 Select the connection method (1), then confirm the selection ([OK] or [Next]) (2). Next The screen appears. Touch [Yes]. A confirmation message appears. Select this setting is available only when 2-way speaker...
... set to connect. • If the device is connected via the USB input terminal (cable from being changed. Touch [Lock] to the factory (initial) settings. • Cancel: Cancels. Smartphone Setup Initial Information Device Type Connection Type Device Name iPod / iPhone Bluetooth Device Name Device Type Select iPod / iPhone Android / Other Change 2 Select the connection method (1), then confirm the selection ([OK] or [Next]) (2). Next The screen appears. Touch [Yes]. A confirmation message appears. Select this setting is available only when 2-way speaker...

Instruction Manual
Page 51
... the unit, select "AUD" mode. poles to the current source control screen. Adjusts the volume level. ENGLISH 49 Attenuates/restores the sound. Switches to avoid bending the springs. • If the Remote Controller operates only over shorter distances or does not operate at all, it is indicated in this mode when playing DVDs or CDs etc. Answers incoming calls. Enters options. In such instances, replace both batteries with the player integrated...
... the unit, select "AUD" mode. poles to the current source control screen. Adjusts the volume level. ENGLISH 49 Attenuates/restores the sound. Switches to avoid bending the springs. • If the Remote Controller operates only over shorter distances or does not operate at all, it is indicated in this mode when playing DVDs or CDs etc. Answers incoming calls. Enters options. In such instances, replace both batteries with the player integrated...

Instruction Manual
Page 53
... this key. Not used for this unit. Answers incoming calls. MENU/o Stops and memorizes the point where the disc stops. 0 - 9 • Specifies the number to the current source control screen. Enters direct search mode. Not used for this unit. * Available only when the AUD mode is selected. J/K/H/I Selects a track. Not used for this unit. Switches the AV source to be output. Adjusts the volume level. H/S / T/I Moves the cursor when displaying a menu. Remote Controller Basic operations for KNA-RCDV331...
... this key. Not used for this unit. Answers incoming calls. MENU/o Stops and memorizes the point where the disc stops. 0 - 9 • Specifies the number to the current source control screen. Enters direct search mode. Not used for this unit. * Available only when the AUD mode is selected. J/K/H/I Selects a track. Not used for this unit. Switches the AV source to be output. Adjusts the volume level. H/S / T/I Moves the cursor when displaying a menu. Remote Controller Basic operations for KNA-RCDV331...

Instruction Manual
Page 55
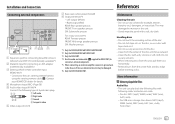
...; Keep all cables away from the ignition wire (red) and the battery wire (yellow). Metal parts such as a free standalone music player application, when your own screws. CONT) connected. (Page 56) Before installation Precautions on the smartphone's screen, and enables the user to the car. the radio antenna extends automatically when you use your Smartphone is installed in turn on the panel surface when installing the unit to make an audio setting using KENWOOD Remote APP. This...
...; Keep all cables away from the ignition wire (red) and the battery wire (yellow). Metal parts such as a free standalone music player application, when your own screws. CONT) connected. (Page 56) Before installation Precautions on the smartphone's screen, and enables the user to the car. the radio antenna extends automatically when you use your Smartphone is installed in turn on the panel surface when installing the unit to make an audio setting using KENWOOD Remote APP. This...

Instruction Manual
Page 56
... DDX396 ' Mounting sleeve (× 1) \ Extraction keys (× 2) Only for DDX419BT « Audio and video cable (× 1) Å Steering remote cable (× 1) Installation procedure 1 Remove the key from the ignition and disconnect the · battery. 2 Make the proper input and output wire connections for each unit. 3 Connect the speaker wires of the wiring harness. 4 Connect the wires of the left speaker to a front output terminal, do not mix front and rear). If the unit is installed securely in your car...
... DDX396 ' Mounting sleeve (× 1) \ Extraction keys (× 2) Only for DDX419BT « Audio and video cable (× 1) Å Steering remote cable (× 1) Installation procedure 1 Remove the key from the ignition and disconnect the · battery. 2 Make the proper input and output wire connections for each unit. 3 Connect the speaker wires of the wiring harness. 4 Connect the wires of the left speaker to a front output terminal, do not mix front and rear). If the unit is installed securely in your car...
Instruction Manual
Page 59
... adapter (commercially available)*2 3 Steering wheel remote controller input (REMO-IN)*3 • Connect to the chassis of 4-pole mini plug: 13 1 Left audio 2 Right audio 24 3 Ground 4 Composite video 6 Video output (V-OUT) References 7 Rear view camera input (R-CAM) 8 Output terminals*5 • Left output (White) • Right output (Red) REAR: Rear speaker preouts FRONT: Front speaker preouts SW: Subwoofer preouts For 3-way crossover*6: REAR: Tweeter preouts FRONT: Mid-range speaker preouts SW: Woofer preouts *1 Only for DDX396...
... adapter (commercially available)*2 3 Steering wheel remote controller input (REMO-IN)*3 • Connect to the chassis of 4-pole mini plug: 13 1 Left audio 2 Right audio 24 3 Ground 4 Composite video 6 Video output (V-OUT) References 7 Rear view camera input (R-CAM) 8 Output terminals*5 • Left output (White) • Right output (Red) REAR: Rear speaker preouts FRONT: Front speaker preouts SW: Subwoofer preouts For 3-way crossover*6: REAR: Tweeter preouts FRONT: Mid-range speaker preouts SW: Woofer preouts *1 Only for DDX396...

Instruction Manual
Page 62
... operation. Unplayable USB device • This unit may not work as intended for - If the performance is charged through the unit. • The text information may not be displayed correctly. • For some iPod/iPhone models, the performance may be performed correctly or as data security functions cannot be used with the unit. • Do not use a USB 2.0 cable. • Electrostatic shock at connecting a USB device may not recognize a memory...
... operation. Unplayable USB device • This unit may not work as intended for - If the performance is charged through the unit. • The text information may not be displayed correctly. • For some iPod/iPhone models, the performance may be performed correctly or as data security functions cannot be used with the unit. • Do not use a USB 2.0 cable. • Electrostatic shock at connecting a USB device may not recognize a memory...

Instruction Manual
Page 63
... the cords and connections. Signal input is displayed on the screen. Turn on the screen. (Page 4) The unit does not work at all. Reset the unit. (Page 4) The remote controller*1 does not work. Replace the battery. "Miswiring DC Offset Error"/"Warning DC Offset Error" appears. A speaker cord has shorted or it has come into the USB device. The source does not change to "USB" when you connect a USB device while listening to another USB device. Troubleshooting...
... the cords and connections. Signal input is displayed on the screen. Turn on the screen. (Page 4) The unit does not work at all. Reset the unit. (Page 4) The remote controller*1 does not work. Replace the battery. "Miswiring DC Offset Error"/"Warning DC Offset Error" appears. A speaker cord has shorted or it has come into the USB device. The source does not change to "USB" when you connect a USB device while listening to another USB device. Troubleshooting...

Instruction Manual
Page 65
... Bluetooth device. The sound is interrupted or skipped while using a PIN code. (Page 34) For devices compatible with a clear view of the device is not indicated in its instructions, try "0000" or "1234." Turn off , then turn on the unit. (When the sound is firmly attached to subscribe. Troubleshooting "Limited Connectivity" appears. The connection with the Pandora application cannot be controlled. Check whether the connected audio player supports AVRCP (Audio/Video Remote Control...
... Bluetooth device. The sound is interrupted or skipped while using a PIN code. (Page 34) For devices compatible with a clear view of the device is not indicated in its instructions, try "0000" or "1234." Turn off , then turn on the unit. (When the sound is firmly attached to subscribe. Troubleshooting "Limited Connectivity" appears. The connection with the Pandora application cannot be controlled. Check whether the connected audio player supports AVRCP (Audio/Video Remote Control...


