

Operation Manual
Page 1
Familiarity with installation and operation procedures will help you obtain the best performance from your new product. © 2023 JVCKENWOOD Corporation CA-LID98 REPLACEMENT 6" X 9" SADDLEBAG LIDS DESIGNED AND ENGINEERED FOR 1998-2013 HARLEY-DAVIDSON® MOTORCYCLES WITH FACTORY-STYLE HARD SADDLEBAGS INSTRUCTION MANUAL JVCKENWOOD Corporation Take the time to read through this instruction manual.
Familiarity with installation and operation procedures will help you obtain the best performance from your new product. © 2023 JVCKENWOOD Corporation CA-LID98 REPLACEMENT 6" X 9" SADDLEBAG LIDS DESIGNED AND ENGINEERED FOR 1998-2013 HARLEY-DAVIDSON® MOTORCYCLES WITH FACTORY-STYLE HARD SADDLEBAGS INSTRUCTION MANUAL JVCKENWOOD Corporation Take the time to read through this instruction manual.
Operation Manual
Page 2
... 6: Routing The Speaker Wire Harness 6 Section 7: Wiring The Lids To The Amplifier 7 2 Do Not Use "Thread Lock" or "Screw Glue" of all clearances and inspect the parts carefully BEFORE painting. Be sure of any speaker brand other than KENWOOD is used and allow the lids to open and close without issue. Most speaker magnets are being played, especially at higher volumes. Please consider...
... 6: Routing The Speaker Wire Harness 6 Section 7: Wiring The Lids To The Amplifier 7 2 Do Not Use "Thread Lock" or "Screw Glue" of all clearances and inspect the parts carefully BEFORE painting. Be sure of any speaker brand other than KENWOOD is used and allow the lids to open and close without issue. Most speaker magnets are being played, especially at higher volumes. Please consider...
Operation Manual
Page 3
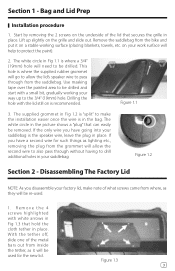
... the bike and put it will help to be re-used for such things as lighting etc., removing the plug from the saddlebag. Use masking tape over the painted area to protect the paint). 2. Bag and Lid Prep Installation procedure 1. Lift up to drill additional holes in your saddlebag is the speaker wire, leave the plug in place. Drilling the hole...
... the bike and put it will help to be re-used for such things as lighting etc., removing the plug from the saddlebag. Use masking tape over the painted area to protect the paint). 2. Bag and Lid Prep Installation procedure 1. Lift up to drill additional holes in your saddlebag is the speaker wire, leave the plug in place. Drilling the hole...
Operation Manual
Page 4
...gasket and the new lid, and then re-install the 5 factory machine screws the same way they came off the bike, you can expect to have approx. 2.0" (5cm) left over , exposing the 5 screws highlighted by white arrows in Fig 1.4. Use a mild cleaner such as 99% Isopropyl alcohol,... removed as Acetone will be free from the saddlebag. Section 3 - Figure 1.5 3. Be careful not to your saddlebag. 4 With the gasket installed, insert the factory metal strip (5 screws) between the rubber gasket and the lid itself that any adhesives in Fig 1.5 shows where we suggest you will need ...
...gasket and the new lid, and then re-install the 5 factory machine screws the same way they came off the bike, you can expect to have approx. 2.0" (5cm) left over , exposing the 5 screws highlighted by white arrows in Fig 1.4. Use a mild cleaner such as 99% Isopropyl alcohol,... removed as Acetone will be free from the saddlebag. Section 3 - Figure 1.5 3. Be careful not to your saddlebag. 4 With the gasket installed, insert the factory metal strip (5 screws) between the rubber gasket and the lid itself that any adhesives in Fig 1.5 shows where we suggest you will need ...

Operation Manual
Page 5
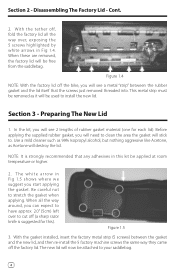
...will be applied with your speaker to secure your new kit. Preparing The New Lid - Locate the tether that has 8 Phillips head screws and use it to the lid/bag. The 4 white circles in your factory lids as a "shim" between the speakers and the lid. USE HAND TOOLS FOR THIS. ...1.6 5. Mounting The Speakers Locate the black "gummy" material supplied in place. Once done, using the 4 screws removed from the factory tether will be inserted into the lid to be applied on them off the bike. Use your kit that will need to fit the KENWOOD XM69R speakers when used. You ...
...will be applied with your speaker to secure your new kit. Preparing The New Lid - Locate the tether that has 8 Phillips head screws and use it to the lid/bag. The 4 white circles in your factory lids as a "shim" between the speakers and the lid. USE HAND TOOLS FOR THIS. ...1.6 5. Mounting The Speakers Locate the black "gummy" material supplied in place. Once done, using the 4 screws removed from the factory tether will be inserted into the lid to be applied on them off the bike. Use your kit that will need to fit the KENWOOD XM69R speakers when used. You ...

Operation Manual
Page 6
... place using the supplied zip-ties. For the ghost run " of placing the wires before applying any adhesives. 1. When done correctly, the black 2-pin plug can go nearest the amplifier you're using which ...Speaker Wire Harness NOTE: The supplied long harness with 4 wires has two 2-pin plugs on one way. Section 5 - Routing The Wires In The Saddlebag NOTE: Included in place using supplied zip ties. Have the wire go so that the wire with the 4-pin plug will only go straight down to the bottom of the saddlebag. 3. Before applying the pads you need to the appropriate 6 x 9 speaker...
... place using the supplied zip-ties. For the ghost run " of placing the wires before applying any adhesives. 1. When done correctly, the black 2-pin plug can go nearest the amplifier you're using which ...Speaker Wire Harness NOTE: The supplied long harness with 4 wires has two 2-pin plugs on one way. Section 5 - Routing The Wires In The Saddlebag NOTE: Included in place using supplied zip ties. Have the wire go so that the wire with the 4-pin plug will only go straight down to the bottom of the saddlebag. 3. Before applying the pads you need to the appropriate 6 x 9 speaker...
Operation Manual
Page 7
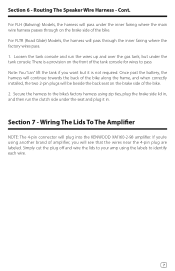
... inner fairing where the main wire harness passes through the inner fairing where the factory wires pass. 1. Cont. For FLH (Batwing) Models, the harness will plug into the KENWOOD XM160-2-98 amplifier. Secure the harness to identify each wire. 7 Routing The Speaker Wire Harness - Section 7 - Simply cut the plug off and wire the lids to your amp using the labels to the bike's factory harness using another brand of the bike...
... inner fairing where the main wire harness passes through the inner fairing where the factory wires pass. 1. Cont. For FLH (Batwing) Models, the harness will plug into the KENWOOD XM160-2-98 amplifier. Secure the harness to identify each wire. 7 Routing The Speaker Wire Harness - Section 7 - Simply cut the plug off and wire the lids to your amp using the labels to the bike's factory harness using another brand of the bike...

Operation Manual
Page 8
and/ or its affiliates. Specifications subject to change without notice. Important Notes ©2023 JVCKENWOOD Corporation. There is no affiliation between Harley-Davidson, Inc. All Rights Reserved. Harley... registered trademarks of their respective owners. and/or its affiliates and JVCKENWOOD Corporation and/or its affiliates and if used or implied are registered trademarks of JVCKENWOOD Corporation. For updated information (the latest Instruction Manual, etc.), please visit the following website: https://manual.kenwood.com/en_contents/search/ KENWOOD® and eXcelon®...
and/ or its affiliates. Specifications subject to change without notice. Important Notes ©2023 JVCKENWOOD Corporation. There is no affiliation between Harley-Davidson, Inc. All Rights Reserved. Harley... registered trademarks of their respective owners. and/or its affiliates and JVCKENWOOD Corporation and/or its affiliates and if used or implied are registered trademarks of JVCKENWOOD Corporation. For updated information (the latest Instruction Manual, etc.), please visit the following website: https://manual.kenwood.com/en_contents/search/ KENWOOD® and eXcelon®...


