Kenwood CA-LID98 Support and Manuals
Get Help and Manuals for this Kenwood item

View All Support Options Below
Free Kenwood CA-LID98 manuals!
Problems with Kenwood CA-LID98?
Ask a Question
Free Kenwood CA-LID98 manuals!
Problems with Kenwood CA-LID98?
Ask a Question
Popular Kenwood CA-LID98 Manual Pages
Operation Manual - Page 1

CA-LID98
REPLACEMENT 6" X 9" SADDLEBAG LIDS DESIGNED AND ENGINEERED FOR 1998-2013 HARLEY-DAVIDSON® MOTORCYCLES WITH FACTORY-STYLE HARD SADDLEBAGS
INSTRUCTION MANUAL
JVCKENWOOD Corporation
Take the time to read through this instruction manual. Familiarity with installation and operation procedures will help you obtain the best performance from your new product. © 2023 JVCKENWOOD ...
Operation Manual - Page 2
... may end up stuck to open and close without issue. Be sure of all clearances and inspect the parts carefully BEFORE painting. Metal objects packed into your saddlebags. Contents
Section 1: Bag and Lid Prep 3 Section...please exercise caution in how you pack your saddlebags. KENWOOD assumes ZERO RESPONSIBILITY for fitment issues, or water leaks when any kind, as it destroys plastic ...
Operation Manual - Page 3
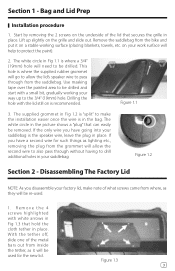
Bag and Lid Prep
Installation procedure
1. Use masking tape over the painted area to make note of what screws came from inside the tether, as it... drill additional holes in the bag. The white circle in place.
If the only wire you disassemble your factory lid, make the installation easier once the wire is "split" to be drilled. Remove the saddlebag from the saddlebag.
Operation Manual - Page 4
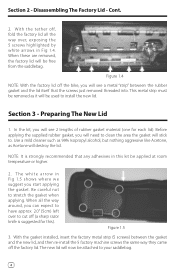
...as it will see a metal "strip" between the gasket and the new lid, and then re-install the 5 factory machine screws the same way they came off , fold the factory lid all the ... the gasket. Cont.
2. Disassembling The Factory Lid - Preparing The New Lid
1. With the gasket installed, insert the factory metal strip (5 screws) between the rubber gasket and the lid itself that any ...
Operation Manual - Page 5

...stick" the plates in your speaker to the lid/bag.
NOTE: Let the striker plate's adhesive "set" for how and where these will be inserted into the lid to seal the hole shown in ... Locate the bag that came with your kit that has 8 Phillips head screws and use it to fit the KENWOOD XM69R speakers when used. Preparing The New Lid - Cont.
4. NOTE: Each kit comes with 4 new "...
Operation Manual - Page 6

... off and attach your own terminals to clean the plastic well using a mild cleaner such as 99% Isopropyl alcohol, but nothing aggressive like Acetone, as instructed, you drilled the hole for the grommet, do another fold so the wire wants to point to point the wire forward along the bottom of...
Operation Manual - Page 7
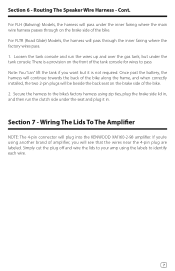
...another brand of the bike.
Cont. For FLTR (Road Glide) Models, the harness will be beside the back seat on the brake ...continue towards the back of the bike along the frame, and when correctly installed, the two 2-pin plugs will pass through on the front of the ... You "can" lift the tank if you will plug into the KENWOOD XM160-2-98 amplifier. Simply cut the plug off and wire the lids...
Operation Manual - Page 8

There is no affiliation between Harley-Davidson, Inc. For updated information (the latest Instruction Manual, etc.), please visit the following website:
https://manual.kenwood.com/en_contents/search/ and/ or its affiliates. Specifications subject to change without notice. All other trademarks are trademarks or registered trademarks of their respective owners. Harley-Davidson®, ...
Kenwood CA-LID98 Reviews
We have not received any reviews for Kenwood yet.