
Instruction Manual
Page 1
... installation and operation procedures will help you call upon your new CD-receiver. For your records Record the serial number, found on the back of the unit, in the spaces designated on the product. Model KDC-219, KDC-2019V, KDC-2019, KDC-29MR, KDC-119, KDC-119S, KDC-217, KDC-217S Serial number © B64-2114-00 (KWN) KDC-219 KDC-2019V KDC-2019 KDC-29MR KDC-119 KDC-119S KDC-217 KDC-217S CD-RECEIVER INSTRUCTION MANUAL AMPLI-TUNER-LECTEUR DE CD MODE...
... installation and operation procedures will help you call upon your new CD-receiver. For your records Record the serial number, found on the back of the unit, in the spaces designated on the product. Model KDC-219, KDC-2019V, KDC-2019, KDC-29MR, KDC-119, KDC-119S, KDC-217, KDC-217S Serial number © B64-2114-00 (KWN) KDC-219 KDC-2019V KDC-2019 KDC-29MR KDC-119 KDC-119S KDC-217 KDC-217S CD-RECEIVER INSTRUCTION MANUAL AMPLI-TUNER-LECTEUR DE CD MODE...
Instruction Manual
Page 2
... 7 Power Selecting the Source Volume Attenuator Loudness System Q Audio Control Speaker Setting Clock Display Adjusting Clock DSI (Disabled System Indicator) Theft Deterrent Faceplate Tuner features 10 Tuning Mode Tuning Station Preset Memory Auto Memory Entry Preset Tuning CRSC (Clean Reception System Circuit) CD/External disc control features 12 Playing CD Playing External Disc Fast Forwarding and Reversing Track Search Album Search Track/Album Repeat Track Scan Random Play Magazine Random Play Basic Operations of remote......15 Loading and Replacing the battery Basic operations In Tuner...
... 7 Power Selecting the Source Volume Attenuator Loudness System Q Audio Control Speaker Setting Clock Display Adjusting Clock DSI (Disabled System Indicator) Theft Deterrent Faceplate Tuner features 10 Tuning Mode Tuning Station Preset Memory Auto Memory Entry Preset Tuning CRSC (Clean Reception System Circuit) CD/External disc control features 12 Playing CD Playing External Disc Fast Forwarding and Reversing Track Search Album Search Track/Album Repeat Track Scan Random Play Magazine Random Play Basic Operations of remote......15 Loading and Replacing the battery Basic operations In Tuner...
Instruction Manual
Page 3
... made. This equipment may generate or use radio frequency energy. In compliance with the limits for help. 2Warning 2CAUTION Use of controls or adjustments or performance of labels on, or inside the product relating to laser product safety. Changes or modifications to provide reasonable protection against harmful interference in accordance with Canadian ICES-003. -3- KENWOOD CORPORATION 2967-3, ISHIKAWA-CHO, HACHIOJI...
... made. This equipment may generate or use radio frequency energy. In compliance with the limits for help. 2Warning 2CAUTION Use of controls or adjustments or performance of labels on, or inside the product relating to laser product safety. Changes or modifications to provide reasonable protection against harmful interference in accordance with Canadian ICES-003. -3- KENWOOD CORPORATION 2967-3, ISHIKAWA-CHO, HACHIOJI...
Instruction Manual
Page 4
... replacing a fuse, only use the wrong screws, you try to load a 3 in the CD slot If you could damage the unit. IMPORTANT INFORMATION About the disc changer to be dangerous to this unit, the converter cord CADS100 and/or switching adapter KCA-S210A are generated. To connect a disc changer having the "O-N" switch to your unit and the CD changer if you connect them incorrectly. CD with its adapter into the unit, the adapter...
... replacing a fuse, only use the wrong screws, you try to load a 3 in the CD slot If you could damage the unit. IMPORTANT INFORMATION About the disc changer to be dangerous to this unit, the converter cord CADS100 and/or switching adapter KCA-S210A are generated. To connect a disc changer having the "O-N" switch to your unit and the CD changer if you connect them incorrectly. CD with its adapter into the unit, the adapter...
Instruction Manual
Page 5
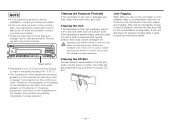
... Kenwood dealer. • Press the reset button if the Disc auto changer fails to explain more clearly how the controls are examples used . If the unit still does not operate normally after you experience problems during installation, consult your Kenwood dealer. • If the unit does not seem to play. Therefore, what appears on the display in actual operation. Cleaning the Unit If the faceplate of the display and the panel...
... Kenwood dealer. • Press the reset button if the Disc auto changer fails to explain more clearly how the controls are examples used . If the unit still does not operate normally after you experience problems during installation, consult your Kenwood dealer. • If the unit does not seem to play. Therefore, what appears on the display in actual operation. Cleaning the Unit If the faceplate of the display and the panel...
Instruction Manual
Page 7
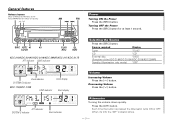
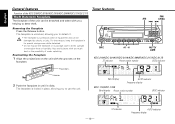
Source required Display Tuner "TUnE" CD "CD" External disc "DISC" (Function of the KDC-219/KDC-2019V/KDC-2019/KDC-29MR) Standby (Illumination only mode) "OFF" Clock indicator SYSTEM Q indicator KDC-119/KDC-119S LOUD indicator Clock display Clock display ATT indicator SYSTEM Q indicator Clock indicator Volume Increasing Volume Press the [u] button. Press the [ATT] button. Each time the button is pressed the Attenuator turns ON or OFF. When it's ON, the "ATT" indicator blinks. -7- Turning OFF the Power Press the [SRC] button for at least 1 second...
Source required Display Tuner "TUnE" CD "CD" External disc "DISC" (Function of the KDC-219/KDC-2019V/KDC-2019/KDC-29MR) Standby (Illumination only mode) "OFF" Clock indicator SYSTEM Q indicator KDC-119/KDC-119S LOUD indicator Clock display Clock display ATT indicator SYSTEM Q indicator Clock indicator Volume Increasing Volume Press the [u] button. Press the [ATT] button. Each time the button is pressed the Attenuator turns ON or OFF. When it's ON, the "ATT" indicator blinks. -7- Turning OFF the Power Press the [SRC] button for at least 1 second...
Instruction Manual
Page 8
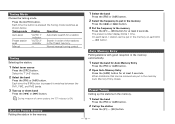
... best sound setting preset for different types of Flat - Select the "OFF" display. 2 Enter Speaker Setting mode Press the [Q] button. -8- When it's ON, "LOUD" indicator is pressed the sound setting switches. Each time the button is pressed the items that the System Q value is changed , the Bass, Middle, and Treble set Press the [SRC] button. 2 Select the Sound type Press the [Q] button. Each time the button is ON. Audio Control 1 Select the source for adjustment Press the [SRC] button. 2 Enter Audio Control mode...
... best sound setting preset for different types of Flat - Select the "OFF" display. 2 Enter Speaker Setting mode Press the [Q] button. -8- When it's ON, "LOUD" indicator is pressed the sound setting switches. Each time the button is pressed the items that the System Q value is changed , the Bass, Middle, and Treble set Press the [SRC] button. 2 Select the Sound type Press the [Q] button. Each time the button is ON. Audio Control 1 Select the source for adjustment Press the [SRC] button. 2 Enter Audio Control mode...
Instruction Manual
Page 9
.... Each time the step 1 and 2 operation is pressed the clock display turns ON or OFF. 3 Select the Speaker type Press the [4] or [¢] button. Speaker type Display OFF For the OEM speaker For 6 & 6x9 in . Function of the KDC-219/KDC-2019V/KDC-2019/KDC-29MR/KDC-217/KDC-217S DSI (Disabled System Indicator) A red indicator will blink on the unit after the faceplate is removed, warning potential thieves. 1 Turn the power OFF Press...
.... Each time the step 1 and 2 operation is pressed the clock display turns ON or OFF. 3 Select the Speaker type Press the [4] or [¢] button. Speaker type Display OFF For the OEM speaker For 6 & 6x9 in . Function of the KDC-219/KDC-2019V/KDC-2019/KDC-29MR/KDC-217/KDC-217S DSI (Disabled System Indicator) A red indicator will blink on the unit after the faceplate is removed, warning potential thieves. 1 Turn the power OFF Press...
Instruction Manual
Page 10
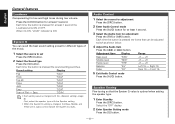
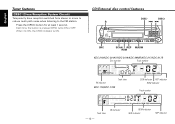
... the faceplate. Band display AUTO indicator Frequency display KDC-119/KDC-119S Band display Preset station number CRSC indicator - 10 - Reattaching the Faceplate 1 Align the projections on the unit with too much dust or the possibility of water splashing. The faceplate is a precision piece of equipment and can be damaged by shocks or jolts. English General features Function of the KDC-219/KDC-2019V/KDC-2019/KDC-29MR/KDC-217/KDC-217S...
... the faceplate. Band display AUTO indicator Frequency display KDC-119/KDC-119S Band display Preset station number CRSC indicator - 10 - Reattaching the Faceplate 1 Align the projections on the unit with too much dust or the possibility of water splashing. The faceplate is a precision piece of equipment and can be damaged by shocks or jolts. English General features Function of the KDC-219/KDC-2019V/KDC-2019/KDC-29MR/KDC-217/KDC-217S...
Instruction Manual
Page 11
... a station. Auto Memory Entry Putting stations with good reception in the Preset memory. Each time the button is ON. Normal manual tuning control. 1 Select the band Press the [FM] or [AM] button. 2 Select the frequency to put in the memory on each band, 1 station can be put in the memory Press the [4] or [¢] button. 3 Put the frequency in the memory Auto Memory Entry closes. The preset number display blinks 1 time. Each time the [FM] button is pressed it switches...
... a station. Auto Memory Entry Putting stations with good reception in the Preset memory. Each time the button is ON. Normal manual tuning control. 1 Select the band Press the [FM] or [AM] button. 2 Select the frequency to put in the memory on each band, 1 station can be put in the memory Press the [4] or [¢] button. 3 Put the frequency in the memory Auto Memory Entry closes. The preset number display blinks 1 time. Each time the [FM] button is pressed it switches...
Instruction Manual
Page 12
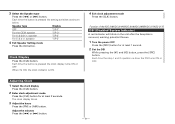
... RDM KDC-219/KDC-2019V/KDC-2019/KDC-29MR/KDC-217/KDC-217S Disc number Track number IN indicator Track time KDC-119/KDC-119S SCN indicator REP indicator RDM indicator Track number Track time - 12 - Each time the button is ON. When it's ON, the CRSC indicator is pressed CRSC turns ON or OFF. English Tuner features CRSC (Clean Reception System Circuit) Temporarily have reception switched from stereo to mono...
... RDM KDC-219/KDC-2019V/KDC-2019/KDC-29MR/KDC-217/KDC-217S Disc number Track number IN indicator Track time KDC-119/KDC-119S SCN indicator REP indicator RDM indicator Track number Track time - 12 - Each time the button is ON. When it's ON, the CRSC indicator is pressed CRSC turns ON or OFF. English Tuner features CRSC (Clean Reception System Circuit) Temporarily have reception switched from stereo to mono...
Instruction Manual
Page 13
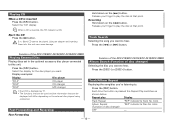
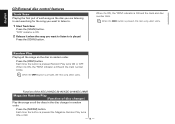
... [DISC+] button. Each time the button is displayed as shown below. blink. Using an adapter and inserting them into this unit. Press the [4] or [¢] button. Function of the KDC-219/KDC-2019V/KDC-2019/KDC-29MR Playing External Disc Playing discs set in . (8cm) CD cannot be displayed will differ depending on the [4] button. Display examples: Display Disc player "CD-2" "DISC" "DISC" CD player CD changer MD changer • Disc #10 is pressed the Repeat Play switches as "0". • The functions that can cause damage. Fast Forwarding - 13 - Select...
... [DISC+] button. Each time the button is displayed as shown below. blink. Using an adapter and inserting them into this unit. Press the [4] or [¢] button. Function of the KDC-219/KDC-2019V/KDC-2019/KDC-29MR Playing External Disc Playing discs set in . (8cm) CD cannot be displayed will differ depending on the [4] button. Display examples: Display Disc player "CD-2" "DISC" "DISC" CD player CD changer MD changer • Disc #10 is pressed the Repeat Play switches as "0". • The functions that can cause damage. Fast Forwarding - 13 - Select...
Instruction Manual
Page 14
... Play turns ON or OFF. - 14 - Press the [RDM] button. Each time the button is pressed, the next song select starts. When it when the song you want to listen to . 1 Start Track Scan Press the [SCAN] button. Press the [M.RDM] button. English CD/External disc control features Track Scan Playing the first part of disc changer) Play the songs on the disc in random order. Random Play Playing...
... Play turns ON or OFF. - 14 - Press the [RDM] button. Each time the button is pressed, the next song select starts. When it when the song you want to listen to . 1 Start Track Scan Press the [SCAN] button. Press the [M.RDM] button. English CD/External disc control features Track Scan Playing the first part of disc changer) Play the songs on the disc in random order. Random Play Playing...
Instruction Manual
Page 15
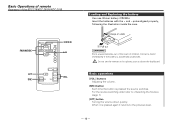
.../AM/DISC ATT SRC 4/¢ 38 VOL. 2WARNING Store unused batteries out of the reach of the KDC-219/KDC-2019V/KDC-2019 Loading and Replacing the battery Use one lithium battery (CR2025). Contact a doctor immediately if the battery is pressed again it returns to (page 7). [ATT] button Turning the volume down quickly. Basic operations [VOL.] buttons Adjusting the volume. [SRC] button Each time the button is pressed the source switches. Do not set the remote on...
.../AM/DISC ATT SRC 4/¢ 38 VOL. 2WARNING Store unused batteries out of the reach of the KDC-219/KDC-2019V/KDC-2019 Loading and Replacing the battery Use one lithium battery (CR2025). Contact a doctor immediately if the battery is pressed again it returns to (page 7). [ATT] button Turning the volume down quickly. Basic operations [VOL.] buttons Adjusting the volume. [SRC] button Each time the button is pressed the source switches. Do not set the remote on...
Instruction Manual
Page 17
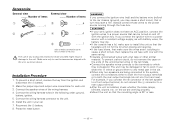
... the - battery. 2. Accessories External view ......... Connect the wiring harness connector to a power source with a constant voltage supply, as shown above. connector to the unit. Number of the wiring harness. 4. Make sure only to use of any metal part in the car. • When only two speakers are working properly. • Mount the unit so that in your car's ignition does not have an ACC position, connect the ignition wires to a power source that the faceplate will not...
... the - battery. 2. Accessories External view ......... Connect the wiring harness connector to a power source with a constant voltage supply, as shown above. connector to the unit. Number of the wiring harness. 4. Make sure only to use of any metal part in the car. • When only two speakers are working properly. • Mount the unit so that in your car's ignition does not have an ACC position, connect the ignition wires to a power source that the faceplate will not...
Instruction Manual
Page 18
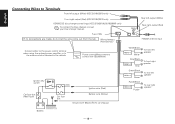
... right speaker 33 To rear left output (White) 23 2 KENWOOD disc changer control input (KDC-219/2019V/2019/29MR only) To connect the Disc changer, consult your Disc changer manual. 3 REAR L Rear right output (Red) 28 Fuse (10A) 24 R If no connections are made, do not let the wire come out from the tab.4 Wiring harness (Accessory1)25 6 Connect either to the power control terminal when using the optional power amplifier, or to the antenna control terminal in the vehicle. English Connecting Wires to...
... right speaker 33 To rear left output (White) 23 2 KENWOOD disc changer control input (KDC-219/2019V/2019/29MR only) To connect the Disc changer, consult your Disc changer manual. 3 REAR L Rear right output (Red) 28 Fuse (10A) 24 R If no connections are made, do not let the wire come out from the tab.4 Wiring harness (Accessory1)25 6 Connect either to the power control terminal when using the optional power amplifier, or to the antenna control terminal in the vehicle. English Connecting Wires to...
Instruction Manual
Page 21
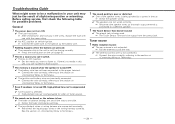
... and battery wire are not wired correctly.27 ☞ Reconnect the speaker wires so that each source. ? No sound can 't be a malfunction in the unit is not extended. ☞ Pull the antenna out all the way to one with one side.21 ☞ Center the fader and balance settings. ✔ The input/output wires or wiring harness are connected incorrectly.22 ☞ Reconnect the input/output wires or the wiring harness correctly. Troubleshooting Guide...
... and battery wire are not wired correctly.27 ☞ Reconnect the speaker wires so that each source. ? No sound can 't be a malfunction in the unit is not extended. ☞ Pull the antenna out all the way to one with one side.21 ☞ Center the fader and balance settings. ✔ The input/output wires or wiring harness are connected incorrectly.22 ☞ Reconnect the input/output wires or the wiring harness correctly. Troubleshooting Guide...
Instruction Manual
Page 22
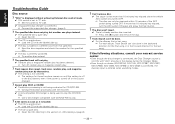
... service center: • Even though the disc changer is connected, the Disc Changer source is not ON, with "AVin" showing in the forward direction for CD-R/CD-RW. ☞ Conduct finalization processing with CD recorder. ✔ A non-compatible CD changer is not being used to play start by themselves.59 ✔ The setting is not canceled. ☞ The settings for the specified disc. ✔ The disc is turned off or the source changed. ? A CD ejects...
... service center: • Even though the disc changer is connected, the Disc Changer source is not ON, with "AVin" showing in the forward direction for CD-R/CD-RW. ☞ Conduct finalization processing with CD recorder. ✔ A non-compatible CD changer is not being used to play start by themselves.59 ✔ The setting is not canceled. ☞ The settings for the specified disc. ✔ The disc is turned off or the source changed. ? A CD ejects...
Instruction Manual
Page 23
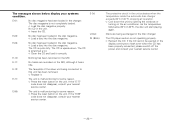
... in the Disc changer.E57 The CD player section is malfunctioning for some reason.E99A ➪ Press the reset button on the unit. E-10: Nothing has been recorded on the MD.E10 E-11: No tracks are being connected to flash even when the CD has been properly reinserted, please switch off the power and consult your nearest service center. If the "E-99" code does...
... in the Disc changer.E57 The CD player section is malfunctioning for some reason.E99A ➪ Press the reset button on the unit. E-10: Nothing has been recorded on the MD.E10 E-11: No tracks are being connected to flash even when the CD has been properly reinserted, please switch off the power and consult your nearest service center. If the "E-99" code does...

Instruction Manual
Page 24
... Channel separation 85 dB Audio section Maximum output power KDC-219/2019V/2019 50 W x 4 KDC-29MR/217/217S/119/119S 45 W x 4 Full Bandwidth Power (at less than 1% THD 22 W x 4 Tone action Bass 100 Hz ±10 dB Middle 1 kHz ±10 dB Treble 10 kHz ±10 dB Preout level / Load (during disc play 1800 mV/10 kΩ Preout impedance 600 Ω General Operating...
... Channel separation 85 dB Audio section Maximum output power KDC-219/2019V/2019 50 W x 4 KDC-29MR/217/217S/119/119S 45 W x 4 Full Bandwidth Power (at less than 1% THD 22 W x 4 Tone action Bass 100 Hz ±10 dB Middle 1 kHz ±10 dB Treble 10 kHz ±10 dB Preout level / Load (during disc play 1800 mV/10 kΩ Preout impedance 600 Ω General Operating...


