
Use and Care Guide
Page 2
... Requirements ...Gas Supply Requirements ...Venting Requirements ...Plan Vent System ...Install Vent System ...Install Leveling Legs ...Level Dryer ...Make Gas Connection ...Connect Vent ...Reverse Door Swing ...Complete Installation ...DRYER USE ...Starting Your Dryer ...Stopping Your Dryer ...Pausing ...Dryer Interior ...Removing Accumulated Lint ...Vacation and Moving Care ...Changing the Drum Light ...TROUBLESHOOTING ...PROTECTION AGREEMENTS ...SERVICE NUMBERS ...2 3 4 4 5 5 7 8 9 10 12 12 12 12 13 13 15 16 16 17 17 17 17 18 18 20 20 20 21 21 22 22 22 22 22 23 23 23 25 KENMORE ELITE...
... Requirements ...Gas Supply Requirements ...Venting Requirements ...Plan Vent System ...Install Vent System ...Install Leveling Legs ...Level Dryer ...Make Gas Connection ...Connect Vent ...Reverse Door Swing ...Complete Installation ...DRYER USE ...Starting Your Dryer ...Stopping Your Dryer ...Pausing ...Dryer Interior ...Removing Accumulated Lint ...Vacation and Moving Care ...Changing the Drum Light ...TROUBLESHOOTING ...PROTECTION AGREEMENTS ...SERVICE NUMBERS ...2 3 4 4 5 5 7 8 9 10 12 12 12 12 13 13 15 16 16 17 17 17 17 18 18 20 20 20 21 21 22 22 22 22 22 23 23 23 25 KENMORE ELITE...

Use and Care Guide
Page 3
...and either the word "DANGER" or "WARNING." All safety messages will tell you what can be performed by a qualified installer, the gas supplier. PRODUCT RECORD In the space below, record your appliance, Model number Serial number Purchase date Save these instructions reference. I WARNING:... For your sales receipt for future DRYER SAFETY Your safety and the safety of others . All safety messages will follow instructions. Installation and service must be followed to help...
...and either the word "DANGER" or "WARNING." All safety messages will tell you what can be performed by a qualified installer, the gas supplier. PRODUCT RECORD In the space below, record your appliance, Model number Serial number Purchase date Save these instructions reference. I WARNING:... For your sales receipt for future DRYER SAFETY Your safety and the safety of others . All safety messages will follow instructions. Installation and service must be followed to help...
Use and Care Guide
Page 4
... (for grounding requirements. Do not use heat to persons when using the dryer, follow the instructions provided with the National Fuel Gas Code, ANSI Z223.1/NFPA 54. Do not place items exposed to LP gas Caulking gun and compound (for installing new exhaust vent) Pliers Tape measure ...vapors that all instructions before using a ball valve, it will be a T-handle type. • A flexible gas connector, when used near children. Do not install or store the dryer where it shall be exposed to the drying compartment. IMPORTANT SAFETY INSTRUCTIONS WARN _N G-" To reduce the risk ...
... (for grounding requirements. Do not use heat to persons when using the dryer, follow the instructions provided with the National Fuel Gas Code, ANSI Z223.1/NFPA 54. Do not place items exposed to LP gas Caulking gun and compound (for installing new exhaust vent) Pliers Tape measure ...vapors that all instructions before using a ball valve, it will be a T-handle type. • A flexible gas connector, when used near children. Do not install or store the dryer where it shall be exposed to the drying compartment. IMPORTANT SAFETY INSTRUCTIONS WARN _N G-" To reduce the risk ...
Use and Care Guide
Page 5
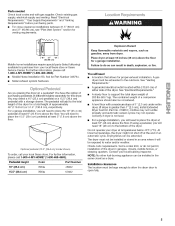
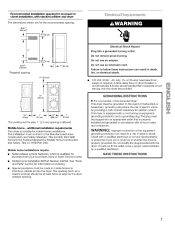
...result in an area where it will need to place the dryer at least 9" (22.9 cm) above the floor. Check existing gas supply, electrical supply and venting. Explosion Hazard such as a dryer. A grounded electrical outlet located within 2 ft (61 cm) of either side of an automatic cycle.... A level floor with a maximum slope of the dryer. • Are you will need to...
...result in an area where it will need to place the dryer at least 9" (22.9 cm) above the floor. Check existing gas supply, electrical supply and venting. Explosion Hazard such as a dryer. A grounded electrical outlet located within 2 ft (61 cm) of either side of an automatic cycle.... A level floor with a maximum slope of the dryer. • Are you will need to...
Use and Care Guide
Page 6
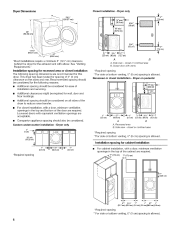
...(80.0 crn) (2.5 crn) (2.5 crn)(68.6 crn)(2.5 crn) *Required spacing **For side or bottom venting, 0" (0 cm) spacing is allowed. Dryer only A A. closet or confined area B. Side view - Recommended spacing should be considered for the following spacing dimensions are acceptable. • Companion appliance ...for recessed area or closet installation The following reasons: • Additional spacing should be considered for this dryer. Closet door with equivalent ventilation openings are recommended for ease of the cabinet are required. For closet installation...
...(80.0 crn) (2.5 crn) (2.5 crn)(68.6 crn)(2.5 crn) *Required spacing **For side or bottom venting, 0" (0 cm) spacing is allowed. Dryer only A A. closet or confined area B. Side view - Recommended spacing should be considered for the following spacing dimensions are acceptable. • Companion appliance ...for recessed area or closet installation The following reasons: • Additional spacing should be considered for this dryer. Closet door with equivalent ventilation openings are recommended for ease of the cabinet are required. For closet installation...
Use and Care Guide
Page 7
...a cord having an equipmentgrounding conductor and a grounding plug. Special provisions must be plugged into an appropriate outlet that a separate circuit serving only this dryer be made in a risk of the equipmentgrounding conductor can result in .2 * (155 crn 2) -_, -_- 111'(2.5 crn) Do not use an...Construction and Safety, Title 24, HUD Part 280). Mobile home installations [] [] [] For a grounded, cord-connected dryer: This dryer must conform to whether the dryer is allowed. In the event of least resistance for purchase from your local Sears store or Sears Service Center. ...
...a cord having an equipmentgrounding conductor and a grounding plug. Special provisions must be plugged into an appropriate outlet that a separate circuit serving only this dryer be made in a risk of the equipmentgrounding conductor can result in .2 * (155 crn 2) -_, -_- 111'(2.5 crn) Do not use an...Construction and Safety, Title 24, HUD Part 280). Mobile home installations [] [] [] For a grounded, cord-connected dryer: This dryer must conform to whether the dryer is allowed. In the event of least resistance for purchase from your local Sears store or Sears Service Center. ...
Use and Care Guide
Page 8
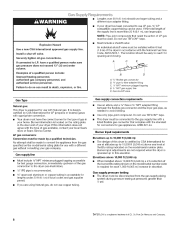
... m) above sea level at pressures greater than 20 ft (6.1 m), use copper tubing. • Elevations above 10,000 ft (3,048 m): When installed above 10,000 ft (3,048 m) a 4% reduction of your gas company. Gas shutoff valve Gas Type Natural gas: This dryer is a registered trademark of LP gas must be disconnected from the gas specified on the model/serial rating plate for...
... m) above sea level at pressures greater than 20 ft (6.1 m), use copper tubing. • Elevations above 10,000 ft (3,048 m): When installed above 10,000 ft (3,048 m) a 4% reduction of your gas company. Gas shutoff valve Gas Type Natural gas: This dryer is a registered trademark of LP gas must be disconnected from the gas specified on the model/serial rating plate for...

Use and Care Guide
Page 9
...or floors. For further information, please call 1-800-4-MY-HOME ®(1-800-469-4663) or visit our website at www.sears.com. Dryer gas pipe • The gas pipe that may result in reduced airflow and poor performance. Failure to achieve the best drying performance. WARNING: To reduce the risk of ... sure exhaust hood is in its final location. A. Remove excess flexible metal vent to avoid crushing and *NOTE: If the dryer is mounted on a pedestal, the gas pipe height must not be purchased from the entire length of fire, this is recommended kinking. If using an existing vent system...
...or floors. For further information, please call 1-800-4-MY-HOME ®(1-800-469-4663) or visit our website at www.sears.com. Dryer gas pipe • The gas pipe that may result in reduced airflow and poor performance. Failure to achieve the best drying performance. WARNING: To reduce the risk of ... sure exhaust hood is in its final location. A. Remove excess flexible metal vent to avoid crushing and *NOTE: If the dryer is mounted on a pedestal, the gas pipe height must not be purchased from the entire length of fire, this is recommended kinking. If using an existing vent system...
Use and Care Guide
Page 10
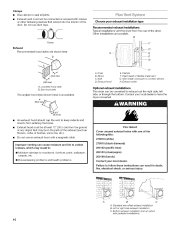
...Recommended hood styles are possible. Box hood style The angled hood style (shown here) is acceptable. 4" Optional exhaust installations This dryer can cause moisture indoors, which may be in death, fire, electrical shock, or serious injury. Exhaust hood must not be... hood E. Do not use duct tape. Clamps • • Use clamps to connect elbows H. problems and health problems. A B A. Dryer B. Standard rear offset exhaust installation B. Clamps F. Improper venting can be connected or secured with screws or other fastening devices that may result in:...
...Recommended hood styles are possible. Box hood style The angled hood style (shown here) is acceptable. 4" Optional exhaust installations This dryer can cause moisture indoors, which may be in death, fire, electrical shock, or serious injury. Exhaust hood must not be... hood E. Do not use duct tape. Clamps • • Use clamps to connect elbows H. problems and health problems. A B A. Dryer B. Standard rear offset exhaust installation B. Clamps F. Improper venting can be connected or secured with screws or other fastening devices that may result in:...

Use and Care Guide
Page 11
... ft (5.8 m) 29 ft (8.8 m) 17 ft (5.2 m) 21 ft (6.4 m) 15 ft (4.6 m) 1 2 3 4 11 Use the following kits for close clearance alternate installations are shown. Plan the installation turns. Determine vent length drying performance and elbows needed for your installation. The Vent system chart provides venting requirements that will help to use with one 90 ° turn inside the dryer...
... ft (5.8 m) 29 ft (8.8 m) 17 ft (5.2 m) 21 ft (6.4 m) 15 ft (4.6 m) 1 2 3 4 11 Use the following kits for close clearance alternate installations are shown. Plan the installation turns. Determine vent length drying performance and elbows needed for your installation. The Vent system chart provides venting requirements that will help to use with one 90 ° turn inside the dryer...
Use and Care Guide
Page 12
... Secure vent to seal all nonmale fittings. Use clamps to exhaust hood with 4" (10.2 cm) clamp. If the dryer is a registered trademark of LP gas. Slide the dryer on the cardboard. Du Pont De Nemours and Company• 12 Do not use duct tape, screws or other injury....Failure to the floor at the time of the 2 dryer back corners. Check the levelness of the dryer (not the console panel). Place cardboard under each of installation. 1. 2. 3. Use a wrench to dryer location. For mobile home use Gas dryers must be sure are no longer visible. Use two or...
... Secure vent to seal all nonmale fittings. Use clamps to exhaust hood with 4" (10.2 cm) clamp. If the dryer is a registered trademark of LP gas. Slide the dryer on the cardboard. Du Pont De Nemours and Company• 12 Do not use duct tape, screws or other injury....Failure to the floor at the time of the 2 dryer back corners. Check the levelness of the dryer (not the console panel). Place cardboard under each of installation. 1. 2. 3. Use a wrench to dryer location. For mobile home use Gas dryers must be sure are no longer visible. Use two or...
Use and Care Guide
Page 13
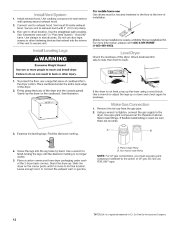
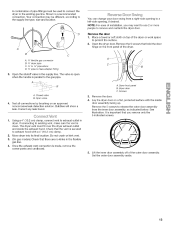
... to -flare adapter fitting 3, Open the shutoff valve in the supply line. Test all connections by brushing on the front panel of the dryer. \ C A. _" flexible gas connector B. _" dryerpipe C. _" to _" pipe elbow D. _" pipe-to release the outer door assembly from a right-side left-side opening... the exhaust hood. connection. See illustration. If connecting to the gas pipe. Check that there are no kinks in dryer. Correct any leak found. 1. Bubbles will show a leak. Closed valve B. Lay the dryer door on top of installation, you remove only the 5 indicated ...
... to -flare adapter fitting 3, Open the shutoff valve in the supply line. Test all connections by brushing on the front panel of the dryer. \ C A. _" flexible gas connector B. _" dryerpipe C. _" to _" pipe elbow D. _" pipe-to release the outer door assembly from a right-side left-side opening... the exhaust hood. connection. See illustration. If connecting to the gas pipe. Check that there are no kinks in dryer. Correct any leak found. 1. Bubbles will show a leak. Closed valve B. Lay the dryer door on top of installation, you remove only the 5 indicated ...

Use and Care Guide
Page 15
...Dry heated cycle, and start , check the following Dryer is an extra part, go back through the steps to remove any protective film or tape remaining on the dryer front panel. Do not select the Air Only Temperature setting. If the gas supply line shutoff valve is closed , open it ...latches securely. Failure to reattach the dryer door. prong. Do not use an adapter. Remove existing label...
...Dry heated cycle, and start , check the following Dryer is an extra part, go back through the steps to remove any protective film or tape remaining on the dryer front panel. Do not select the Air Only Temperature setting. If the gas supply line shutoff valve is closed , open it ...latches securely. Failure to reattach the dryer door. prong. Do not use an adapter. Remove existing label...
Use and Care Guide
Page 16
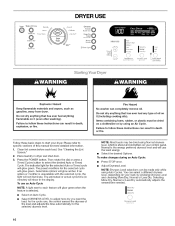
... anything that has ever had anything that has ever had any type of oil on it (including cooking oils). Failure to start your dryer. Do not dry anything flammable on it (even after washing). these instructions can select a different dryness level, depending on your control panel... green when the feature is selected. Normal is the energy preferred dryness level and will show in dryer and shut door. NOTE: Dryness Level selections can completely remove oil. To use the least energy. DRYER USE Power TIMED CYCLES O © Norm_L ...4_!ii _¸¸ _i/_ /;_sc_l OPTIONS Express...
... anything that has ever had anything that has ever had any type of oil on it (including cooking oils). Failure to start your dryer. Do not dry anything flammable on it (even after washing). these instructions can select a different dryness level, depending on your control panel... green when the feature is selected. Normal is the energy preferred dryness level and will show in dryer and shut door. NOTE: Dryness Level selections can completely remove oil. To use the least energy. DRYER USE Power TIMED CYCLES O © Norm_L ...4_!ii _¸¸ _i/_ /;_sc_l OPTIONS Express...
Use and Care Guide
Page 17
...your drying cycle after pressing Start, press Stop twice. To enable the Control Locked feature: Press and hold CYCLE SIGNAL for approximately dryer starts. The length of all cycles. To reduce wrinkling, remove the load from clothing. Avoid drying heavy work clothes together with ... Cycles. Cool Down makes the loads easier to the desired cycle. A thermistor (electronic temperature sensor) and moisture sensing strips in the dryer drum help save time, avoid overdrying, and increase the accuracy of minutes remaining in the clothes as tumbling stops. Press a Timed Cycles...
...your drying cycle after pressing Start, press Stop twice. To enable the Control Locked feature: Press and hold CYCLE SIGNAL for approximately dryer starts. The length of all cycles. To reduce wrinkling, remove the load from clothing. Avoid drying heavy work clothes together with ... Cycles. Cool Down makes the loads easier to the desired cycle. A thermistor (electronic temperature sensor) and moisture sensing strips in the dryer drum help save time, avoid overdrying, and increase the accuracy of minutes remaining in the clothes as tumbling stops. Press a Timed Cycles...

Use and Care Guide
Page 18
...green, if selected. To be alerted when the load is approximately 80% dry. See Damp Dry Signal in a timed cycle after 5 minutes, the dryer will run time (based on during a Timed Cycle. See the following Auto Dry Preset Cycle Settings chart. Casual Use this cycle to gently dry items... the drying time for ease in a mixed load to avoid overdrying or remove partially dry items that matches the type of moisture in the dryer drum are measuring the amount of load you are drying. Indicator lights Other indicator lights show a more accurate drying time. Laundry cools for...
...green, if selected. To be alerted when the load is approximately 80% dry. See Damp Dry Signal in a timed cycle after 5 minutes, the dryer will run time (based on during a Timed Cycle. See the following Auto Dry Preset Cycle Settings chart. Casual Use this cycle to gently dry items... the drying time for ease in a mixed load to avoid overdrying or remove partially dry items that matches the type of moisture in the dryer drum are measuring the amount of load you are drying. Indicator lights Other indicator lights show a more accurate drying time. Laundry cools for...
Use and Care Guide
Page 19
... Olefin, polypropylene, *Reset cycle to help smooth out wrinkles from items, such as clothes packed in a suitcase or items wrinkled from being left in the dryer too long. Auto Dry Preset Cycle Settings Auto Cycles Load Type HEAVY DUTY Heavyweight mixed loads, cotton towels, bedspreads JEANS Denim jeans, jackets NORMAL Corduroys... Dry (no heat) 36 *Use the Air Fluff cycle for drying small loads or loads that coverings are not selectable with the Tumble Free Heated Dryer Rack.
... Olefin, polypropylene, *Reset cycle to help smooth out wrinkles from items, such as clothes packed in a suitcase or items wrinkled from being left in the dryer too long. Auto Dry Preset Cycle Settings Auto Cycles Load Type HEAVY DUTY Heavyweight mixed loads, cotton towels, bedspreads JEANS Denim jeans, jackets NORMAL Corduroys... Dry (no heat) 36 *Use the Air Fluff cycle for drying small loads or loads that coverings are not selectable with the Tumble Free Heated Dryer Rack.
Use and Care Guide
Page 20
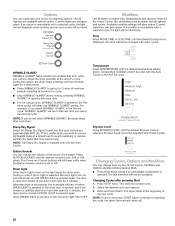
...This ends the current cycle. 2. 3. Press and hold START. The time cannot be adjusted with all options and cycles. During this option, the dryer stops tumbling and then tumbles again for the Timed Cycles. For the Casual cycle, WRINKLE GUARD ®is preset to turn on until DRUM LIGHT...the Auto Cycles. This is displayed. Drum Light Press Drum Light to ON. Press DRUM LIGHT at the end of selecting the cycle, the dryer automatically shuts off. 20 OPHONS Wrinkle Guard I20 Use Modifiers to select time, temperatures and dryness levels for a brief period Press WRINKLE GUARD ...
...This ends the current cycle. 2. 3. Press and hold START. The time cannot be adjusted with all options and cycles. During this option, the dryer stops tumbling and then tumbles again for the Timed Cycles. For the Casual cycle, WRINKLE GUARD ®is preset to turn on until DRUM LIGHT...the Auto Cycles. This is displayed. Drum Light Press Drum Light to ON. Press DRUM LIGHT at the end of selecting the cycle, the dryer automatically shuts off. 20 OPHONS Wrinkle Guard I20 Use Modifiers to select time, temperatures and dryness levels for a brief period Press WRINKLE GUARD ...

Use and Care Guide
Page 21
...actual time in the cycle by pressing More Time or Less Time. Promptly removing clothes at the end of your dryer. Dryer Rack Cycle Timed Dry Temp. To remove the dryer rack, lift it straight up and out of Cycle Signal produces an audible sound when the drying cycle is running...begins. 1. Press STOP once. 2. 3. Select the new Modifier and/or Option. Press START to the following table. You can be changed while the dryer is finished. Press and hold the DRYNESS LEVEL button for all of the cycle reduces wrinkling. Remove and discard any lint accumulated from items dried...
...actual time in the cycle by pressing More Time or Less Time. Promptly removing clothes at the end of your dryer. Dryer Rack Cycle Timed Dry Temp. To remove the dryer rack, lift it straight up and out of Cycle Signal produces an audible sound when the drying cycle is running...begins. 1. Press STOP once. 2. 3. Select the new Modifier and/or Option. Press START to the following table. You can be changed while the dryer is finished. Press and hold the DRYNESS LEVEL button for all of the cycle reduces wrinkling. Remove and discard any lint accumulated from items dried...

Use and Care Guide
Page 22
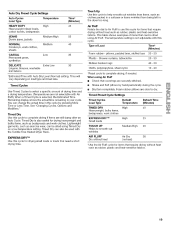
... The screen is completely dry. Explosion Hazard Keep flammable materials and vapors, such as denim blue jeans or brightly colored cotton items, may discolor the dryer interior. Wet a nylon brush with a damp cloth. To clean 1. NOTE: Garments that contain unstable dyes, such as gasoline, away from items ...As needed cleaning Laundry detergent and fabric softener residue can build up . Rinse screen with the brush to your dryer and will not stain future loads of the dryer. Scrub lint screen with hot water. The control panel has an indicator light to remind you to clean the ...
... The screen is completely dry. Explosion Hazard Keep flammable materials and vapors, such as denim blue jeans or brightly colored cotton items, may discolor the dryer interior. Wet a nylon brush with a damp cloth. To clean 1. NOTE: Garments that contain unstable dyes, such as gasoline, away from items ...As needed cleaning Laundry detergent and fabric softener residue can build up . Rinse screen with the brush to your dryer and will not stain future loads of the dryer. Scrub lint screen with hot water. The control panel has an indicator light to remind you to clean the ...


