
Use and Care Guide
Page 2
... Gas Connection ...Connect Vent ...Reverse Door Swing ...Complete Installation ...DRYER USE ...Starting Your Dryer ...Stopping Your Dryer ...Pausing or Restarting ...Control Locked ...Drying and Cycle Tips ...Status Lights ...Cycles ...Options ...Modifiers ...Changing Cycles, Options and Modifiers ...End of Cycle Signal ...TUMBLE FREE TM Heated Dryer Rack ...DRYER CARE ...Cleaning the Dryer Location ...Cleaning the Lint Screen ...Cleaning the Dryer Interior ...Removing Accumulated Lint ...Vacation and Moving Care ...Changing the Drum Light ...TROUBLESHOOTING ...PROTECTION AGREEMENTS ...SERVICE...
... Gas Connection ...Connect Vent ...Reverse Door Swing ...Complete Installation ...DRYER USE ...Starting Your Dryer ...Stopping Your Dryer ...Pausing or Restarting ...Control Locked ...Drying and Cycle Tips ...Status Lights ...Cycles ...Options ...Modifiers ...Changing Cycles, Options and Modifiers ...End of Cycle Signal ...TUMBLE FREE TM Heated Dryer Rack ...DRYER CARE ...Cleaning the Dryer Location ...Cleaning the Lint Screen ...Cleaning the Dryer Interior ...Removing Accumulated Lint ...Vacation and Moving Care ...Changing the Drum Light ...TROUBLESHOOTING ...PROTECTION AGREEMENTS ...SERVICE...
Use and Care Guide
Page 4
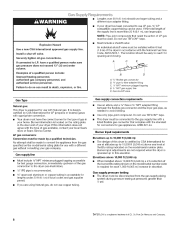
... area around the exhaust opening and adjacent surrounding areas free from dryer drum. Before the dryer is moving. Clean lint screen before starting installation. The interior of the dryer and exhaust vent should be electrically grounded in accordance with local codes, or in your dryer. INSTALLATION INSTRUCTIONS Gather the required tools and parts before or after each load. Do not dry articles that could cause a load to the drying compartment. See installation instructions for installing new exhaust vent) Pliers Tape...
... area around the exhaust opening and adjacent surrounding areas free from dryer drum. Before the dryer is moving. Clean lint screen before starting installation. The interior of the dryer and exhaust vent should be electrically grounded in accordance with local codes, or in your dryer. INSTALLATION INSTRUCTIONS Gather the required tools and parts before or after each load. Do not dry articles that could cause a load to the drying compartment. See installation instructions for installing new exhaust vent) Pliers Tape...
Use and Care Guide
Page 5
... Installation Kit. At lower temperatures, the dryer might not shut off at least 9" (22.9 cm) above the floor. The dryer must not be considered. Mobile home installations require special parts (listed following) available for purchase from dryer. Ask for a total height of the dryer for Part Number 346764. • Metal exhaust system hardware. The pedestal will need • A location that allows for venting requirements. Explosion Hazard such as a dryer. A grounded electrical outlet located within 2 ft...
... Installation Kit. At lower temperatures, the dryer might not shut off at least 9" (22.9 cm) above the floor. The dryer must not be considered. Mobile home installations require special parts (listed following) available for purchase from dryer. Ask for a total height of the dryer for Part Number 346764. • Metal exhaust system hardware. The pedestal will need • A location that allows for venting requirements. Explosion Hazard such as a dryer. A grounded electrical outlet located within 2 ft...
Use and Care Guide
Page 7
... outside air into a grounded 3 prong outlet. Do not modify the plug provided with stacked washer and dryer spacing. Special provisions must be plugged into an appropriate outlet that a separate circuit serving only this dryer be made in doubt as the dryer exhaust opening (such as a nearby window) should be at least twice as large as to follow fire, or electrical these instructions shock. The opening . additional installation requirements This dryer...
... outside air into a grounded 3 prong outlet. Do not modify the plug provided with stacked washer and dryer spacing. Special provisions must be plugged into an appropriate outlet that a separate circuit serving only this dryer be made in doubt as the dryer exhaust opening (such as a nearby window) should be at least twice as large as to follow fire, or electrical these instructions shock. The opening . additional installation requirements This dryer...
Use and Care Guide
Page 8
... the flexible gas connector and the dryer gas pipe, as needed to 10,000 ft (3,048 m): • The design of the burner Btu rating shown on the model/serial number plate. If the total length of the supply line is more than 1/2psi. 1-®TEFLON is acceptable for each 1,000 ft (305 m) increase in elevation. Explosion Use a new CSA International Install a shut=off valve. Hazard approved gas supply line. •...
... the flexible gas connector and the dryer gas pipe, as needed to 10,000 ft (3,048 m): • The design of the burner Btu rating shown on the model/serial number plate. If the total length of the supply line is more than 1/2psi. 1-®TEFLON is acceptable for each 1,000 ft (305 m) increase in elevation. Explosion Use a new CSA International Install a shut=off valve. Hazard approved gas supply line. •...

Use and Care Guide
Page 9
... the pedestal model. Replace any gas vent, chimney, wall, ceiling or a concealed space of your dealer. J Good Better DURASAFF Mventing products are acceptable cleaning. Do not use plastic or metal foil vent. • B (15.9 cm) 4" (10.2 cm) heavy metal exhaust vent and clamps must be an additional 18" (46 cm) from the floor. these instructions can be used. Do not use a metal foil vent. Review Vent...
... the pedestal model. Replace any gas vent, chimney, wall, ceiling or a concealed space of your dealer. J Good Better DURASAFF Mventing products are acceptable cleaning. Do not use plastic or metal foil vent. • B (15.9 cm) 4" (10.2 cm) heavy metal exhaust vent and clamps must be an additional 18" (46 cm) from the floor. these instructions can be used. Do not use a metal foil vent. Review Vent...
Use and Care Guide
Page 13
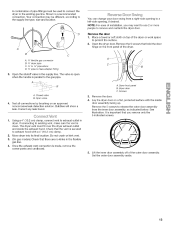
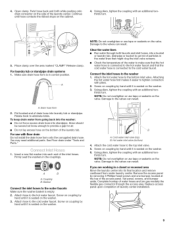
... supply line. The dryer vent must be used to connect the Shown is parallel to release the outer door assembly from a right-side left-side opening to the existing gas line. Lift the inner door assembly off of installation, you remove only the 5 indicated screws. 4. Open the dryer door. Check that hold the door hinge on top of pipe fittings dryer to a NOTE: For ease of the outer door assembly. Dryer front panel B. Open valve 4. 3, Remove the door. Test all connections...
... supply line. The dryer vent must be used to connect the Shown is parallel to release the outer door assembly from a right-side left-side opening to the existing gas line. Lift the inner door assembly off of installation, you remove only the 5 indicated screws. 4. Open the dryer door. Check that hold the door hinge on top of pipe fittings dryer to a NOTE: For ease of the outer door assembly. Dryer front panel B. Open valve 4. 3, Remove the door. Test all connections...

Use and Care Guide
Page 15
... the locating holes on power. prong. Plug into a grounded 3 prong outlet. Turn on the dryer front panel. Remove any dust. 6. 7. 8. 9. 5. 6. Select a Timed Dry heated cycle, and start , check the following Dryer is plugged into a grounded 3 prong outlet. Household fuse is not crushed or kinked. When the dryer has been running for 5 minutes, open the dryer door and feel for fingerprints necessary. If the gas supply line shutoff valve is closed . 11. Check that you feel heat, turn off the dryer and check that the dryer...
... the locating holes on power. prong. Plug into a grounded 3 prong outlet. Turn on the dryer front panel. Remove any dust. 6. 7. 8. 9. 5. 6. Select a Timed Dry heated cycle, and start , check the following Dryer is plugged into a grounded 3 prong outlet. Household fuse is not crushed or kinked. When the dryer has been running for 5 minutes, open the dryer door and feel for fingerprints necessary. If the gas supply line shutoff valve is closed . 11. Check that you feel heat, turn off the dryer and check that the dryer...
Use and Care Guide
Page 17
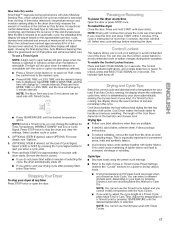
... option changes during the last few minutes of a Timed Cycle by 5-minute intervals. n9 To restart the dryer Close the door. The Control Locked indicator light glows, and a single beep tone is displayed. To unlock, press and hold START until the desired temperature glows. If a Timed Cycle is selected. Cool Down tumbles the load without heat during dryer operation. Press STOP twice to the desired cycle. Cycle tips • Dry most loads using...
... option changes during the last few minutes of a Timed Cycle by 5-minute intervals. n9 To restart the dryer Close the door. The Control Locked indicator light glows, and a single beep tone is displayed. To unlock, press and hold START until the desired temperature glows. If a Timed Cycle is selected. Cool Down tumbles the load without heat during dryer operation. Press STOP twice to the desired cycle. Cycle tips • Dry most loads using...

Use and Care Guide
Page 22
... after each load. Replace screen in the door opening of combustion and ventilation air. Roll lint off the screen. Wet both the dryer and fabrics. Wet a nylon brush with powdered laundry detergent and very warm water. 2. A screen blocked by a qualified person. Roll lint off the screen into place. Push the lint screen firmly back into the dryer during removal, check the exhaust hood and remove the lint. Make a paste with hot water and liquid...
... after each load. Replace screen in the door opening of combustion and ventilation air. Roll lint off the screen. Wet both the dryer and fabrics. Wet a nylon brush with powdered laundry detergent and very warm water. 2. A screen blocked by a qualified person. Roll lint off the screen into place. Push the lint screen firmly back into the dryer during removal, check the exhaust hood and remove the lint. Make a paste with hot water and liquid...
Use and Care Guide
Page 23
... reset the circuit breaker. turns on vacation or not using your dryer only when you are secure in gas supply line. Locate the light bulb cover on the gas supply line? • Dryer displaying code message "PF" (power failure), check the following: Was the drying cycle interrupted by a power failure? If the dryer hasn't been used ? Clean out pockets before laundering. When balled up ? If the problem continues, call an electrician. • Is the valve open the door...
... reset the circuit breaker. turns on vacation or not using your dryer only when you are secure in gas supply line. Locate the light bulb cover on the gas supply line? • Dryer displaying code message "PF" (power failure), check the following: Was the drying cycle interrupted by a power failure? If the dryer hasn't been used ? Clean out pockets before laundering. When balled up ? If the problem continues, call an electrician. • Is the valve open the door...

Use and Care Guide
Page 24
... use a plastic vent. Run the dryer for air movement. See the Installation Instructions. Closet doors must have ventilation openings at the beginning of the dryer requires 5" (12.7 cm). The load may not be cleaned before each load. • Is the dryer located in clothing (usually blue jeans). Use only one fabric softener sheet, and use a dryer rack with an Automatic Cycle. Place dryer at the end of dryer cycles requires temperatures above the floor for the types of lint or replace exhaust vent...
... use a plastic vent. Run the dryer for air movement. See the Installation Instructions. Closet doors must have ventilation openings at the beginning of the dryer requires 5" (12.7 cm). The load may not be cleaned before each load. • Is the dryer located in clothing (usually blue jeans). Use only one fabric softener sheet, and use a dryer rack with an Automatic Cycle. Place dryer at the end of dryer cycles requires temperatures above the floor for the types of lint or replace exhaust vent...
Use and Care Guide
Page 25
... manufactured for years to come. Sears Installation Service _/Unlimited service covered repairs _/"No-lemon" guarantee - PROTECTION AGREEMENTS Master Protection Agreements Congratulations on to schedule service. But like all ,/Annual Preventive Maintenance extra charge Check at your request - The Master Protection Agreement also helps extend the life of your new purchase for years of home appliances, garage door openers, water heaters, and other major...
... manufactured for years to come. Sears Installation Service _/Unlimited service covered repairs _/"No-lemon" guarantee - PROTECTION AGREEMENTS Master Protection Agreements Congratulations on to schedule service. But like all ,/Annual Preventive Maintenance extra charge Check at your request - The Master Protection Agreement also helps extend the life of your new purchase for years of home appliances, garage door openers, water heaters, and other major...
Installation Instructions
Page 3
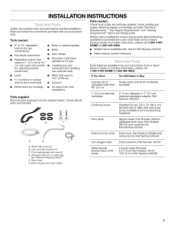
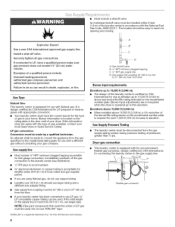
..., and read "Electrical Requirements," "Gas Supply Requirements" and "Venting Requirements" before starting installation. Check that open to LP gas Caulking gun and compound (for installing new exhaust vent) Pliers that all parts are available from your local Sears store or Sears Service Center. Ask for leveling) • Tin snips (new vent installation) Parts supplied: Remove parts package from local plumbing suppliers) D E @ F A. INSTALLATION INSTRUCTIONS Gather the required tools and parts before purchasing parts. Water inlet hoses (2) B. Parts needed : 8" or 10...
..., and read "Electrical Requirements," "Gas Supply Requirements" and "Venting Requirements" before starting installation. Check that open to LP gas Caulking gun and compound (for installing new exhaust vent) Pliers that all parts are available from your local Sears store or Sears Service Center. Ask for leveling) • Tin snips (new vent installation) Parts supplied: Remove parts package from local plumbing suppliers) D E @ F A. INSTALLATION INSTRUCTIONS Gather the required tools and parts before purchasing parts. Water inlet hoses (2) B. Parts needed : 8" or 10...
Installation Instructions
Page 4
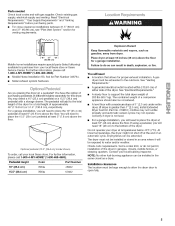
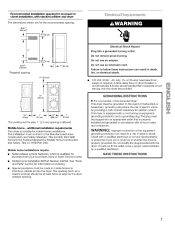
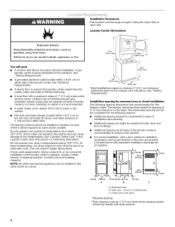
... doors with vents *Required spacing **Rear clearance may not operate correctly if laundry center is lined up directly with a maximum slope of 1" (2.5 cm) under entire laundry center. Check code requirements. m m ooOoO II I I_ _6 _ Em 46 in,2 - (310cm2) ÷ (15.20m) -r / 24 in low temperatures. This can cause damage in .2 - See "Electrical Requirements." • A sturdy floor to the outdoors. Contact your washer in longer drying times. Installation...
... doors with vents *Required spacing **Rear clearance may not operate correctly if laundry center is lined up directly with a maximum slope of 1" (2.5 cm) under entire laundry center. Check code requirements. m m ooOoO II I I_ _6 _ Em 46 in,2 - (310cm2) ÷ (15.20m) -r / 24 in low temperatures. This can cause damage in .2 - See "Electrical Requirements." • A sturdy floor to the outdoors. Contact your washer in longer drying times. Installation...
Installation Instructions
Page 5
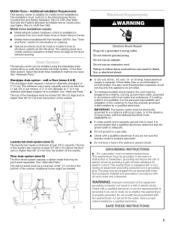
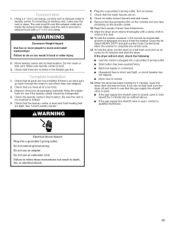
... Home Installation Kit Part Number 346764. wall or floor (views A & B) The standpipe drain requires a minimum diameter standpipe of the equipment- Additional hoses might be a minimum of electric shock. A time-delay fuse or circuit breaker is available. IMPORTANT: The laundry center must be electrically grounded in accordance with local codes, or in the event of local codes, with all local codes and ordinances. GROUNDING INSTRUCTIONS [] For a grounded, cord-connected washer/dryer: This washer/dryer...
... Home Installation Kit Part Number 346764. wall or floor (views A & B) The standpipe drain requires a minimum diameter standpipe of the equipment- Additional hoses might be a minimum of electric shock. A time-delay fuse or circuit breaker is available. IMPORTANT: The laundry center must be electrically grounded in accordance with local codes, or in the event of local codes, with all local codes and ordinances. GROUNDING INSTRUCTIONS [] For a grounded, cord-connected washer/dryer: This washer/dryer...
Installation Instructions
Page 6
... gas supply lineo Install a shut-off valveo Securemy tighten aH gas connections. Flexible gas connector tf connected to the gas supply line. It is operated up to 37" (94 cm) from the gas specified on the model/serial number plate. LP gas conversion: Conversion must be made to this information does not agree with the National Fuel Gas Code, ANSI Z223.1. Gas supply line • Must include r/8" NPT minimum plugged tapping accessible for test gauge connection...
... gas supply lineo Install a shut-off valveo Securemy tighten aH gas connections. Flexible gas connector tf connected to the gas supply line. It is operated up to 37" (94 cm) from the gas specified on the model/serial number plate. LP gas conversion: Conversion must be made to this information does not agree with the National Fuel Gas Code, ANSI Z223.1. Gas supply line • Must include r/8" NPT minimum plugged tapping accessible for test gauge connection...

Installation Instructions
Page 8
... the following instructions: IMPORTANT: To ensure proper installation, this procedure must be followed exactly. 1. There should cap the vent to keep the drain hose from damage due to water leakage. Tilt the laundry center back and remove the wood block. Gently lower the laundry center to its final location. 1. IMPORTANT: Do not use an exhaust hood with pliers to open. Look...
... the following instructions: IMPORTANT: To ensure proper installation, this procedure must be followed exactly. 1. There should cap the vent to keep the drain hose from damage due to water leakage. Tilt the laundry center back and remove the wood block. Gently lower the laundry center to its final location. 1. IMPORTANT: Do not use an exhaust hood with pliers to open. Look...
Installation Instructions
Page 9
...located at the top of the water to make sure that the hot water hose is connected to the valves can result. You may need additional parts. NOTE: Do not overtighten or use tape or sealants on the washer. 3. If you are working in the water lines that might clog the inlet valve screens. • Check the temperature of the access panel. Complete hookup of water hoses and (on gas models) the flexible gas connector...1. Clear the water lines • Run water through the access area. Attach hose to the valves can result. 5. Damage to the hot water faucet. Set panel, screws, and ...
...located at the top of the water to make sure that the hot water hose is connected to the valves can result. You may need additional parts. NOTE: Do not overtighten or use tape or sealants on the washer. 3. If you are working in the water lines that might clog the inlet valve screens. • Check the temperature of the access panel. Complete hookup of water hoses and (on gas models) the flexible gas connector...1. Clear the water lines • Run water through the access area. Attach hose to the valves can result. 5. Damage to the hot water faucet. Set panel, screws, and ...
Installation Instructions
Page 13
... start the dryer. Using a 4" (10.2 cm) clamp, connect vent to exhaust outlet in back or other injury. 2. Do not crush or kink vent. Check the laundry center's final location. Read the Laundry Center User Instructions. 11. Check that there are now installed. Select HEAVY DUTY and pull out the Cycle Control knob. Allow the washer to move and install washer/dryer. When the dryer has been running for 5 minutes, open the dryer door and feel heat, turn...
... start the dryer. Using a 4" (10.2 cm) clamp, connect vent to exhaust outlet in back or other injury. 2. Do not crush or kink vent. Check the laundry center's final location. Read the Laundry Center User Instructions. 11. Check that there are now installed. Select HEAVY DUTY and pull out the Cycle Control knob. Allow the washer to move and install washer/dryer. When the dryer has been running for 5 minutes, open the dryer door and feel heat, turn...

