
Use and Care Guide
Page 2
... you . Sears, Roebuck and Co. TABLE OF CONTENTS WARRANTY 2 DRYER SAFETY 3 INSTALLATION INSTRUCTIONS 4 Tools and Parts 4 Location Requirements 5 Electrical Requirements 6 Gas Supply Requirements 6 Venting Requirements 7 Plan Vent System 8 Install Vent System 9...Dryer Rack 19 DRYER CARE 20 Cleaning the Dryer Location 20 Cleaning the Lint Screen 20 Cleaning the Dryer Interior 20 Removing Accumulated Lint 21 Water Inlet Hoses 21 Vacation, Storage and Moving Care 21 Changing the Drum Light 21 TROUBLESHOOTING 22 PROTECTION AGREEMENTS 23 SERVICE NUMBERS BACK COVER KENMORE ELITE...
... you . Sears, Roebuck and Co. TABLE OF CONTENTS WARRANTY 2 DRYER SAFETY 3 INSTALLATION INSTRUCTIONS 4 Tools and Parts 4 Location Requirements 5 Electrical Requirements 6 Gas Supply Requirements 6 Venting Requirements 7 Plan Vent System 8 Install Vent System 9...Dryer Rack 19 DRYER CARE 20 Cleaning the Dryer Location 20 Cleaning the Lint Screen 20 Cleaning the Dryer Interior 20 Removing Accumulated Lint 21 Water Inlet Hoses 21 Vacation, Storage and Moving Care 21 Changing the Drum Light 21 TROUBLESHOOTING 22 PROTECTION AGREEMENTS 23 SERVICE NUMBERS BACK COVER KENMORE ELITE...
Use and Care Guide
Page 4
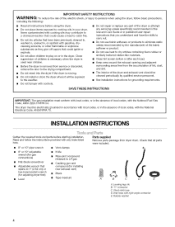
...8226; nPeliewrsexhaust vent) • Tape measure Parts supplied Remove parts package from the accumulation of lint, dust, and dirt. • The interior of the dryer and exhaust vent should be electrically grounded in accordance with the National Fuel Gas Code, ANSI Z223.1/NFPA 54. Leveling ... codes, with right-angle E. Rubber washer connector 4 INSTALLATION INSTRUCTIONS Gather the required tools and parts before using the dryer. • Do not place items exposed to LP gas • Caulking gun and compound (for grounding requirements. Check that • Vent clamps •...
...8226; nPeliewrsexhaust vent) • Tape measure Parts supplied Remove parts package from the accumulation of lint, dust, and dirt. • The interior of the dryer and exhaust vent should be electrically grounded in accordance with the National Fuel Gas Code, ANSI Z223.1/NFPA 54. Leveling ... codes, with right-angle E. Rubber washer connector 4 INSTALLATION INSTRUCTIONS Gather the required tools and parts before using the dryer. • Do not place items exposed to LP gas • Caulking gun and compound (for grounding requirements. Check that • Vent clamps •...
Use and Care Guide
Page 5
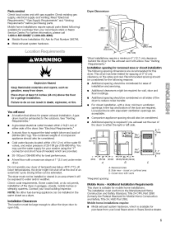
... garages, closets, mobile homes or sleeping quarters. Parts needed ) which is available for ease of the dryer to reduce noise transfer. The combined weight of a companion appliance should also be considered. • Cold water faucets located within 2 ft (61 cm) of 20-100 psi (138-...be exposed to open fully. *Most installations require a minimum 5" (12.7 cm) clearance behind the dryer for Mobile Home Construction and Safety, Title 24, HUD Part 280). See "Venting Requirements." A gas dryer must not be installed or stored in an area where it will need • A location that...
... garages, closets, mobile homes or sleeping quarters. Parts needed ) which is available for ease of the dryer to reduce noise transfer. The combined weight of a companion appliance should also be considered. • Cold water faucets located within 2 ft (61 cm) of 20-100 psi (138-...be exposed to open fully. *Most installations require a minimum 5" (12.7 cm) clearance behind the dryer for Mobile Home Construction and Safety, Title 24, HUD Part 280). See "Venting Requirements." A gas dryer must not be installed or stored in an area where it will need • A location that...

Use and Care Guide
Page 6
...an adapter. GROUNDING INSTRUCTIONS • For a grounded, cord-connected dryer: This dryer must be made by providing a path of least resistance for lengths under 20 ft (6.1 m) if local codes and gas supplier permit. 6 grounding conductor can result in death, fire, or.... Failure to whether the dryer is designcertified by a qualified electrician. This dryer is equipped for Part Number 49572. SAVE THESE INSTRUCTIONS Explosion Hazard Use a new CSA International approved gas supply line. Burner information is acceptable for electric current. Gas Supply Line: • ...
...an adapter. GROUNDING INSTRUCTIONS • For a grounded, cord-connected dryer: This dryer must be made by providing a path of least resistance for lengths under 20 ft (6.1 m) if local codes and gas supplier permit. 6 grounding conductor can result in death, fire, or.... Failure to whether the dryer is designcertified by a qualified electrician. This dryer is equipped for Part Number 49572. SAVE THESE INSTRUCTIONS Explosion Hazard Use a new CSA International approved gas supply line. Burner information is acceptable for electric current. Gas Supply Line: • ...
Use and Care Guide
Page 9
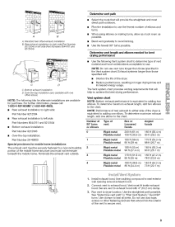
...requirements that will provide the straightest and most direct path outdoors. • Plan the installation to left side (Part Numbers 8544761 and 8212504). Install exhaust hood. Vent must not terminate beneath the mobile home. Use clamps to seal...ft (22.1 m) 1. To determine maximum exhaust length, add two elbows to exhaust hood. To determine maximum exhaust length, add one offset elbow) NOTE: The following Vent system chart to determine type of vent material and hood combinations acceptable to adding one elbow. Secure vent to exhaust hood with one elbow to dryer...
...requirements that will provide the straightest and most direct path outdoors. • Plan the installation to left side (Part Numbers 8544761 and 8212504). Install exhaust hood. Vent must not terminate beneath the mobile home. Use clamps to seal...ft (22.1 m) 1. To determine maximum exhaust length, add two elbows to exhaust hood. To determine maximum exhaust length, add one offset elbow) NOTE: The following Vent system chart to determine type of vent material and hood combinations acceptable to adding one elbow. Secure vent to exhaust hood with one elbow to dryer...
Use and Care Guide
Page 13
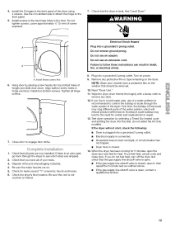
...prong outlet. Install the 2 hinges to see which will not start, check the following: Dryer is an extra part, go back through the water system in death, A_ fire, or electrical shock. When the dryer has been running for leaks around "Y" connector, faucet and hoses. 6. Install screws in ... of screw exposed. 7. 4. Remove any dust. 12. See "Level Dryer." 7f Electrical Shock Hazard A_ Plug into a grounded 3 prong outlet. Check that the gas supply line shutoff valve is open. • If the gas supply line shutoff valve is closed, open it, then repeat the 5-minute...
...prong outlet. Install the 2 hinges to see which will not start, check the following: Dryer is an extra part, go back through the water system in death, A_ fire, or electrical shock. When the dryer has been running for leaks around "Y" connector, faucet and hoses. 6. Install screws in ... of screw exposed. 7. 4. Remove any dust. 12. See "Level Dryer." 7f Electrical Shock Hazard A_ Plug into a grounded 3 prong outlet. Check that the gas supply line shutoff valve is open. • If the gas supply line shutoff valve is closed, open it, then repeat the 5-minute...
Use and Care Guide
Page 16
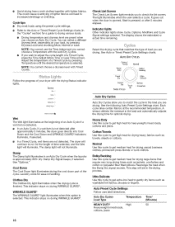
...for drying casual business clothes, permanent press blends or work clothes together with Timed Cycles. You can select a different dryness level, depending on your dryer with the Auto Dry Cycles. Adjust the temperature of a Timed Cycle, press the Time Adjust (More Time or Less Time) arrows. The ...such as washable knit fabrics, blouses or lingerie. Normal Use this cycle to drying various loads. This indicator stays on during the cool down part of time selected, and the Wet light will not illuminate. The light illuminates when the user selects a cycle, it goes out when ...
...for drying casual business clothes, permanent press blends or work clothes together with Timed Cycles. You can select a different dryness level, depending on your dryer with the Auto Dry Cycles. Adjust the temperature of a Timed Cycle, press the Time Adjust (More Time or Less Time) arrows. The ...such as washable knit fabrics, blouses or lingerie. Normal Use this cycle to drying various loads. This indicator stays on during the cool down part of time selected, and the Wet light will not illuminate. The light illuminates when the user selects a cycle, it goes out when ...


