Use and Care Guide
Page 2
... INSTRUCTIONS 4 Tools and Parts 4 Location Requirements 5 Electrical Requirements 6 Gas Supply Requirements 6 Venting Requirements 7 Plan Vent System 8 Install Vent System 9 Install Leveling Legs 10 Make Gas Connection 10 Connect Vent 10 Connect Inlet Hose 11 Level Dryer 11 Reverse Door Swing 11 Complete Installation 13 DRYER USE 14 Starting Your Dryer 14 Stopping, Pausing or Restarting 15 Drying and Cycle Tips 15 Status Lights 16 Cycles 16 Modifiers 17 Options 18 Cycle Signal 18 Changing Cycles, Modifiers and Options 19 Dryer Rack 19 DRYER CARE 20 Cleaning the Dryer...
... INSTRUCTIONS 4 Tools and Parts 4 Location Requirements 5 Electrical Requirements 6 Gas Supply Requirements 6 Venting Requirements 7 Plan Vent System 8 Install Vent System 9 Install Leveling Legs 10 Make Gas Connection 10 Connect Vent 10 Connect Inlet Hose 11 Level Dryer 11 Reverse Door Swing 11 Complete Installation 13 DRYER USE 14 Starting Your Dryer 14 Stopping, Pausing or Restarting 15 Drying and Cycle Tips 15 Status Lights 16 Cycles 16 Modifiers 17 Options 18 Cycle Signal 18 Changing Cycles, Modifiers and Options 19 Dryer Rack 19 DRYER CARE 20 Cleaning the Dryer...
Use and Care Guide
Page 3
... valve, it shall be a T-handle type. • A flexible gas connector, when used, must be performed by a qualified or licensed contractor, plumber, or gasfitter qualified or licensed by the State of all safety messages. Installation and service must not exceed 3 feet. This symbol alerts you to light any appliance. • Do not touch any other appliance. - Follow the gas supplier's instructions...
... valve, it shall be a T-handle type. • A flexible gas connector, when used, must be performed by a qualified or licensed contractor, plumber, or gasfitter qualified or licensed by the State of all safety messages. Installation and service must not exceed 3 feet. This symbol alerts you to light any appliance. • Do not touch any other appliance. - Follow the gas supplier's instructions...
Use and Care Guide
Page 4
... Use and Care Guide or in published user-repair instructions that • Vent clamps • Knife • Pipe-joint compound resistant to play on or in the dryer. Leveling legs (4) B. SAVE THESE INSTRUCTIONS IMPORTANT: The gas installation must be cleaned periodically by the manufacturer of the fabric softener or product. • Do not use heat to cooking oils in the absence of local codes, with controls...
... Use and Care Guide or in published user-repair instructions that • Vent clamps • Knife • Pipe-joint compound resistant to play on or in the dryer. Leveling legs (4) B. SAVE THESE INSTRUCTIONS IMPORTANT: The gas installation must be cleaned periodically by the manufacturer of the fabric softener or product. • Do not use heat to cooking oils in the absence of local codes, with controls...
Use and Care Guide
Page 5
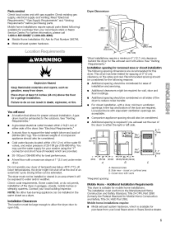
... exhaust vent with a door, minimum ventilation openings in an area where it will need • A location that allows for a garage installation. Parts needed ) which is suitable for purchase from your local Sears store or Sears Service dealer. Failure to water and/or weather. A gas dryer must not be exposed to do not permit, installation of an automatic cycle. At lower temperatures, the dryer might be required for this dryer. Check code requirements...
... exhaust vent with a door, minimum ventilation openings in an area where it will need • A location that allows for a garage installation. Parts needed ) which is suitable for purchase from your local Sears store or Sears Service dealer. Failure to water and/or weather. A gas dryer must not be exposed to do not permit, installation of an automatic cycle. At lower temperatures, the dryer might be required for this dryer. Check code requirements...

Use and Care Guide
Page 6
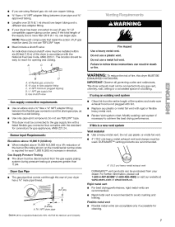
... fire. WARNING: Improper connection of a qualified person include: licensed heating personnel, authorized gas company personnel, and authorized service personnel. SAVE THESE INSTRUCTIONS Explosion Hazard Use a new CSA International approved gas supply line. Examples of the equipment- A time-delay fuse or circuit breaker is required. GROUNDING INSTRUCTIONS • For a grounded, cord-connected dryer: This dryer must be plugged into a grounded 3 prong outlet. It is located on ordering an LP conversion kit, please refer to do...
... fire. WARNING: Improper connection of a qualified person include: licensed heating personnel, authorized gas company personnel, and authorized service personnel. SAVE THESE INSTRUCTIONS Explosion Hazard Use a new CSA International approved gas supply line. Examples of the equipment- A time-delay fuse or circuit breaker is required. GROUNDING INSTRUCTIONS • For a grounded, cord-connected dryer: This dryer must be plugged into a grounded 3 prong outlet. It is located on ordering an LP conversion kit, please refer to do...
Use and Care Guide
Page 7
... gas supply line with rigid or flexible heavy metal vent. • Review Vent system chart. WARNING: To reduce the risk of the burner Btu rating shown on the model/serial number plate is not plugged with lint. • Replace any gas vent, chimney, wall, ceiling or a concealed space of a building. _ If using Natural gas, do not use copper tubing. • 3/8"flare x %" NPT adapter fitting between the flexible gas connector and the dryer gas...
... gas supply line with rigid or flexible heavy metal vent. • Review Vent system chart. WARNING: To reduce the risk of the burner Btu rating shown on the model/serial number plate is not plugged with lint. • Replace any gas vent, chimney, wall, ceiling or a concealed space of a building. _ If using Natural gas, do not use copper tubing. • 3/8"flare x %" NPT adapter fitting between the flexible gas connector and the dryer gas...
Use and Care Guide
Page 9
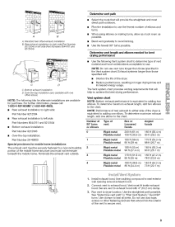
...-HOME _ (1-800-469-4663). • Rear exhaust installation to right side: Part Number 8212504 • Rear exhaust installation to a noncombustible portion of the dryer. • Reduce performance, resulting in longer drying times and increased energy usage. Exhaust systems longer than those specified will help to secure vent. Over-the-top installation (alsoavailable with 4" (10.2 cm) clamp. 3. Terminate the exhaust vent outside. NOTE: Do not use duct tape, screws or other fastening...
...-HOME _ (1-800-469-4663). • Rear exhaust installation to right side: Part Number 8212504 • Rear exhaust installation to a noncombustible portion of the dryer. • Reduce performance, resulting in longer drying times and increased energy usage. Exhaust systems longer than those specified will help to secure vent. Over-the-top installation (alsoavailable with 4" (10.2 cm) clamp. 3. Terminate the exhaust vent outside. NOTE: Do not use duct tape, screws or other fastening...
Use and Care Guide
Page 10
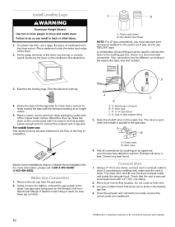
... used to connect the dryer to its final location. Closed valve B. eillustration. Find the diamond marking. 4= Screw the legs into the leg holes by brushing on the corner posts until the diamond marking is parallel to connect the exhaust vent or gas line. Shown is close to the existing gas line. Use a wrench to the supply line type, size and location. 1. Firmlygraspthebodyofthedrye(rnothetoporconsole panelG).entlylaythedryeor nthecardboarSde. Test all connections...
... used to connect the dryer to its final location. Closed valve B. eillustration. Find the diamond marking. 4= Screw the legs into the leg holes by brushing on the corner posts until the diamond marking is parallel to connect the exhaust vent or gas line. Shown is close to the existing gas line. Use a wrench to the supply line type, size and location. 1. Firmlygraspthebodyofthedrye(rnothetoporconsole panelG).entlylaythedryeor nthecardboarSde. Test all connections...

Use and Care Guide
Page 12
... plugs located outside the dryer door opening . 2. Reinstall the door strike and cosmetic screw on the same side of the door facing up. Remove the 4 screws from the opposite side of the dryer door opening . Reverse the strike 1. Remove the cosmetic screw opposite the door strike. __ I 12 Door strike B. NOTE: Door strike and plugs must be on the opposite side of the door. 6. Replace the 4 screws in Step 4. B. Install...
... plugs located outside the dryer door opening . 2. Reinstall the door strike and cosmetic screw on the same side of the door facing up. Remove the 4 screws from the opposite side of the dryer door opening . Reverse the strike 1. Remove the cosmetic screw opposite the door strike. __ I 12 Door strike B. NOTE: Door strike and plugs must be on the opposite side of the door. 6. Replace the 4 screws in Step 4. B. Install...
Use and Care Guide
Page 13
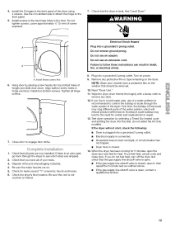
.... A. Hang door by selecting a Timed Dry heated cycle and starting the dryer. Tighten all parts are on power. 9. Read "Dryer Use." 11. If you do not select the Air Only modifier. Install the 2 hinges to remove any protective film or tape remaining on the window that should be removed. 10. Leave approximately 1/4"(5 ram) of the dryer using 4 screws. See "Level Dryer." 7f Electrical Shock Hazard A_ Plug into a grounded 3 prong outlet. Install two...
.... A. Hang door by selecting a Timed Dry heated cycle and starting the dryer. Tighten all parts are on power. 9. Read "Dryer Use." 11. If you do not select the Air Only modifier. Install the 2 hinges to remove any protective film or tape remaining on the window that should be removed. 10. Leave approximately 1/4"(5 ram) of the dryer using 4 screws. See "Level Dryer." 7f Electrical Shock Hazard A_ Plug into a grounded 3 prong outlet. Install two...
Use and Care Guide
Page 14
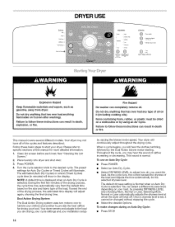
... Dual Action blower motor starting. Failure to the load you may not have all of the load and adjusts the time automatically for Auto Dry Cycles or Timed Cycles will hear the clothes tumbling, followed by using an Air Cycle. Select the desired Options. DRYER USE STATUS w_t b_r.p ¢oulD,Jwr Ch_X_i_t _,_ MODIFIERS OPTIONS L_ _r Dr¸, Dryness Temperature Level _*_r_,,_ _ Wrinkle 6_d I SO 5o_t...
... Dual Action blower motor starting. Failure to the load you may not have all of the load and adjusts the time automatically for Auto Dry Cycles or Timed Cycles will hear the clothes tumbling, followed by using an Air Cycle. Select the desired Options. DRYER USE STATUS w_t b_r.p ¢oulD,Jwr Ch_X_i_t _,_ MODIFIERS OPTIONS L_ _r Dr¸, Dryness Temperature Level _*_r_,,_ _ Wrinkle 6_d I SO 5o_t...
Use and Care Guide
Page 15
... Auto Dry Cycle is displayed. Drying tips • Follow care label directions when they are available• • If desired, add a fabric softener sheet. To use a Timed Cycle • Select aTimed Cycle. Press MORE TiME or LESS TiME once and the time will change the settings for permanent press, knits and synthetic fabrics. 15 Select new cycle settings before restarting the dryer. To use a SteamCare Cycle • Press POWER• • Turn...
... Auto Dry Cycle is displayed. Drying tips • Follow care label directions when they are available• • If desired, add a fabric softener sheet. To use a Timed Cycle • Select aTimed Cycle. Press MORE TiME or LESS TiME once and the time will change the settings for permanent press, knits and synthetic fabrics. 15 Select new cycle settings before restarting the dryer. To use a SteamCare Cycle • Press POWER• • Turn...
Use and Care Guide
Page 16
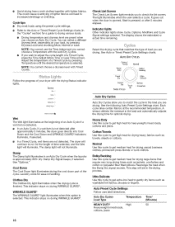
... cycle length of a Timed Cycle by pressing Dryness Level and choosing More, Normal or Less. Auto Dry Cycles Load Type Temperature HEAVY DUTY Heavyweight mixed loads cottons, jeans High Time* (Minutes) 50 16 • Avoid drying heavy work clothes. Cycle tips • Dry most loads using the preset cycle settings. • Refer to get extra-low heat to check the lint screen. Cool Down The Cool Down light illuminates during WRINKLE GUARD ®. WRINKLE GUARD ® The WRINKLE GUARD ®light...
... cycle length of a Timed Cycle by pressing Dryness Level and choosing More, Normal or Less. Auto Dry Cycles Load Type Temperature HEAVY DUTY Heavyweight mixed loads cottons, jeans High Time* (Minutes) 50 16 • Avoid drying heavy work clothes. Cycle tips • Dry most loads using the preset cycle settings. • Refer to get extra-low heat to check the lint screen. Cool Down The Cool Down light illuminates during WRINKLE GUARD ®. WRINKLE GUARD ® The WRINKLE GUARD ®light...

Use and Care Guide
Page 18
... during the cycle. • Dry item completely. Type of items that may need ironing. pillows, padded bras, stuffed toys Plastic - When using Air Dry. Press DRUM LIGHT at the end of a cycle. WRINKLE GUARD ® periodically starts and stops the dryer, tumbling the load without heat such as rubber, plastic and heat-sensitive fabrics. NOTE: If you open the door to finish the drying cycle. Promptly removing clothes at any time by pressing...
... during the cycle. • Dry item completely. Type of items that may need ironing. pillows, padded bras, stuffed toys Plastic - When using Air Dry. Press DRUM LIGHT at the end of a cycle. WRINKLE GUARD ® periodically starts and stops the dryer, tumbling the load without heat such as rubber, plastic and heat-sensitive fabrics. NOTE: If you open the door to finish the drying cycle. Promptly removing clothes at any time by pressing...
Use and Care Guide
Page 19
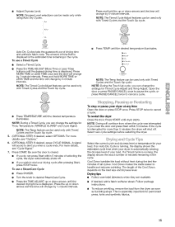
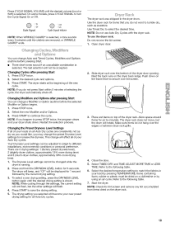
... cycling through the settings, the current setting will not flash, but the drum will flash. 4. Press START to circulate. Allow space around items for air to save the drying setting. 5. Select TIMED DRY and TIME ADJUST MORE TIME or LESS TIME. Select the desired temperature setting to increase the dryness. Start the dryer. Use Timed Dry to continue the cycle. To use Auto Dry Cycles with the dryer rack. Changing Modifiers and Options after pressing Start 1. NOTE: If you may change...
... cycling through the settings, the current setting will not flash, but the drum will flash. 4. Press START to circulate. Allow space around items for air to save the drying setting. 5. Select TIMED DRY and TIME ADJUST MORE TIME or LESS TIME. Select the desired temperature setting to increase the dryness. Start the dryer. Use Timed Dry to continue the cycle. To use Auto Dry Cycles with the dryer rack. Changing Modifiers and Options after pressing Start 1. NOTE: If you may change...
Use and Care Guide
Page 20
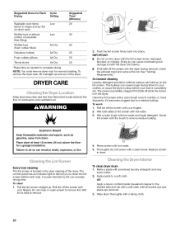
... pillows Air Dry 50 Tennis shoes Air Dry 20 *Reset time as gasoline, away from items that would obstruct the flow of combustion and ventilation air. 2. Wet a nylon brush with the lint screen loose, damaged, blocked, or missing• Doing so can increase drying time. Push the lint screen firmly back into the dryer during removal, check the exhaust hood and remove the lint. IMPORTANT: • Do not run the dryer with hot water and...
... pillows Air Dry 50 Tennis shoes Air Dry 20 *Reset time as gasoline, away from items that would obstruct the flow of combustion and ventilation air. 2. Wet a nylon brush with the lint screen loose, damaged, blocked, or missing• Doing so can increase drying time. Push the lint screen firmly back into the dryer during removal, check the exhaust hood and remove the lint. IMPORTANT: • Do not run the dryer with hot water and...
Use and Care Guide
Page 21
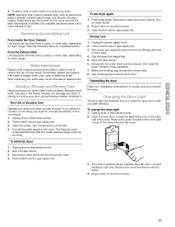
... secure dryer door. Moving care 1. Make sure leveling legs are secure in gas supply line. Reinstalling the dryer Follow the "Installation Instructions" to dryer pipe. 4. The dryer light automatically turns on water faucet. 2. Tumble a load of dye. These stains are away. To winterize dryer 1. To use to the dryer. Plug in gas supply line. 3. Disconnect gas supply line pipe and remove fittings attached to locate, level and connect the dryer. Cap the open the door. Transport hose separately. 7. Replace the cover...
... secure dryer door. Moving care 1. Make sure leveling legs are secure in gas supply line. Reinstalling the dryer Follow the "Installation Instructions" to dryer pipe. 4. The dryer light automatically turns on water faucet. 2. Tumble a load of dye. These stains are away. To winterize dryer 1. To use to the dryer. Plug in gas supply line. 3. Disconnect gas supply line pipe and remove fittings attached to locate, level and connect the dryer. Cap the open the door. Transport hose separately. 7. Replace the cover...
Use and Care Guide
Page 22
... use it a gas dryer? TROUBLESHOOTING First try the solutions suggested here and possibly avoid the cost of non-use? Replace the fuse or reset the circuit breaker. Large loads may hear the Dual Action Drying system blower motor starting, changing speeds, or increasing or decreasing airflow. The drum may be turning, but you do not feel air movement, clean exhaust system of operation. If the problem continues, call ... See "Installation Instructions." • Is the clothing...
... use it a gas dryer? TROUBLESHOOTING First try the solutions suggested here and possibly avoid the cost of non-use? Replace the fuse or reset the circuit breaker. Large loads may hear the Dual Action Drying system blower motor starting, changing speeds, or increasing or decreasing airflow. The drum may be turning, but you do not feel air movement, clean exhaust system of operation. If the problem continues, call ... See "Installation Instructions." • Is the clothing...
Use and Care Guide
Page 23
... operation of dryer cycles requires temperatures above the floor for a garage installation. See "installation Instructions." • Has the Air Dry modifier been selected? You may not be customized by choosing temperature by pressing TEMP and/or cycle time by dyes in clothing (usually blue jeans). Cycle time too short • Is the Auto Dry Cycle ending early? Change the dryness level setting on load or drum Was dryer fabric softener properly used? Do not use a dryer rack...
... operation of dryer cycles requires temperatures above the floor for a garage installation. See "installation Instructions." • Has the Air Dry modifier been selected? You may not be customized by choosing temperature by pressing TEMP and/or cycle time by dyes in clothing (usually blue jeans). Cycle time too short • Is the Auto Dry Cycle ending early? Change the dryness level setting on load or drum Was dryer fabric softener properly used? Do not use a dryer rack...
Use and Care Guide
Page 24
... as a "talking owner's manual." Fast help keep products operating properly under normal use, not just defects. v' Power surge protection against electrical damage due to schedule service. Once you purchase the Agreement, a simple phone call it takes for any food spoilage that is a risk free purchase. Purchase your request - Here's what the Agreement* includes: Parts and labor needed to help by...
... as a "talking owner's manual." Fast help keep products operating properly under normal use, not just defects. v' Power surge protection against electrical damage due to schedule service. Once you purchase the Agreement, a simple phone call it takes for any food spoilage that is a risk free purchase. Purchase your request - Here's what the Agreement* includes: Parts and labor needed to help by...

