Use and Care Guide
Page 2
...Location Requirements 5 Electrical Requirements 6 Electrical Connection 8 Venting Requirements 13 Plan Vent System 14 Install Vent System 15 Install Leveling Legs 15 Connect Vent 15 Connect Inlet Hose 16 Level Dryer 16 Reverse Door Swing 17 Complete Installation 18 DRYER USE 19 Starting Your Dryer 19 Stopping, ... 23 Options 23 Cycle Signal 23 Changing Cycles, Modifiers and Options 24 Dryer Rack 24 DRYER CARE 25 Cleaning the Dryer Location 25 Cleaning the Lint Screen 25 Cleaning the Dryer Interior 25 Removing Accumulated Lint 26 Water Inlet Hoses 26 Vacation, Storage...
...Location Requirements 5 Electrical Requirements 6 Electrical Connection 8 Venting Requirements 13 Plan Vent System 14 Install Vent System 15 Install Leveling Legs 15 Connect Vent 15 Connect Inlet Hose 16 Level Dryer 16 Reverse Door Swing 17 Complete Installation 18 DRYER USE 19 Starting Your Dryer 19 Stopping, ... 23 Options 23 Cycle Signal 23 Changing Cycles, Modifiers and Options 24 Dryer Rack 24 DRYER CARE 25 Cleaning the Dryer Location 25 Cleaning the Lint Screen 25 Cleaning the Dryer Interior 25 Removing Accumulated Lint 26 Water Inlet Hoses 26 Vacation, Storage...
Use and Care Guide
Page 4
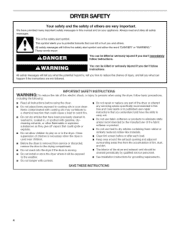
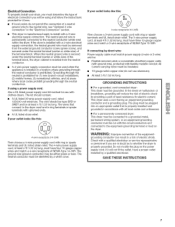
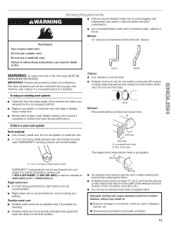
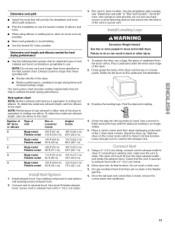
...or product. [] Do not use heat to dry articles containing foam rubber or similarly textured rubber-like materials. [] Clean lint screen before using the dryer, follow the safety alert symbol and either the word "DANGER" or "WARNING." You can kill or hurt you don't follow instructions. SAVE THESE .... These words mean: You can happen if the instructions are very important. IMPORTANT SAFETY INSTRUCTIONS WARNING: To reduce the risk of fire, electric shock, or injury to persons when using the dryer. [] Do not place items exposed to the drying compartment. [] Do not reach into the...
...or product. [] Do not use heat to dry articles containing foam rubber or similarly textured rubber-like materials. [] Clean lint screen before using the dryer, follow the safety alert symbol and either the word "DANGER" or "WARNING." You can kill or hurt you don't follow instructions. SAVE THESE .... These words mean: You can happen if the instructions are very important. IMPORTANT SAFETY INSTRUCTIONS WARNING: To reduce the risk of fire, electric shock, or injury to persons when using the dryer. [] Do not place items exposed to the drying compartment. [] Do not reach into the...
Use and Care Guide
Page 5
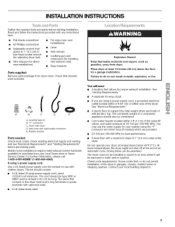
... Sears store or Sears Service Center. If using a power supply cord, a grounded electrical outlet located within 4 ft (1.2 m) of the water fill valves, and water pressure of the dryer in ring terminals or spade terminals with a maximum slope of 1" (2.5 cm) under entire dryer. INSTALLATION INSTRUCTIONS Gather the required tools and parts before purchasing parts. Leveling...
... Sears store or Sears Service Center. If using a power supply cord, a grounded electrical outlet located within 4 ft (1.2 m) of the water fill valves, and water pressure of the dryer in ring terminals or spade terminals with a maximum slope of 1" (2.5 cm) under entire dryer. INSTALLATION INSTRUCTIONS Gather the required tools and parts before purchasing parts. Leveling...
Use and Care Guide
Page 6
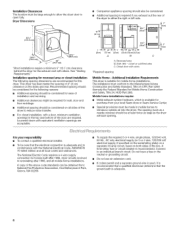
...The installation must conform to introduce outside air into the dryer. To supply the required 3 or 4 wire, single phase, 120/240 volt, 60 Hz., AC only electrical supply (or 3 or 4 wire, 120/208 volt electrical supply, if specified on the serial/rating plate) ...that a qualified electrician determine that the electrical connection is recommended. Dryer Dimensions • Companion appliance spacing should be obtained from your responsibility • To contact a qualified electrical installer. • To be considered for ease of the dryer to an individual branch circuit. A time...
...The installation must conform to introduce outside air into the dryer. To supply the required 3 or 4 wire, single phase, 120/240 volt, 60 Hz., AC only electrical supply (or 3 or 4 wire, 120/208 volt electrical supply, if specified on the serial/rating plate) ...that a qualified electrician determine that the electrical connection is recommended. Dryer Dimensions • Companion appliance spacing should be obtained from your responsibility • To contact a qualified electrical installer. • To be considered for ease of the dryer to an individual branch circuit. A time...
Use and Care Guide
Page 7
... supply connection must be at least 4 ft (1.22 m) long. GROUNDING INSTRUCTIONS [] For a grounded, cord-connected dryer: This dryer must be insulated. [] 10-gauge solid copper wire (do not permit the connection of a neutral ground wire to the dryer must end in ring terminals or spade terminals with a 3-wire electrical supply connection. All current-carrying wires...
... supply connection must be at least 4 ft (1.22 m) long. GROUNDING INSTRUCTIONS [] For a grounded, cord-connected dryer: This dryer must be insulated. [] 10-gauge solid copper wire (do not permit the connection of a neutral ground wire to the dryer must end in ring terminals or spade terminals with a 3-wire electrical supply connection. All current-carrying wires...
Use and Care Guide
Page 9
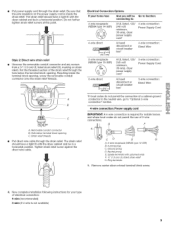
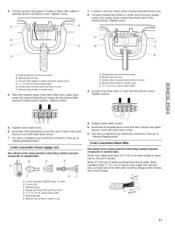
...Be sure that the wire insulation on strain relief). The strain relief should have a tight fit with the dryer cabinet and be in a horizontal position. Put the threaded section of electrical connection: 4-wire (recommended) 3-wire (if 4-wire is required for your home has: And you will ...be in a horizontal position. Strain relief threads Put direct wire cable through the strain relief. Ground prong D. Spade terminals with the dryer cabinet and be Go ...
...Be sure that the wire insulation on strain relief). The strain relief should have a tight fit with the dryer cabinet and be in a horizontal position. Put the threaded section of electrical connection: 4-wire (recommended) 3-wire (if 4-wire is required for your home has: And you will ...be in a horizontal position. Strain relief threads Put direct wire cable through the strain relief. Ground prong D. Spade terminals with the dryer cabinet and be Go ...
Use and Care Guide
Page 10
Tighten strain relief screws. 6. Direct wire cable must have completed your electrical connection. Shape ends of extra length so dryer can be moved if needed. Dotted line shows position of the terminal block (hook facing right), squeeze hooked end together and tighten screw, ...together. Neutral ground wire C. Strip insulation back 1" (2.5 cm). Dotted line shows position of power supply cord under the center screw of dryer rear panel. You have 5 ft (1.52 m) of wires into slot of the terminal block. Connect neutral ground wire and the neutral wire (white or center wire) of...
Tighten strain relief screws. 6. Direct wire cable must have completed your electrical connection. Shape ends of extra length so dryer can be moved if needed. Dotted line shows position of the terminal block (hook facing right), squeeze hooked end together and tighten screw, ...together. Neutral ground wire C. Strip insulation back 1" (2.5 cm). Dotted line shows position of power supply cord under the center screw of dryer rear panel. You have 5 ft (1.52 m) of wires into slot of the terminal block. Connect neutral ground wire and the neutral wire (white or center wire) of...
Use and Care Guide
Page 11
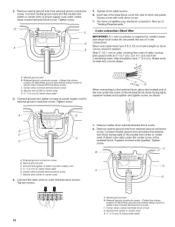
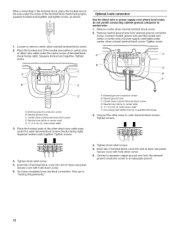
...conductor to neutral wire. Connect ground wire (green or bare) of dryer rear panel. Squeeze hooked ends together. Neutral ground wire C. Tighten screws. !! !! 5. You have completed your electrical connection. You have 5 ft (1.52 m) of the terminal block. Place the hooked ends of the... other wires to the center, silver-colored terminal screw of extra length so dryer can be moved if needed. A. Neutral wire (white or ...
...conductor to neutral wire. Connect ground wire (green or bare) of dryer rear panel. Squeeze hooked ends together. Neutral ground wire C. Tighten screws. !! !! 5. You have completed your electrical connection. You have 5 ft (1.52 m) of the terminal block. Place the hooked ends of the... other wires to the center, silver-colored terminal screw of extra length so dryer can be moved if needed. A. Neutral wire (white or ...
Use and Care Guide
Page 12
...conductor to "Venting Requirements." = A. Remove center silver-colored terminal block screw. 2. Neutral ground wire C. Squeeze hooked ends together. You have completed your electrical connection. Tighten screws. !! !! 4. Tighten screw. Neutral wire (white or center wire) E. _" (1.9 cm) UL Iisted strain relief 3= Place the... Place the hooked end of the neutral wire (white or center wire) of direct wire cable under the center screw of dryer rear panel. Squeeze hooked end together. Tighten strain relief screw. 5. Now go to neutral wire. 1. When connecting to ...
...conductor to "Venting Requirements." = A. Remove center silver-colored terminal block screw. 2. Neutral ground wire C. Squeeze hooked ends together. You have completed your electrical connection. Tighten screws. !! !! 4. Tighten screw. Neutral wire (white or center wire) E. _" (1.9 cm) UL Iisted strain relief 3= Place the... Place the hooked end of the neutral wire (white or center wire) of direct wire cable under the center screw of dryer rear panel. Squeeze hooked end together. Tighten strain relief screw. 5. Now go to neutral wire. 1. When connecting to ...
Use and Care Guide
Page 13
...a plastic vent. DURASAFE TM venting products are acceptable only if accessible for cleaning. • Flexible metal vent must be fully extended and supported when the dryer is in the path of fire, this is a new vent system Vent material • Use a heavy metal vent. B (10.2 cm) A. ... • Exhaust vent must not be connected or secured with rigid or flexible heavy metal vent. • Review Vent system chart. If this dryer MUST BE EXHAUSTED OUTDOORS. Box hood style The angled hood style (shown here) is not plugged with a magnetic latch. WARNING: To reduce the...
...a plastic vent. DURASAFE TM venting products are acceptable only if accessible for cleaning. • Flexible metal vent must be fully extended and supported when the dryer is in the path of fire, this is a new vent system Vent material • Use a heavy metal vent. B (10.2 cm) A. ... • Exhaust vent must not be connected or secured with rigid or flexible heavy metal vent. • Review Vent system chart. If this dryer MUST BE EXHAUSTED OUTDOORS. Box hood style The angled hood style (shown here) is not plugged with a magnetic latch. WARNING: To reduce the...
Use and Care Guide
Page 14
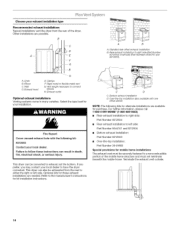
...left side (Part Numbers 8544761 and 8212504). This dryer can result in many varieties. Optional kits for kit installation instructions. Dryer B. Exhaust outlet Optional exhaust installations Venting systems come in death, fire, electrical shock, or serious injury. C c. Choose ...your local dealer to have the dryer converted. Clamps E Rigid metal or flexible metal...
...left side (Part Numbers 8544761 and 8212504). This dryer can result in many varieties. Optional kits for kit installation instructions. Dryer B. Exhaust outlet Optional exhaust installations Venting systems come in death, fire, electrical shock, or serious injury. C c. Choose ...your local dealer to have the dryer converted. Clamps E Rigid metal or flexible metal...
Use and Care Guide
Page 15
... dryer. To protect the floor, use . Firmly grasp the body of vent Box or Louvered hoods Angled hoods 0 Rigid metal 200 ft (61 m) 185 ft (56.4 m) Flexible metal 100 ft (30.5 m) 93 ft (28.2 m) 1 Rigid metal 190 ft (58 m) 175 ft (53.3 m) Flexible metal 95 ft (29 m) 88 ft (26.7 m) 2 Rigid metal 180 ft (55 m) 165 ft (50.3 m) Flexible metal 90 ft...
... dryer. To protect the floor, use . Firmly grasp the body of vent Box or Louvered hoods Angled hoods 0 Rigid metal 200 ft (61 m) 185 ft (56.4 m) Flexible metal 100 ft (30.5 m) 93 ft (28.2 m) 1 Rigid metal 190 ft (58 m) 175 ft (53.3 m) Flexible metal 95 ft (29 m) 88 ft (26.7 m) 2 Rigid metal 180 ft (55 m) 165 ft (50.3 m) Flexible metal 90 ft...
Use and Care Guide
Page 16
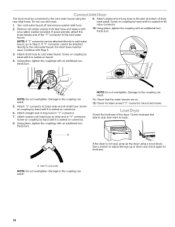
... Screw on coupling by hand until it is seated on fill valve connector. 10. NOTE: Do not overtighten. Damage to adjust the legs up the dryer using the new inlet hoses. NOTE: Do not overtighten. Check that the water faucets are on connector. 6. Use a wrench to the coupling can result... of long hose to fill valve at bottom of long hose to "Y" connector. 7. NOTE: If "Y" connector can result. 11. Attach angled end of dryer back panel. Damage to the coupling can be attached directly to cold water faucet, go to the coupling can result. 5. Check levelness first side to...
... Screw on coupling by hand until it is seated on fill valve connector. 10. NOTE: Do not overtighten. Damage to adjust the legs up the dryer using the new inlet hoses. NOTE: Do not overtighten. Check that the water faucets are on connector. 6. Use a wrench to the coupling can result... of long hose to fill valve at bottom of long hose to "Y" connector. 7. NOTE: If "Y" connector can result. 11. Attach angled end of dryer back panel. Damage to the coupling can be attached directly to cold water faucet, go to the coupling can result. 5. Check levelness first side to...
Use and Care Guide
Page 17
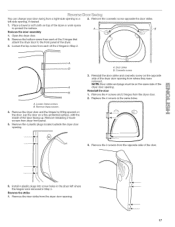
...the same side of the door facing up. A. NOTE: Door strike and plugs must be on a flat, protected surface, with the inside of the dryer door opening. Replace the 4 screws in the same holes. Remove the 4 screws from the opposite side of the 2 hinges in Step 2. 2. ... the hinges by lifting upward on the opposite side of the dryer. 3. J 3. Reverse the strike 1. Remove remaining 2 loose screws from the dryer door. 2. Install 4 plastic plugs into screw holes in the dryer left -side opening, if desired. 1. Open the dryer door. 2. Loosen the top screw from each of the 2...
...the same side of the door facing up. A. NOTE: Door strike and plugs must be on a flat, protected surface, with the inside of the dryer door opening. Replace the 4 screws in the same holes. Remove the 4 screws from the opposite side of the 2 hinges in Step 2. 2. ... the hinges by lifting upward on the opposite side of the dryer. 3. J 3. Reverse the strike 1. Remove remaining 2 loose screws from the dryer door. 2. Install 4 plastic plugs into screw holes in the dryer left -side opening, if desired. 1. Open the dryer door. 2. Loosen the top screw from each of the 2...
Use and Care Guide
Page 18
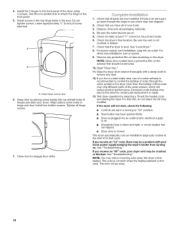
...Check that you receive an "L2" code, there may be crushed or blocked. For power supply cord installation, plug into an outlet and/or electrical supply is level. This odor is common when the heating element is not crushed or kinked. 7. Excessive scale buildup may notice a burning odor ... vent is first used. NOTE: Glass door models have all parts are now installed. If you receive an "AF" code, your tools. 3. This dryer automatically runs an installation diagnostic routine at the start , check the following: • Controls are on power. 9. NOTE: You may lead to remove ...
...Check that you receive an "L2" code, there may be crushed or blocked. For power supply cord installation, plug into an outlet and/or electrical supply is level. This odor is common when the heating element is not crushed or kinked. 7. Excessive scale buildup may notice a burning odor ... vent is first used. NOTE: Glass door models have all parts are now installed. If you receive an "AF" code, your tools. 3. This dryer automatically runs an installation diagnostic routine at the start , check the following: • Controls are on power. 9. NOTE: You may lead to remove ...

Use and Care Guide
Page 19
...death, explosion, or fire. WARNING: To reduce the risk of fire, electric shock, or injury to the load you may not have all of the drying process, the cycle time may automatically vary from dryer. Clean lint screen before operating this manual for drying your installation setup ... and vapors, such as gasoline, away from the default time based on a clothesline or by the Dual Action blower motor starting. Your dryer will illuminate. The preset settings for the selected dryness level. Once a dryness level is selected. Failure to specific sections of airflow increasing or...
...death, explosion, or fire. WARNING: To reduce the risk of fire, electric shock, or injury to the load you may not have all of the drying process, the cycle time may automatically vary from dryer. Clean lint screen before operating this manual for drying your installation setup ... and vapors, such as gasoline, away from the default time based on a clothesline or by the Dual Action blower motor starting. Your dryer will illuminate. The preset settings for the selected dryness level. Once a dryness level is selected. Failure to specific sections of airflow increasing or...
Use and Care Guide
Page 20
...POWER. Press the TIME ADJUST up or down arrows until the desired drying time is running , the display shows the estimated cycle time when your dryer is the estimated time remaining in the "Cycles" section) for more details, see "Cycle Signal." 7, Press START. NOTE: During the Touch Up.... This could cause overdrying of the Cool Down depends on the load size and dryness level. Select new cycle settings before restarting the dryer. Select the correct cycle and dryness level or temperature for Timed Cycle Adjust and Temp Adjust. This is displayed. Press and hold the...
...POWER. Press the TIME ADJUST up or down arrows until the desired drying time is running , the display shows the estimated cycle time when your dryer is the estimated time remaining in the "Cycles" section) for more details, see "Cycle Signal." 7, Press START. NOTE: During the Touch Up.... This could cause overdrying of the Cool Down depends on the load size and dryness level. Select new cycle settings before restarting the dryer. Select the correct cycle and dryness level or temperature for Timed Cycle Adjust and Temp Adjust. This is displayed. Press and hold the...
Use and Care Guide
Page 21
... on during the cool down part of your load, by pressing Temperature until the desired temperature is pressed, or after approximately 5 minutes, the dryer goes directly into Cool Down and the Cool Down and WRINKLE GUARD®indicators illuminate, if selected. • In a Timed Cycle, wet ...an Auto Dry Cycle when the laundry is not detected after 5 minutes elapses. You can select a different dryness level, depending on your dryer with the drying Status indicator lights. Laundry cools for drying casual business clothes, permanent press blends or work clothes. Each cycle dries certain ...
... on during the cool down part of your load, by pressing Temperature until the desired temperature is pressed, or after approximately 5 minutes, the dryer goes directly into Cool Down and the Cool Down and WRINKLE GUARD®indicators illuminate, if selected. • In a Timed Cycle, wet ...an Auto Dry Cycle when the laundry is not detected after 5 minutes elapses. You can select a different dryness level, depending on your dryer with the drying Status indicator lights. Laundry cools for drying casual business clothes, permanent press blends or work clothes. Each cycle dries certain ...

Use and Care Guide
Page 22
...Cycles Use SteamCare Cycles to smooth out wrinkles and reduce odors from the previous cycle. 22 Refresh This cycle is sprayed into the dryer drum after several minutes of tumbling with steam cycles as it may also be dried using Timed Dry on fabric. 100% cotton garments... Medium 60 Jackets, comforters, cotton or polyester fiber filled pillows ULTRA DELICATE Extra-Low 25 Washable knits, blouses, lingerie *Estimated Time with the dryer rack. When a SteamCare Cycle is best for this cycle, a small amount of water is also useful for an extended period. NOTE: Results...
...Cycles Use SteamCare Cycles to smooth out wrinkles and reduce odors from the previous cycle. 22 Refresh This cycle is sprayed into the dryer drum after several minutes of tumbling with steam cycles as it may also be dried using Timed Dry on fabric. 100% cotton garments... Medium 60 Jackets, comforters, cotton or polyester fiber filled pillows ULTRA DELICATE Extra-Low 25 Washable knits, blouses, lingerie *Estimated Time with the dryer rack. When a SteamCare Cycle is best for this cycle, a small amount of water is also useful for an extended period. NOTE: Results...

Use and Care Guide
Page 23
... _ (30, 60, 90, 150 minutes) WRINKLE GUARD ®helps keep wrinkles from forming when you open the door to stop the dryer, rearrange the load inside the dryer drum. You can be on until the desired volume (Loud or Soft) is selected. Cycle Signal The Cycle Signal produces an audible sound...Dry is available only with Auto Dry Cycles. NOTE: The Damp Dry Signal is not available with the Auto Dry Cycles. During this option, the dryer stops tumbling and then tumbles again for items that coverings are slow to get heat-free, periodic tumbling at any time to finish the drying...
... _ (30, 60, 90, 150 minutes) WRINKLE GUARD ®helps keep wrinkles from forming when you open the door to stop the dryer, rearrange the load inside the dryer drum. You can be on until the desired volume (Loud or Soft) is selected. Cycle Signal The Cycle Signal produces an audible sound...Dry is available only with Auto Dry Cycles. NOTE: The Damp Dry Signal is not available with the Auto Dry Cycles. During this option, the dryer stops tumbling and then tumbles again for items that coverings are slow to get heat-free, periodic tumbling at any time to finish the drying...


