Use and Care Guide
Page 2
...Location Requirements 5 Electrical Requirements 6 Electrical Connection 8 Venting Requirements 13 Plan Vent System 14 Install Vent System 15 Install Leveling Legs 15 Connect Vent 15 Connect Inlet Hose 16 Level Dryer 16 Reverse Door Swing 17 Complete Installation 18 DRYER USE 19 Starting Your Dryer 19 Stopping, ... 23 Options 23 Cycle Signal 23 Changing Cycles, Modifiers and Options 24 Dryer Rack 24 DRYER CARE 25 Cleaning the Dryer Location 25 Cleaning the Lint Screen 25 Cleaning the Dryer Interior 25 Removing Accumulated Lint 26 Water Inlet Hoses 26 Vacation, Storage...
...Location Requirements 5 Electrical Requirements 6 Electrical Connection 8 Venting Requirements 13 Plan Vent System 14 Install Vent System 15 Install Leveling Legs 15 Connect Vent 15 Connect Inlet Hose 16 Level Dryer 16 Reverse Door Swing 17 Complete Installation 18 DRYER USE 19 Starting Your Dryer 19 Stopping, ... 23 Options 23 Cycle Signal 23 Changing Cycles, Modifiers and Options 24 Dryer Rack 24 DRYER CARE 25 Cleaning the Dryer Location 25 Cleaning the Lint Screen 25 Cleaning the Dryer Interior 25 Removing Accumulated Lint 26 Water Inlet Hoses 26 Vacation, Storage...
Use and Care Guide
Page 4
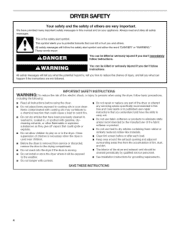
...that you understand and have provided many important safety messages in this Use and Care Guide or in the dryer. IMPORTANT SAFETY INSTRUCTIONS WARNING: To reduce the risk of fire, electric shock, or injury to reduce the chance of injury, and tell you don't immediately follow instructions. This... is , tell you how to persons when using the dryer, follow the safety alert symbol and either the word "DANGER" or "WARNING." DRYER SAFETY Your safety and...
...that you understand and have provided many important safety messages in this Use and Care Guide or in the dryer. IMPORTANT SAFETY INSTRUCTIONS WARNING: To reduce the risk of fire, electric shock, or injury to reduce the chance of injury, and tell you don't immediately follow instructions. This... is , tell you how to persons when using the dryer, follow the safety alert symbol and either the word "DANGER" or "WARNING." DRYER SAFETY Your safety and...
Use and Care Guide
Page 5
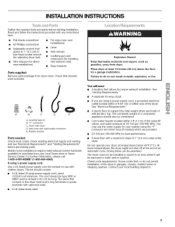
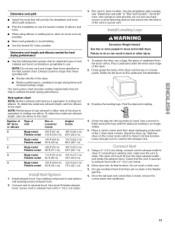
... exhaust vent) • Tape measure Parts supplied: Remove parts package from dryer drum. You may use with clothes dryers. The wires that opens to water and/or weather. "Y" connector C. See "Electrical Requirements." • A sturdy floor to do not permit, installation of ...all parts were included. 1 A B C D A. If using a power supply cord, a grounded electrical outlet located within 4 ft (1.2 m) of the water fill valves, and water pressure of the dryer in ring terminals or spade terminals with a maximum slope of an automatic cycle. Explosion Hazard Keep flammable ...
... exhaust vent) • Tape measure Parts supplied: Remove parts package from dryer drum. You may use with clothes dryers. The wires that opens to water and/or weather. "Y" connector C. See "Electrical Requirements." • A sturdy floor to do not permit, installation of ...all parts were included. 1 A B C D A. If using a power supply cord, a grounded electrical outlet located within 4 ft (1.2 m) of the water fill valves, and water pressure of the dryer in ring terminals or spade terminals with a maximum slope of an automatic cycle. Explosion Hazard Keep flammable ...
Use and Care Guide
Page 6
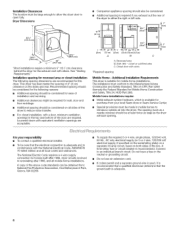
... circuit. Do not have a fuse in mobile homes to introduce outside air into the dryer. Additional Installation Requirements This dryer is adequate and in conformance with the National Electrical Code, ANSl/NFPA 70-latest edition and all local codes and ordinances. Recommended spacing should... be large enough to allow the dryer door to open fully. The National Electric Code requires a 4-wire supply connection for homes built after 1996, dryer circuits involved in the top and bottom of installation and servicing. If codes...
... circuit. Do not have a fuse in mobile homes to introduce outside air into the dryer. Additional Installation Requirements This dryer is adequate and in conformance with the National Electrical Code, ANSl/NFPA 70-latest edition and all local codes and ordinances. Recommended spacing should... be large enough to allow the dryer door to open fully. The National Electric Code requires a 4-wire supply connection for homes built after 1996, dryer circuits involved in the top and bottom of installation and servicing. If codes...
Use and Care Guide
Page 7
...dryer. Grounding through the neutral is prohibited for it will reduce the risk of electric shock by a qualified electrician. The neutral conductor must be used when the appliance is installed in a location where grounding through the neutral conductors. The 3-wire power supply cord, at least 4 ft... power supply cord kit marked for electric current. Check with a 3-wire electrical supply connection. Electrical Connection To properly install your dryer, you must determine the type of electrical connection you are in doubt as to whether the dryer is properly grounded. The cord should...
...dryer. Grounding through the neutral is prohibited for it will reduce the risk of electric shock by a qualified electrician. The neutral conductor must be used when the appliance is installed in a location where grounding through the neutral conductors. The 3-wire power supply cord, at least 4 ft... power supply cord kit marked for electric current. Check with a 3-wire electrical supply connection. Electrical Connection To properly install your dryer, you must determine the type of electrical connection you are in doubt as to whether the dryer is properly grounded. The cord should...
Use and Care Guide
Page 9
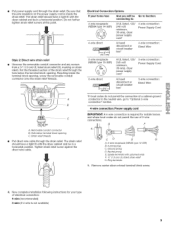
... on strain relief). The strain relief should have a tight fit with the dryer cabinet and be in a horizontal position. Hole below the terminal block opening. Electrical Connection Options If your type of electrical connection: 4-wire (recommended) 3-wire (if 4-wire is not available Neutral ...* it breaker 3-wire receptacle (NEMA type 10-30R) A UL listed, 120/ 3-wire connection: 240-volt Power Supply Cord 30-amp, dryer _._ mpoinwimerumsu, pply cord* 3-wire direct A fused disconnect or 3-wire connection: Direct Wire cbiorcxu* it breaker *If local codes do not ...
... on strain relief). The strain relief should have a tight fit with the dryer cabinet and be in a horizontal position. Hole below the terminal block opening. Electrical Connection Options If your type of electrical connection: 4-wire (recommended) 3-wire (if 4-wire is not available Neutral ...* it breaker 3-wire receptacle (NEMA type 10-30R) A UL listed, 120/ 3-wire connection: 240-volt Power Supply Cord 30-amp, dryer _._ mpoinwimerumsu, pply cord* 3-wire direct A fused disconnect or 3-wire connection: Direct Wire cbiorcxu* it breaker *If local codes do not ...
Use and Care Guide
Page 10
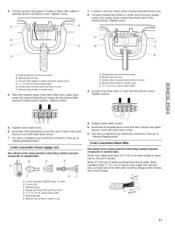
... ground wire from end of cable, leaving bare ground wire at 5" (12.7 cm). Tighten strain relief screws. 6. You have 5 ft (1.52 m) of extra length so dryer can be moved if needed. Cut 11/2'' (3.8 cm) from external ground conductor screw. Neutral ground wire B. When connecting to "Venting ... the terminal block, place the hooked end of the wire under the screw of 3 wire connections. Direct wire cable must have completed your electrical connection. Remove neutral ground wire from 3 remaining wires. Secure cover with hold-down screw. 7. Neutral wire (white or center wire) E....
... ground wire from end of cable, leaving bare ground wire at 5" (12.7 cm). Tighten strain relief screws. 6. You have 5 ft (1.52 m) of extra length so dryer can be moved if needed. Cut 11/2'' (3.8 cm) from external ground conductor screw. Neutral ground wire B. When connecting to "Venting ... the terminal block, place the hooked end of the wire under the screw of 3 wire connections. Direct wire cable must have completed your electrical connection. Remove neutral ground wire from 3 remaining wires. Secure cover with hold-down screw. 7. Neutral wire (white or center wire) E....
Use and Care Guide
Page 11
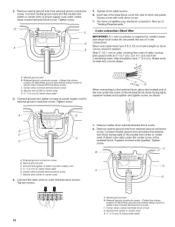
...facing right). Tighten screws. !! !! 5. Tighten strain relief screw. 6. You have completed your electrical connection. Neutral prong D. Tighten strain relief screws. 5. You have 5 ft (1.52 m) of direct wire cable to external ground conductor screw. Strip 31/2'' (8.9 cm) of... strain relief E Ring terminals G. Squeeze hooked ends together. External ground conductor screw B. Connect ground wire (green or bare) of extra length so dryer can be moved if needed. Neutral ground wire C. Center silver-colored terminal block screw D. E A C G F A. 3-wire receptacle (NEMA type...
...facing right). Tighten screws. !! !! 5. Tighten strain relief screw. 6. You have completed your electrical connection. Neutral prong D. Tighten strain relief screws. 5. You have 5 ft (1.52 m) of direct wire cable to external ground conductor screw. Strip 31/2'' (8.9 cm) of... strain relief E Ring terminals G. Squeeze hooked ends together. External ground conductor screw B. Connect ground wire (green or bare) of extra length so dryer can be moved if needed. Neutral ground wire C. Center silver-colored terminal block screw D. E A C G F A. 3-wire receptacle (NEMA type...
Use and Care Guide
Page 12
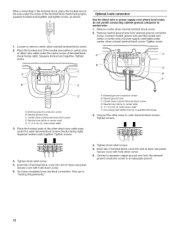
... wire from external ground conductor screw. E A. Now go to outer terminal block screws. Insert tab of terminal block cover into slot of dryer rear panel. Squeeze hooked end together. Tighten screw. Center silver-colored terminal block screw D. Neutral wire (white or center wire) E. ...end together and tighten screw, as shown. 1= Loosen or remove center silver-colored terminal block screw. 2. You have completed your electrical connection. Secure cover with hold -down screw. 6. Optional 3-wire connection Use for direct wire or power supply cord where local ...
... wire from external ground conductor screw. E A. Now go to outer terminal block screws. Insert tab of terminal block cover into slot of dryer rear panel. Squeeze hooked end together. Tighten screw. Center silver-colored terminal block screw D. Neutral wire (white or center wire) E. ...end together and tighten screw, as shown. 1= Loosen or remove center silver-colored terminal block screw. 2. You have completed your electrical connection. Secure cover with hold -down screw. 6. Optional 3-wire connection Use for direct wire or power supply cord where local ...
Use and Care Guide
Page 13
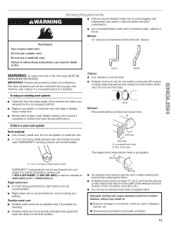
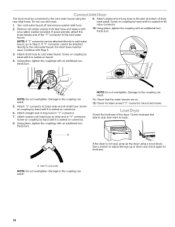
...system if necessary to keep rodents and insects from entering the home. • Exhaust hood must not be fully extended and supported when the dryer is not plugged with lint. • Replace any plastic or metal foil vent with a magnetic latch. Elbows 45 ° elbows provide ... IMPORTANT: Observe all joints. • Exhaust vent must be purchased from the entire length of the duct. Do not use a plastic vent. If this dryer MUST BE EXHAUSTED OUTDOORS. If using an existing vent system • Clean lint from your dealer. B (10.2 cm) A. Box hood style The angled...
...system if necessary to keep rodents and insects from entering the home. • Exhaust hood must not be fully extended and supported when the dryer is not plugged with lint. • Replace any plastic or metal foil vent with a magnetic latch. Elbows 45 ° elbows provide ... IMPORTANT: Observe all joints. • Exhaust vent must be purchased from the entire length of the duct. Do not use a plastic vent. If this dryer MUST BE EXHAUSTED OUTDOORS. If using an existing vent system • Clean lint from your dealer. B (10.2 cm) A. Box hood style The angled...
Use and Care Guide
Page 14
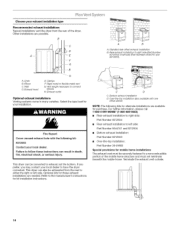
...NOTE: The following kit: 8212503 Contact your local dealer to exhaust out the bottom. This dryer can be converted to have the dryer converted. Standard rear offset exhaust installation B. Select the type best for mobile home installations The ...E Rigid metal or flexible metal vent G. Vent length necessary to a noncombustible portion of the dryer. This dryer can result in many varieties. Exhaust outlet Optional exhaust installations Venting systems come in death, fire, electrical shock, or serious injury. Terminate the exhaust vent outside. /1 14 Wall D. Over-the-...
...NOTE: The following kit: 8212503 Contact your local dealer to exhaust out the bottom. This dryer can be converted to have the dryer converted. Standard rear offset exhaust installation B. Select the type best for mobile home installations The ...E Rigid metal or flexible metal vent G. Vent length necessary to a noncombustible portion of the dryer. This dryer can result in many varieties. Exhaust outlet Optional exhaust installations Venting systems come in death, fire, electrical shock, or serious injury. Terminate the exhaust vent outside. /1 14 Wall D. Over-the-...
Use and Care Guide
Page 15
... 180 ft (55 m) 165 ft (50.3 m) Flexible metal 90 ft (27.4 m) 83 ft (25.1 m) 3 Rigid metal 170 ft (51.8 m) 155 ft (47.2 m) Flexible metal 85 ft (26 m) 78 ft (23.6 m) 4 Rigid metal 160 ft (48.8 m) 145 ft (44.2 m) Flexible metal 80 ft (24.4 m) 73 ft (22.1 m) 1. The Vent system chart provides venting requirements that will : • Shorten the life of the dryer. •...
... 180 ft (55 m) 165 ft (50.3 m) Flexible metal 90 ft (27.4 m) 83 ft (25.1 m) 3 Rigid metal 170 ft (51.8 m) 155 ft (47.2 m) Flexible metal 85 ft (26 m) 78 ft (23.6 m) 4 Rigid metal 160 ft (48.8 m) 145 ft (44.2 m) Flexible metal 80 ft (24.4 m) 73 ft (22.1 m) 1. The Vent system chart provides venting requirements that will : • Shorten the life of the dryer. •...
Use and Care Guide
Page 16
... couplings with new rubber washer provided. Screw on coupling by hand until it is seated on faucet. 4. Damage to adjust the legs up the dryer using the new inlet hoses. Use a wrench to the coupling can result. 16 Damage to the cold water faucet using a wood block. If...rubber washer from inlet hose and replace with an additional twothirds turn. Continue with an additional twothirds turn . ©u ec_, ne _,-@::_se The dryer must be used. Check the levelness of long hose to cold water NOTE: Do not overtighten. Screw on coupling by hand until it is not...
... couplings with new rubber washer provided. Screw on coupling by hand until it is seated on faucet. 4. Damage to adjust the legs up the dryer using the new inlet hoses. Use a wrench to the coupling can result. 16 Damage to the cold water faucet using a wood block. If...rubber washer from inlet hose and replace with an additional twothirds turn. Continue with an additional twothirds turn . ©u ec_, ne _,-@::_se The dryer must be used. Check the levelness of long hose to cold water NOTE: Do not overtighten. Screw on coupling by hand until it is not...
Use and Care Guide
Page 17
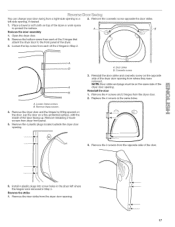
... the door strike and cosmetic screw on a flat, protected surface, with the inside of the door. 6. Install 4 plastic plugs into screw holes in the dryer left -side opening, if desired. 1. Remove the bottom screw from each of the 2 hinges in the same holes. Cosmetic screw 3. NOTE: Door strike and... plugs must be on the same side of the dryer. 3. You can change your door swing from a right-side opening to a left where the hinges were removed in Step 4. Loosen these screws. 4. B. Door strike...
... the door strike and cosmetic screw on a flat, protected surface, with the inside of the door. 6. Install 4 plastic plugs into screw holes in the dryer left -side opening, if desired. 1. Remove the bottom screw from each of the 2 hinges in the same holes. Cosmetic screw 3. NOTE: Door strike and... plugs must be on the same side of the dryer. 3. You can change your door swing from a right-side opening to a left where the hinges were removed in Step 4. Loosen these screws. 4. B. Door strike...
Use and Care Guide
Page 18
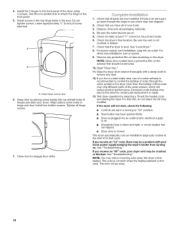
...models have all parts are set in a running or "On" position. • Start button has been pushed firmly. • Dryer is plugged into an outlet and/or electrical supply is recommended to control the buildup of the water system, which step was skipped. 2. A. Check that should be removed. ...10. See "Level Dryer." 8. Remove any dust. 12. If you receive an "L2" code, there may clog different parts of...
...models have all parts are set in a running or "On" position. • Start button has been pushed firmly. • Dryer is plugged into an outlet and/or electrical supply is recommended to control the buildup of the water system, which step was skipped. 2. A. Check that should be removed. ...10. See "Level Dryer." 8. Remove any dust. 12. If you receive an "L2" code, there may clog different parts of...

Use and Care Guide
Page 19
... followed by varying the blower motor speed. Failure to specific sections of the load and adjusts the time automatically for more detailed information, 1. Your dryer will shut off. Throughout the cycle, you will show in death, explosion, or fire. As the cycle runs, the control senses the dryness of...select a different dryness level, depending on the size and fabric type of the drying process, the cycle time may not have all of fire, electric shock, or injury to the load you want the load. items containing foam, rubber, or plastic must be changed without stopping the cycle. 19...
... followed by varying the blower motor speed. Failure to specific sections of the load and adjusts the time automatically for more detailed information, 1. Your dryer will shut off. Throughout the cycle, you will show in death, explosion, or fire. As the cycle runs, the control senses the dryness of...select a different dryness level, depending on the size and fabric type of the drying process, the cycle time may not have all of fire, electric shock, or injury to the load you want the load. items containing foam, rubber, or plastic must be changed without stopping the cycle. 19...
Use and Care Guide
Page 20
... number of minutes remaining in the cycle. If a Timed Cycle is the estimated time remaining in the "Cycles" section) for more than 5 minutes, the dryer will shut off . • If you close the door and press Start within 5 minutes. The length of drying time and enhance fabric care. To use... • Press POWER. For more details, see "Cycle Signal." 7, Press START. NOTE: During the Touch Up cycle, you can change the settings for your dryer at any time Open the door or press STOP once. Select the correct cycle and dryness level or temperature for Timed Cycle Adjust and Temp...
... number of minutes remaining in the cycle. If a Timed Cycle is the estimated time remaining in the "Cycles" section) for more than 5 minutes, the dryer will shut off . • If you close the door and press Start within 5 minutes. The length of drying time and enhance fabric care. To use... • Press POWER. For more details, see "Cycle Signal." 7, Press START. NOTE: During the Touch Up cycle, you can change the settings for your dryer at any time Open the door or press STOP once. Select the correct cycle and dryness level or temperature for Timed Cycle Adjust and Temp...
Use and Care Guide
Page 21
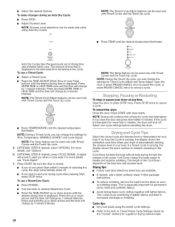
...STATUS Wet _i Dar_ Cool Down ClotUrDesry Wrinkle 6uald Che¢k til, t Screen(_ Wet The Wet light illuminates at the recommended temperature. The dryer will continue to get medium heat for optimal drying. Damp Dry Signal beeps, if selected. See "Options." Cool Down The Cool Down light ...illuminates during WRINKLE GUARD _. This indicator stays on your dryer with Timed Cycles. This indicator stays on during the cool down part of load you to get high heat for drying large items that ...
...STATUS Wet _i Dar_ Cool Down ClotUrDesry Wrinkle 6uald Che¢k til, t Screen(_ Wet The Wet light illuminates at the recommended temperature. The dryer will continue to get medium heat for optimal drying. Damp Dry Signal beeps, if selected. See "Options." Cool Down The Cool Down light ...illuminates during WRINKLE GUARD _. This indicator stays on your dryer with Timed Cycles. This indicator stays on during the cool down part of load you to get high heat for drying large items that ...

Use and Care Guide
Page 22
... wrinkles from loads consisting of one to four dry items. Medium High Touch Up Helps to smooth out wrinkles in loads left in the dryer too long. Timed Preset Cycle Settings Timed Cycles Load Type Default Temperature Default Time* (Minutes) TIMED DRY Heavyweight, High 40 bulky items,...estimated time remaining display shows the actual time remaining in your cycle. The dry time and temperature can change the actual time in the dryer for drying small loads or loads that need a short drying time. Lightweight garments, such as blankets and work clothes EXPRESS DRY TM ...
... wrinkles from loads consisting of one to four dry items. Medium High Touch Up Helps to smooth out wrinkles in loads left in the dryer too long. Timed Preset Cycle Settings Timed Cycles Load Type Default Temperature Default Time* (Minutes) TIMED DRY Heavyweight, High 40 bulky items,...estimated time remaining display shows the actual time remaining in your cycle. The dry time and temperature can change the actual time in the dryer for drying small loads or loads that need a short drying time. Lightweight garments, such as blankets and work clothes EXPRESS DRY TM ...

Use and Care Guide
Page 23
... Signal Select the Damp Dry Signal to alert you open the door to stop the dryer, rearrange the load inside the dryer drum. Rearranging the load will remain on your model) unless you that may need ironing.... WRINKLE GUARD _ periodically starts and stops the dryer, tumbling the load without heat for items that coverings are approximately 80% dry. High ...WRINKLE GUARD ® in a mixed load to turn on when DRUM LIGHT is pressed or the dryer door is selected, the drum light turns on and will be on until the desired volume (Loud ...
... Signal Select the Damp Dry Signal to alert you open the door to stop the dryer, rearrange the load inside the dryer drum. Rearranging the load will remain on your model) unless you that may need ironing.... WRINKLE GUARD _ periodically starts and stops the dryer, tumbling the load without heat for items that coverings are approximately 80% dry. High ...WRINKLE GUARD ® in a mixed load to turn on when DRUM LIGHT is pressed or the dryer door is selected, the drum light turns on and will be on until the desired volume (Loud ...


