Use and Care Guide
Page 2
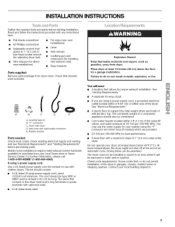
... INSTALLATION INSTRUCTIONS 5 Tools and Parts 5 Location Requirements 5 Electrical Requirements 6 Electrical Connection 8 Venting Requirements 13 Plan Vent System 14 Install Vent System 15 Install Leveling Legs 15 Connect Vent 15 Connect Inlet Hose 16 Level Dryer 16 Reverse Door Swing 17 Complete Installation 18 DRYER USE 19 Starting Your Dryer 19 Stopping, Pausing or Restarting 20 Drying and Cycle Tips 20 Status Lights 21 Cycles 21 Modifiers 23 Options 23 Cycle Signal 23 Changing Cycles, Modifiers and Options 24 Dryer Rack 24 DRYER CARE 25 Cleaning the Dryer Location...
... INSTALLATION INSTRUCTIONS 5 Tools and Parts 5 Location Requirements 5 Electrical Requirements 6 Electrical Connection 8 Venting Requirements 13 Plan Vent System 14 Install Vent System 15 Install Leveling Legs 15 Connect Vent 15 Connect Inlet Hose 16 Level Dryer 16 Reverse Door Swing 17 Complete Installation 18 DRYER USE 19 Starting Your Dryer 19 Stopping, Pausing or Restarting 20 Drying and Cycle Tips 20 Status Lights 21 Cycles 21 Modifiers 23 Options 23 Cycle Signal 23 Changing Cycles, Modifiers and Options 24 Dryer Rack 24 DRYER CARE 25 Cleaning the Dryer Location...
Use and Care Guide
Page 3
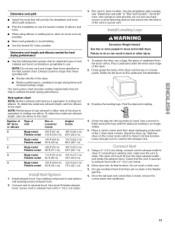
.... v' Power surge protection against electrical damage due to help by law. Sears Installation Service For Sears professional installation of parts or systems resulting from accident, abuse, misuse or use , not just defects. Expendable items that is all instructions supplied with the product. 7. Damage to or failure of home appliances, garage door openers, water heaters, and other than its intended purpose. 6. This warranty applies...
.... v' Power surge protection against electrical damage due to help by law. Sears Installation Service For Sears professional installation of parts or systems resulting from accident, abuse, misuse or use , not just defects. Expendable items that is all instructions supplied with the product. 7. Damage to or failure of home appliances, garage door openers, water heaters, and other than its intended purpose. 6. This warranty applies...
Use and Care Guide
Page 4
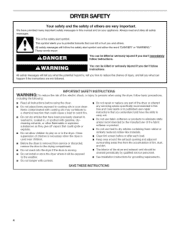
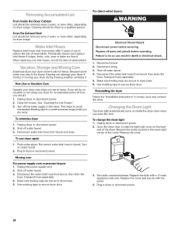
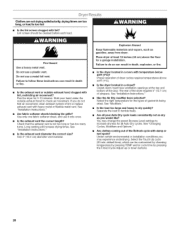
... exhaust opening and adjacent surrounding areas free from service or discarded, remove the door to cooking oils in the dryer. All safety messages will tell you and others are not followed. Close supervision of fire, electric shock, or injury to persons when using the dryer. [] Do not place items exposed to the drying compartment. [] Do not reach into the dryer if the drum...
... exhaust opening and adjacent surrounding areas free from service or discarded, remove the door to cooking oils in the dryer. All safety messages will tell you and others are not followed. Close supervision of fire, electric shock, or injury to persons when using the dryer. [] Do not place items exposed to the drying compartment. [] Do not reach into the dryer if the drum...
Use and Care Guide
Page 5
...). Do not operate your washer using a power supply cord, a grounded electrical outlet located within 4 ft (1.2 m) of the water fill valves, and water pressure of the dryer in ring terminals or spade terminals with clothes dryers. Check code requirements. Rubber washer connector Parts needed ) which are using the "Y" connector and short hose (if needed : Check local codes, check existing electrical supply and venting and see "Electrical Requirements" and "Venting Requirements" before starting installation. The kit should also be extended. Drying times can result in...
...). Do not operate your washer using a power supply cord, a grounded electrical outlet located within 4 ft (1.2 m) of the water fill valves, and water pressure of the dryer in ring terminals or spade terminals with clothes dryers. Check code requirements. Rubber washer connector Parts needed ) which are using the "Y" connector and short hose (if needed : Check local codes, check existing electrical supply and venting and see "Electrical Requirements" and "Venting Requirements" before starting installation. The kit should also be extended. Drying times can result in...
Use and Care Guide
Page 6
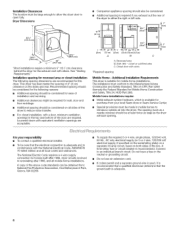
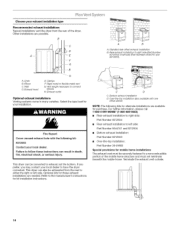
...-amp circuit, fused on all sides of the line. This dryer has been tested for mobile home installations. Recommended spacing should be considered on both sides of the dryer to reduce noise transfer. If codes permit and a separate ground wire is used, it is recommended that a qualified electrician determine that the electrical connection is your local Sears store or Sears Service Center. Installation Clearances The location...
...-amp circuit, fused on all sides of the line. This dryer has been tested for mobile home installations. Recommended spacing should be considered on both sides of the dryer to reduce noise transfer. If codes permit and a separate ground wire is used, it is recommended that a qualified electrician determine that the electrical connection is your local Sears store or Sears Service Center. Installation Clearances The location...
Use and Care Guide
Page 7
... cable (with ground wire), protected with ring or spade terminals and UL listed strain relief. SAVE THESE INSTRUCTIONS If your outlet looks like this : 4-wire receptacle (14-30R) Then choose a 4-wire power supply cord with flexible metallic conduit. Check with clothes dryers. If using a power supply cord: Use a UL listed power supply cord kit marked for use aluminum). [] At least 5 ft (1.52 m) long. This dryer is permanently connected to a grounded metal, permanent wiring system, or an...
... cable (with ground wire), protected with ring or spade terminals and UL listed strain relief. SAVE THESE INSTRUCTIONS If your outlet looks like this : 4-wire receptacle (14-30R) Then choose a 4-wire power supply cord with flexible metallic conduit. Check with clothes dryers. If using a power supply cord: Use a UL listed power supply cord kit marked for use aluminum). [] At least 5 ft (1.52 m) long. This dryer is permanently connected to a grounded metal, permanent wiring system, or an...
Use and Care Guide
Page 10
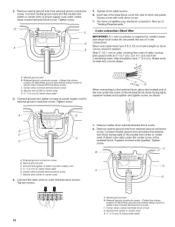
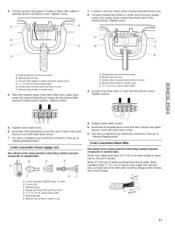
... wire) of power supply cord under the screw of the terminal block (hook facing right), squeeze hooked end together and tighten screw, as shown. 1= Remove center silver-colored terminal block screw. 2. C. Center silver-colored terminal block screw D. A. 2= Remove neutral ground wire from end of cable, leaving bare ground wire at 5" (12.7 cm). B A i 5. Secure cover with hold-down screw. 7. You have 5 ft (1.52 m) of dryer rear panel. Direct wire cable must have completed your electrical connection...
... wire) of power supply cord under the screw of the terminal block (hook facing right), squeeze hooked end together and tighten screw, as shown. 1= Remove center silver-colored terminal block screw. 2. C. Center silver-colored terminal block screw D. A. 2= Remove neutral ground wire from end of cable, leaving bare ground wire at 5" (12.7 cm). B A i 5. Secure cover with hold-down screw. 7. You have 5 ft (1.52 m) of dryer rear panel. Direct wire cable must have completed your electrical connection...
Use and Care Guide
Page 11
... terminal block screw. 2. Neutral ground wire C. Place the hooked ends of dryer rear panel. External ground conductor screw B. Secure cover with hold -down screw. 6. Neutral prong D. Insert tab of terminal block cover into slot of the other wires to external ground conductor screw. Now go to "Venting Requirements." 3-wire connection: Power supply cord Use where local codes permit connecting cabinet-ground conductor to neutral wire. Direct wire cable must have completed your electrical connection. Center silver-colored terminal block...
... terminal block screw. 2. Neutral ground wire C. Place the hooked ends of dryer rear panel. External ground conductor screw B. Secure cover with hold -down screw. 6. Neutral prong D. Insert tab of terminal block cover into slot of the other wires to external ground conductor screw. Now go to "Venting Requirements." 3-wire connection: Power supply cord Use where local codes permit connecting cabinet-ground conductor to neutral wire. Direct wire cable must have completed your electrical connection. Center silver-colored terminal block...
Use and Care Guide
Page 12
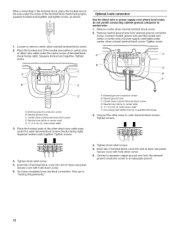
... relief screws. 5. Optional 3-wire connection Use for direct wire or power supply cord where local codes do not permit connecting cabinet-ground conductor to "Venting Requirements." = A. You have completed your electrical connection. External ground conductor screw B. Neutral wire (white or center wire) E. _" (1.9 cm) UL listed strain relief E Grounding path determined by a qualified electrician 3= Connect the other direct wire cable wires under center, silver-colored terminal block screw. Place the hooked end of the...
... relief screws. 5. Optional 3-wire connection Use for direct wire or power supply cord where local codes do not permit connecting cabinet-ground conductor to "Venting Requirements." = A. You have completed your electrical connection. External ground conductor screw B. Neutral wire (white or center wire) E. _" (1.9 cm) UL listed strain relief E Grounding path determined by a qualified electrician 3= Connect the other direct wire cable wires under center, silver-colored terminal block screw. Place the hooked end of the...
Use and Care Guide
Page 13
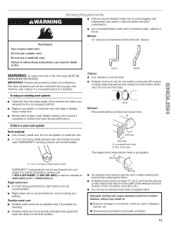
..., carpets, etc. [] Housecleaning problems and health problems. 13 Do not use duct tape. DURASAFE TM venting products are acceptable only if accessible for cleaning. • Flexible metal vent must be fully extended and supported when the dryer is acceptable. 4" (10.2cm) heavymetal exhaust vent DURASAFE TM vent products can be purchased from entering the home. • Exhaust hood must not be connected into the interior...
..., carpets, etc. [] Housecleaning problems and health problems. 13 Do not use duct tape. DURASAFE TM venting products are acceptable only if accessible for cleaning. • Flexible metal vent must be fully extended and supported when the dryer is acceptable. 4" (10.2cm) heavymetal exhaust vent DURASAFE TM vent products can be purchased from entering the home. • Exhaust hood must not be connected into the interior...
Use and Care Guide
Page 14
... The exhaust vent must not terminate beneath the mobile home. Terminate the exhaust vent outside. /1 14 i .... Wall D. Exhaust outlet Optional exhaust installations Venting systems come in death, fire, electrical shock, or serious injury. Select the type best for purchase. Fire Hazard Cover unused exhaust hole with one offset elbow) NOTE: The following kit: 8212503 Contact your installation. Other installations are needed. B A ........i F A A. Standard rear offset exhaust installation B. Z A. Dryer B. Vent length necessary to follow these exhaust installations are...
... The exhaust vent must not terminate beneath the mobile home. Terminate the exhaust vent outside. /1 14 i .... Wall D. Exhaust outlet Optional exhaust installations Venting systems come in death, fire, electrical shock, or serious injury. Select the type best for purchase. Fire Hazard Cover unused exhaust hole with one offset elbow) NOTE: The following kit: 8212503 Contact your installation. Other installations are needed. B A ........i F A A. Standard rear offset exhaust installation B. Z A. Dryer B. Vent length necessary to follow these exhaust installations are...
Use and Care Guide
Page 15
... connect the exhaust vent. 1. Determine vent length and elbows needed for best drying performance • Use the following Vent system chart to determine type of vent material and hood combinations acceptable to adding two elbows. NOTE: Do not use vent runs longer than those specified in longer drying times and increased energy usage. Exhaust systems longer than those specified will: • Shorten the life of the dryer is made, remove...
... connect the exhaust vent. 1. Determine vent length and elbows needed for best drying performance • Use the following Vent system chart to determine type of vent material and hood combinations acceptable to adding two elbows. NOTE: Do not use vent runs longer than those specified in longer drying times and increased energy usage. Exhaust systems longer than those specified will: • Shorten the life of the dryer is made, remove...
Use and Care Guide
Page 17
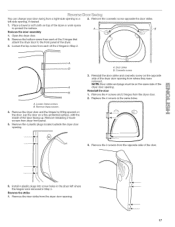
... door 1. Replace the 4 screws in Step 4. Reverse the strike 1. J 3. Remove the door strike from dryer front panel. 5. Remove the 4 plastic plugs located outside the dryer door opening from the dryer door. 2. I 17 Remove the cosmetic screw opposite the door strike. -A .A "B A. B. Door strike B. Remove the 4 screws and 2 hinges from where they were removed. Loosen the top screw from each of the 2 hinges that attach the dryer door to the front panel of the dryer or work...
... door 1. Replace the 4 screws in Step 4. Reverse the strike 1. J 3. Remove the door strike from dryer front panel. 5. Remove the 4 plastic plugs located outside the dryer door opening from the dryer door. 2. I 17 Remove the cosmetic screw opposite the door strike. -A .A "B A. B. Door strike B. Remove the 4 screws and 2 hinges from where they were removed. Loosen the top screw from each of the 2 hinges that attach the dryer door to the front panel of the dryer or work...
Use and Care Guide
Page 18
... is an extra part, go away. 18 Check for certain part replacement or repair. 13. For direct wire installation, turn on . 5. Read "Dryer Use." 11. This dryer automatically runs an installation diagnostic routine at the start , check the following: • Controls are set in the dryer. If you have a protective film on . • Household fuse is intact and tight, or circuit breaker has not tripped. • Dryer door is recommended to control the buildup of...
... is an extra part, go away. 18 Check for certain part replacement or repair. 13. For direct wire installation, turn on . 5. Read "Dryer Use." 11. This dryer automatically runs an installation diagnostic routine at the start , check the following: • Controls are set in the dryer. If you have a protective film on . • Household fuse is intact and tight, or circuit breaker has not tripped. • Dryer door is recommended to control the buildup of...

Use and Care Guide
Page 19
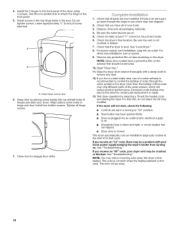
... a cycle begins, you are drying, your cycle settings and your load, by using an Air Cycle. Follow these instructions can completely remove oil. Place laundry into dryer and shut door. 3. Do not dry anything flammable on your installation setup by the Dual Action blower motor starting. Throughout the cycle, you want the load. To use an Auto Dry Cycle • Press POWER. Select DRYNESS LEVEL to the load you will shut off. As the cycle runs, the control senses...
... a cycle begins, you are drying, your cycle settings and your load, by using an Air Cycle. Follow these instructions can completely remove oil. Place laundry into dryer and shut door. 3. Do not dry anything flammable on your installation setup by the Dual Action blower motor starting. Throughout the cycle, you want the load. To use an Auto Dry Cycle • Press POWER. Select DRYNESS LEVEL to the load you will shut off. As the cycle runs, the control senses...
Use and Care Guide
Page 25
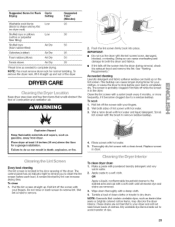
... clothes. Suggested Items for Rack Drying Cycle Setting Washable wool items (block to shape and lay flat on the lint screen. To remove the dryer rack, lift it becomes clogged due to a residue buildup. Push the lint screen firmly back into the dryer during removal, check the exhaust hood and remove the lint, See "Venting Requirements." Doing so can cause overheating and damage to remove residue buildup. This buildup can cause longer drying times...
... clothes. Suggested Items for Rack Drying Cycle Setting Washable wool items (block to shape and lay flat on the lint screen. To remove the dryer rack, lift it becomes clogged due to a residue buildup. Push the lint screen firmly back into the dryer during removal, check the exhaust hood and remove the lint, See "Venting Requirements." Doing so can cause overheating and damage to remove residue buildup. This buildup can cause longer drying times...
Use and Care Guide
Page 26
For direct-wired dryers: From Inside the Dryer Cabinet Lint should be removed every 2 years, or more often, depending on dryer usage. Cleaning should be done by a qualified person. Periodically inspect and replace inlet hoses if bulges, kinks, cuts, wear or leaks are found. I , ' ...... "_ "+_]I ' Replace inlet hoses and hose screen after 5 years of use to reduce the risk of replacement. When replacing your inlet hoses, record the date of hose failure. From the Exhaust Vent Lint should be removed every 2 years, or more often, depending on dryer usage.
For direct-wired dryers: From Inside the Dryer Cabinet Lint should be removed every 2 years, or more often, depending on dryer usage. Cleaning should be done by a qualified person. Periodically inspect and replace inlet hoses if bulges, kinks, cuts, wear or leaks are found. I , ' ...... "_ "+_]I ' Replace inlet hoses and hose screen after 5 years of use to reduce the risk of replacement. When replacing your inlet hoses, record the date of hose failure. From the Exhaust Vent Lint should be removed every 2 years, or more often, depending on dryer usage.
Use and Care Guide
Page 27
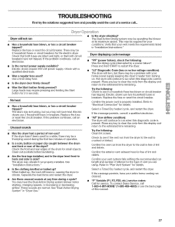
... run Has a household fuse blown, or has a circuit breaker tripped? Was a regular fuse used for service. Large loads may not have your vent meets the requirements listed in "Dryer Use." Unusualsounds • Has the dryer had a period of lint and debris. Replace the fuse or reset the circuit breaker. Confirm the power cord is the dryer door firmly closed? "AF" (low airflow condition): The dryer will continue to "Electrical Connection" for details. Try the following : Was the drying cycle...
... run Has a household fuse blown, or has a circuit breaker tripped? Was a regular fuse used for service. Large loads may not have your vent meets the requirements listed in "Dryer Use." Unusualsounds • Has the dryer had a period of lint and debris. Replace the fuse or reset the circuit breaker. Confirm the power cord is the dryer door firmly closed? "AF" (low airflow condition): The dryer will continue to "Electrical Connection" for details. Try the following : Was the drying cycle...
Use and Care Guide
Page 28
... has too many turns. See "Installation Instructions." Long venting will increase drying times. Has the Air Dry modifier been selected? Are all Auto Dry cycles. Are fabric softener sheets blocking the grille? See "Changing Cycles, Modifiers and Options." default time), which can be cleaned before each load. Explosion Hazard Keep flammable materials and vapors, such as you may change the preset Dryness Level settings to check air movement. Is the dryer located in a room...
... has too many turns. See "Installation Instructions." Long venting will increase drying times. Has the Air Dry modifier been selected? Are all Auto Dry cycles. Are fabric softener sheets blocking the grille? See "Changing Cycles, Modifiers and Options." default time), which can be cleaned before each load. Explosion Hazard Keep flammable materials and vapors, such as you may change the preset Dryness Level settings to check air movement. Is the dryer located in a room...
Use and Care Guide
Page 29
... faucet and dryer's water inlet valve. This cycle is turned on load or drum • Was dryer fabric softener properly used for the first time? Change the dryness level setting on fabric type. Was the dryer overloaded? Check that the water supply is best for reducing wrinkles and odors from dryer at the beginning of two to move and install dryer. These cycles are wrinkled • Was the load removed from loads consisting of wrinkle-free cotton...
... faucet and dryer's water inlet valve. This cycle is turned on load or drum • Was dryer fabric softener properly used for the first time? Change the dryness level setting on fabric type. Was the dryer overloaded? Check that the water supply is best for reducing wrinkles and odors from dryer at the beginning of two to move and install dryer. These cycles are wrinkled • Was the load removed from loads consisting of wrinkle-free cotton...


