Owners Manual
Page 2
...Canister Care 13 Bag Changing 13 Cleaning Exterior and Attachments ..... 13 Motor Safety Filter Changing .......... 14 Exhaust Filter Changing 14 Power-Mate ® Care 15 Belt Changing and Agitator Cleaning .. 15-I6 Light Bulb Changing 17 Agitator Servicing 17 Troubleshooting Requesting Assistance Or Service 18 Back Cover Please read this guide. Model No. LIMITED ONEYEAR WARRANTY ON KENMORE VACUUM CLEANER This warranty is in use . This warranty excludes vacuum cleaner bags, belts, light bulbs, and filters, which vary from the date of Purchase Keep...
...Canister Care 13 Bag Changing 13 Cleaning Exterior and Attachments ..... 13 Motor Safety Filter Changing .......... 14 Exhaust Filter Changing 14 Power-Mate ® Care 15 Belt Changing and Agitator Cleaning .. 15-I6 Light Bulb Changing 17 Agitator Servicing 17 Troubleshooting Requesting Assistance Or Service 18 Back Cover Please read this guide. Model No. LIMITED ONEYEAR WARRANTY ON KENMORE VACUUM CLEANER This warranty is in use . This warranty excludes vacuum cleaner bags, belts, light bulbs, and filters, which vary from the date of Purchase Keep...
Owners Manual
Page 3
... nozzle, Hold plug when rewinding onto cord reel. Do not leave vacuum cleaner when plugged in place (If applicable). Do not pull or carry by anyone unable to a Sears Service Center. Keep on wet surfaces. The fumes from heated surfaces. These products clog the bag, reduce airflow and can create a fire hazard or explosion. Do not operate vacuum cleaner without dust bag and/or filters in this Owner's Manual carefully for important use...
... nozzle, Hold plug when rewinding onto cord reel. Do not leave vacuum cleaner when plugged in place (If applicable). Do not pull or carry by anyone unable to a Sears Service Center. Keep on wet surfaces. The fumes from heated surfaces. These products clog the bag, reduce airflow and can create a fire hazard or explosion. Do not operate vacuum cleaner without dust bag and/or filters in this Owner's Manual carefully for important use...
Owners Manual
Page 4
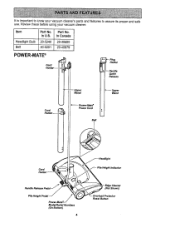
Review these before using your vacuum cleaner's parts and features to know your vacuum cleaner. In U.S. 20-5240 20-5201 Part No. It is important to assure its proper and safe use. In Canada 20-40600 20-40979 POWER-MATE® Cord _ or "-- Handle Quick Release Wand Upper Wand Cord Holder-- ,. Item Headlight Bulb Belt Part No. Power Cord Belt f Cord Pile Height PedaJP°wer'Mate / Model/Serial Numbers (On Bottom) 4 (Not Shown) =rotector Reset Button
Review these before using your vacuum cleaner's parts and features to know your vacuum cleaner. In U.S. 20-5240 20-5201 Part No. It is important to assure its proper and safe use. In Canada 20-40600 20-40979 POWER-MATE® Cord _ or "-- Handle Quick Release Wand Upper Wand Cord Holder-- ,. Item Headlight Bulb Belt Part No. Power Cord Belt f Cord Pile Height PedaJP°wer'Mate / Model/Serial Numbers (On Bottom) 4 (Not Shown) =rotector Reset Button
Owners Manual
Page 5
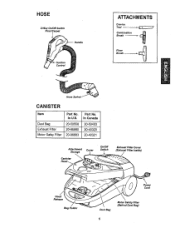
In Canada 20-50403 20-40320 20-40321 Attachment Storage Cover I On/Off Switch l Canister _:Tp_ (_ _'_ _- Floor Hose SwivaJ CANISTER Item Part No. Exhaust Filter Cover (Exhaust Filter Inside) / ""o " " "_...._ /_ Bag Holder . "_ Dust Bag Motor S_fety Filter (Behionud;tBeg) HOSE 2.Way On/Off Switch Floor/Carpet ATTACHMENTS Crevice Tool Brush _- In U.S, Dust Bag Exhaust Filter 20-50558 20-86880 Motor $afey Filter 20-86883 Part No. Combination Brush _-
In Canada 20-50403 20-40320 20-40321 Attachment Storage Cover I On/Off Switch l Canister _:Tp_ (_ _'_ _- Floor Hose SwivaJ CANISTER Item Part No. Exhaust Filter Cover (Exhaust Filter Inside) / ""o " " "_...._ /_ Bag Holder . "_ Dust Bag Motor S_fety Filter (Behionud;tBeg) HOSE 2.Way On/Off Switch Floor/Carpet ATTACHMENTS Crevice Tool Brush _- In U.S, Dust Bag Exhaust Filter 20-50558 20-86880 Motor $afey Filter 20-86883 Part No. Combination Brush _-
Owners Manual
Page 6
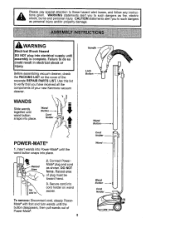
... assembling vacuum cleaner, check the PACKING LIST on '_--_L_ Cord I I Button _ J Cord To remove: Disconnect cord, steady PowerMate ®with foot and turn wands until wand button snaps into cord holder on wand swivel. Insert wands into Power-Mate ®until the wand button snaps into electrical supply until assembly is complete. Cord Holder -_l"h _L Wand Wand I _1 r Handle Lock Button Wand Button_ POWER-MATE ® 1. Connect PowerMate ®plug and cord as personal injury and/or property damage. Use this list...
... assembling vacuum cleaner, check the PACKING LIST on '_--_L_ Cord I I Button _ J Cord To remove: Disconnect cord, steady PowerMate ®with foot and turn wands until wand button snaps into cord holder on wand swivel. Insert wands into Power-Mate ®until the wand button snaps into electrical supply until assembly is complete. Cord Holder -_l"h _L Wand Wand I _1 r Handle Lock Button Wand Button_ POWER-MATE ® 1. Connect PowerMate ®plug and cord as personal injury and/or property damage. Use this list...
Owners Manual
Page 7
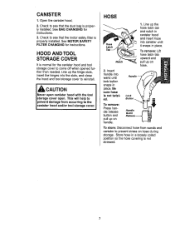
... when opened further than needed. Handle Quick To store: Disconnect hose from wands and canister to prevent stress on handle. See MOTOR SAFETY FILTER CHANGING for instructions. 3. Check to see that the dust bag is net stressed. CANISTER 1. Line up the hose latch tab and notch in canister hood and insert hose into wand until it snaps in place. HOOD AND TOOL STORAGE COVER It is not twisted, Lock Button To remove: Press handle 'release button...
... when opened further than needed. Handle Quick To store: Disconnect hose from wands and canister to prevent stress on handle. See MOTOR SAFETY FILTER CHANGING for instructions. 3. Check to see that the dust bag is net stressed. CANISTER 1. Line up the hose latch tab and notch in canister hood and insert hose into wand until it snaps in place. HOOD AND TOOL STORAGE COVER It is not twisted, Lock Button To remove: Press handle 'release button...

Owners Manual
Page 8
...: Refer to prevent personal injury. ON/OFF / 6. Toturn vacuum cleaner on, step on the ON/OFF switch. 7, To turn on the indicator. OPERATING INSTRUCTIONS kWARNING Personal Injury and Product Damage Hazard DO NOT plug in if switch is wider than the other. Remove cord from cord to install the proper outlet. The cord moves rapidly when rewinding. one blade is in the outlet, reverse the...
...: Refer to prevent personal injury. ON/OFF / 6. Toturn vacuum cleaner on, step on the ON/OFF switch. 7, To turn on the indicator. OPERATING INSTRUCTIONS kWARNING Personal Injury and Product Damage Hazard DO NOT plug in if switch is wider than the other. Remove cord from cord to install the proper outlet. The cord moves rapidly when rewinding. one blade is in the outlet, reverse the...
Owners Manual
Page 9
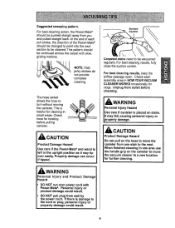
... of each assembly area in small areas. CAUTION Product Damage Hazard Use care if the Power-Mate ® and wand is left in one area use the handle grip on the hose to move the vacuum cleaner to be cleaned. For best cleaning results, fully close the suction control. For best cleaning results, keep the airflow passage open. Unplug from one stair to the cord or plug, personal...
... of each assembly area in small areas. CAUTION Product Damage Hazard Use care if the Power-Mate ® and wand is left in one area use the handle grip on the hose to move the vacuum cleaner to be cleaned. For best cleaning results, fully close the suction control. For best cleaning results, keep the airflow passage open. Unplug from one stair to the cord or plug, personal...
Owners Manual
Page 10
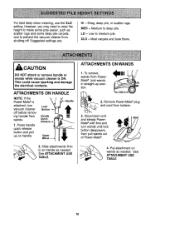
... wands. ly on handle as needed . Medium to medium pile. CAUTION DO NOT attach or remove handle or wands while vacuum cleaner is attached, turn wands until lock i button disappears, then pull wands out of Power-Mate ®. 4. Mate ®, lock wands in straight-up on wands as needed . Suggested settings are: HI - Slide attachments firm- Put attachment on handle. This could cause sparking and damage the electrical contacts. Quick Release--_ 1. See ATTACHMENT USE TABLE. Handle Upper Wand -- 2. See ATTACHMENT USE...
... wands. ly on handle as needed . Medium to medium pile. CAUTION DO NOT attach or remove handle or wands while vacuum cleaner is attached, turn wands until lock i button disappears, then pull wands out of Power-Mate ®. 4. Mate ®, lock wands in straight-up on wands as needed . Suggested settings are: HI - Slide attachments firm- Put attachment on handle. This could cause sparking and damage the electrical contacts. Quick Release--_ 1. See ATTACHMENT USE TABLE. Handle Upper Wand -- 2. See ATTACHMENT USE...
Owners Manual
Page 11
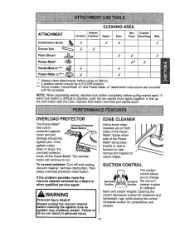
... together to help remove dirt trapped at carpet edges. SUCTION CONTROL The suction control allows you to run. If the agitator slows down or stops, the overload protector shuts off and unplug vacuum cleaner, remove obstruction, then press overload protector reset button. Depress lock button and then pull wands apart. To correct problem: Turn off the Power-Mate ®. CLEANING AREA ATTACHMENT Between Furniture* Cushions* Drapes* Stairs Bare Carpeted Floors FloorstRugs Walls Combination Brush 4 ,/ / # Crevice Tool # 4 Floor Brush 4 4 4 Power-Mate ®...
... together to help remove dirt trapped at carpet edges. SUCTION CONTROL The suction control allows you to run. If the agitator slows down or stops, the overload protector shuts off and unplug vacuum cleaner, remove obstruction, then press overload protector reset button. Depress lock button and then pull wands apart. To correct problem: Turn off the Power-Mate ®. CLEANING AREA ATTACHMENT Between Furniture* Cushions* Drapes* Stairs Bare Carpeted Floors FloorstRugs Walls Combination Brush 4 ,/ / # Crevice Tool # 4 Floor Brush 4 4 4 Power-Mate ®...
Owners Manual
Page 12
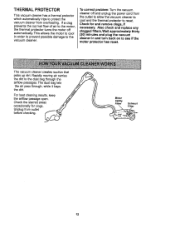
... vacuum cleaner. The vacuum cleaner creates suction that picks up dirt. The dust bag lets the air pass through the airflow passages. Also check and replace any clogged filters.Wait approximately thirty (30) minutes and plug the vacuum cleaner in order to prevent possible damage to see if the motor protector has reset. Check for clogs. //_% ,_/'y /F//j_ Unplug from overheating. To correct problem: Turn the vacuum cleaner off and unplug the power cord from the outlet to allow the vacuum cleaner...
... vacuum cleaner. The vacuum cleaner creates suction that picks up dirt. The dust bag lets the air pass through the airflow passages. Also check and replace any clogged filters.Wait approximately thirty (30) minutes and plug the vacuum cleaner in order to prevent possible damage to see if the motor protector has reset. Check for clogs. //_% ,_/'y /F//j_ Unplug from overheating. To correct problem: Turn the vacuum cleaner off and unplug the power cord from the outlet to allow the vacuum cleaner...
Owners Manual
Page 13
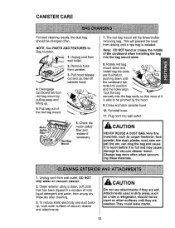
... lift canister hood. 4. Unplug cord from canister. 3. Clean exterior using a clean, soft cloth that none of the red bag mount. CANISTER CARE For best cleaning results, the dust bag should not be used in a solution of vacuum cleaner and attachments. Pull hood release out and up . 5. Check the motor safety filter and replace if necessary. 7. To reduce static electricity and dust buildup, wipe outer surface of mild liquid detergent and water, then wrung dry. They...
... lift canister hood. 4. Unplug cord from canister. 3. Clean exterior using a clean, soft cloth that none of the red bag mount. CANISTER CARE For best cleaning results, the dust bag should not be used in a solution of vacuum cleaner and attachments. Pull hood release out and up . 5. Check the motor safety filter and replace if necessary. 7. To reduce static electricity and dust buildup, wipe outer surface of mild liquid detergent and water, then wrung dry. They...
Owners Manual
Page 14
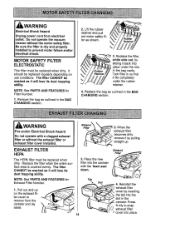
... operate the vacuum cleaner without the motor safety filter. Remove the bag as outlined in the BAG CHANGING section. WARNING Exhaust_ Filter _ _ 2. When the becomes dirty, remove it will lose its dust trapping ability. NOTE: See PARTS AND FEATURES for Filter Number. 1. Press firmly to remove from electrical outlet. IbWARNING Electrical Shock Hazard Unplug power cord from the canister and lay aside. 3. Replace the bag as it will lose its dust trapping ability. Replace the filter...
... operate the vacuum cleaner without the motor safety filter. Remove the bag as outlined in the BAG CHANGING section. WARNING Exhaust_ Filter _ _ 2. When the becomes dirty, remove it will lose its dust trapping ability. NOTE: See PARTS AND FEATURES for Filter Number. 1. Press firmly to remove from electrical outlet. IbWARNING Electrical Shock Hazard Unplug power cord from the canister and lay aside. 3. Replace the bag as it will lose its dust trapping ability. Replace the filter...
Owners Manual
Page 15
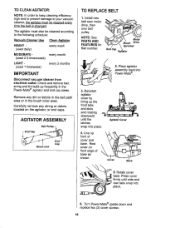
... Agitator Cover 6. WARNING I Electrical Shock Or Personal Injury Hazard Disconnect electrical supply before performing maintenance to do so could result in electrical shock or personal injury from the Power-Mate ® base. See AGITATOR ASSEMBLY for picture of agitator cover and rotate forward to release from vacuum cleaner suddenly starting. Failure to the vacuum cleaner. Press handle release pedal and lower the swivel. Lift rear latches up . Turn...
... Agitator Cover 6. WARNING I Electrical Shock Or Personal Injury Hazard Disconnect electrical supply before performing maintenance to do so could result in electrical shock or personal injury from the Power-Mate ® base. See AGITATOR ASSEMBLY for picture of agitator cover and rotate forward to release from vacuum cleaner suddenly starting. Failure to the vacuum cleaner. Press handle release pedal and lower the swivel. Lift rear latches up . Turn...
Owners Manual
Page 16
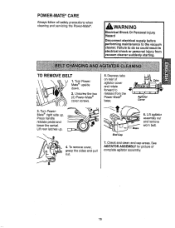
.... Cover Base 5. Install new belt over motor drive, then over belt pulley. Press cover firmly until the latches snap into place. 6. Place agitator assembly back into Power-Mate ® . 3. AGITATOR ASSEMBLY Belt Pulley_ Brush Unit TO REPLACE BELT 1. Carefully remove any dirt or debris in the belt path area or in the Power-Mate ® agitator and end cap areas. Rotate cover back. TO CLEAN AGITATOR: NOTE: In order to keep cleaning efficiency high...
.... Cover Base 5. Install new belt over motor drive, then over belt pulley. Press cover firmly until the latches snap into place. 6. Place agitator assembly back into Power-Mate ® . 3. AGITATOR ASSEMBLY Belt Pulley_ Brush Unit TO REPLACE BELT 1. Carefully remove any dirt or debris in the belt path area or in the Power-Mate ® agitator and end cap areas. Rotate cover back. TO CLEAN AGITATOR: NOTE: In order to keep cleaning efficiency high...
Owners Manual
Page 17
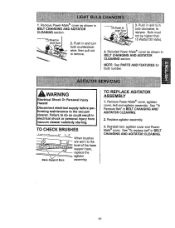
..., agitator cover, belt and agitator assembly. Reinstall belt, agitator cover and PowerMate ® cover. Reinstall Power-Mate ® cover as shown in electrical shock or personal injury from vacuum cleaner suddenly starting, i i TO CHECK BRUSHES ._r l__.are When brushes worn to I replace. NOTE: See PARTS AND FEATURES for Bulb number. See "To replace belt" in BELT CHANGING AND AGITATOR CLEANING. 2. Failure to do so could result in BELT CHANGING AND AGITATOR CLEANING section. Push In And Turn 2. Remove Power...
..., agitator cover, belt and agitator assembly. Reinstall belt, agitator cover and PowerMate ® cover. Reinstall Power-Mate ® cover as shown in electrical shock or personal injury from vacuum cleaner suddenly starting, i i TO CHECK BRUSHES ._r l__.are When brushes worn to I replace. NOTE: See PARTS AND FEATURES for Bulb number. See "To replace belt" in BELT CHANGING AND AGITATOR CLEANING. 2. Failure to do so could result in BELT CHANGING AND AGITATOR CLEANING section. Push In And Turn 2. Remove Power...
Owners Manual
Page 18
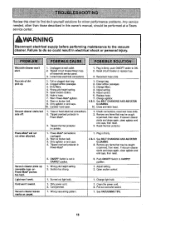
... AGITATOR CLEANING, 10. Hose or hoodelectrical connections. 2. Dirtyagitatoror endcaps. 4, Trippedoverloadprotectorin Power-Mate" 1, Plug in firmly, push ON/OFFswitch to ON. 2. Vacuum cleaner picks up , 1. Push ON/OFF Switch to do -it-yourself solutions for minor performance problems. Any service needed, other than those described in this owner's manual, should be performed at householdservicepanel. 3, Loosehoseelectricalconnections. 1. Open suction control. Pull out cord and rewind. 1. Plug in firmly. 2&3. 4, See BELT CHANGINGAND AGITATOR CLEANING. Poorjob of dirt pick...
... AGITATOR CLEANING, 10. Hose or hoodelectrical connections. 2. Dirtyagitatoror endcaps. 4, Trippedoverloadprotectorin Power-Mate" 1, Plug in firmly, push ON/OFFswitch to ON. 2. Vacuum cleaner picks up , 1. Push ON/OFF Switch to do -it-yourself solutions for minor performance problems. Any service needed, other than those described in this owner's manual, should be performed at householdservicepanel. 3, Loosehoseelectricalconnections. 1. Open suction control. Pull out cord and rewind. 1. Plug in firmly. 2&3. 4, See BELT CHANGINGAND AGITATOR CLEANING. Poorjob of dirt pick...

Owners Manual
Page 36
...maintenance agreement (Canada) on a product serviced by Sears: iiii ii ii !iii!ii !i!1!-8il0i0!-827-6655 (U,S,A,) 1-800-361-6665 (Canada) _iiiii_!i :!_i_ _ Para pedir servicio de reparacibn a domicilio, y para ordenar piezas: Au Canada pour service en francis: 1-800-LE-FOYER Mc i iill iii!il ..... For Sears professional installation..., no matter who sold itl For the replacement parts, accessories and fill II i_ii i!ii owner's manuals that you need to do-it-yourself. _ii!ili!iiiii!_'! iii;i;;i; For repair - :: Your Home ..... of Sears, Roebuck and Co. ® Marca Registrada...
...maintenance agreement (Canada) on a product serviced by Sears: iiii ii ii !iii!ii !i!1!-8il0i0!-827-6655 (U,S,A,) 1-800-361-6665 (Canada) _iiiii_!i :!_i_ _ Para pedir servicio de reparacibn a domicilio, y para ordenar piezas: Au Canada pour service en francis: 1-800-LE-FOYER Mc i iill iii!il ..... For Sears professional installation..., no matter who sold itl For the replacement parts, accessories and fill II i_ii i!ii owner's manuals that you need to do-it-yourself. _ii!ili!iiiii!_'! iii;i;;i; For repair - :: Your Home ..... of Sears, Roebuck and Co. ® Marca Registrada...


