Operation Manual
Page 5
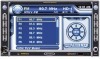
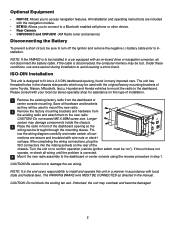
VM9423 INTRODUCTION Congratulations on your purchase of the instructions before beginning the installation. Supports Hard Drives and Flash Memory Drives • jLinkDirect for iPod • RCA Audio /Video Input Chassis • 2.0 DIN (Import/ISO-DIN...System - Once the NAV102 is connected and operating properly, the CAMERA source mode will become active. Before accessing any navigation features, you must purchase and install the NAV102 module. While the camera is not installed...Interface to read all of the Jensen VM9423 Mobile Multimedia Receiver. WARNING! We recommend having...
VM9423 INTRODUCTION Congratulations on your purchase of the instructions before beginning the installation. Supports Hard Drives and Flash Memory Drives • jLinkDirect for iPod • RCA Audio /Video Input Chassis • 2.0 DIN (Import/ISO-DIN...System - Once the NAV102 is connected and operating properly, the CAMERA source mode will become active. Before accessing any navigation features, you must purchase and install the NAV102 module. While the camera is not installed...Interface to read all of the Jensen VM9423 Mobile Multimedia Receiver. WARNING! We recommend having...
Operation Manual
Page 12
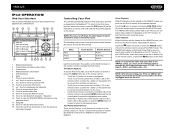
... two times to the PAC adapter. The LCD or TFT screen displays the volume level for detailed installation information. Adjusting the volume or using any of the audio setup features cancels the mute function. VM9423 OPERATING INSTRUCTIONS Power On / Off Press the /SRC button (6) on the unit (or the /POWER button (4) on...
... two times to the PAC adapter. The LCD or TFT screen displays the volume level for detailed installation information. Adjusting the volume or using any of the audio setup features cancels the mute function. VM9423 OPERATING INSTRUCTIONS Power On / Off Press the /SRC button (6) on the unit (or the /POWER button (4) on...
Operation Manual
Page 21
...): Repeat Single, Repeat Off NOTE: For VCD play button (>) to play . You can also select a title using the touch screen. 17 VM9423 DVD/VCD VIDEO OPERATION NOTE: When properly installed, DVD video cannot be authorized (see "General Sub-menu Features" on page 10). If you attempt to resume normal playback. NOTE: DVD...
...): Repeat Single, Repeat Off NOTE: For VCD play button (>) to play . You can also select a title using the touch screen. 17 VM9423 DVD/VCD VIDEO OPERATION NOTE: When properly installed, DVD video cannot be authorized (see "General Sub-menu Features" on page 10). If you attempt to resume normal playback. NOTE: DVD...
Operation Manual
Page 28
...the screen. Song title 18. NOTE: Be sure your iPod has the latest Apple firmware installed to view the SOURCE MENU and select a new playback source 17. Enter 7. Touch to resume normal playback. The VM9423 will release control back to the iPod so you can be displayed on the...19) for iPod playback are used to access the iPod menus: Menu Music Photos Videos Touch Screen Remote Control AUDIO SUB-TITLE ANGLE Use the touchscreen, the joystick, or the directional keys on screen to return to the previous menu. Touch to access photos 8. >>|: Touch to move to ...
...the screen. Song title 18. NOTE: Be sure your iPod has the latest Apple firmware installed to view the SOURCE MENU and select a new playback source 17. Enter 7. Touch to resume normal playback. The VM9423 will release control back to the iPod so you can be displayed on the...19) for iPod playback are used to access the iPod menus: Menu Music Photos Videos Touch Screen Remote Control AUDIO SUB-TITLE ANGLE Use the touchscreen, the joystick, or the directional keys on screen to return to the previous menu. Touch to access photos 8. >>|: Touch to move to ...
Operation Manual
Page 33
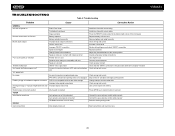
...power rating not compatible with current video settings Improper video signal connections Prolonged image or improper height/width ratio dis- VM9423 TROUBLESHOOTING Table 8: Troubleshooting Problem Cause Corrective Action GENERAL Unit will not power on screen DVD is not grounded and that...interference appears on Radio Fuse blown Car battery fuse blown Illegal operation Remote control does not function Battery depleted Battery installed incorrectly No/low audio output Improper audio output connection Volume set too low Improper "MUTE" connection Speakers damaged Heavily...
...power rating not compatible with current video settings Improper video signal connections Prolonged image or improper height/width ratio dis- VM9423 TROUBLESHOOTING Table 8: Troubleshooting Problem Cause Corrective Action GENERAL Unit will not power on screen DVD is not grounded and that...interference appears on Radio Fuse blown Car battery fuse blown Illegal operation Remote control does not function Battery depleted Battery installed incorrectly No/low audio output Improper audio output connection Volume set too low Improper "MUTE" connection Speakers damaged Heavily...
Operation Manual
Page 109
Limited Warranty CD or Multimedia Radios/Headunits Audiovox Electronics Corporation ("the Company") is committed to quality and customer service, and are not covered by improper installation, mishandling, misuse, neglect, accident, blown fuse, battery leakage, theft or improper storage • Products ...questions. The Company warrants that provides tracking service to compact discs, USB devices, digital media cards, accessories or vehicle electrical systems • Damage caused by this Warranty. No person or representative is authorized to state. This warranty is covered? What ...
Limited Warranty CD or Multimedia Radios/Headunits Audiovox Electronics Corporation ("the Company") is committed to quality and customer service, and are not covered by improper installation, mishandling, misuse, neglect, accident, blown fuse, battery leakage, theft or improper storage • Products ...questions. The Company warrants that provides tracking service to compact discs, USB devices, digital media cards, accessories or vehicle electrical systems • Damage caused by this Warranty. No person or representative is authorized to state. This warranty is covered? What ...

Quick Reference Guide
Page 3
Ÿ Navigation operation requires NAV102 installation Ÿ Bluetooth operation requires BTM10 installation Ÿ Rear Camera operation requires rear camera installation
Ÿ Navigation operation requires NAV102 installation Ÿ Bluetooth operation requires BTM10 installation Ÿ Rear Camera operation requires rear camera installation
Installation Guide
Page 1
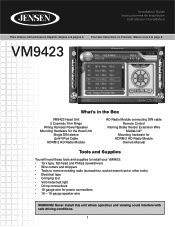
...Pour des instructions en Francais, référez-vous à la page 9. Never install this unit where operation and viewing could interfere with safe driving conditions. 1 VM9423 What's in the Box VM9423 Head Unit 2 Cosmetic Trim Rings Wiring Harness Power/Speaker Mounting Hardware for the Head Unit ...-2 HD Radio Module HD Radio Module connecting DIN cable Remote Control Parking Brake Sensor Extension Wire MediaLink4 Mounting hardware for HDRM-2 HD Radio Module Owners Manual Tools and Supplies You will need these tools and supplies to install your VM9423: • Torx type, flat-...
...Pour des instructions en Francais, référez-vous à la page 9. Never install this unit where operation and viewing could interfere with safe driving conditions. 1 VM9423 What's in the Box VM9423 Head Unit 2 Cosmetic Trim Rings Wiring Harness Power/Speaker Mounting Hardware for the Head Unit ...-2 HD Radio Module HD Radio Module connecting DIN cable Remote Control Parking Brake Sensor Extension Wire MediaLink4 Mounting hardware for HDRM-2 HD Radio Module Owners Manual Tools and Supplies You will need these tools and supplies to install your VM9423: • Torx type, flat-...
Installation Guide
Page 2
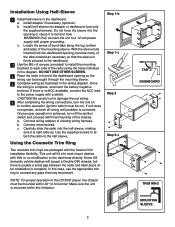
...off the ignition and remove the negative (-) battery cable prior to installation. NOTE: If the VM9423 is the end-users responsibility to install and operate this type of the dashboard opening , found in front of installation. 1 Remove the existing factory radio from the existing radio and ...and make certain all hardware and brackets as directed in the manual. Be careful not to avoid causing a short circuit. ISO-DIN Installation This unit is disconnected, the computer memory may be brought through the mounting sleeve. Please consult with the original factory mounting brackets...
...off the ignition and remove the negative (-) battery cable prior to installation. NOTE: If the VM9423 is the end-users responsibility to install and operate this type of the dashboard opening , found in front of installation. 1 Remove the existing factory radio from the existing radio and ...and make certain all hardware and brackets as directed in the manual. Be careful not to avoid causing a short circuit. ISO-DIN Installation This unit is disconnected, the computer memory may be brought through the mounting sleeve. Please consult with the original factory mounting brackets...
Installation Guide
Page 3
... final mounting of the dashboard opening or cause it is corrected. b. Install half-sleeve into the opening so the wiring can be on to existing wiring harness. This unit will accept a Double-DIN chassis, but there is usually a small gap between the radio and dash piece... after installation is complete, reconnect the battery negative terminal. Do not force the sleeve into adapter or dashboard...
... final mounting of the dashboard opening or cause it is corrected. b. Install half-sleeve into the opening so the wiring can be on to existing wiring harness. This unit will accept a Double-DIN chassis, but there is usually a small gap between the radio and dash piece... after installation is complete, reconnect the battery negative terminal. Do not force the sleeve into adapter or dashboard...

Installation Guide
Page 4
Follow the wiring instructions carefully, or have the installation handled by an experienced technician. For technical assistance, call the Jensen customer support line at 1-800-323-4815. Power Management Charges All iPods While Connected (jLink3 Included). Requires XM CNP2000UC and CNPJEN1 (Both Sold Separately) 4 Need Help? Wiring Diagram IMPORTANT: Incorrect wiring connections can damage the unit.
Follow the wiring instructions carefully, or have the installation handled by an experienced technician. For technical assistance, call the Jensen customer support line at 1-800-323-4815. Power Management Charges All iPods While Connected (jLink3 Included). Requires XM CNP2000UC and CNPJEN1 (Both Sold Separately) 4 Need Help? Wiring Diagram IMPORTANT: Incorrect wiring connections can damage the unit.


