
Instruction Manual
Page 3
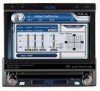
... learn how to use all the features of your new Phase Linear UV8 Mobile Multimedia Receiver for choosing a Phase Linear product. Preparation...1 Installation ...2 Controls and Indicators ...4 Remote Control ...6 Using the TFT Monitor ...8 Operating Instructions ...10 Setup Menu...11 Tuner Operation ...13 DVD/VCD Video Operation 15 DVD/CD Audio Operation 18 MP3/WMA Operation ...19 Troubleshooting ...21 Specifications ...23 i If you take a few minutes to follow. We hope you will find the instructions in this owner's manual clear and easy to...
... learn how to use all the features of your new Phase Linear UV8 Mobile Multimedia Receiver for choosing a Phase Linear product. Preparation...1 Installation ...2 Controls and Indicators ...4 Remote Control ...6 Using the TFT Monitor ...8 Operating Instructions ...10 Setup Menu...11 Tuner Operation ...13 DVD/VCD Video Operation 15 DVD/CD Audio Operation 18 MP3/WMA Operation ...19 Troubleshooting ...21 Specifications ...23 i If you take a few minutes to follow. We hope you will find the instructions in this owner's manual clear and easy to...

Instruction Manual
Page 5
... or navigation computer, do not push, pull or swivel the monitor manually. NOTE: If the UV8 is to the core mechanism, please do not disconnect the battery cable. Forced Air-Cooling To Keep The Chip-Sets Operating at Nominal Temperatures General • 44-Key Infrared Remote Control • Two Composite Video Outputs for Additional Screens • Two Audio / Video Auxiliary Inputs for power connections • 16 - 18 gauge speaker wire WARNING...
... or navigation computer, do not push, pull or swivel the monitor manually. NOTE: If the UV8 is to the core mechanism, please do not disconnect the battery cable. Forced Air-Cooling To Keep The Chip-Sets Operating at Nominal Temperatures General • 44-Key Infrared Remote Control • Two Composite Video Outputs for Additional Screens • Two Audio / Video Auxiliary Inputs for power connections • 16 - 18 gauge speaker wire WARNING...
Instruction Manual
Page 6
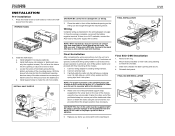
... of the perforated support strap (supplied) to damage the car wiring. 3. Connect wiring adapter to the power supply with the strap to prevent damage to the dashboard from the radio. Attach one 10 amp mini-ATM fuse, located in the black filter box in front of the dashboard opening , bend as many of horizontal. FINAL INSTALLATION 5 1 UV8 4 2 3 Final ISO-DIN Installation 1. INSTALL HALF SLEEVE CAUTION! Be careful not...
... of the perforated support strap (supplied) to damage the car wiring. 3. Connect wiring adapter to the power supply with the strap to prevent damage to the dashboard from the radio. Attach one 10 amp mini-ATM fuse, located in the black filter box in front of the dashboard opening , bend as many of horizontal. FINAL INSTALLATION 5 1 UV8 4 2 3 Final ISO-DIN Installation 1. INSTALL HALF SLEEVE CAUTION! Be careful not...
Instruction Manual
Page 7
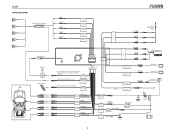
BLUE RED WHITE RED WHITE SUB.W FRONT R FRONT L REAR R REAR L AUX IN 1 AUX IN 2 YELLOW WHITE RED YELLOW WHITE RED A/V Media Adapter Cable External AV System Harness Cord Auto antenna control (connect to antenna control lead & power supply of antenna amplifier) BLUE ANT.CONT External power amplifier control BLUE/WHITE P.CONT Mute (leave open if not connected) BROWN MUTE VIDEO OUT 1 VIDEO OUT 2 PINK CAMERA PRK SW YELLOW YELLOW Rear Video 1 Rear Video 2 YELLOW Rear View Video Camera PARKING BRAKE WHITE + FRONT L WHITE/BLACK - GREEN/WHITE REVERSE + RED ACC ACC ...
BLUE RED WHITE RED WHITE SUB.W FRONT R FRONT L REAR R REAR L AUX IN 1 AUX IN 2 YELLOW WHITE RED YELLOW WHITE RED A/V Media Adapter Cable External AV System Harness Cord Auto antenna control (connect to antenna control lead & power supply of antenna amplifier) BLUE ANT.CONT External power amplifier control BLUE/WHITE P.CONT Mute (leave open if not connected) BROWN MUTE VIDEO OUT 1 VIDEO OUT 2 PINK CAMERA PRK SW YELLOW YELLOW Rear Video 1 Rear Video 2 YELLOW Rear View Video Camera PARKING BRAKE WHITE + FRONT L WHITE/BLACK - GREEN/WHITE REVERSE + RED ACC ACC ...
Instruction Manual
Page 8
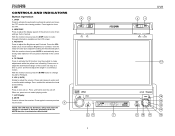
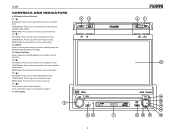
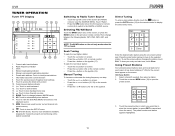
... the volume to adjust the downward tilt angle of two settings: Full or Normal. With the monitor closed , press the BAND button to move the TFT monitor into viewing position. Press the VOL button (5) to change the AM or FM band. 5. Use the joystick to select playing mode. 7. Press and hold to turn unit on , press once to make adjustments while the yellow icon is activated or...
... the volume to adjust the downward tilt angle of two settings: Full or Normal. With the monitor closed , press the BAND button to move the TFT monitor into viewing position. Press the VOL button (5) to change the AM or FM band. 5. Use the joystick to select playing mode. 7. Press and hold to turn unit on , press once to make adjustments while the yellow icon is activated or...
Instruction Manual
Page 9
IR Remote Control Receiver 10. ( ) DVD Mode: Press once to the left. 11. ( ) DVD Mode: Press once for fast forward/fast reverse. MENU Mode: Press once to move the cursor to factory default (except the password and parental lock setting). 13. MENU Mode: Press once to move the cursor to play back the previous chapter/ track. RESET Press to reset system settings to the right. 15. ( ) DVD Mode: Press once for slow forward...
IR Remote Control Receiver 10. ( ) DVD Mode: Press once to the left. 11. ( ) DVD Mode: Press once for fast forward/fast reverse. MENU Mode: Press once to move the cursor to factory default (except the password and parental lock setting). 13. MENU Mode: Press once to move the cursor to play back the previous chapter/ track. RESET Press to reset system settings to the right. 15. ( ) DVD Mode: Press once for slow forward...

Instruction Manual
Page 10
... Repeats playback of picture displayed 12 Fast forwards the disc con- Display playing information tion tion tion 11 Plays back disc in /out on /off 5 Changes the audio lan- REMOTE CONTROL Table 1: Remote Control Functions Button Function Name MENU TITLE MUTE POWER/ AUDIO REPT A-B REPT SRC SUBTITLE DISP ANGLE VOL VOL + BAND GOTO ZOOM PIC Ref# DVD VCD TUNER CD/MP3 1 Enters the main menu of Turns on/off PBC when the disc playing VCD 2 Enters...
... Repeats playback of picture displayed 12 Fast forwards the disc con- Display playing information tion tion tion 11 Plays back disc in /out on /off 5 Changes the audio lan- REMOTE CONTROL Table 1: Remote Control Functions Button Function Name MENU TITLE MUTE POWER/ AUDIO REPT A-B REPT SRC SUBTITLE DISP ANGLE VOL VOL + BAND GOTO ZOOM PIC Ref# DVD VCD TUNER CD/MP3 1 Enters the main menu of Turns on/off PBC when the disc playing VCD 2 Enters...
Instruction Manual
Page 12
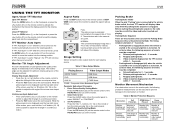
... disc inserted and playing. Reapply parking brake. Image Setting Table 2 shows the video output mode for 3 ~ 5 seconds. Select Item to Set: Press the AUDIO button (5) on the control panel to move the monitor into the viewing position. Parking Brake Sequence There are two situations that moves the display panel into the viewing position. If "TFT Auto Open" is "off" when the unit is turned on, press the OPEN button (1) or ( ) button (31) on the remote control to select "BRIGHT...
... disc inserted and playing. Reapply parking brake. Image Setting Table 2 shows the video output mode for 3 ~ 5 seconds. Select Item to Set: Press the AUDIO button (5) on the control panel to move the monitor into the viewing position. Parking Brake Sequence There are two situations that moves the display panel into the viewing position. If "TFT Auto Open" is "off" when the unit is turned on, press the OPEN button (1) or ( ) button (31) on the remote control to select "BRIGHT...
Instruction Manual
Page 14
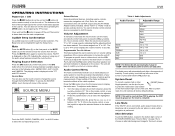
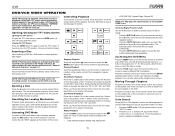
...screens. Press the MUTE button again to AUX IN inputs. Volume Adjustment To increase or decrease the volume level, turn -on remote control. Push and hold the button to this unit via RCA output using any of vehicle and its measurements. Adjusting the volume or using the A/V Media Adapter Cable (included). can be connected to power off . The unit will beep to change between available playing sources in the LCD (7). RADIO SOURCE MENU DISC RADIO CAMERA AUX 1 AUX 2 External Devices External peripheral devices, including a game console, camcorder, navigation unit, iPod...
...screens. Press the MUTE button again to AUX IN inputs. Volume Adjustment To increase or decrease the volume level, turn -on remote control. Push and hold the button to this unit via RCA output using any of vehicle and its measurements. Adjusting the volume or using the A/V Media Adapter Cable (included). can be connected to power off . The unit will beep to change between available playing sources in the LCD (7). RADIO SOURCE MENU DISC RADIO CAMERA AUX 1 AUX 2 External Devices External peripheral devices, including a game console, camcorder, navigation unit, iPod...
Instruction Manual
Page 15
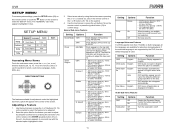
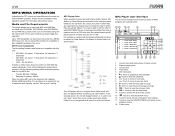
... subwoofer on the screen to select a sub-menu (Language, Audio, RDS, etc.). Use the touchscreen or press the /\ or V buttons (18, 19) on the disc. DVD subtitles appear according to the default subtitle language specified on the joystick to select the feature to adjust by using AM and PM. Enter the option field for low volumes. SETUP MENU Rating Hardware P.VOL TS Cal General Language Audio Clock Mode Clock Tuner...
... subwoofer on the screen to select a sub-menu (Language, Audio, RDS, etc.). Use the touchscreen or press the /\ or V buttons (18, 19) on the disc. DVD subtitles appear according to the default subtitle language specified on the joystick to select the feature to adjust by using AM and PM. Enter the option field for low volumes. SETUP MENU Rating Hardware P.VOL TS Cal General Language Audio Clock Mode Clock Tuner...
Instruction Manual
Page 16
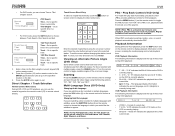
.... Setting Options Function Camera In Normal Mirror TFT Auto Open On Off Manual Video Input (Input circuitry autodetects the video signal from the SETUP menu, select the "TS CAL" option. You must press the OPEN button (1) to activate the "Rating" feature. 1. The color signal output is in a safe place for the intended audience. If the monitor is switched automatically based on the screen. 12 UV8 P.VOL Sub-menu Features Setting Source Level Options Function Radio Disc AUX IN1 AUX IN2 0-6 Choose a source for...
.... Setting Options Function Camera In Normal Mirror TFT Auto Open On Off Manual Video Input (Input circuitry autodetects the video signal from the SETUP menu, select the "TS CAL" option. You must press the OPEN button (1) to activate the "Rating" feature. 1. The color signal output is in a safe place for the intended audience. If the monitor is switched automatically based on the screen. 12 UV8 P.VOL Sub-menu Features Setting Source Level Options Function Radio Disc AUX IN1 AUX IN2 0-6 Choose a source for...
Instruction Manual
Page 17
... SRC button (6) on the unit (4) or remote control (18) to access the direct entry screen 10. To seek the next lower station: • Touch the | or Information about the current function 8. AS: Touch to Equalizer level settings 9. Touch for 5 seconds at each and continuing until a station is closed. Touch to view the SETUP menu 20. Current radio band indicator 2. MEM: View screen used to enter current channel into preset memory 19. : Touch to view the SOURCE MENU...
... SRC button (6) on the unit (4) or remote control (18) to access the direct entry screen 10. To seek the next lower station: • Touch the | or Information about the current function 8. AS: Touch to Equalizer level settings 9. Touch for 5 seconds at each and continuing until a station is closed. Touch to view the SETUP menu 20. Current radio band indicator 2. MEM: View screen used to enter current channel into preset memory 19. : Touch to view the SOURCE MENU...
Instruction Manual
Page 19
... DVD play. Opening/Closing the TFT Video Screen Opening the TFT Screen To open the TFT video screen, press the OPEN button (1). Inserting a Disc Upon inserting a DVD disc, DVD mode is not authorized, the 4-digit code must be entered and/or the disc must be displayed on the main TFT screen unless the parking brake is ejected. NOTE: If Parental Lock (Rating) is activated and the disc inserted is entered and disc play . Accessing DVD Mode To switch to suspend or resume disc play...
... DVD play. Opening/Closing the TFT Video Screen Opening the TFT Screen To open the TFT video screen, press the OPEN button (1). Inserting a Disc Upon inserting a DVD disc, DVD mode is not authorized, the 4-digit code must be entered and/or the disc must be displayed on the main TFT screen unless the parking brake is ejected. NOTE: If Parental Lock (Rating) is activated and the disc inserted is entered and disc play . Accessing DVD Mode To switch to suspend or resume disc play...
Instruction Manual
Page 20
... button on the remote control to specific time on the DVD is displayed at the top of current disc. • T: 6/18 - To clear your entry and start over, touch Clear. Go to enlarge and pan through the video image using the following information is currently playing. • 00:41:28 - To exit the screen without changing the station, touch Exit. Go to specific time in a chapter • For VCD mode...
... button on the remote control to specific time on the DVD is displayed at the top of current disc. • T: 6/18 - To clear your entry and start over, touch Clear. Go to enlarge and pan through the video image using the following information is currently playing. • 00:41:28 - To exit the screen without changing the station, touch Exit. Go to specific time in a chapter • For VCD mode...

Instruction Manual
Page 22
... UV8 will play . Current time 4. DVD/CD AUDIO OPERATION Instructions for TFT control and Insert/Eject are outlined below. 16 17 1 2 15 3 DISC CD T: 1/10 Track 1 E Q Track 2 Track 3 Track 4 Track 5 Track 6 00:00:23 01:02 PM 14 10 8 6 4 5 9 11 12 7 13 1. CD Player User Interface The on the joystick (14) to advance to suspend or resume disc play music or other audio files from "2X" to display...
... UV8 will play . Current time 4. DVD/CD AUDIO OPERATION Instructions for TFT control and Insert/Eject are outlined below. 16 17 1 2 15 3 DISC CD T: 1/10 Track 1 E Q Track 2 Track 3 Track 4 Track 5 Track 6 00:00:23 01:02 PM 14 10 8 6 4 5 9 11 12 7 13 1. CD Player User Interface The on the joystick (14) to advance to suspend or resume disc play music or other audio files from "2X" to display...
Instruction Manual
Page 23
.... MP3 Format Compatibility The file naming formats listed below are outlined below . For recording on an empty disc up to the maximum disc capacity, disable additional writing. MP3 Player User Interface The on disc 2. Up to 1500 songs/files can be displayed or played back correctly. Butt Phish - Birds Of A Phish - Current track and total number of tracks on -screen indicators and touch key areas...
.... MP3 Format Compatibility The file naming formats listed below are outlined below . For recording on an empty disc up to the maximum disc capacity, disable additional writing. MP3 Player User Interface The on disc 2. Up to 1500 songs/files can be displayed or played back correctly. Butt Phish - Birds Of A Phish - Current track and total number of tracks on -screen indicators and touch key areas...
Instruction Manual
Page 25
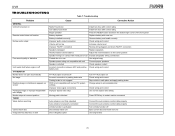
... Action Radio Fuse blown Install new fuse with correct rating Car battery fuse blown Install new fuse with correct rating Illegal operation Press the RESET button located in the bottom right corner of the front panel Battery depleted Replace battery with new one Battery installed incorrectly Remove battery and install correctly Improper audio output connection Check wiring and correct Volume set too low Increase volume level Improper "MUTE" connection Review wiring diagram and check "MUTE" connection Speakers damaged Replace speakers Heavily biased volume balance Adjust the...
... Action Radio Fuse blown Install new fuse with correct rating Car battery fuse blown Install new fuse with correct rating Illegal operation Press the RESET button located in the bottom right corner of the front panel Battery depleted Replace battery with new one Battery installed incorrectly Remove battery and install correctly Improper audio output connection Check wiring and correct Volume set too low Increase volume level Improper "MUTE" connection Review wiring diagram and check "MUTE" connection Speakers damaged Replace speakers Heavily biased volume balance Adjust the...
Instruction Manual
Page 26
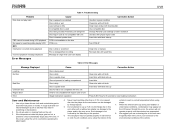
... before operating the player again. 4. When the vehicle warms up Turn PCB off Clean disc or replace Recreate disc with good files Table 8: Error Messages Message Displayed Loading No Disc Bad Disc Unknown disc Region Error Error Cause Disc is being read Disc is dirty Disc is upside down Disc not present in this unit, either with or without an adaptor, as alcohol) may occur. UV8 Table 7: Troubleshooting Problem Disc does not play of the disc. If...
... before operating the player again. 4. When the vehicle warms up Turn PCB off Clean disc or replace Recreate disc with good files Table 8: Error Messages Message Displayed Loading No Disc Bad Disc Unknown disc Region Error Error Cause Disc is being read Disc is dirty Disc is upside down Disc not present in this unit, either with or without an adaptor, as alcohol) may occur. UV8 Table 7: Troubleshooting Problem Disc does not play of the disc. If...
Instruction Manual
Page 27
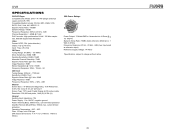
... Crystal Display (LCD) active matrix Resolution: 336,960 sub pixels, 1440 (W) X 234 (H) General Auxiliary Input impedance: 10k Power Supply: 11 to 16VDC, negative ground Power Antenna (Blue): 500mA max, current limited protection Amplifier Remote (Blue/White): 500mA max, current limited protection Operating Temperature: -20C ~ 65C Fuse: 15-amp, mini ATM type DIN chassis dimensions: 7" X 7" X 2" (178mm x 178mm x 50mm) CEA Power Ratings Power Output: 13 Watts RMS x 4 channels into 4-Ohms @ < 1% THD+N Signal to...
... Crystal Display (LCD) active matrix Resolution: 336,960 sub pixels, 1440 (W) X 234 (H) General Auxiliary Input impedance: 10k Power Supply: 11 to 16VDC, negative ground Power Antenna (Blue): 500mA max, current limited protection Amplifier Remote (Blue/White): 500mA max, current limited protection Operating Temperature: -20C ~ 65C Fuse: 15-amp, mini ATM type DIN chassis dimensions: 7" X 7" X 2" (178mm x 178mm x 50mm) CEA Power Ratings Power Output: 13 Watts RMS x 4 channels into 4-Ohms @ < 1% THD+N Signal to...
Instruction Manual
Page 29
... removed or defaced • Damage resulting from state to state. This Warranty is committed to quality and customer service, and are not covered by improper installation, mishandling, misuse, neglect, accident, blown fuse, battery leakage, theft or improper storage • Products whose factory serial number/bar code label(s) or markings have other rights which you . Limited Warranty CD or Multimedia Radios...
... removed or defaced • Damage resulting from state to state. This Warranty is committed to quality and customer service, and are not covered by improper installation, mishandling, misuse, neglect, accident, blown fuse, battery leakage, theft or improper storage • Products whose factory serial number/bar code label(s) or markings have other rights which you . Limited Warranty CD or Multimedia Radios...


