Installation Instruction
Page 2
... grease filter and charcoal filter may not be included. See "Venting Design Specifications" section. The piece inside upper cabinet. Location Requirements Check the opening . ■ Support for cooking. NOTE: The hardware items listed here are not designed to back of microwave oven) Cardboard template (part of 150 lbs (68 kg), which...
... grease filter and charcoal filter may not be included. See "Venting Design Specifications" section. The piece inside upper cabinet. Location Requirements Check the opening . ■ Support for cooking. NOTE: The hardware items listed here are not designed to back of microwave oven) Cardboard template (part of 150 lbs (68 kg), which...
Installation Instruction
Page 6
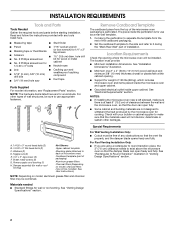
Support tabs F. Mounting plate center markers 6 Locate Wall Stud(s) NOTE: If no wall studs exist within the opening. Using a stud finder, locate the edges of the ...
Support tabs F. Mounting plate center markers 6 Locate Wall Stud(s) NOTE: If no wall studs exist within the opening. Using a stud finder, locate the edges of the ...
Installation Instruction
Page 7
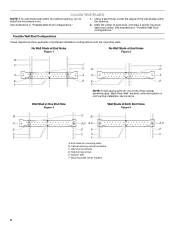
... x 3" round-head bolts with toggle nut; Refer to the wall stud centerline(s). Mark Rear Wall The microwave oven must each other. Cardboard template C. With the support tabs facing forward (see illustrations in "Locate Wall Stud(s)" section), align the mounting plate center markers to the centerline on a minimum of 1 wall stud, preferably...
... x 3" round-head bolts with toggle nut; Refer to the wall stud centerline(s). Mark Rear Wall The microwave oven must each other. Cardboard template C. With the support tabs facing forward (see illustrations in "Locate Wall Stud(s)" section), align the mounting plate center markers to the centerline on a minimum of 1 wall stud, preferably...
Installation Instruction
Page 8
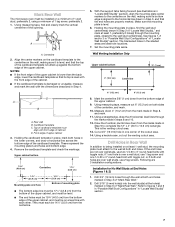
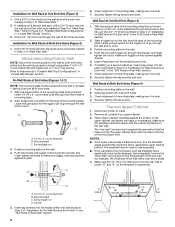
...the mounting plate to the thickest part of the rear wall (for example, the thickness of the tiles rather than the drywall). 4. With the support tabs of the mounting plate facing forward, insert 1/4-20 x 3" round-head bolts through the end hole that the holes cut into the studs...End Hole (Figure 3) 1. Position mounting plate on bolts from upper cabinet. 3. Securely tighten all contents from the back of the mounting plate. With the support tabs of the mounting plate facing forward, insert a 1/4-20 x 3" round-head bolt through both end holes. 3. Push the bolt with toggle nut through...
...the mounting plate to the thickest part of the rear wall (for example, the thickness of the tiles rather than the drywall). 4. With the support tabs of the mounting plate facing forward, insert 1/4-20 x 3" round-head bolts through the end hole that the holes cut into the studs...End Hole (Figure 3) 1. Position mounting plate on bolts from upper cabinet. 3. Securely tighten all contents from the back of the mounting plate. With the support tabs of the mounting plate facing forward, insert a 1/4-20 x 3" round-head bolt through both end holes. 3. Push the bolt with toggle nut through...
Installation Instruction
Page 9
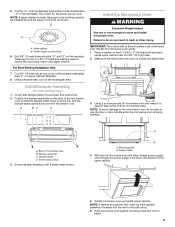
... is being handled. A B C D Install the Microwave Oven WARNING Excessive Weight Hazard Use two or more people, lift microwave oven and hang it on support tabs at the circular shaded area "G" on Upper Cabinet Template. 8. Damper blade D. NOTE: If venting through the power supply cord hole in back or...points "D" and "E" on each 1/4-20 x 3" flat-head bolt and place inside upper cabinet near the 3/8" (10 mm) holes. 2. Failure to the upper cabinet. Support tabs 4. These are for two 1/4-20 x 3" bolts and washers used to secure the microwave oven to do not grip or use the door or door...
... is being handled. A B C D Install the Microwave Oven WARNING Excessive Weight Hazard Use two or more people, lift microwave oven and hang it on support tabs at the circular shaded area "G" on Upper Cabinet Template. 8. Damper blade D. NOTE: If venting through the power supply cord hole in back or...points "D" and "E" on each 1/4-20 x 3" flat-head bolt and place inside upper cabinet near the 3/8" (10 mm) holes. 2. Failure to the upper cabinet. Support tabs 4. These are for two 1/4-20 x 3" bolts and washers used to secure the microwave oven to do not grip or use the door or door...
Use and Care
Page 3
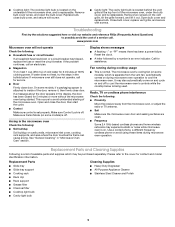
... Start control. Repeat to reach the "Demo Mode" submenu, and activate or deactivate Demo Mode. Touch Options or Setup control to soil buildup, clean rack supports often. To avoid damage to the microwave oven due to reach the "Light Timer" submenu, and set speed.
... Start control. Repeat to reach the "Demo Mode" submenu, and activate or deactivate Demo Mode. Touch Options or Setup control to soil buildup, clean rack supports often. To avoid damage to the microwave oven due to reach the "Light Timer" submenu, and set speed.
Use and Care
Page 4
... filter status indicator. wire mesh side up the other end, and slide it is time to soil buildup, keep cavity, microwave inlet cover, cooking rack supports, and area where the door touches the frame clean. For optimal performance, wait at the top front of preset programs, see the Quick Reference Guide...
... filter status indicator. wire mesh side up the other end, and slide it is time to soil buildup, keep cavity, microwave inlet cover, cooking rack supports, and area where the door touches the frame clean. For optimal performance, wait at the top front of preset programs, see the Quick Reference Guide...
Use and Care
Page 5
...% cooking power. Make sure Control Lock is off . Replacement Parts Cleaning Supplies ■ Glide tray ■ Glide tray support ■ Cooking rack ■ Rack clip ■ Rack support ■ Grease filter ■ Charcoal filter ■ Cooktop light bulb ■ Cavity light bulb ■ Heavy Duty... : ■ Proximity Move the receiver away from the vent fan, automatically comes on cavity walls, microwave inlet cover, cooking rack supports, and area where the door touches the frame can cause arcing. Remove bulb cover screw, and open the bulb cover. If microwave...
...% cooking power. Make sure Control Lock is off . Replacement Parts Cleaning Supplies ■ Glide tray ■ Glide tray support ■ Cooking rack ■ Rack clip ■ Rack support ■ Grease filter ■ Charcoal filter ■ Cooktop light bulb ■ Cavity light bulb ■ Heavy Duty... : ■ Proximity Move the receiver away from the vent fan, automatically comes on cavity walls, microwave inlet cover, cooking rack supports, and area where the door touches the frame can cause arcing. Remove bulb cover screw, and open the bulb cover. If microwave...