Installation Instruction
Page 1
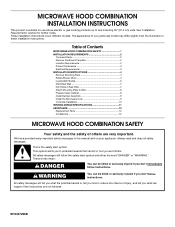
The appearance of Contents MICROWAVE HOOD COMBINATION SAFETY 1 INSTALLATION REQUIREMENTS 2 Tools and Parts 2 Remove Cardboard Template 2 Location Requirements 2 Product Dimensions 3 Electrical Requirements 3 INSTALLATION INSTRUCTIONS 4 Remove Mounting Plate 4 Rotate Blower Motor 4... Upper Cabinet 8 Install Damper Assembly 9 Install the Microwave Oven 9 Complete Installation 10 VENTING DESIGN SPECIFICATIONS 11 ASSISTANCE 12 Replacement Parts 12 Accessories 12 MICROWAVE HOOD COMBINATION SAFETY Your safety and the safety of injury, and tell you how to potential hazards that...
The appearance of Contents MICROWAVE HOOD COMBINATION SAFETY 1 INSTALLATION REQUIREMENTS 2 Tools and Parts 2 Remove Cardboard Template 2 Location Requirements 2 Product Dimensions 3 Electrical Requirements 3 INSTALLATION INSTRUCTIONS 4 Remove Mounting Plate 4 Rotate Blower Motor 4... Upper Cabinet 8 Install Damper Assembly 9 Install the Microwave Oven 9 Complete Installation 10 VENTING DESIGN SPECIFICATIONS 11 ASSISTANCE 12 Replacement Parts 12 Accessories 12 MICROWAVE HOOD COMBINATION SAFETY Your safety and the safety of injury, and tell you how to potential hazards that...
Installation Instruction
Page 2
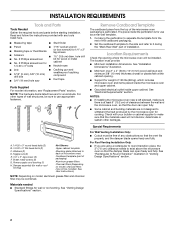
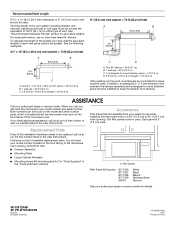
...3 Phillips screwdriver for wall or roof venting. NOTE: The hardware items listed here are not designed to back of microwave oven) Cardboard template (part of the microwave oven packaging is for use appropriate fasteners. Toggle nuts (2) E. 1/4" x 2" lag screws (2) F. Power supply cord bushing ...If you are using a rectangular to round transition piece, the 3" (7.6 cm) clearance needs to it during the "Mark Rear Wall" part of the cardboard packaging. 2. See "Electrical Requirements" section. NOTES: ■ If installing the microwave oven near a left sidewall, make ...
...3 Phillips screwdriver for wall or roof venting. NOTE: The hardware items listed here are not designed to back of microwave oven) Cardboard template (part of the microwave oven packaging is for use appropriate fasteners. Toggle nuts (2) E. 1/4" x 2" lag screws (2) F. Power supply cord bushing ...If you are using a rectangular to round transition piece, the 3" (7.6 cm) clearance needs to it during the "Mark Rear Wall" part of the cardboard packaging. 2. See "Electrical Requirements" section. NOTES: ■ If installing the microwave oven near a left sidewall, make ...
Installation Instruction
Page 8
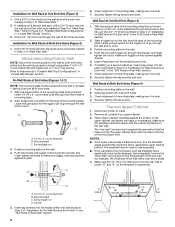
... the support tabs of the mounting plate facing forward, insert a 1/4-20 x 3" round-head bolt through the drywall, and finger tighten the bolts to the thickest part of the rear wall (for example, the thickness of "Installation for Wall Studs at Both End Holes (Figure 4) 1. Securely tighten the lag screw(s) and bolt...
... the support tabs of the mounting plate facing forward, insert a 1/4-20 x 3" round-head bolt through the drywall, and finger tighten the bolts to the thickest part of the rear wall (for example, the thickness of "Installation for Wall Studs at Both End Holes (Figure 4) 1. Securely tighten the lag screw(s) and bolt...
Installation Instruction
Page 12
.... Each panel is located behind the door. ■ Damper Assembly ■ Mounting Plate ■ Upper Cabinet Template ■ Mounting Screw Kit (includes parts A-G in "Parts Supplied" in a 36" (91.4 cm) or 42" (106.7 cm) wide opening , behind the microwave oven door on the model and serial ... in pairs. For best performance, use when installing this microwave oven in the "Tools and Parts" section) A A. If you will need the microwave oven model number and serial number. Replacement Parts If any of the microwave oven opening . You will need your dealer to round transition piece...
.... Each panel is located behind the door. ■ Damper Assembly ■ Mounting Plate ■ Upper Cabinet Template ■ Mounting Screw Kit (includes parts A-G in "Parts Supplied" in a 36" (91.4 cm) or 42" (106.7 cm) wide opening , behind the microwave oven door on the model and serial ... in pairs. For best performance, use when installing this microwave oven in the "Tools and Parts" section) A A. If you will need the microwave oven model number and serial number. Replacement Parts If any of the microwave oven opening . You will need your dealer to round transition piece...
Use and Care
Page 1
... hazard is the safety alert symbol. You will follow instructions. Puede encontrar su número de modelo y de serie en la etiqueta ubicada en la parte frontal de la abertura del horno de microondas, detrás de la puerta. All safety messages will need assistance, call us at www.jennair.com...
... hazard is the safety alert symbol. You will follow instructions. Puede encontrar su número de modelo y de serie en la etiqueta ubicada en la parte frontal de la abertura del horno de microondas, detrás de la puerta. All safety messages will need assistance, call us at www.jennair.com...
Use and Care
Page 2
...■ When flambeing foods under the hood, turn oven off, and disconnect the power cord, or shut off the pad and touch electrical parts involving a risk of the microwave oven when the microwave oven is damaged. This type of injury to defeat or tamper with maximum width of... overheat the liquid. - Grease should not be boiling. Do not use straight-sided containers with such features). ■ Do not store any materials, other part of 36" (91.44 cm). ■ Clean Ventilating Hoods Frequently - Do not use the microwave oven near a swimming pool, or similar locations. ■...
...■ When flambeing foods under the hood, turn oven off, and disconnect the power cord, or shut off the pad and touch electrical parts involving a risk of the microwave oven when the microwave oven is damaged. This type of injury to defeat or tamper with maximum width of... overheat the liquid. - Grease should not be boiling. Do not use straight-sided containers with such features). ■ Do not store any materials, other part of 36" (91.44 cm). ■ Clean Ventilating Hoods Frequently - Do not use the microwave oven near a swimming pool, or similar locations. ■...
Use and Care
Page 3
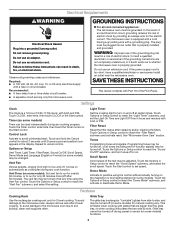
.... 3 or P.M. Touch the Options or Setup control to unlock control. Touch the Start control to follow these instructions can result in hours and minutes with Part 18 of the FCC Rules. This is equipped with a cord having a grounding wire with a fuse or circuit breaker. Glide tray cannot be used independently during...
.... 3 or P.M. Touch the Options or Setup control to unlock control. Touch the Start control to follow these instructions can result in hours and minutes with Part 18 of the FCC Rules. This is equipped with a cord having a grounding wire with a fuse or circuit breaker. Glide tray cannot be used independently during...
Use and Care
Page 5
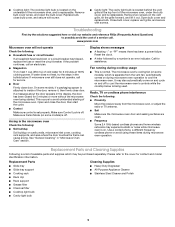
...service. ■ Door Firmly close door. The microwave oven's cooling fan (on during microwave oven operation to cool the microwave oven. Replacement Parts and Cleaning Supplies Following is a list of a service call for 5 minutes or more without the microwave oven being used. Replace bulb,... ■ Cooktop light: The cooktop light bulb is located on and off to cool the microwave oven's controls while the cooktop below . Replacement Parts Cleaning Supplies ■ Glide tray ■ Glide tray support ■ Cooking rack ■ Rack clip ■ Rack support ■ Grease ...
...service. ■ Door Firmly close door. The microwave oven's cooling fan (on during microwave oven operation to cool the microwave oven. Replacement Parts and Cleaning Supplies Following is a list of a service call for 5 minutes or more without the microwave oven being used. Replace bulb,... ■ Cooktop light: The cooktop light bulb is located on and off to cool the microwave oven's controls while the cooktop below . Replacement Parts Cleaning Supplies ■ Glide tray ■ Glide tray support ■ Cooking rack ■ Rack clip ■ Rack support ■ Grease ...

Use and Care
Page 6
...purchase, when this appliance is operated and maintained according to instructions attached to or furnished with the product, Jenn-Air will pay for factory specified parts for the following components (if applicable to the product) if defective in accordance with published installation instructions. ... operated and maintained according to instructions attached to or furnished with the product, Jenn-Air brand of Whirlpool Corporation or Whirlpool Canada LP (hereafter "Jenn-Air") will pay for factory specified parts and repair labor to correct house wiring or plumbing. 2. Service must be ...
...purchase, when this appliance is operated and maintained according to instructions attached to or furnished with the product, Jenn-Air will pay for factory specified parts for the following components (if applicable to the product) if defective in accordance with published installation instructions. ... operated and maintained according to instructions attached to or furnished with the product, Jenn-Air brand of Whirlpool Corporation or Whirlpool Canada LP (hereafter "Jenn-Air") will pay for factory specified parts and repair labor to correct house wiring or plumbing. 2. Service must be ...
Warranty
Page 1
... Any food loss due to the appliance. 9. This major appliance is designed to be provided by a Jenn-Air designated service company. Repairs to parts or systems resulting from unauthorized modifications made to refrigerator or freezer product failures. 7. This warranty is void if... and maintained according to instructions attached to or furnished with the product, Jenn-Air brand of Whirlpool Corporation or Whirlpool Canada LP (hereafter "Jenn-Air") will pay for factory specified parts and repair labor to correct defects in materials or workmanship. Costs associated ...
... Any food loss due to the appliance. 9. This major appliance is designed to be provided by a Jenn-Air designated service company. Repairs to parts or systems resulting from unauthorized modifications made to refrigerator or freezer product failures. 7. This warranty is void if... and maintained according to instructions attached to or furnished with the product, Jenn-Air brand of Whirlpool Corporation or Whirlpool Canada LP (hereafter "Jenn-Air") will pay for factory specified parts and repair labor to correct defects in materials or workmanship. Costs associated ...