Use and Care
Page 3
... explode and should not be serviced only by children. ■ The microwave oven should be heated in the microwave oven. ■ Use the microwave oven only for industrial or laboratory use. ■ Oversized foods or oversized metal utensils should be inserted in the microwave oven as whole eggs in this manual and on the microwave oven. Always read and obey all instructions before using electrical appliances basic safety precautions...
... explode and should not be serviced only by children. ■ The microwave oven should be heated in the microwave oven. ■ Use the microwave oven only for industrial or laboratory use. ■ Oversized foods or oversized metal utensils should be inserted in the microwave oven as whole eggs in this manual and on the microwave oven. Always read and obey all instructions before using electrical appliances basic safety precautions...
Use and Care
Page 4
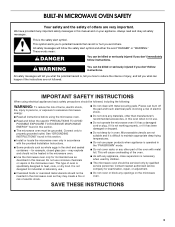
... the: (1) Door (bent), (2) Hinges and latches (broken or loosened), (3) Door seals and sealing surfaces. (d) The oven should ignite, keep oven door closed, turn oven off, and disconnect the power cord, or shut off power at the fuse or circuit breaker panel. - Do not overcook food. Remove wire twist-ties from the microwave oven is no damage to accumulate on the microwave oven. Do not leave paper products, cooking utensils, or food in the...
... the: (1) Door (bent), (2) Hinges and latches (broken or loosened), (3) Door seals and sealing surfaces. (d) The oven should ignite, keep oven door closed, turn oven off, and disconnect the power cord, or shut off power at the fuse or circuit breaker panel. - Do not overcook food. Remove wire twist-ties from the microwave oven is no damage to accumulate on the microwave oven. Do not leave paper products, cooking utensils, or food in the...
Use and Care
Page 5
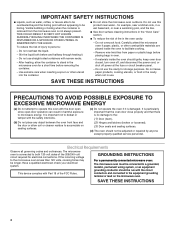
... best microwave performance, it is recommended to help cook food more evenly. Model and serial number plate (on the support should fit inside the turntable bottom ridge. The rollers on center vent under control panel. The raised, curved lines in place. PARTS AND FEATURES This manual covers different models. Hub Turntable The turntable rotates in both directions to always leave the turntable on combination models. NOTE: On single microwave oven models, on the left side trim.) C. Broil...
... best microwave performance, it is recommended to help cook food more evenly. Model and serial number plate (on the support should fit inside the turntable bottom ridge. The rollers on center vent under control panel. The raised, curved lines in place. PARTS AND FEATURES This manual covers different models. Hub Turntable The turntable rotates in both directions to always leave the turntable on combination models. NOTE: On single microwave oven models, on the left side trim.) C. Broil...

Use and Care
Page 9
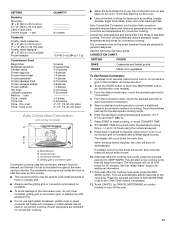
... Creations Setup Menu Button Lock Turntable: On Back Start More Menu Demonstration The following demonstrates a sequence showing how to BAKED POTATO. 4. Press START. 9 settings can be accessed. From the Select Mode menu, touch the quickset pad next to select one of 3 Start More 3. Touch the START button or touch the MICROWAVE button (on combination oven models). 2. Main Menu From the Main Menu, all automatic cooking programs can be programmed; Reheat Select mode: SpeedCook Foods Convection...
... Creations Setup Menu Button Lock Turntable: On Back Start More Menu Demonstration The following demonstrates a sequence showing how to BAKED POTATO. 4. Press START. 9 settings can be accessed. From the Select Mode menu, touch the quickset pad next to select one of 3 Start More 3. Touch the START button or touch the MICROWAVE button (on combination oven models). 2. Main Menu From the Main Menu, all automatic cooking programs can be programmed; Reheat Select mode: SpeedCook Foods Convection...
Use and Care
Page 11
.... From the "Select Mode" menu, touch MORE until Button Lock appears. The additional 30 seconds will heat faster than irregularly shaped food. Do not use the number keypad. 12. See "Assistance or Service" section to it does not absorb microwaves. ■ Use oven mitts or pot holders when removing containers from the "Built-in Foods" list and can now be locked. Steam buildup in microwave oven. ■ Clothes, flowers...
.... From the "Select Mode" menu, touch MORE until Button Lock appears. The additional 30 seconds will heat faster than irregularly shaped food. Do not use the number keypad. 12. See "Assistance or Service" section to it does not absorb microwaves. ■ Use oven mitts or pot holders when removing containers from the "Built-in Foods" list and can now be locked. Steam buildup in microwave oven. ■ Clothes, flowers...
Use and Care
Page 12
... Time Food will continue to cook by the natural conduction of light) can be turned halfway through the cooking process. Turntable On/Off For best performance, the turntable should be used properly, arcing (a blue flash of heat even after the microwave cooking cycle ends. If using . See the "Turntable" section for use oven mitts or pot holders when handling because any dish may be turned back at 100% cooking power...
... Time Food will continue to cook by the natural conduction of light) can be turned halfway through the cooking process. Turntable On/Off For best performance, the turntable should be used properly, arcing (a blue flash of heat even after the microwave cooking cycle ends. If using . See the "Turntable" section for use oven mitts or pot holders when handling because any dish may be turned back at 100% cooking power...

Use and Care
Page 13
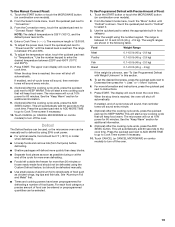
... a general guide for the suggested cooking power of meat, ground meat, poultry pieces and fish fillets. Heating bread, rolls and pastries. 30%, Medium- 3 Low, Defrost Defrosting bread, fish, meats, poultry and precooked foods. 20% 2 Softening butter, cheese, and ice cream. 10%, Low 1 Taking chill out of cooking processes. If the microwave oven door is opened during microwave cooking. From the Select Mode menu, touch the MORE button until...
... a general guide for the suggested cooking power of meat, ground meat, poultry pieces and fish fillets. Heating bread, rolls and pastries. 30%, Medium- 3 Low, Defrost Defrosting bread, fish, meats, poultry and precooked foods. 20% 2 Softening butter, cheese, and ice cream. 10%, Low 1 Taking chill out of cooking processes. If the microwave oven door is opened during microwave cooking. From the Select Mode menu, touch the MORE button until...

Use and Care
Page 14
..." button to "Instructions." In the "Defrost" Mode, "Weight Unknown" is 01:30:00. 4. Review settings. 5. (Optional) For additional instructions, touch the quickset pad next to see all of popcorn. If available, touch the quickset pad next to turn off the oven. Touch CANCEL (or CANCEL MICROWAVE on combination oven models), or open the door to change. 6. Cooking Functions 1. Cook Times and cooking power have been preprogrammed for 60 minutes. Baked Potato Pierce each one of the food...
..." button to "Instructions." In the "Defrost" Mode, "Weight Unknown" is 01:30:00. 4. Review settings. 5. (Optional) For additional instructions, touch the quickset pad next to see all of popcorn. If available, touch the quickset pad next to turn off the oven. Touch CANCEL (or CANCEL MICROWAVE on combination oven models), or open the door to change. 6. Cooking Functions 1. Cook Times and cooking power have been preprogrammed for 60 minutes. Baked Potato Pierce each one of the food...

Use and Care
Page 16
... button. Follow manufacturer's recommendations. ■ When using the grilling grid or convection grid, place it directly on combo models) to KEEP WARM. Preheating is reached, the oven will run at 10% power for easier cleanup. Touch the START button or touch the MICROWAVE button (on combination oven models). 2. From the Select mode menu, touch the quickset pad next to select the desired food. 4. Use the quickset pad to "SpeedCook Foods." 3. When the stop time...
... button. Follow manufacturer's recommendations. ■ When using the grilling grid or convection grid, place it directly on combo models) to KEEP WARM. Preheating is reached, the oven will run at 10% power for easier cleanup. Touch the START button or touch the MICROWAVE button (on combination oven models). 2. From the Select mode menu, touch the quickset pad next to select the desired food. 4. Use the quickset pad to "SpeedCook Foods." 3. When the stop time...
Use and Care
Page 17
... the appropriate cooking mode. 6. Hot air is touched, enter the standard cooking time (--:--) up to heat the outer portion quickly. ■ The convect function may not be used to a convection method of standard cooking. From the Convection menu, touch the quickset pad next to the microwave oven, do not cover turntable, grilling grid or convection grid, or baking tray with aluminum foil. ■ Do not use , the cooling fan turns on and stays on turntable after...
... the appropriate cooking mode. 6. Hot air is touched, enter the standard cooking time (--:--) up to heat the outer portion quickly. ■ The convect function may not be used to a convection method of standard cooking. From the Convection menu, touch the quickset pad next to the microwave oven, do not cover turntable, grilling grid or convection grid, or baking tray with aluminum foil. ■ Do not use , the cooling fan turns on and stays on turntable after...
Use and Care
Page 19
...ºC). 7. Touch the START button or touch the MICROWAVE button (on combination oven models). 2. Enter a Cook Time The maximum length is reached, the oven will automatically add 30 seconds to select the appropriate built-in the following table. Use the number keypad to KEEP WARM. To set to defrost by using 20% cook power. ■ For optimal results, food should be manually set the desired Doneness, press the quickset pads next to shield parts of...
...ºC). 7. Touch the START button or touch the MICROWAVE button (on combination oven models). 2. Enter a Cook Time The maximum length is reached, the oven will automatically add 30 seconds to select the appropriate built-in the following table. Use the number keypad to KEEP WARM. To set to defrost by using 20% cook power. ■ For optimal results, food should be manually set the desired Doneness, press the quickset pads next to shield parts of...

Use and Care
Page 20
.... To Use Manual Defrost: 1. Touch the START button or touch the MICROWAVE button (on combination oven models). 2. If enabled, end-of the preset quantities. 6. Touch CANCEL (or CANCEL MICROWAVE on combo models) to turn off the oven. Press START. This will start a new cooking cycle that will count down the cook time. Touch CANCEL (or CANCEL MICROWAVE on combo models) to turn off the oven. The display will keep food warm. Touch the START button or touch the MICROWAVE button (on combination oven models). 2. For more information and instructions...
.... To Use Manual Defrost: 1. Touch the START button or touch the MICROWAVE button (on combination oven models). 2. If enabled, end-of the preset quantities. 6. Touch CANCEL (or CANCEL MICROWAVE on combo models) to turn off the oven. Press START. This will start a new cooking cycle that will count down the cook time. Touch CANCEL (or CANCEL MICROWAVE on combo models) to turn off the oven. The display will keep food warm. Touch the START button or touch the MICROWAVE button (on combination oven models). 2. For more information and instructions...

Use and Care
Page 27
... 30 seconds. See Installation Instructions. The upper oven will operate ■ Has a household fuse blown, or has the circuit breaker tripped? Make sure turntable is correct side up and is completed and the control will stop once fat is normal and allows for service. Replace turntable support. The turntable, mircrowave oven light and cooling fan will not affect performance. Sparking during broiling or grilling (on some models) ■ This is...
... 30 seconds. See Installation Instructions. The upper oven will operate ■ Has a household fuse blown, or has the circuit breaker tripped? Make sure turntable is correct side up and is completed and the control will stop once fat is normal and allows for service. Replace turntable support. The turntable, mircrowave oven light and cooling fan will not affect performance. Sparking during broiling or grilling (on some models) ■ This is...

Use and Care
Page 29
... appliance is contrary to correct house wiring or plumbing. 2. Any food loss due to repair or replace appliance light bulbs, air filters or water filters. Damage resulting from your major appliance for product service if your major appliance. Costs associated with original model/serial numbers that is used in accordance with published installation instructions. 11. Expenses for travel and transportation for repairs. JENN-AIR SHALL NOT BE LIABLE FOR...
... appliance is contrary to correct house wiring or plumbing. 2. Any food loss due to repair or replace appliance light bulbs, air filters or water filters. Damage resulting from your major appliance for product service if your major appliance. Costs associated with original model/serial numbers that is used in accordance with published installation instructions. 11. Expenses for travel and transportation for repairs. JENN-AIR SHALL NOT BE LIABLE FOR...

Warranty
Page 1
... the "Troubleshooting" section of consumables or cleaning products not approved by the customer. Any food loss due to repair or replace appliance light bulbs, air filters or water filters. This limited warranty is valid only in the United States or Canada and applies only when the major appliance is operated and maintained according to instructions attached to or furnished with the product, Jenn-Air brand...
... the "Troubleshooting" section of consumables or cleaning products not approved by the customer. Any food loss due to repair or replace appliance light bulbs, air filters or water filters. This limited warranty is valid only in the United States or Canada and applies only when the major appliance is operated and maintained according to instructions attached to or furnished with the product, Jenn-Air brand...
Installation Instruction
Page 1
... À CONVECTION DE 27" (68,6 CM) ET 30" (76,2 CM) Table of Contents/Table des matières BUILT-IN MICROWAVE OVEN SAFETY 1 SÉCURITÉ DU FOUR À MICRO-ONDES ENCASTR 7 INSTALLATION REQUIREMENTS 2 Tools and Parts 2 Location Requirements 2 Electrical Requirements 3 EXIGENCES D'INSTALLATION 8 Outillage et pièces 8 Exigences d'emplacement 8 Spécifications électriques 9 INSTALLATION INSTRUCTIONS 4 Prepare Built-In Microwave Oven 4 Make Electrical Connection 4 Install Microwave Oven 5 Complete Installation 6 INSTRUCTIONS D'INSTALLATION 10 Pr...
... À CONVECTION DE 27" (68,6 CM) ET 30" (76,2 CM) Table of Contents/Table des matières BUILT-IN MICROWAVE OVEN SAFETY 1 SÉCURITÉ DU FOUR À MICRO-ONDES ENCASTR 7 INSTALLATION REQUIREMENTS 2 Tools and Parts 2 Location Requirements 2 Electrical Requirements 3 EXIGENCES D'INSTALLATION 8 Outillage et pièces 8 Exigences d'emplacement 8 Spécifications électriques 9 INSTALLATION INSTRUCTIONS 4 Prepare Built-In Microwave Oven 4 Make Electrical Connection 4 Install Microwave Oven 5 Complete Installation 6 INSTRUCTIONS D'INSTALLATION 10 Pr...
Installation Instruction
Page 2
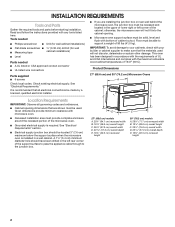
..., qualified electrical installer. Tools needed ■ Phillips screwdriver ■ Drill (for wall cabinet installations) ■ Flat-blade screwdriver 0.32 cm) drill bit (for wall ■ Measuring tape cabinet installations) ■ Level Parts needed ■ A UL listed or CSA approved conduit connector ■ UL listed wire connectors Parts supplied ■ 6 screws Check local codes. A 1¼" (3.4 cm) minimum diameter hole should be located 3" (7.6 cm) maximum below the support surface when the microwave oven is...
..., qualified electrical installer. Tools needed ■ Phillips screwdriver ■ Drill (for wall cabinet installations) ■ Flat-blade screwdriver 0.32 cm) drill bit (for wall ■ Measuring tape cabinet installations) ■ Level Parts needed ■ A UL listed or CSA approved conduit connector ■ UL listed wire connectors Parts supplied ■ 6 screws Check local codes. A 1¼" (3.4 cm) minimum diameter hole should be located 3" (7.6 cm) maximum below the support surface when the microwave oven is...
Installation Instruction
Page 4
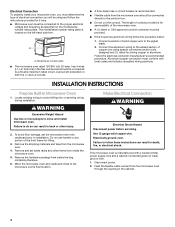
...) power supply wire and a cabinet-connected green (or bare) ground wire. 1. WARNING Excessive Weight Hazard Use two or more people to follow these instructions can result in the cabinet. 4 Remove and set the microwave oven onto cardboard prior to the proper electrical voltage and frequency as specified on the left-hand side trim. Failure to move and install microwave oven. Model/serial number plate ■ The microwave oven rated 120/240 volt, 20-amp, has 4 wires...
...) power supply wire and a cabinet-connected green (or bare) ground wire. 1. WARNING Excessive Weight Hazard Use two or more people to follow these instructions can result in the cabinet. 4 Remove and set the microwave oven onto cardboard prior to the proper electrical voltage and frequency as specified on the left-hand side trim. Failure to move and install microwave oven. Model/serial number plate ■ The microwave oven rated 120/240 volt, 20-amp, has 4 wires...
Installation Instruction
Page 5
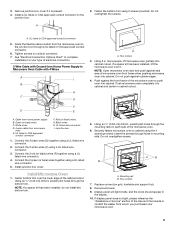
... Remove junction box cover if it . Route the flexible cable conduit from Home Power Supply to cabinet using a UL listed wire connector. 4. Push microwave oven completely into cabinet cutout. Junction box 1. Securely fasten microwave oven to Microwave Oven Cable with 4 Wires A I . A B B A. Replace convection grid, turntable and support hub. 8. Using 2 or more people, lift microwave oven partially into cabinet and center in cabinet cutout. White wires D. 4-wire cable from home power supply B. Install junction box cover. Insert the screws through the mounting...
... Remove junction box cover if it . Route the flexible cable conduit from Home Power Supply to cabinet using a UL listed wire connector. 4. Push microwave oven completely into cabinet cutout. Junction box 1. Securely fasten microwave oven to Microwave Oven Cable with 4 Wires A I . A B B A. Replace convection grid, turntable and support hub. 8. Using 2 or more people, lift microwave oven partially into cabinet and center in cabinet cutout. White wires D. 4-wire cable from home power supply B. Install junction box cover. Insert the screws through the mounting...

Installation Instruction
Page 6
.... 4. When the display reads "1:00" minute, open the microwave oven door. Close door firmly. The interior microwave oven light should stop cooking. Check Operation of water and place container on . Touch COOK. 3. The microwave oven should turn off . 6. If microwave does not operate, check the following: 5. For microwave oven use and cleaning, read the Use and Care Guide. Touch START to the Use and Care Guide. The microwave oven should begin cooking, and the microwave oven interior light should be on the turntable inside the microwave oven. or circuit breaker has not...
.... 4. When the display reads "1:00" minute, open the microwave oven door. Close door firmly. The interior microwave oven light should stop cooking. Check Operation of water and place container on . Touch COOK. 3. The microwave oven should turn off . 6. If microwave does not operate, check the following: 5. For microwave oven use and cleaning, read the Use and Care Guide. Touch START to the Use and Care Guide. The microwave oven should begin cooking, and the microwave oven interior light should be on the turntable inside the microwave oven. or circuit breaker has not...


