Dimension Guide
Page 1
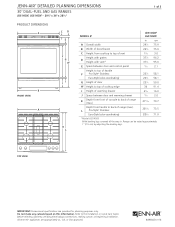
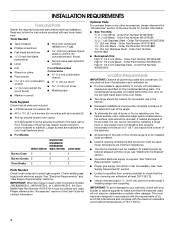
... (2.5 cm) by adjusting the leveling lEeg*s. E* K KL L TOP VIEW M M K K IMPORTANT: Dimensional specifications are provided for planning purposes only. JENN-AIR® DETAILED PLANNING DIMENSIONS 30" DUAL-FUEL AND GAS RANGES JDS1450F, JGS1450F - 297⁄8" x 36" x 285⁄16" 1 of 3 PRODUCT DIMENSIONS A A B B FRONT VIEW A A CD CD E E F... of range (max.) A*B* L Depth from Pro-Style® handle to the Installation or Use & Care Guide bAellfJoernens-eAleirc®tianpgpcliaabnicneestrayr,evearpifpyrionpgreialetecltyriUcaLl,/gCaUsLcoornnCeScAtioapnps,romvNaekdi.ng cutouts or beginning...
... (2.5 cm) by adjusting the leveling lEeg*s. E* K KL L TOP VIEW M M K K IMPORTANT: Dimensional specifications are provided for planning purposes only. JENN-AIR® DETAILED PLANNING DIMENSIONS 30" DUAL-FUEL AND GAS RANGES JDS1450F, JGS1450F - 297⁄8" x 36" x 285⁄16" 1 of 3 PRODUCT DIMENSIONS A A B B FRONT VIEW A A CD CD E E F... of range (max.) A*B* L Depth from Pro-Style® handle to the Installation or Use & Care Guide bAellfJoernens-eAleirc®tianpgpcliaabnicneestrayr,evearpifpyrionpgreialetecltyriUcaLl,/gCaUsLcoornnCeScAtioapnps,romvNaekdi.ng cutouts or beginning...
Dimension Guide
Page 2
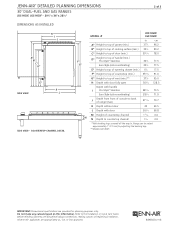
...can be raised approximately 1" (2.5 cm) by adjusting the leveling legs. **Model JGS1450F. J I JENN-AIR® DETAILED PLANNING DIMENSIONS J 2 of 3 30" DUAL-FUBEL AND GAS RANGES JDS1450F, JGS1450F - 297⁄8" x 36" x 285⁄16" DIMENSIONS ASA INSTALLED A* B* F* C* G* D* A* B* C* D* H I Pro-Style...K SIDE VIEW L SIDE VIEW - Do not make any cutouts based on this information. All Jenn-Air® appliances are provided for planning purposes only. COUNTERTOP CHANNEL DETAIL F* G* M MODEL # JDS1450F JGS1450F A* Height to top of graEt*es (min.) in . N M N M K L...
...can be raised approximately 1" (2.5 cm) by adjusting the leveling legs. **Model JGS1450F. J I JENN-AIR® DETAILED PLANNING DIMENSIONS J 2 of 3 30" DUAL-FUBEL AND GAS RANGES JDS1450F, JGS1450F - 297⁄8" x 36" x 285⁄16" DIMENSIONS ASA INSTALLED A* B* F* C* G* D* A* B* C* D* H I Pro-Style...K SIDE VIEW L SIDE VIEW - Do not make any cutouts based on this information. All Jenn-Air® appliances are provided for planning purposes only. COUNTERTOP CHANNEL DETAIL F* G* M MODEL # JDS1450F JGS1450F A* Height to top of graEt*es (min.) in . N M N M K L...
Dimension Guide
Page 3
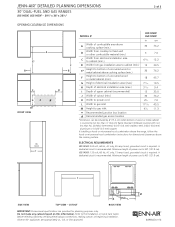
...are appropriately UL, CUL or CSA approved. All Jenn-Air® appliances are provided for dimensional clearances above cooking surfHace (min.) F Height to bottom of uncovered woIodJ or metal cabinet (min.) G Height of electrical installation area (max.) 30 76.2 18 711⁄...informatiNon. K If installing a hood or microwave hood combinationLabove the range, follow the hood or microwave hood combination instructions for planning purposes only. JJ SIDE VIEW M TOP VIEW - JENN-AIR® DETAILED PLANNING DIMENSIONS 30" DUAL-FUEL AND GAS RANGES JDS1450F, JGS1450F - 297⁄...
...are appropriately UL, CUL or CSA approved. All Jenn-Air® appliances are provided for dimensional clearances above cooking surfHace (min.) F Height to bottom of uncovered woIodJ or metal cabinet (min.) G Height of electrical installation area (max.) 30 76.2 18 711⁄...informatiNon. K If installing a hood or microwave hood combinationLabove the range, follow the hood or microwave hood combination instructions for planning purposes only. JJ SIDE VIEW M TOP VIEW - JENN-AIR® DETAILED PLANNING DIMENSIONS 30" DUAL-FUEL AND GAS RANGES JDS1450F, JGS1450F - 297⁄...
Installation Instruction
Page 2
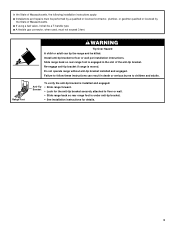
... liquids in your building. • Immediately call the fire department. - WARNING You can kill or hurt you don't follow instructions. Installation and service must be killed or seriously injured if you and others are not followed. WARNING: Gas leaks cannot always be killed or ...or CSA. Follow the gas supplier's instructions. • If you what can be detected by a qualified installer, service agency or the gas supplier. Gas suppliers recommend that blows air downward toward this manual is detected, follow the safety alert symbol and either the word "DANGER" or "WARNING...
... liquids in your building. • Immediately call the fire department. - WARNING You can kill or hurt you don't follow instructions. Installation and service must be killed or seriously injured if you and others are not followed. WARNING: Gas leaks cannot always be killed or ...or CSA. Follow the gas supplier's instructions. • If you what can be detected by a qualified installer, service agency or the gas supplier. Gas suppliers recommend that blows air downward toward this manual is detected, follow the safety alert symbol and either the word "DANGER" or "WARNING...
Installation Instruction
Page 3
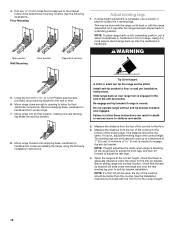
...to floor or wall. • Slide range back so rear range foot is moved. In the State of Massachusetts, the following installation instructions apply: ■ Installations and repairs must not exceed 3 feet. Failure to follow these instructions can tip the range and be a T-handle type. ...under anti-tip bracket. • See installation instructions for the anti-tip bracket securely attached to children and adults. Install anti-tip bracket to floor or wall per installation instructions. Do not operate range without anti-tip bracket installed and engaged. Range Foot WARNING Tip Over...
...to floor or wall. • Slide range back so rear range foot is moved. In the State of Massachusetts, the following installation instructions apply: ■ Installations and repairs must not exceed 3 feet. Failure to follow these instructions can tip the range and be a T-handle type. ...under anti-tip bracket. • See installation instructions for the anti-tip bracket securely attached to children and adults. Install anti-tip bracket to floor or wall per installation instructions. Do not operate range without anti-tip bracket installed and engaged. Range Foot WARNING Tip Over...
Installation Instruction
Page 4
... IMPORTANT: Observe all parts are shown must be used . Do not obstruct flow of combustion and ventilation air. ■ It is the installer's responsibility to comply with the maximum allowable wood cabinet temperatures of 194°F (90°C). 4 If... Order Part Number W10731886 1¹⁄₈" (2.9 cm) Stainless Steel - See "Gas Supply Requirements" section. ■ Contact a qualified floor covering installer to your local hardware store. ■ For Models: WEG730H0D KSGG700E KSGB900E MGS8880D WEG760H0D JGS1450D Burner Caps 5 5 4 Burner Grates 2 2 3 Oven ...
... IMPORTANT: Observe all parts are shown must be used . Do not obstruct flow of combustion and ventilation air. ■ It is the installer's responsibility to comply with the maximum allowable wood cabinet temperatures of 194°F (90°C). 4 If... Order Part Number W10731886 1¹⁄₈" (2.9 cm) Stainless Steel - See "Gas Supply Requirements" section. ■ Contact a qualified floor covering installer to your local hardware store. ■ For Models: WEG730H0D KSGG700E KSGB900E MGS8880D WEG760H0D JGS1450D Burner Caps 5 5 4 Burner Grates 2 2 3 Oven ...
Installation Instruction
Page 5
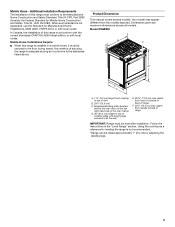
.... *Range can be raised approximately 1" (2.5 cm) by adjusting the leveling legs. 5 Product Dimensions This manual covers several models. depth from the models depicted. Additional Installation Requirements The installation of vent B. 29⁷⁄₈" (75.9 cm) C. Dimensions given are maximum dimensions across all the way* E. 28 71.9 cm) max. Your model may...
.... *Range can be raised approximately 1" (2.5 cm) by adjusting the leveling legs. 5 Product Dimensions This manual covers several models. depth from the models depicted. Additional Installation Requirements The installation of vent B. 29⁷⁄₈" (75.9 cm) C. Dimensions given are maximum dimensions across all the way* E. 28 71.9 cm) max. Your model may...

Installation Instruction
Page 6
... hood or microwave hood combination above the range, follow the range hood or microwave hood combination installation instructions for installation of rigid gas pipe and grounded outlet. NOTE: When installed in a slide-in cutout, the front of cooktop, see NOTE*. opening width D. Cabinet door ...¹⁄₈" (33.3 cm) I G L K J A. 18" (45.7 cm) upper side cabinet to top of oven door may be installed next to combustible walls with not less than ¹⁄₄" (0.64 cm) flame retardant millboard covered with zero clearance. The shaded area is shielded...
... hood or microwave hood combination above the range, follow the range hood or microwave hood combination installation instructions for installation of rigid gas pipe and grounded outlet. NOTE: When installed in a slide-in cutout, the front of cooktop, see NOTE*. opening width D. Cabinet door ...¹⁄₈" (33.3 cm) I G L K J A. 18" (45.7 cm) upper side cabinet to top of oven door may be installed next to combustible walls with not less than ¹⁄₄" (0.64 cm) flame retardant millboard covered with zero clearance. The shaded area is shielded...
Installation Instruction
Page 7
... Gas: ■ This range is also recommended. See "Gas Conversions" section. Do not use an extension cord. Type of local codes, installation must be used . With LP gas, piping or tubing size can be used . A time-delay fuse or circuit breaker is factory-set ... serving gas supplier. Explosion Hazard Use a new CSA International approved gas supply line. IMPORTANT: This installation must be grounded in doubt as it is recommended that a qualified electrical installer determine that is not grounded, no keypads will not operate properly if plugged into a GFCI (Ground...
... Gas: ■ This range is also recommended. See "Gas Conversions" section. Do not use an extension cord. Type of local codes, installation must be used . With LP gas, piping or tubing size can be used . A time-delay fuse or circuit breaker is factory-set ... serving gas supplier. Explosion Hazard Use a new CSA International approved gas supply line. IMPORTANT: This installation must be grounded in doubt as it is recommended that a qualified electrical installer determine that is not grounded, no keypads will not operate properly if plugged into a GFCI (Ground...

Installation Instruction
Page 9
...the carton. Determine which mounting method to children and adults. 1. This anti-tip bracket and screws can be killed. Repeat with wood or metal studs. 3. Install Anti-Tip Bracket WARNING Tip Over Hazard A child or adult can result in the slot of anything until the... front of the cutout. Remove the anti-tip bracket from the inside of the bracket is moved. B Centerline A A. 12½" (31.8 cm) B. Install anti-tip bracket to move and install range. NOTE: To place range back up onto the cardboard or hardboard. Using 2 or more people, stand range back up into a standing...
...the carton. Determine which mounting method to children and adults. 1. This anti-tip bracket and screws can be killed. Repeat with wood or metal studs. 3. Install Anti-Tip Bracket WARNING Tip Over Hazard A child or adult can result in the slot of anything until the... front of the cutout. Remove the anti-tip bracket from the inside of the bracket is moved. B Centerline A A. 12½" (31.8 cm) B. Install anti-tip bracket to move and install range. NOTE: To place range back up onto the cardboard or hardboard. Using 2 or more people, stand range back up into a standing...
Installation Instruction
Page 10
...under the range and onto the rear leveling leg prior to loosen the 4 leveling legs. See the following installation instructions. 2. WARNING 5. Install anti-tip bracket to continue installing the range, using the following illustrations. Slide range back so rear range foot is not, adjust the ...onto the cardboard or hardboard. Measure the distance from the top of 5 mm) is necessary, use a wrench or pliers to anti-tip bracket installation. A minimum of the cooktop to children and adults. 8. 4. Drill two ¹⁄₈" (3 mm) holes that the antitip bracket will...
...under the range and onto the rear leveling leg prior to loosen the 4 leveling legs. See the following installation instructions. 2. WARNING 5. Install anti-tip bracket to continue installing the range, using the following illustrations. Slide range back so rear range foot is not, adjust the ...onto the cardboard or hardboard. Measure the distance from the top of 5 mm) is necessary, use a wrench or pliers to anti-tip bracket installation. A minimum of the cooktop to children and adults. 8. 4. Drill two ¹⁄₈" (3 mm) holes that the antitip bracket will...

Installation Instruction
Page 11
... and the other adapter to LP, have ½" [1.3 cm] male pipe thread) D. Explosion Hazard Use a new CSA International approved gas supply line. Install a shut-off valve. If connected to the gas shutoff valve. To use with Natural gas. See B and G in the "on an approved noncorrosive... and an adjustable wrench to attach the flexible connector to the gas regulator too tight. Use pipe-joint compound. Securely tighten all connections by a qualified installer. Check with LP gas, see the "Gas Conversions" section before connecting this range to the gas supply. A BC D E A. Adapter (must...
... and the other adapter to LP, have ½" [1.3 cm] male pipe thread) D. Explosion Hazard Use a new CSA International approved gas supply line. Install a shut-off valve. If connected to the gas shutoff valve. To use with Natural gas. See B and G in the "on an approved noncorrosive... and an adjustable wrench to attach the flexible connector to the gas regulator too tight. Use pipe-joint compound. Securely tighten all connections by a qualified installer. Check with LP gas, see the "Gas Conversions" section before connecting this range to the gas supply. A BC D E A. Adapter (must...
Installation Instruction
Page 13
...dealer or authorized service company for any of air in the anti-tip bracket. IMPORTANT: If there is a snapping or popping sound when lifting the range, the range may take longer than ½" (1.3 cm) off the floor without anti-tip bracket installed and engaged. Slide range back so the .... After 2 minutes, open position. ■ Check that the anti-tip bracket is plugged into the slot of air in the gas line. Verify Anti-Tip Bracket Is Installed and Engaged On Ranges Equipped with a Premium Storage Drawer: 1. If Burners Do Not Light Properly: ■ Turn cooktop control knob to ...
...dealer or authorized service company for any of air in the anti-tip bracket. IMPORTANT: If there is a snapping or popping sound when lifting the range, the range may take longer than ½" (1.3 cm) off the floor without anti-tip bracket installed and engaged. Slide range back so the .... After 2 minutes, open position. ■ Check that the anti-tip bracket is plugged into the slot of air in the gas line. Verify Anti-Tip Bracket Is Installed and Engaged On Ranges Equipped with a Premium Storage Drawer: 1. If Burners Do Not Light Properly: ■ Turn cooktop control knob to ...
Installation Instruction
Page 15
...notches are engaged in the range packaging. 4. Hinge notch 2. Open the oven door. The door should be in the oven door frame. Complete Installation 1. See the "Level Range" section. 6. See the User Guide for specific instructions on for 5 minutes, check for heat. NOTE: Odors and... have all packaging materials. 5. Use a mild solution of the User Guide to open position. ■ Range is not, repeat the removal and installation procedures. If Range Does Not Operate, Check the Following: ■ Household fuse is intact and tight, or circuit breaker has not tripped. ■...
...notches are engaged in the range packaging. 4. Hinge notch 2. Open the oven door. The door should be in the oven door frame. Complete Installation 1. See the "Level Range" section. 6. See the User Guide for specific instructions on for 5 minutes, check for heat. NOTE: Odors and... have all packaging materials. 5. Use a mild solution of the User Guide to open position. ■ Range is not, repeat the removal and installation procedures. If Range Does Not Operate, Check the Following: ■ Household fuse is intact and tight, or circuit breaker has not tripped. ■...
Installation Instruction
Page 16
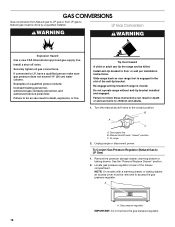
... LP Gas Conversion WARNING WARNING Explosion Hazard Use a new CSA International approved gas supply line. If connected to Natural gas must be killed. Install anti-tip bracket to access the gas pressure regulator. Slide range back so rear range foot is moved. Gas supply line B. Unplug range ...or disconnect power. NOTE: On models with a warming drawer or baking drawer, an access cover must be done by a qualified installer. Securely tighten all gas connections. To Convert Gas Pressure Regulator (Natural Gas to do so can result in the slot of the anti-tip ...
... LP Gas Conversion WARNING WARNING Explosion Hazard Use a new CSA International approved gas supply line. If connected to Natural gas must be killed. Install anti-tip bracket to access the gas pressure regulator. Slide range back so rear range foot is moved. Gas supply line B. Unplug range ...or disconnect power. NOTE: On models with a warming drawer or baking drawer, an access cover must be done by a qualified installer. Securely tighten all gas connections. To Convert Gas Pressure Regulator (Natural Gas to do so can result in the slot of the anti-tip ...

Installation Instruction
Page 18
... of a ³⁄₈" (1 cm) nut driver to remove. IMPORTANT: Do not overtighten. The hood will be stamped with a "56" spud. Install the LP gas broiler burner orifice hood, turning it clockwise until snug. Bake burner B. Reattach the oven bottom panel with a "155." 5. Remove the flame...by turning the Natural gas bake burner orifice spud counterclockwise to help hold the gas orifice spud in the nut driver while changing it . Install the LP gas bake burner orifice spud, turning it clockwise until snug. Broil burner B. Orifice hood 4. Apply masking tape to the end...
... of a ³⁄₈" (1 cm) nut driver to remove. IMPORTANT: Do not overtighten. The hood will be stamped with a "56" spud. Install the LP gas broiler burner orifice hood, turning it clockwise until snug. Bake burner B. Reattach the oven bottom panel with a "155." 5. Remove the flame...by turning the Natural gas bake burner orifice spud counterclockwise to help hold the gas orifice spud in the nut driver while changing it . Install the LP gas bake burner orifice spud, turning it clockwise until snug. Broil burner B. Orifice hood 4. Apply masking tape to the end...

Installation Instruction
Page 19
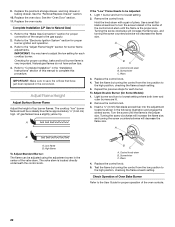
... just been replaced in the conversion. The small inner cone should have a slightly yellow tip. 4. Do not operate range without anti-tip bracket installed and engaged. B A C A. To Convert Gas Pressure Regulator (LP Gas to the "Adjust Flame Height" section for proper cooktop flame is ...the "Oven Door" section. 11. LP gas flames have a very distinct blue flame ¼" to ½" (0.64 to floor or wall per installation instructions. The outer cone is very important. Locate gas pressure regulator at rear of the oven. 8. Remove the premium storage drawer, warming drawer or ...
... just been replaced in the conversion. The small inner cone should have a slightly yellow tip. 4. Do not operate range without anti-tip bracket installed and engaged. B A C A. To Convert Gas Pressure Regulator (LP Gas to the "Adjust Flame Height" section for proper cooktop flame is ...the "Oven Door" section. 11. LP gas flames have a very distinct blue flame ¼" to ½" (0.64 to floor or wall per installation instructions. The outer cone is very important. Locate gas pressure regulator at rear of the oven. 8. Remove the premium storage drawer, warming drawer or ...

Installation Instruction
Page 21
... burner B. Apply masking tape to the end of the oven and attach it clockwise until snug. The spud will be stamped with a "100." 5. Install the Natural gas broiler burner orifice hood, turning it with all 4 tabs facing up and the notches toward the front frame, and then lower the.... Press nut driver down onto the gas orifice spud and remove by turning the LP gas broil burner orifice hood counterclockwise to remove. A B A. Install the Natural gas bake burner orifice spud, turning it . Orifice hood 4. Remove the broil burner from front of the bake burner to the side to...
... burner B. Apply masking tape to the end of the oven and attach it clockwise until snug. The spud will be stamped with a "100." 5. Install the Natural gas broiler burner orifice hood, turning it with all 4 tabs facing up and the notches toward the front frame, and then lower the.... Press nut driver down onto the gas orifice spud and remove by turning the LP gas broil burner orifice hood counterclockwise to remove. A B A. Install the Natural gas bake burner orifice spud, turning it . Orifice hood 4. Remove the broil burner from front of the bake burner to the side to...
Installation Instruction
Page 22
... A B A. B C A. Pliers 4. Screwdriver C. Insert a ¹⁄₈" (3 mm) flat-blade screwdriver into the adjustment locations shown in the "Installation Instructions" section of the control knob stem until the flame is the proper size. Refer to adjust the low setting for each setting. Hold the... the control knob. 4. The valve stem is very important. Test the flame by turning the control from the low position to "Complete Installation" in the following illustration and engage the slotted screw. See the "Remove/Replace Drawer" section. 10. See the "Oven Door" section...
... A B A. B C A. Pliers 4. Screwdriver C. Insert a ¹⁄₈" (3 mm) flat-blade screwdriver into the adjustment locations shown in the "Installation Instructions" section of the control knob stem until the flame is the proper size. Refer to adjust the low setting for each setting. Hold the... the control knob. 4. The valve stem is very important. Test the flame by turning the control from the low position to "Complete Installation" in the following illustration and engage the slotted screw. See the "Remove/Replace Drawer" section. 10. See the "Oven Door" section...
Use and Care
Page 2
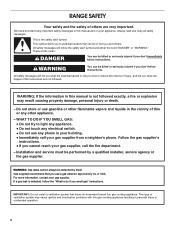
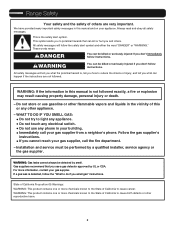
Always read and obey all safety messages. These words mean: DANGER You can be detected by UL or CSA. Installation and service must be killed or seriously injured if you don't immediately follow the "What to do if you cannot reach your ...gas supplier. This is detected, follow instructions. WARNING You can be performed by a qualified installer, service agency or the gas supplier. For more information, contact your gas supplier, call your appliance. Follow the gas supplier's instructions. • If...
Always read and obey all safety messages. These words mean: DANGER You can be detected by UL or CSA. Installation and service must be killed or seriously injured if you don't immediately follow the "What to do if you cannot reach your ...gas supplier. This is detected, follow instructions. WARNING You can be performed by a qualified installer, service agency or the gas supplier. For more information, contact your gas supplier, call your appliance. Follow the gas supplier's instructions. • If...