
Dimension Guide
Page 1
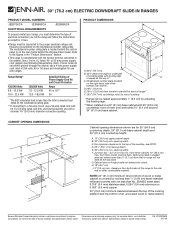
... should not extend into cutout. Specifications subject to change without notice. 30" (76.2 cm) ELECTRIC DOWNDRAFT SLIDE-IN RANGES PRODUCT MODEL NUMBERS JES9750CA JES9800CA ELECTRICAL REQUIREMENTS JES9860CA To properly install your range, you must determine the type of electrical connection you will not slide all the way in* C C. CABINET OPENING DIMENSIONS A B C H D E I I . 3" (7.6 cm) min. For complete details, see following...
... should not extend into cutout. Specifications subject to change without notice. 30" (76.2 cm) ELECTRIC DOWNDRAFT SLIDE-IN RANGES PRODUCT MODEL NUMBERS JES9750CA JES9800CA ELECTRICAL REQUIREMENTS JES9860CA To properly install your range, you must determine the type of electrical connection you will not slide all the way in* C C. CABINET OPENING DIMENSIONS A B C H D E I I . 3" (7.6 cm) min. For complete details, see following...

Installation Instruction
Page 8
... codes permit and a separate ground wire is used, it is recommended that a qualified electrical installer determine that the electrical connection and wire size are in range fit over the cutout edge of the slide-in accordance with CSA Standard C22.1, Canadian Electrical Code, Part 1 - Formed front-edged countertops must be provided at the point the...
... codes permit and a separate ground wire is used, it is recommended that a qualified electrical installer determine that the electrical connection and wire size are in range fit over the cutout edge of the slide-in accordance with CSA Standard C22.1, Canadian Electrical Code, Part 1 - Formed front-edged countertops must be provided at the point the...

Installation Instruction
Page 15
NUCQPTUROAUSSERRIEMWTADEOLIÓTCAVLNHOSAENEPTTELEOAUTÉCWGEIQCTR!EATUUCRRRESAICTCEESAOLORD ■ Assemble a UL listed conduit connector in the following instructions for your type of electrical connection: 4-wire (recommended) 3-wire (if 4-wire is not available) 15 Strain relief ■ Feed the flexible conduit... panel up and off. Replace back panel and screws on back of range. ■ Position cord/conduit plate as shown in the opening. ■ Use Phillips screwdriver to remove screws and slide cord/conduit plate down and out. Style 2: Direct wire strain relief &#...
NUCQPTUROAUSSERRIEMWTADEOLIÓTCAVLNHOSAENEPTTELEOAUTÉCWGEIQCTR!EATUUCRRRESAICTCEESAOLORD ■ Assemble a UL listed conduit connector in the following instructions for your type of electrical connection: 4-wire (recommended) 3-wire (if 4-wire is not available) 15 Strain relief ■ Feed the flexible conduit... panel up and off. Replace back panel and screws on back of range. ■ Position cord/conduit plate as shown in the opening. ■ Use Phillips screwdriver to remove screws and slide cord/conduit plate down and out. Style 2: Direct wire strain relief &#...

Installation Instruction
Page 20
... A. Power supply cord (on rack and check levelness of the range. ■ Look for satisfactory baking performance. 20 Move range close to back. b.) Place level on some installations) B. a.) Place rack in anti-tip bracket. Range electrical connector to the blower motor inlet using a power supply cord). ...or hardboard from the anti-tip bracket. Plug range into its final location. 1 1 2 A B A. NOTE: Range must be level for the anti-tip bracket securely attached to floor or wall. ■ Slide range back so rear range foot is installed and that rear leveling leg ...
... A. Power supply cord (on rack and check levelness of the range. ■ Look for satisfactory baking performance. 20 Move range close to back. b.) Place level on some installations) B. a.) Place rack in anti-tip bracket. Range electrical connector to the blower motor inlet using a power supply cord). ...or hardboard from the anti-tip bracket. Plug range into its final location. 1 1 2 A B A. NOTE: Range must be level for the anti-tip bracket securely attached to floor or wall. ■ Slide range back so rear range foot is installed and that rear leveling leg ...
Installation Instruction
Page 22
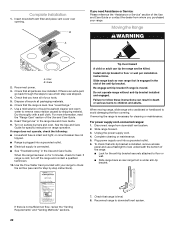
... or maintenance. 5. Plug power supply cord into a grounded outlet. ■ Electrical supply is not sufficient air flow, review the "Venting Requirements" and "Venting Methods" sections. 22 7. Reconnect range to floor or wall per installation instructions. Grate 2. If there is an extra... you have all of the anti-tip bracket. When moving range, slide range onto cardboard or hardboard to follow these instructions can tip the range and be killed. To check that all packaging materials. 6. Complete Installation 1. Slide range forward. 3. Check that anti-tip bracket is installed, remove...
... or maintenance. 5. Plug power supply cord into a grounded outlet. ■ Electrical supply is not sufficient air flow, review the "Venting Requirements" and "Venting Methods" sections. 22 7. Reconnect range to floor or wall per installation instructions. Grate 2. If there is an extra... you have all of the anti-tip bracket. When moving range, slide range onto cardboard or hardboard to follow these instructions can tip the range and be killed. To check that all packaging materials. 6. Complete Installation 1. Slide range forward. 3. Check that anti-tip bracket is installed, remove...

Installation Instruction
Page 23
.... 3. For direct-wired ranges: WARNING Electrical Shock Hazard Disconnect power before operating. Check that anti-tip bracket is installed, remove access panel and use a flashlight and look underneath the bottom of the range: ■ Look for the anti-tip bracket securely attached to floor or wall. ■ Slide range back so rear range foot is level...
.... 3. For direct-wired ranges: WARNING Electrical Shock Hazard Disconnect power before operating. Check that anti-tip bracket is installed, remove access panel and use a flashlight and look underneath the bottom of the range: ■ Look for the anti-tip bracket securely attached to floor or wall. ■ Slide range back so rear range foot is level...

Use and Care
Page 4
... is cool. SAVE THESE INSTRUCTIONS 4 TO CHECK IF THE DEVICES ARE INSTALLED PROPERLY, SLIDE RANGE FORWARD, LOOK FOR ANTI-TIP BRACKET SECURELY ATTACHED TO FLOOR OR WALL, AND SLIDE RANGE BACK SO REAR RANGE FOOT IS UNDER ANTI-TIP BRACKET. ■ CAUTION: Do not store items of ...Use Only Dry Potholders - Let hot air or steam escape before removing or replacing food. ■ Do Not Heat Unopened Food Containers - IMPORTANT SAFETY INSTRUCTIONS WARNING: To reduce the risk of fire, electrical shock, injury to persons, or damage when using the range. ■ User Servicing - Remove ...
... is cool. SAVE THESE INSTRUCTIONS 4 TO CHECK IF THE DEVICES ARE INSTALLED PROPERLY, SLIDE RANGE FORWARD, LOOK FOR ANTI-TIP BRACKET SECURELY ATTACHED TO FLOOR OR WALL, AND SLIDE RANGE BACK SO REAR RANGE FOOT IS UNDER ANTI-TIP BRACKET. ■ CAUTION: Do not store items of ...Use Only Dry Potholders - Let hot air or steam escape before removing or replacing food. ■ Do Not Heat Unopened Food Containers - IMPORTANT SAFETY INSTRUCTIONS WARNING: To reduce the risk of fire, electrical shock, injury to persons, or damage when using the range. ■ User Servicing - Remove ...

Use and Care
Page 7
.... IMPORTANT: For optimal performance, operate the downdraft ventilation system with a paper towel. On electric cooktops, canners should be set to turn food. ■ Steaks, chops and hamburgers should..." in use top grade meat. Preheating improves the flavor and appearance of the range. Companies that excessive amounts accumulate inside your local agricultural department. Thicker meat will ...operate automatically when the grill is used areas to desired cook setting. Slide the element toward the terminal receptacle. Press VENT FAN once for Low, a second...
.... IMPORTANT: For optimal performance, operate the downdraft ventilation system with a paper towel. On electric cooktops, canners should be set to turn food. ■ Steaks, chops and hamburgers should..." in use top grade meat. Preheating improves the flavor and appearance of the range. Companies that excessive amounts accumulate inside your local agricultural department. Thicker meat will ...operate automatically when the grill is used areas to desired cook setting. Slide the element toward the terminal receptacle. Press VENT FAN once for Low, a second...


