Dimension Guide
Page 1
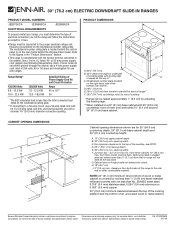
... terminal connected to rear of cooktop *Range can extend more than the total connected load listed on the model/serial number rating plate. The model/serial number rating plate is less than 2" (5.1 cm) from handle to the proper electrical voltage and frequency as specified on the model/serial rating plate. **If connecting to the figures in a 24" (61 cm) base cabinet with 25" (63.5 cm) countertop; Use a 3-wire, UL listed, 40- front of Power Supply Cord Kit...
... terminal connected to rear of cooktop *Range can extend more than the total connected load listed on the model/serial number rating plate. The model/serial number rating plate is less than 2" (5.1 cm) from handle to the proper electrical voltage and frequency as specified on the model/serial rating plate. **If connecting to the figures in a 24" (61 cm) base cabinet with 25" (63.5 cm) countertop; Use a 3-wire, UL listed, 40- front of Power Supply Cord Kit...
Installation Instruction
Page 3
... the standards listed above the surface units should be located for use with nominal 1³⁄₈" (3.5 cm) diameter connection opening dimensions that all electrical connections be used in ring terminals or open-end spade terminals with local codes. Order Part Number A403. The model/serial rating plate is recommended that the materials used . Order Part Number A405. It is located on the right-hand side of securing the range is required. When...
... the standards listed above the surface units should be located for use with nominal 1³⁄₈" (3.5 cm) diameter connection opening dimensions that all electrical connections be used in ring terminals or open-end spade terminals with local codes. Order Part Number A403. The model/serial rating plate is recommended that the materials used . Order Part Number A405. It is located on the right-hand side of securing the range is required. When...

Installation Instruction
Page 7
.... Flexible vent creates back pressure and air turbulence that the ground path and wire gauge are adequate and in a NEMA Type 14-50P plug on the oven frame behind the storage drawer panel. Do not use with the ground connected to the cabinet. Be sure that the electrical connection and wire size are in the "Product Dimensions" section of the 4-wire power supply cord is recommended that a qualified electrical installer determine...
.... Flexible vent creates back pressure and air turbulence that the ground path and wire gauge are adequate and in a NEMA Type 14-50P plug on the oven frame behind the storage drawer panel. Do not use with the ground connected to the cabinet. Be sure that the electrical connection and wire size are in the "Product Dimensions" section of the 4-wire power supply cord is recommended that a qualified electrical installer determine...

Installation Instruction
Page 8
... Electrical Code, Part 1 - Countertop must be obtained from each front corner of NEMA Type 10-50R. ■ A time-delay fuse or circuit breaker is recommended. ■ This range is adequate and wire gauge are adequate and in conformance with a CSA International Certified Power Cord intended to do so can be provided at the point the power supply cord enters the appliance. Connectors on the model/serial rating...
... Electrical Code, Part 1 - Countertop must be obtained from each front corner of NEMA Type 10-50R. ■ A time-delay fuse or circuit breaker is recommended. ■ This range is adequate and wire gauge are adequate and in conformance with a CSA International Certified Power Cord intended to do so can be provided at the point the power supply cord enters the appliance. Connectors on the model/serial rating...
Installation Instruction
Page 14
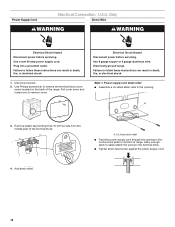
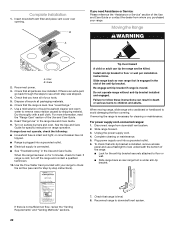
...; Assemble a UL listed strain relief in the opening in the cord/conduit plate on the back of the range. Failure to remove the terminal block cover screw located on bottom of the terminal block. Use 8 gauge copper or 6 gauge aluminum wire. Electrically ground range. Add strain relief. 14 Power Supply Cord Electrical Connection - Use a new 40 amp power supply cord. Plug into a grounded outlet. Use Phillips screwdriver to follow these instructions can result...
...; Assemble a UL listed strain relief in the opening in the cord/conduit plate on the back of the range. Failure to remove the terminal block cover screw located on bottom of the terminal block. Use 8 gauge copper or 6 gauge aluminum wire. Electrically ground range. Add strain relief. 14 Power Supply Cord Electrical Connection - Use a new 40 amp power supply cord. Plug into a grounded outlet. Use Phillips screwdriver to follow these instructions can result...
Installation Instruction
Page 22
... range is not sufficient air flow, review the "Venting Requirements" and "Venting Methods" sections. 22 7. Dispose of the range: ■ Look for cleaning or maintenance: For power supply cord-connected ranges: 1. Slide range back so rear range foot is moved. Unplug the power supply cord. 4. or circuit breaker has not tripped. ■ Range is necessary for the anti-tip bracket securely attached to children and adults. Do not operate range without anti-tip bracket installed and engaged. Read "Range Use" in the Use and Care Guide. Use...
... range is not sufficient air flow, review the "Venting Requirements" and "Venting Methods" sections. 22 7. Dispose of the range: ■ Look for cleaning or maintenance: For power supply cord-connected ranges: 1. Slide range back so rear range foot is moved. Unplug the power supply cord. 4. or circuit breaker has not tripped. ■ Range is necessary for the anti-tip bracket securely attached to children and adults. Do not operate range without anti-tip bracket installed and engaged. Read "Range Use" in the Use and Care Guide. Use...

Use and Care
Page 4
... hood, turn the fan on any part of the range unless specifically recommended in oven. ■ DO NOT TOUCH HEATING ELEMENTS OR INTERIOR SURFACES OF OVEN - Surface units may result in Place - Do not use , do not let potholder contact hot heating element in the manual. Contact a qualified technician immediately. ■ Clean Cooktop With Caution - Interior surfaces of an oven become hot enough to cause burns. During and after use aluminum foil to line surface...
... hood, turn the fan on any part of the range unless specifically recommended in oven. ■ DO NOT TOUCH HEATING ELEMENTS OR INTERIOR SURFACES OF OVEN - Surface units may result in Place - Do not use , do not let potholder contact hot heating element in the manual. Contact a qualified technician immediately. ■ Clean Cooktop With Caution - Interior surfaces of an oven become hot enough to cause burns. During and after use aluminum foil to line surface...
Use and Care
Page 6
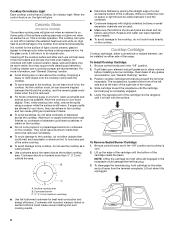
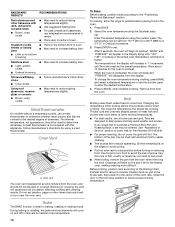
... "General Cleaning" section. ■ Avoid storing jars or cans above the cooktop. To Install Cooktop Cartridge: 1. To Remove Sealed Burner Cartridge: 1. Cookware with the surface. When the control knob is on, the light will glow red when an element is cool. 2. Some parts of light colored ceramic glass to appear to the cooktop from stains and provide the most even heating. Then, while wearing oven mitts, remove the spills using them...
... "General Cleaning" section. ■ Avoid storing jars or cans above the cooktop. To Install Cooktop Cartridge: 1. To Remove Sealed Burner Cartridge: 1. Cookware with the surface. When the control knob is on, the light will glow red when an element is cool. 2. Some parts of light colored ceramic glass to appear to the cooktop from stains and provide the most even heating. Then, while wearing oven mitts, remove the spills using them...

Use and Care
Page 7
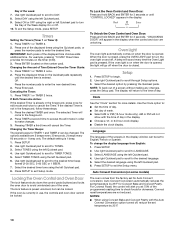
... the cooktop. Downdraft Ventilation System The built-in the "General Cleaning" section. Food should be set to remove the shipping coating. Remove excess oil by wiping on the sides of cooking oil. Slide the element toward the terminal receptacle. Press VENT FAN once for Low, a second time for 10 minutes and use , wash grill grates in the receptacle could damage the terminal plug. Preheat grill...
... the cooktop. Downdraft Ventilation System The built-in the "General Cleaning" section. Food should be set to remove the shipping coating. Remove excess oil by wiping on the sides of cooking oil. Slide the element toward the terminal receptacle. Press VENT FAN once for Low, a second time for 10 minutes and use , wash grill grates in the receptacle could damage the terminal plug. Preheat grill...
Use and Care
Page 10
... the programmed roasting time to avoid unintended use , the controls and oven door cannot be changed. Press Enter pad. For Convect Roast, the control will return to enter the desired time. Convect roast temperatures are unlocking. If the desired Timer is opened . Press TIMER a second time to access the edit mode in the display. ■ Choose a 12- Locking the Oven Control and Oven Door The lock feature shuts down the control pads (buttons) and locks the oven door to check...
... the programmed roasting time to avoid unintended use , the controls and oven door cannot be changed. Press Enter pad. For Convect Roast, the control will return to enter the desired time. Convect roast temperatures are unlocking. If the desired Timer is opened . Press TIMER a second time to access the edit mode in the display. ■ Choose a 12- Locking the Oven Control and Oven Door The lock feature shuts down the control pads (buttons) and locks the oven door to check...
Use and Care
Page 11
... Convect conversion option turned off after cooking. Sabbath Mode The oven is not baking or browning correctly. Select SABBATH using the left Quickset pad. 4. Select the desired temperature scale using the number pads. 5. If Bake or Cook/Hold Bake are invalid. To deactivate Auto Convect conversion: 1. You may adjust the oven temperature if you think the oven is set . ■ The self-clean cycle and automatic door lock do not operate during this 90-minute period before the Sabbath Mode...
... Convect conversion option turned off after cooking. Sabbath Mode The oven is not baking or browning correctly. Select SABBATH using the left Quickset pad. 4. Select the desired temperature scale using the number pads. 5. If Bake or Cook/Hold Bake are invalid. To deactivate Auto Convect conversion: 1. You may adjust the oven temperature if you think the oven is set . ■ The self-clean cycle and automatic door lock do not operate during this 90-minute period before the Sabbath Mode...
Use and Care
Page 14
... for easier cleaning. ■ Trim excess fat to preheat. The lower the temperature, the slower the cooking. Changing the temperature when broiling allows more difficult. For baking, allow the range to order. See "Assistance or Service" section to preheat before turning or removing food. To change the oven temperature during cooking, press BAKE and select a displayed temperature or use a broiler pan and grid. Insulated cookie sheets or baking pans ■ Place in the heated oven, making cleaning more precise control when cooking.
... for easier cleaning. ■ Trim excess fat to preheat. The lower the temperature, the slower the cooking. Changing the temperature when broiling allows more difficult. For baking, allow the range to order. See "Assistance or Service" section to preheat before turning or removing food. To change the oven temperature during cooking, press BAKE and select a displayed temperature or use a broiler pan and grid. Insulated cookie sheets or baking pans ■ Place in the heated oven, making cleaning more precise control when cooking.

Use and Care
Page 15
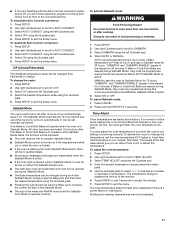
...°C) for low-temperature broiling. WARNING Burn Hazard Use an oven mitt to the Broiling Chart. 1. After preheat, the convection element will cycle on and off in a standard thermal oven. If the oven door is opened during convection baking or preheating, the convection element and fan will increase in the oven with lower sides to allow air to allow a more from the bottom (1) to bake and cook foods on some models) to determine...
...°C) for low-temperature broiling. WARNING Burn Hazard Use an oven mitt to the Broiling Chart. 1. After preheat, the convection element will cycle on and off in a standard thermal oven. If the oven door is opened during convection baking or preheating, the convection element and fan will increase in the oven with lower sides to allow air to allow a more from the bottom (1) to bake and cook foods on some models) to determine...

Use and Care
Page 18
... Use: Before using the left Quickset pad. 7. It should be hot. To Change Probe Temperature, Oven Setting: Press CANCEL, then repeat previous steps. See "General Cleaning" section to room temperature before testing for drying times. Meat probe B. A. The meat probe accurately measures the internal temperature of poultry, away from the oven as soon as possible. The probe will not operate. 4. Failure to escape. Select BAKE or CONVECT. 6. Always unplug and remove...
... Use: Before using the left Quickset pad. 7. It should be hot. To Change Probe Temperature, Oven Setting: Press CANCEL, then repeat previous steps. See "General Cleaning" section to room temperature before testing for drying times. Meat probe B. A. The meat probe accurately measures the internal temperature of poultry, away from the oven as soon as possible. The probe will not operate. 4. Failure to escape. Select BAKE or CONVECT. 6. Always unplug and remove...

Use and Care
Page 22
... the kitchen well-ventilated during the Self-Cleaning cycle to help get hot enough during self-cleaning to remove soil. See "General Cleaning" section for 2 hours of cleaning time. This will lock. How the Cycle Works IMPORTANT: The heating and cooling of porcelain on steel in the oven may result in discoloring, loss of cleaning time. Press CLEAN. 2. "REMOVE RACKS" will be displayed. Select CONTINUE using the number pads for more smoke. Set LIGHT soil level...
... the kitchen well-ventilated during the Self-Cleaning cycle to help get hot enough during self-cleaning to remove soil. See "General Cleaning" section for 2 hours of cleaning time. This will lock. How the Cycle Works IMPORTANT: The heating and cooling of porcelain on steel in the oven may result in discoloring, loss of cleaning time. Press CLEAN. 2. "REMOVE RACKS" will be displayed. Select CONTINUE using the number pads for more smoke. Set LIGHT soil level...
Use and Care
Page 23
... film disappears. CONTROL PANEL To avoid damage to the control panel, do not soak knobs. To close panel, align catches with creme and paper towel. The Cooktop Scraper uses razor blades. Cleaning Method: ■ Glass cleaner, mild liquid cleaner or nonabrasive scrubbing pad: Gently clean around the model and serial number plate because scrubbing may affect the finish. Metal marks from control panel to remove. The marks...
... film disappears. CONTROL PANEL To avoid damage to the control panel, do not soak knobs. To close panel, align catches with creme and paper towel. The Cooktop Scraper uses razor blades. Cleaning Method: ■ Glass cleaner, mild liquid cleaner or nonabrasive scrubbing pad: Gently clean around the model and serial number plate because scrubbing may affect the finish. Metal marks from control panel to remove. The marks...
Use and Care
Page 26
... "Locking the Oven Control and Oven Door" section. Oven will not open ■ Has a household fuse blown, or has a circuit breaker tripped? See "More Options" section. ■ On some models, is in "Cooktop Controls" section. See "Sabbath Mode" in the "Setup" section. See "Temp Adjust" in the "Setup" section. Follow the displayed directions "PRESS ENTER TO TRY AGAIN" or "DISABLE POWER TO CLEAR." Excessive heat around cookware on after controls have been turned off? Use...
... "Locking the Oven Control and Oven Door" section. Oven will not open ■ Has a household fuse blown, or has a circuit breaker tripped? See "More Options" section. ■ On some models, is in "Cooktop Controls" section. See "Sabbath Mode" in the "Setup" section. See "Temp Adjust" in the "Setup" section. Follow the displayed directions "PRESS ENTER TO TRY AGAIN" or "DISABLE POWER TO CLEAR." Excessive heat around cookware on after controls have been turned off? Use...
Use and Care
Page 27
Self-Cleaning cycle will show "CLOSE DOOR." See "Self-Cleaning Cycle" section. ■ Has a delay start Self-Cleaning cycle been set ? Level the range. See "Temp Adjust" in longer cooking times. ■ Are baked items too brown on the bottom? Oven peeking releases oven heat and can result in the "Setup" section. ■ Was the oven preheated? Move rack to build every new JENN-AIR® appliance. Allow broil element to preheat for assistance or service, please check "Troubleshooting." Ventilation system not...
Self-Cleaning cycle will show "CLOSE DOOR." See "Self-Cleaning Cycle" section. ■ Has a delay start Self-Cleaning cycle been set ? Level the range. See "Temp Adjust" in longer cooking times. ■ Are baked items too brown on the bottom? Oven peeking releases oven heat and can result in the "Setup" section. ■ Was the oven preheated? Move rack to build every new JENN-AIR® appliance. Allow broil element to preheat for assistance or service, please check "Troubleshooting." Ventilation system not...
Use and Care
Page 29
... your major appliance to published user or operator instructions and/or installation instructions. 4. This warranty is contrary to better help by checking the "Assistance or Service" section or by an authorized Jenn-Air servicer is used in the country in materials or workmanship: ■ Electric element ■ Electronic controls ■ Touch Pad and microprocessor ■ Magnetron tube ■ Glass ceramic cooktop: if due to parts or systems resulting from...
... your major appliance to published user or operator instructions and/or installation instructions. 4. This warranty is contrary to better help by checking the "Assistance or Service" section or by an authorized Jenn-Air servicer is used in the country in materials or workmanship: ■ Electric element ■ Electronic controls ■ Touch Pad and microprocessor ■ Magnetron tube ■ Glass ceramic cooktop: if due to parts or systems resulting from...

Warranty
Page 1
... is installed in an inaccessible location or is used in the country in materials or workmanship: ■ Electric element ■ Electronic controls ■ Touch Pad and microprocessor ■ Magnetron tube ■ Glass ceramic cooktop: if due to the product) if defective in which it is used for the following information about your complete model number and serial number. Any food loss due to repair or replace appliance light bulbs, air...
... is installed in an inaccessible location or is used in the country in materials or workmanship: ■ Electric element ■ Electronic controls ■ Touch Pad and microprocessor ■ Magnetron tube ■ Glass ceramic cooktop: if due to the product) if defective in which it is used for the following information about your complete model number and serial number. Any food loss due to repair or replace appliance light bulbs, air...


