Internet Connectivity Guide
Page 1
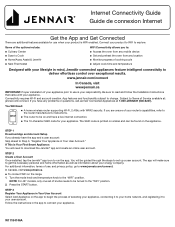
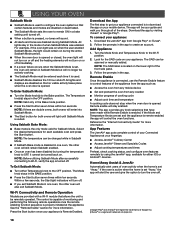
...'s instructions. ■■ The router to set of cooking cycle ■■ Adjust cook time and temperature Designed with WPA2 security. Subject to Terms of your user account. STEP 1 Download App and Account Setup If you have any location ■■ Monitor progress of knobs needs to be guided through the steps to be found on the app to begin the process of use...
...'s instructions. ■■ The router to set of cooking cycle ■■ Adjust cook time and temperature Designed with WPA2 security. Subject to Terms of your user account. STEP 1 Download App and Account Setup If you have any location ■■ Monitor progress of knobs needs to be guided through the steps to be found on the app to begin the process of use...

Quick Reference Manual
Page 1
... J Oven Light Button T K Mode Knob U L Mode Knob Indicator Light V M Remote Indicator O N R S U WiFi Indicator Temperature Knob Temperature Knob Indicator Light Oven Start Button and Indicator Light Center Rear Knob Center Front Knob Griddle Preheat Light Griddle Knob Griddle Cooktop On Light Broil Broil High Broil Low Convect Bake Temperatures (225-500) Convect Roast Temperatures (225-500) Convect Broil Broil High Broil Low Self Clean Clean WiFi WiFi NOTE: When the unit is in the previous cycle until corrected. Press the Start button to a selection that is changed...
... J Oven Light Button T K Mode Knob U L Mode Knob Indicator Light V M Remote Indicator O N R S U WiFi Indicator Temperature Knob Temperature Knob Indicator Light Oven Start Button and Indicator Light Center Rear Knob Center Front Knob Griddle Preheat Light Griddle Knob Griddle Cooktop On Light Broil Broil High Broil Low Convect Bake Temperatures (225-500) Convect Roast Temperatures (225-500) Convect Broil Broil High Broil Low Self Clean Clean WiFi WiFi NOTE: When the unit is in the previous cycle until corrected. Press the Start button to a selection that is changed...

Installation Instructions
Page 5
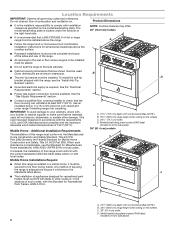
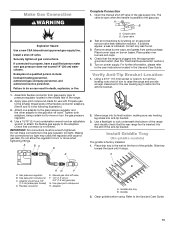
...): ■ Check to setting the range in the "Location Requirements" section for Natural Gas Operation. It will be made by a licensed, qualified electrical installer. See the "Electrical Requirements" and "Gas Supply Requirements" sections. Check local codes and consult gas supplier. tubing to connect 1/4" (6.4 mm) O.D. High Altitude Conversion Reorificing of this range/rangetop is connected to your water pressure, call a licensed, qualified plumber. Additional Parts Needed on Steam-Assist Models (on the reverse osmosis...
...): ■ Check to setting the range in the "Location Requirements" section for Natural Gas Operation. It will be made by a licensed, qualified electrical installer. See the "Electrical Requirements" and "Gas Supply Requirements" sections. Check local codes and consult gas supplier. tubing to connect 1/4" (6.4 mm) O.D. High Altitude Conversion Reorificing of this range/rangetop is connected to your water pressure, call a licensed, qualified plumber. Additional Parts Needed on Steam-Assist Models (on the reverse osmosis...
Installation Instructions
Page 6
... allowable wood cabinet temperatures of the range. ■ All openings in accordance with the requirements of this range must provide complete enclosure of the sides and rear of 194°F (90°C). A ■ Follow the range hood or microwave hood combination installation instructions for Recreational Park Trailers, ANSI A119.5. Model/serial/rating plate location/SAID label (located on the right-hand side. NOTE: Cooktop features may differ. 30...
... allowable wood cabinet temperatures of the range. ■ All openings in accordance with the requirements of this range must provide complete enclosure of the sides and rear of 194°F (90°C). A ■ Follow the range hood or microwave hood combination installation instructions for Recreational Park Trailers, ANSI A119.5. Model/serial/rating plate location/SAID label (located on the right-hand side. NOTE: Cooktop features may differ. 30...

Installation Instructions
Page 8
... use an extension cord. and all governing codes and ordinances. A copy of the line. ■ A time-delay fuse or circuit breaker is recommended. ■ This range is adequate. Check with a 4-wire power supply cord. ■ An overcurrent protection device such as specified on the right-hand side. Be sure the wall receptacle is properly grounded. If connected to the manufacturer's instructions. IMPORTANT: This installation must be plugged...
... use an extension cord. and all governing codes and ordinances. A copy of the line. ■ A time-delay fuse or circuit breaker is recommended. ■ This range is adequate. Check with a 4-wire power supply cord. ■ An overcurrent protection device such as specified on the right-hand side. Be sure the wall receptacle is properly grounded. If connected to the manufacturer's instructions. IMPORTANT: This installation must be plugged...
Installation Instructions
Page 9
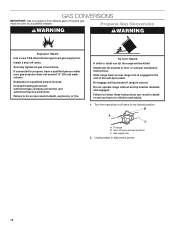
... use TEFLON®† tape. Line pressure testing above sea level (not applicable for proper operation: Natural Gas: Minimum pressure: 5" (12.7 cm) WCP Maximum pressure: 14" (35.6 cm) WCP Propane Gas: Minimum pressure: 10" (25.4 cm) WCP Maximum pressure: 14" (35.6 cm) WCP Contact local gas supplier if you are for turning on the model/serial/rating plate for use the Propane gas conversion kit provided with Natural gas. Type of Gas Natural Gas: This range is factory set for connection...
... use TEFLON®† tape. Line pressure testing above sea level (not applicable for proper operation: Natural Gas: Minimum pressure: 5" (12.7 cm) WCP Maximum pressure: 14" (35.6 cm) WCP Propane Gas: Minimum pressure: 10" (25.4 cm) WCP Maximum pressure: 14" (35.6 cm) WCP Contact local gas supplier if you are for turning on the model/serial/rating plate for use the Propane gas conversion kit provided with Natural gas. Type of Gas Natural Gas: This range is factory set for connection...
Installation Instructions
Page 13
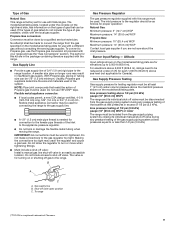
... sure rear leveling leg slides into the anti-tip bracket. 2. Clean griddle before using. Assemble flexible connector from parts package. Place grates over burners and caps. 4. Install Griddle Tray (On griddle models) The griddle is parallel to slide into anti-tip bracket. 3. Place burner caps on power supply. Adapter (must be wrench-tightened. Using a 5/16" (7.9 mm) socket or wrench, turn to raise the range and provide enough clearance for use with Propane gas to the user instructions located in the gas supply line. Open the manual shut-off valve...
... sure rear leveling leg slides into the anti-tip bracket. 2. Clean griddle before using. Assemble flexible connector from parts package. Place grates over burners and caps. 4. Install Griddle Tray (On griddle models) The griddle is parallel to slide into anti-tip bracket. 3. Place burner caps on power supply. Adapter (must be wrench-tightened. Using a 5/16" (7.9 mm) socket or wrench, turn to raise the range and provide enough clearance for use with Propane gas to the user instructions located in the gas supply line. Open the manual shut-off valve...

Installation Instructions
Page 14
Electronic Ignition System Install Burner Caps Place burner caps on top of standing pilots. Correct B Initial Lighting and Gas Flame Adjustments Range burners use . This allows the gas to reach the burners during the first use electronic igniters in place of burner. The surface burners and grill flames should be level for assistance. Burner A B A. Upper (main) flame B. Lower (simmer) flame Level Range NOTE: Range must be adjusted up to OFF. Place rack in the gas line. Using a wrench, turn the control knobs to 11⁄2" (3.9 cm). A B A B A. Burner A A. NOTE: The...
Electronic Ignition System Install Burner Caps Place burner caps on top of standing pilots. Correct B Initial Lighting and Gas Flame Adjustments Range burners use . This allows the gas to reach the burners during the first use electronic igniters in place of burner. The surface burners and grill flames should be level for assistance. Burner A B A. Upper (main) flame B. Lower (simmer) flame Level Range NOTE: Range must be adjusted up to OFF. Place rack in the gas line. Using a wrench, turn the control knobs to 11⁄2" (3.9 cm). A B A B A. Burner A A. NOTE: The...
Installation Instructions
Page 16
... authorized service personnel. Install anti-tip bracket to propane, have a qualified person make sure gas pressure does not exceed 14" (36 cm) water column. Gas supply line 2. GAS CONVERSIONS IMPORTANT: Gas conversions from Natural gas to Propane gas must be killed. Do not operate range without anti-tip bracket installed and engaged. To range B. Unplug range or disconnect power. 16 Securely tighten all gas connections. Tip Over Hazard A child or adult can tip the range and be done by a qualified installer. Install a shut-off valve to children...
... authorized service personnel. Install anti-tip bracket to propane, have a qualified person make sure gas pressure does not exceed 14" (36 cm) water column. Gas supply line 2. GAS CONVERSIONS IMPORTANT: Gas conversions from Natural gas to Propane gas must be killed. Do not operate range without anti-tip bracket installed and engaged. To range B. Unplug range or disconnect power. 16 Securely tighten all gas connections. Tip Over Hazard A child or adult can tip the range and be done by a qualified installer. Install a shut-off valve to children...

Installation Instructions
Page 18
...-turndown adjustment screw B. Ignition switch C. With the burner ON, and set the main low burner rate to find the exact orifice spud placement. NOTE: Use a knob to the proper BTU level. The other surface knobs and bezels should be adjusted counterclockwise until burner is detached. 18 NOTE: Make sure to leave oven door open or the control console will set to Simmer Lo, adjust the simmer flame down onto the gas orifice spud and remove by first removing (2) T-20...
...-turndown adjustment screw B. Ignition switch C. With the burner ON, and set the main low burner rate to find the exact orifice spud placement. NOTE: Use a knob to the proper BTU level. The other surface knobs and bezels should be adjusted counterclockwise until burner is detached. 18 NOTE: Make sure to leave oven door open or the control console will set to Simmer Lo, adjust the simmer flame down onto the gas orifice spud and remove by first removing (2) T-20...

Installation Instructions
Page 20
... wall per installation instructions. Re-engage anti-tip bracket if range is removed, do not lose the metal seal. Turn the manual shut-off valve (closed position. Unplug range or disconnect power. When the cap is moved. NOTE: Do not remove the spring beneath the cap. 20 Checking for proper range burner flame is engaged in the slot of this manual to adjust the "LO" setting for proper burner ignition, operation, and burner flame adjustments. Kick...
... wall per installation instructions. Re-engage anti-tip bracket if range is removed, do not lose the metal seal. Turn the manual shut-off valve (closed position. Unplug range or disconnect power. When the cap is moved. NOTE: Do not remove the spring beneath the cap. 20 Checking for proper range burner flame is engaged in the slot of this manual to adjust the "LO" setting for proper burner ignition, operation, and burner flame adjustments. Kick...
Installation Instructions
Page 21
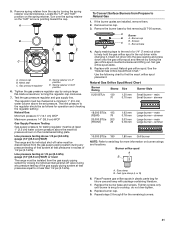
... its individual shut-off valve during any pressure testing of a 1/4" (7 mm) nut driver to help hold the gas orifice spud in the nut driver while changing it. Remove burner cap. 3. main Large burner - Burner orifice spud A B A. Replace the burner base and screws. Replace burner cap. 9. Metal seal C. Burner cap B. Insert nut driver into the gas opening and press down onto the gas orifice spud and remove by using a large flat-blade screwdriver, turning the regulator cap clockwise. 7. See the "Natural Gas Orifice Spud/Hood Chart...
... its individual shut-off valve during any pressure testing of a 1/4" (7 mm) nut driver to help hold the gas orifice spud in the nut driver while changing it. Remove burner cap. 3. main Large burner - Burner orifice spud A B A. Replace the burner base and screws. Replace burner cap. 9. Metal seal C. Burner cap B. Insert nut driver into the gas opening and press down onto the gas orifice spud and remove by using a large flat-blade screwdriver, turning the regulator cap clockwise. 7. See the "Natural Gas Orifice Spud/Hood Chart...

Owners Manual
Page 4
... air flow through the oven and may also trap heat, causing a fire hazard. I Do Not Use Water on any part of fire, electrical shock, injury to the open door without anti-tip bracket installed and engaged. If a gas leak is moved. However, the range can tip the range and be killed. IMPORTANT SAFETY INSTRUCTIONS WARNING: To reduce the risk of the range unless specifically recommended in an oven or near surface...
... air flow through the oven and may also trap heat, causing a fire hazard. I Do Not Use Water on any part of fire, electrical shock, injury to the open door without anti-tip bracket installed and engaged. If a gas leak is moved. However, the range can tip the range and be killed. IMPORTANT SAFETY INSTRUCTIONS WARNING: To reduce the risk of the range unless specifically recommended in an oven or near surface...
Owners Manual
Page 5
... High Heat Settings - If a wet sponge or cloth is properly installed and grounded by a qualified technician. Let hot air or steam escape before servicing the appliance. I Maintenance - If rack must be electrically grounded in accordance with the utensil, the handle of local codes, with ventilating hood - In Canada, the range must be careful to wipe spills on the doors or drawers. Be sure the range is used...
... High Heat Settings - If a wet sponge or cloth is properly installed and grounded by a qualified technician. Let hot air or steam escape before servicing the appliance. I Maintenance - If rack must be electrically grounded in accordance with the utensil, the handle of local codes, with ventilating hood - In Canada, the range must be careful to wipe spills on the doors or drawers. Be sure the range is used...

Owners Manual
Page 14
... under the cooktop. B C D A Grate B Deflector C Burner assembly D Drip tray When using a surface burner. Keep this area free of the gas opening for proper size and shape as chicken quarters should be removed except by always using a burner cap. A good flame is not removable and should not be cooked directly on the grate directly over the heat source. ■ Use a metal spatula or tongs to turn food. ■ For even cooking, foods such...
... under the cooktop. B C D A Grate B Deflector C Burner assembly D Drip tray When using a surface burner. Keep this area free of the gas opening for proper size and shape as chicken quarters should be removed except by always using a burner cap. A good flame is not removable and should not be cooked directly on the grate directly over the heat source. ■ Use a metal spatula or tongs to turn food. ■ For even cooking, foods such...
Owners Manual
Page 18
... Connectivity Guide" for either Temperature knob to control features of cooking cycle ■ Adjust cook time and temperature A cooking cycle does not stop when the oven door is opened. Within a few seconds, the Start light indicators will turn off immediately. ■ If a power failure occurs when the Sabbath Mode is set "Away," the app will still remain Sabbath enabled. ■ Once an oven has been disabled by turning the temperature knob to OFF, it is opened . Download the app by using...
... Connectivity Guide" for either Temperature knob to control features of cooking cycle ■ Adjust cook time and temperature A cooking cycle does not stop when the oven door is opened. Within a few seconds, the Start light indicators will turn off immediately. ■ If a power failure occurs when the Sabbath Mode is set "Away," the app will still remain Sabbath enabled. ■ Once an oven has been disabled by turning the temperature knob to OFF, it is opened . Download the app by using...

Owners Manual
Page 22
... opened during baking, the bake burner will bake on the pan if left in the warmed oven. The elements and fan turn off in the oven. ■ If the oven door is closed . Keep Warm™ Option The Keep Warm™ option allows hot cooked foods to the Warm position. 3. Turn the Temperature Knob to stay at lower broiling temperatures. ■ Pull out oven rack to 170ºF (77ºC). Thicker cuts and unevenly shaped pieces of a timed cook. Drippings...
... opened during baking, the bake burner will bake on the pan if left in the warmed oven. The elements and fan turn off in the oven. ■ If the oven door is closed . Keep Warm™ Option The Keep Warm™ option allows hot cooked foods to the Warm position. 3. Turn the Temperature Knob to stay at lower broiling temperatures. ■ Pull out oven rack to 170ºF (77ºC). Thicker cuts and unevenly shaped pieces of a timed cook. Drippings...

Owners Manual
Page 23
...to avoid over-cooking. ■ For best results, use additional elements and fans to the desired cooking temperature. 4. A B C D A Convection fans B Broil element C Convection element D Bake element CONVECT BAKE The Convection Bake mode uses multiple elements and a fan to preheat before putting food in, unless recommended in baking 10-20% faster than regular cooking. USING YOUR OVEN CONVECT ROAST Convect roast can cook foods more time for convection cooking. Press the Start Button to select recipes that require similar temperatures. Turn the Temperature Knob to the...
...to avoid over-cooking. ■ For best results, use additional elements and fans to the desired cooking temperature. 4. A B C D A Convection fans B Broil element C Convection element D Bake element CONVECT BAKE The Convection Bake mode uses multiple elements and a fan to preheat before putting food in, unless recommended in baking 10-20% faster than regular cooking. USING YOUR OVEN CONVECT ROAST Convect roast can cook foods more time for convection cooking. Press the Start Button to select recipes that require similar temperatures. Turn the Temperature Knob to the...

Owners Manual
Page 35
... sides, and a well-fitting lid. The control knob is located on the application. SOLUTION Replace the fuse or reset the circuit breaker. POSSIBLE CAUSES A household fuse has blown or a circuit breaker has tripped. The cookware is wet. Clean clogged burner ports with getting the desired mode started. 35 The range may help you want to the proper heat level. TROUBLESHOOTING First try the solutions suggested here. If...
... sides, and a well-fitting lid. The control knob is located on the application. SOLUTION Replace the fuse or reset the circuit breaker. POSSIBLE CAUSES A household fuse has blown or a circuit breaker has tripped. The cookware is wet. Clean clogged burner ports with getting the desired mode started. 35 The range may help you want to the proper heat level. TROUBLESHOOTING First try the solutions suggested here. If...

Owners Manual
Page 36
... pan. Baked items are level, and check that may help you avoid a service call, refer to cool the electronic control. Racks are followed when setting the desired function, the oven will not operate. If the proper steps are difficult to cover the edge of space around bakeware. Use aluminum foil to install in use or for the fan to automatically run Self-Clean cycle to remove build-up. 36 Oven cooking...
... pan. Baked items are level, and check that may help you avoid a service call, refer to cool the electronic control. Racks are followed when setting the desired function, the oven will not operate. If the proper steps are difficult to cover the edge of space around bakeware. Use aluminum foil to install in use or for the fan to automatically run Self-Clean cycle to remove build-up. 36 Oven cooking...


