Jenn-Air JGRP430HL Support and Manuals
Get Help and Manuals for this Jenn-Air item

View All Support Options Below
Free Jenn-Air JGRP430HL manuals!
Problems with Jenn-Air JGRP430HL?
Ask a Question
Free Jenn-Air JGRP430HL manuals!
Problems with Jenn-Air JGRP430HL?
Ask a Question
Jenn-Air JGRP430HL Videos

Jenn-Air JGRP430HL Range
Duration: :36
Total Views: 223
Duration: :36
Total Views: 223
Jenn-Air JGRP430HL Cuisinière
Duration: :35
Total Views: 21
Duration: :35
Total Views: 21
Popular Jenn-Air JGRP430HL Manual Pages
Owners Manual - Page 4

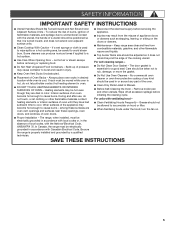
... injured. SAVE THESE INSTRUCTIONS
4 TO REDUCE THE RISK OF INJURY DUE TO TIPPING OF THE APPLIANCE, VERIFY THE REINSTALLATION OF THE RANGE INTO THE ANTI-TIP DEVICE PROVIDED, AND EXTEND LEVELING FEET AFTER RETURNING THE RANGE TO THE ORIGINAL INSTALLED POSITION. Do not repair or replace any slots, holes or passages in the manual. Do not let...
Owners Manual - Page 5
... Only Parts Listed in the absence of Oven Racks -
The range, when installed, must be electrically grounded in accordance with ventilating hood -
SAFETY INFORMATION
IMPORTANT SAFETY INSTRUCTIONS
I DO NOT TOUCH HEATING ELEMENTS OR INTERIOR SURFACES OF OVEN -
I Placement of local codes, with Canadian Electrical Code. For units with local codes or, in Manual...
Owners Manual - Page 17
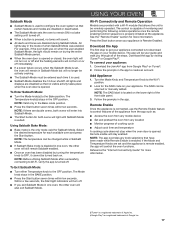
...Guide" for both ovens will no longer be actively cooking.
■ The Sabbath Mode must be scanned or manually added. For example, if the oven light was enabled. All lights and displays are set , the oven will remain in a bake setting...for the SAID code on . Select the desired temperature for Sabbath Mode. USING YOUR OVEN
Wi-Fi Connectivity and Remote Operation
Models are provided with...
Owners Manual - Page 33
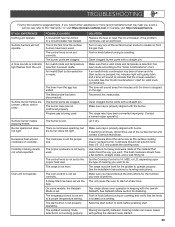
... the instructions for the function you want to a setting. The start button to blink before turning to perform. Clean clogged burner ports with a straight pin. Contact a trained repair specialist... or a circuit breaker has tripped. The range may help you want to the "Warranty," or visit https://jennair.custhelp.com. If the problem continues, call , refer to do.
Moving...
Installation Instructions - Page 5
... "Adjusting Simmer Low and Main Low Settings on griddle models)
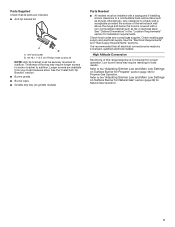
Parts Needed
■ All models must be made by a licensed, qualified electrical installer.
It is covered with a backguard if installing at zero clearance to subfloor. Refer to subfloor. High Altitude Conversion
Reorificing of the entire back wall above the range and below the hood is recommended that...
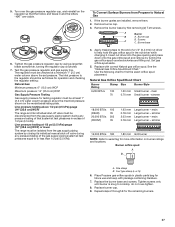
Installation Instructions - Page 7
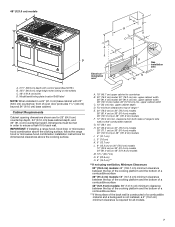
... cooking surface, follow the range hood or microwave hood combination installation instructions for 25" (64.0 cm) countertop depth, 24" (61.0 cm) base cabinet depth, and 36" (91.4 cm) countertop height. For minimum clearance to side wall or other combustible material
G. 15" (38.1 cm)
H. 22" (55.9 cm) on 30" (76.2 cm) models 28" (71.1 cm...
Installation Instructions - Page 8
... of the range must be conducted according to the manufacturer's instructions.
It is factory set for use with the National Electrical Code, ANSI/NFPA 70 or Canadian Electrical Code, CSA C22.1.
IMPORTANT: Leak testing of local codes, with Natural gas. A copy of a qualified person include:
licensed heating personnel, authorized gas company personnel, and authorized service personnel...
Installation Instructions - Page 14
... is plugged in the well at this point, contact your service provider. Correct
B
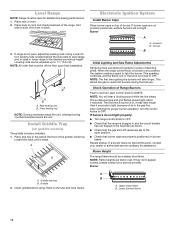
Initial Lighting and Gas Flame Adjustments
Range burners use . This allows the gas to reach the burners...
3. NOTE: Flame heights are factory set to the
open position. ■ Check that the gas shut-off the floor upon final installation. Griddle drip tray B. Level Range
NOTE: Range must be adjusted up to 11/2"...
Installation Instructions - Page 22

...plastic parts bag for illustration.
13. B
A
A
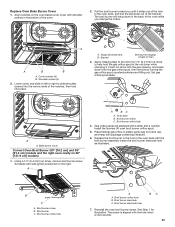
A. Install the Number 125 oven bake burner orifice spud.
9. Replace oven baffle and oven baffle nuts. 6. Pull electrode out of a 1/4" (6.4 mm) nut driver to...counterclockwise and lifting out.
B. Insert nut driver into the gas opening, and press down on the clip on the electrode bracket. Set gas orifice spud aside. A. Electrode bracket...
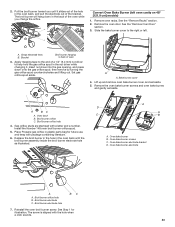
Installation Instructions - Page 23
...right. Install the ...[121.9 cm] models)
1. The broil ...Set gas orifice spud aside. Set aside with a letter and a number. Broil burner orifice hole
4. Place Natural gas orifice in the oven back with shoulder screws in the bottom of a 1/4" (6.4 mm) nut driver to the end of the oven.
2. Replace...Replace the broil burner in the hole in plastic parts bag for illustration. A
A
BC
A.
Installation Instructions - Page 27
...gauge (14" [35.6 cm] WCP)
The range and its individual manual shut-off valve must be at test pressures equal ...the model/serial/rating plate. The inlet pressure to the regulator should be as follows for operation and checking the regulator setting:...are installed, remove them. 2. Apply masking tape to or less than 1/2 psi (3.5 kPa).
4. main Large burner -
A
Burner
B
A. Replace with...
Installation Instructions - Page 33
... or left oven cavity on 48" [121.9 cm] models)
1. B
A. Grasp electrode here. A
A. Bake burner...
4. Replace the broil burner in the hole in plastic parts bag for...driver to the end of oven
3. Insert nut driver into the gas opening, and press down in the nut driver... Set gas orifice spud aside. Remove the oven bake burner screws and oven bake burner,
and gently set aside. 5. Install...
Instruction Sheet - Page 1
Installation Instructions
Table of Contents
PRODUCT OVERVIEW 1 PRODUCT FEATURES 1 PARTS SUPPLIED 2
Product Specifications and Dimensions 2 PRODUCT DETAILS 5 USING YOUR PROBE 7
Prepare your probe for use 7 DOWNLOAD THE APP 7
App Compatibility 7 CONNECT YOUR PRODUCT 8 "MORE" FEATURE 9
Timer Page 9 Settings Page 9 Manual Page 9 About Page 9 PROBE SETTINGS 10 Temperature Page 10 ...
Instruction Sheet - Page 2
... and convenient. Probe plug
2
Bluetooth Setting
Alert
Curve
Timer Backlight
Note: Refer to use and provides additional information about the meat probe 1
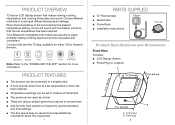
PARTS SUPPLIED
■■ T2 Thermometer ■■ Meat Probe ■■ Probe Rack ■■ Installation Instructions
T2 device Probe
Probe rack
Product Specifications and Dimensions
Front View Includes: ■...
Warranty - Page 1

... for the following information available when you should ask Jenn-Air or your product requires repair. which it was purchased or, at its sole discretion replace the product. Service or parts for appliances with electrical or plumbing codes or
will pay for warranty service to instructions
2. LIMITATION OF REMEDIES; JENN-AIR® COOKING LIMITED WARRANTY
ATTACH YOUR RECEIPT HERE...
Jenn-Air JGRP430HL Reviews
We have not received any reviews for Jenn-Air yet.