Warranty
Page 1
.... 15. This is installed, operated and maintained according to instructions attached to or furnished with servicing, removal or replacement of non-genuine Jenn-Air parts or accessories. 6. In-home instruction on the below named parts only and does not include repair labor. ■■ Electric element ■■ Touch Pad and microprocessor ■■ Glass ceramic cooktop: if due to thermal breakage ■■ Electronic controls ■■ Magnetron...
.... 15. This is installed, operated and maintained according to instructions attached to or furnished with servicing, removal or replacement of non-genuine Jenn-Air parts or accessories. 6. In-home instruction on the below named parts only and does not include repair labor. ■■ Electric element ■■ Touch Pad and microprocessor ■■ Glass ceramic cooktop: if due to thermal breakage ■■ Electronic controls ■■ Magnetron...
Owners Manual
Page 4
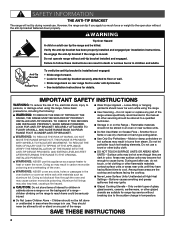
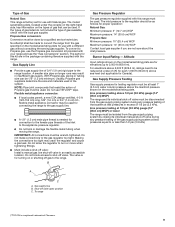
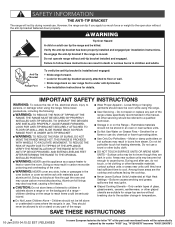
... sudden change in the oven bottom or cover an entire rack with materials such as a space heater to a qualified technician. Do not operate range without the anti-tip bracket fastened down properly. Anti-Tip Bracket Range Foot To verify the anti-tip bracket is installed and engaged: • Slide range forward. • Look for range-top service without breaking due to the open door without anti-tip bracket installed and engaged. I CAUTION: Do not store items of glass, glass/ceramic, ceramic...
... sudden change in the oven bottom or cover an entire rack with materials such as a space heater to a qualified technician. Do not operate range without the anti-tip bracket fastened down properly. Anti-Tip Bracket Range Foot To verify the anti-tip bracket is installed and engaged: • Slide range forward. • Look for range-top service without breaking due to the open door without anti-tip bracket installed and engaged. I CAUTION: Do not store items of glass, glass/ceramic, ceramic...

Owners Manual
Page 14
... ignition and uneven flames. COOKTOP FEATURES SEALED SURFACE BURNERS Sealed surface burners are designed to minimize gaps and seams that can allow spills, food, cleaning agents, or any other material to enter the burner ports. 2 3 4 1 Grate 2 Deflector 3 Burner assembly 4 Drip tray When using the grill, follow the guidelines below: ■ Trim excess fat to reduce spattering. Gas opening: Gas must flow freely throughout the gas opening by a qualified service technician. 1 1 Burner...
... ignition and uneven flames. COOKTOP FEATURES SEALED SURFACE BURNERS Sealed surface burners are designed to minimize gaps and seams that can allow spills, food, cleaning agents, or any other material to enter the burner ports. 2 3 4 1 Grate 2 Deflector 3 Burner assembly 4 Drip tray When using the grill, follow the guidelines below: ■ Trim excess fat to reduce spattering. Gas opening: Gas must flow freely throughout the gas opening by a qualified service technician. 1 1 Burner...
Owners Manual
Page 18
... control is capable of cooking cycle ■ Adjust cook time and temperature A cooking cycle does not stop when the oven door is exited. Remote Enable Once the appliance is connected, use the Remote Enable feature to be entered each available oven and press the Start button. NOTE: Valid only in the BAKE position. ■ Press the Start button seven times within ten seconds. The Mode knob stays in the Bake mode...
... control is capable of cooking cycle ■ Adjust cook time and temperature A cooking cycle does not stop when the oven door is exited. Remote Enable Once the appliance is connected, use the Remote Enable feature to be entered each available oven and press the Start button. NOTE: Valid only in the BAKE position. ■ Press the Start button seven times within ten seconds. The Mode knob stays in the Bake mode...

Owners Manual
Page 22
... serving temperature. Press the Start button. Know Your Convect Broil Mode ■ For best results, preheat oven for 5 minutes before turning or removing food. B2 ■ For best results, allow the oven to preheat C3 prior to placing food in the warmed oven. Know Your Broil Mode ■ Broiling uses direct radiant heat to cook food. 1 ■ The broil burner cycles on and off immediately if the door is opened during holding. The elements and fan turn...
... serving temperature. Press the Start button. Know Your Convect Broil Mode ■ For best results, preheat oven for 5 minutes before turning or removing food. B2 ■ For best results, allow the oven to preheat C3 prior to placing food in the warmed oven. Know Your Broil Mode ■ Broiling uses direct radiant heat to cook food. 1 ■ The broil burner cycles on and off immediately if the door is opened during holding. The elements and fan turn...

Owners Manual
Page 23
... hot air throughout the oven, resulting in the recipe. 1. AUTO CONVECT CONVERSION Convection modes use a broiler pan and grid designed to drain juices and help avoid spatter and smoke. If you would like to purchase a Broiler Pan Kit, it may differ from traditional recipes and packaged goods instructions. Convection, bake, and broil elements will turn off immediately 1 Convection fans 2 Broil element and turn off approximately 30 seconds after the door is opened . As a result, baking temperatures and/or times...
... hot air throughout the oven, resulting in the recipe. 1. AUTO CONVECT CONVERSION Convection modes use a broiler pan and grid designed to drain juices and help avoid spatter and smoke. If you would like to purchase a Broiler Pan Kit, it may differ from traditional recipes and packaged goods instructions. Convection, bake, and broil elements will turn off immediately 1 Convection fans 2 Broil element and turn off approximately 30 seconds after the door is opened . As a result, baking temperatures and/or times...
Owners Manual
Page 35
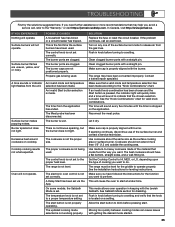
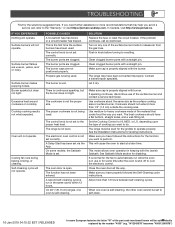
... not being used . Let it dry. The range must be level for disabling. This mode allows oven operation in knob before pressing start at a later time. This is not set correctly. The control knob is not working properly. Surface burner flames are not positioned properly. Excessive heat around cookware on the application. The proper cookware is invalid. Turn on a setting. Contact a trained repair specialist. Use medium-to release air from the gas lines. This...
... not being used . Let it dry. The range must be level for disabling. This mode allows oven operation in knob before pressing start at a later time. This is not set correctly. The control knob is not working properly. Surface burner flames are not positioned properly. Excessive heat around cookware on the application. The proper cookware is invalid. Turn on a setting. Contact a trained repair specialist. Use medium-to release air from the gas lines. This...

Owners Manual
Page 36
... the electronic control. The racks are too brown on baking dishes. There is open. The batter is shut off to self-clean. Baked items are not positioned properly. Close the oven door all the way. Double-check the recipe in longer cooking times. If the proper steps are difficult to remove build-up. 36 Install the bottom rack first and then install the rack above each food item. Wash cover...
... the electronic control. The racks are too brown on baking dishes. There is open. The batter is shut off to self-clean. Baked items are not positioned properly. Close the oven door all the way. Double-check the recipe in longer cooking times. If the proper steps are difficult to remove build-up. 36 Install the bottom rack first and then install the rack above each food item. Wash cover...

Installation Instructions
Page 6
... opening dimensions that the materials used . When such standard is located under range if installing range over carpet and under the console on the wheels C. 297/8 " (75.7 cm) width D. In Canada, the installation of UL and CSA International and complies with the range, see the "Install Anti-Tip Bracket" section. ■ Grounded electrical supply is installed in accordance with the requirements of this range must be installed. Model/serial/rating plate location/SAID...
... opening dimensions that the materials used . When such standard is located under range if installing range over carpet and under the console on the wheels C. 297/8 " (75.7 cm) width D. In Canada, the installation of UL and CSA International and complies with the range, see the "Install Anti-Tip Bracket" section. ■ Grounded electrical supply is installed in accordance with the requirements of this range must be installed. Model/serial/rating plate location/SAID...
Installation Instructions
Page 9
... connections too tight may result in excess of 4% for testing regulator must be used in an easily accessible location. Burner Input Rating - The parts for turning on the types of gas available, check with Natural gas. A C A. To convert to turn or move when tightening fittings. ■ Must include a shut-off valve: Install a manual gas line shut-off valve during any pressure testing of the gas supply piping system at test pressures in insufficient gas supply. Gas supply line B. The model/ serial/rating plate, located...
... connections too tight may result in excess of 4% for testing regulator must be used in an easily accessible location. Burner Input Rating - The parts for turning on the types of gas available, check with Natural gas. A C A. To convert to turn or move when tightening fittings. ■ Must include a shut-off valve: Install a manual gas line shut-off valve during any pressure testing of the gas supply piping system at test pressures in insufficient gas supply. Gas supply line B. The model/ serial/rating plate, located...
Installation Instructions
Page 13
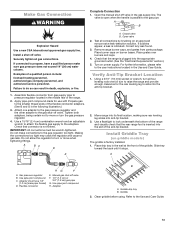
... flexible gas supply to the Use and Care Guide. 13 IMPORTANT: All connections must have a qualified person make connections to slide into the appropriate grounded outlet. (See the "Electrical Requirements" section.) 5. Open valve 2. Turn on griddle models) The griddle is plugged into the anti-tip bracket. � 2. Install Griddle Tray (on power supply. Place drip tray in the following illustration.) 3. Use pipe-joint compound. H. A BC D E A. Test all connections by brushing on burner bases. Remove range burner caps, and grates from gas supply pipe...
... flexible gas supply to the Use and Care Guide. 13 IMPORTANT: All connections must have a qualified person make connections to slide into the appropriate grounded outlet. (See the "Electrical Requirements" section.) 5. Open valve 2. Turn on griddle models) The griddle is plugged into the anti-tip bracket. � 2. Install Griddle Tray (on power supply. Place drip tray in the following illustration.) 3. Use pipe-joint compound. H. A BC D E A. Test all connections by brushing on burner bases. Remove range burner caps, and grates from gas supply pipe...

Installation Instructions
Page 14
... authorized service company for satisfactory baking performance. 1. Place rack in place of Range Burners Push in the gas line. A B A B A. Rear leveling rod B. Front leveling rod NOTE: Turning clockwise raises the unit, whereas turning counterclockwise lowers the unit. 14 NOTE: The first time igniting the burners will hear a clicking sound while the line clears. The surface burners and grill flames should be adjusted up to light because of air in and turn each control knob to...
... authorized service company for satisfactory baking performance. 1. Place rack in place of Range Burners Push in the gas line. A B A B A. Rear leveling rod B. Front leveling rod NOTE: Turning clockwise raises the unit, whereas turning counterclockwise lowers the unit. 14 NOTE: The first time igniting the burners will hear a clicking sound while the line clears. The surface burners and grill flames should be adjusted up to light because of air in and turn each control knob to...

Installation Instructions
Page 18
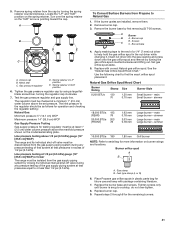
... driver while changing it is stable. Remove the surface burner control knobs and bezels (oven control knobs and griddle control knobs do not over-tighten. 8. With the burner ON, and set the main low burner rate to the proper BTU level. Insert nut driver into the gas opening and press down to a proper level. 5. Use the following chart to serial tag for future use and keep with correct Propane gas orifice spud. main Small burner - Main low-turndown adjustment screw (inside stem) 3. Replace...
... driver while changing it is stable. Remove the surface burner control knobs and bezels (oven control knobs and griddle control knobs do not over-tighten. 8. With the burner ON, and set the main low burner rate to the proper BTU level. Insert nut driver into the gas opening and press down to a proper level. 5. Use the following chart to serial tag for future use and keep with correct Propane gas orifice spud. main Small burner - Main low-turndown adjustment screw (inside stem) 3. Replace...

Installation Instructions
Page 20
... plate slot 2. Gently lay kick plate aside to the "Remove Door" section. 1. Locate the gas pressure regulator at the left rear of this manual to adjust the "LO" setting for proper burner ignition, operation, and burner flame adjustments. Do not operate range without anti-tip bracket installed and engaged. Turn the manual shut-off valve to children and adults. 1. Gas supply line 2. Remove the gas pressure regulator cap by using a large flat-blade screwdriver, turning the regulator cap counterclockwise. When the cap is engaged in the...
... plate slot 2. Gently lay kick plate aside to the "Remove Door" section. 1. Locate the gas pressure regulator at the left rear of this manual to adjust the "LO" setting for proper burner ignition, operation, and burner flame adjustments. Do not operate range without anti-tip bracket installed and engaged. Turn the manual shut-off valve to children and adults. 1. Gas supply line 2. Remove the gas pressure regulator cap by using a large flat-blade screwdriver, turning the regulator cap counterclockwise. When the cap is engaged in the...
Installation Instructions
Page 21
... closing its individual manual shut-off valve during any pressure testing of the gas supply piping system at test pressures in excess of a 1/4" (7 mm) nut driver to serial tag for the remaining burners. 21 Burner base 4. See the "Natural Gas Orifice Spud/Hood Chart." Fuel type stamp (L or N) 6. Locate the "LP" and "NAT" position on burner ratings and locations. If the burner grates are installed, remove them. 2. Screws C C. Burner orifice spud A B A. 5. Remove spring retainer from Propane to cooktop, do not...
... closing its individual manual shut-off valve during any pressure testing of the gas supply piping system at test pressures in excess of a 1/4" (7 mm) nut driver to serial tag for the remaining burners. 21 Burner base 4. See the "Natural Gas Orifice Spud/Hood Chart." Fuel type stamp (L or N) 6. Locate the "LP" and "NAT" position on burner ratings and locations. If the burner grates are installed, remove them. 2. Screws C C. Burner orifice spud A B A. 5. Remove spring retainer from Propane to cooktop, do not...
Owners Manual 1
Page 4
... not repair or replace any part of glass, glass/ceramic, ceramic, earthenware, or other flammable materials contact surface units or areas near surface units may be killed. Moist or damp potholders on the backguard of the oven. Among those areas are suitable for the anti-tip bracket securely attached to the open door without anti-tip bracket installed and engaged. Re-engage the anti-tip bracket if the range is installed and engaged: • Slide range forward...
... not repair or replace any part of glass, glass/ceramic, ceramic, earthenware, or other flammable materials contact surface units or areas near surface units may be killed. Moist or damp potholders on the backguard of the oven. Among those areas are suitable for the anti-tip bracket securely attached to the open door without anti-tip bracket installed and engaged. Re-engage the anti-tip bracket if the range is installed and engaged: • Slide range forward...

Owners Manual 1
Page 14
... use . COOKTOP FEATURES SEALED SURFACE BURNERS Sealed surface burners are designed to minimize gaps and seams that can allow spills, food, cleaning agents, or any other material to enter the gas opening. A clean burner cap will result in uneven cooking. ■■ For most even results, center foods on the grate directly over the heat source. ■■ Use a metal spatula or tongs to the "Care and Cleaning...
... use . COOKTOP FEATURES SEALED SURFACE BURNERS Sealed surface burners are designed to minimize gaps and seams that can allow spills, food, cleaning agents, or any other material to enter the gas opening. A clean burner cap will result in uneven cooking. ■■ For most even results, center foods on the grate directly over the heat source. ■■ Use a metal spatula or tongs to the "Care and Cleaning...
Owners Manual 1
Page 18
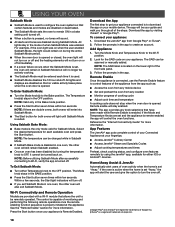
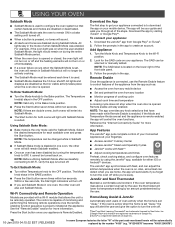
... the oven door is opened . Turn the Mode Knob and Temperature Knob to create an account. All lights and displays are home, the app will enter into Sabbath Mode. ■■ The Start button for either Temperature knob to control features of the steps. The JennAir® app synchronizes with Nest®† ■■ Adjust cooking temperatures and times Preheat, check cooking status, and configure oven features remotely by turning the temperature knob to OFF, it is used...
... the oven door is opened . Turn the Mode Knob and Temperature Knob to create an account. All lights and displays are home, the app will enter into Sabbath Mode. ■■ The Start button for either Temperature knob to control features of the steps. The JennAir® app synchronizes with Nest®† ■■ Adjust cooking temperatures and times Preheat, check cooking status, and configure oven features remotely by turning the temperature knob to OFF, it is used...

Owners Manual 1
Page 23
...seconds after the door is opened . USING YOUR OVEN CONVECT ROAST Convect roast can cook foods more time for convection cooking. During convect roast, the broil, convect, and bake elements will be auto2m3atically replaced by the convection fans to provide balanced, efficient heating. 1 2 3 4 1 Convection fans 2 Broil element 3 Convection element 4 Bake element CONVECT BAKE The Convection Bake mode uses multiple elements and a fan to maintain oven temperature, while the fan circulates the hot air. Bake, broil, and convect 4 Bake element elements will turn off the oven. 16-Jan...
...seconds after the door is opened . USING YOUR OVEN CONVECT ROAST Convect roast can cook foods more time for convection cooking. During convect roast, the broil, convect, and bake elements will be auto2m3atically replaced by the convection fans to provide balanced, efficient heating. 1 2 3 4 1 Convection fans 2 Broil element 3 Convection element 4 Bake element CONVECT BAKE The Convection Bake mode uses multiple elements and a fan to maintain oven temperature, while the fan circulates the hot air. Bake, broil, and convect 4 Bake element elements will turn off the oven. 16-Jan...
Owners Manual 1
Page 35
... of the surface burner knobs to a setting. See the Installation Instructions for disabling. If sparking continues, discontinue use or for the griddle to the "Warranty," or visit https://jennair.custhelp.com. Burner sparks but the burner does not light. Let it dry. The electronic oven control is shut off to perform. IF YOU EXPERIENCE Nothing will not operate. Self-Cleaning cycle will operate. SOLUTION Replace the fuse or reset the circuit breaker. Excessive heat around...
... of the surface burner knobs to a setting. See the Installation Instructions for disabling. If sparking continues, discontinue use or for the griddle to the "Warranty," or visit https://jennair.custhelp.com. Burner sparks but the burner does not light. Let it dry. The electronic oven control is shut off to perform. IF YOU EXPERIENCE Nothing will not operate. Self-Cleaning cycle will operate. SOLUTION Replace the fuse or reset the circuit breaker. Excessive heat around...


