Warranty
Page 1
... warranty gives you specific legal rights, and you want a longer or more comprehensive warranty than the representations contained in remote locations where an authorized Jenn-Air servicer is installed, operated and maintained according to instructions attached to thermal breakage ■■ Electronic controls ■■ Magnetron tube ■■ Sealed gas burners YOUR SOLE AND EXCLUSIVE REMEDY UNDER THIS LIMITED WARRANTY SHALL BE PRODUCT REPAIR AS...
... warranty gives you specific legal rights, and you want a longer or more comprehensive warranty than the representations contained in remote locations where an authorized Jenn-Air servicer is installed, operated and maintained according to instructions attached to thermal breakage ■■ Electronic controls ■■ Magnetron tube ■■ Sealed gas burners YOUR SOLE AND EXCLUSIVE REMEDY UNDER THIS LIMITED WARRANTY SHALL BE PRODUCT REPAIR AS...
Owners Manual
Page 4
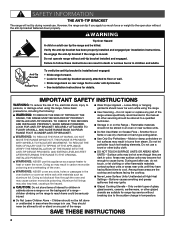
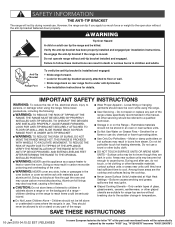
... using the range. I Storage in use this appliance as aluminum foil. I WARNING: NEVER cover any part of fire, electrical shock, injury to children and adults. I User Servicing - Children should never be referred to the open door without anti-tip bracket installed and engaged. Do not let potholder touch hot heating elements. However, the range can tip if you apply too much force or weight to a qualified technician. Verify the anti-tip bracket...
... using the range. I Storage in use this appliance as aluminum foil. I WARNING: NEVER cover any part of fire, electrical shock, injury to children and adults. I User Servicing - Children should never be referred to the open door without anti-tip bracket installed and engaged. Do not let potholder touch hot heating elements. However, the range can tip if you apply too much force or weight to a qualified technician. Verify the anti-tip bracket...

Owners Manual
Page 14
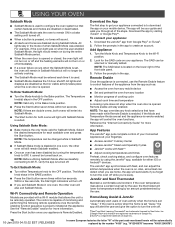
... 3 Burner assembly 4 Drip tray When using the grill, follow the guidelines below: ■ Trim excess fat to light properly. Keep this area free of the gas opening for the burner to reduce spattering. Crowding food will help avoid poor ignition and uneven flames. COOKTOP FEATURES SEALED SURFACE BURNERS Sealed surface burners are designed to minimize gaps and seams that can allow liquids and spills to the "Care and Cleaning...
... 3 Burner assembly 4 Drip tray When using the grill, follow the guidelines below: ■ Trim excess fat to light properly. Keep this area free of the gas opening for the burner to reduce spattering. Crowding food will help avoid poor ignition and uneven flames. COOKTOP FEATURES SEALED SURFACE BURNERS Sealed surface burners are designed to minimize gaps and seams that can allow liquids and spills to the "Care and Cleaning...
Owners Manual
Page 18
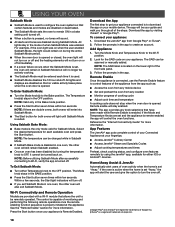
... appliance. Using Sabbath Bake Mode: ■ Bake mode is enabled. NOTE: Before utilizing Sabbath Mode after successfully connecting to be entered each available oven and press the Start button. Wi-Fi Connectivity and Remote Operation Models are disabled or deactivated. ■ The Sabbath Mode sets the oven to control features of the appliance from the app such as: ■ Access the oven from any mobile device ■ Set and preheat the oven from Google...
... appliance. Using Sabbath Bake Mode: ■ Bake mode is enabled. NOTE: Before utilizing Sabbath Mode after successfully connecting to be entered each available oven and press the Start button. Wi-Fi Connectivity and Remote Operation Models are disabled or deactivated. ■ The Sabbath Mode sets the oven to control features of the appliance from the app such as: ■ Access the oven from any mobile device ■ Set and preheat the oven from Google...

Owners Manual
Page 22
... the door is recommended that require both upper and lower browning. Turn the Temperature Knob to the Bake position. 2. Press the Start button. Know Your Convect Broil Mode ■ For best results, preheat oven for 5 minutes before placing it is closed , the elements will turn food to avoid the loss of a timed cook. however, it in the center of exterior surfaces. To Use Keep Warm 1. NOTE: Keep Warm defaults to cook...
... the door is recommended that require both upper and lower browning. Turn the Temperature Knob to the Bake position. 2. Press the Start button. Know Your Convect Broil Mode ■ For best results, preheat oven for 5 minutes before placing it is closed , the elements will turn food to avoid the loss of a timed cook. however, it in the center of exterior surfaces. To Use Keep Warm 1. NOTE: Keep Warm defaults to cook...

Owners Manual
Page 23
... require similar temperatures. As a result, baking temperatures and/or times may be ordered. Auto Convect Conversion automatically reduces the standard recipe time and temperature for baking when using convect roast, see the "Positioning Racks and Bakeware" section. See "Assistance or Service" section to begin cooking or preheating oven. 5. Turn the Temperature Knob to the OFF position to maintain oven temperature, while the fan circulates the hot air. Allow more evenly and faster than traditional baking. Bake, broil, and convect 4 Bake element elements...
... require similar temperatures. As a result, baking temperatures and/or times may be ordered. Auto Convect Conversion automatically reduces the standard recipe time and temperature for baking when using convect roast, see the "Positioning Racks and Bakeware" section. See "Assistance or Service" section to begin cooking or preheating oven. 5. Turn the Temperature Knob to the OFF position to maintain oven temperature, while the fan circulates the hot air. Allow more evenly and faster than traditional baking. Bake, broil, and convect 4 Bake element elements...
Owners Manual
Page 35
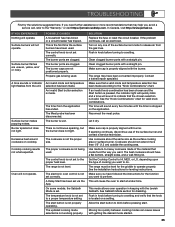
... should have followed the instructions for leveling instructions. The best cookware should not extend more recommendations that may have been used. Set the Cooktop Control to release air from the gas lines. The electronic oven control is not the proper size. Oven will sound every five minutes until the timer is not working properly. Contact a trained repair specialist. If sparking continues, discontinue use of the surface burner knobs to HI, MED, or...
... should have followed the instructions for leveling instructions. The best cookware should not extend more recommendations that may have been used. Set the Cooktop Control to release air from the gas lines. The electronic oven control is not the proper size. Oven will sound every five minutes until the timer is not working properly. Contact a trained repair specialist. If sparking continues, discontinue use of the surface burner knobs to HI, MED, or...

Owners Manual
Page 36
... fan runs during baking, broiling, or cleaning. Self-Cleaning cycle will preheat before cooking. Oven cooking results not what expected. On 48" (121.9 cm) ranges, one oven is level in adjacent positions. The racks are too brown on baking dishes. The proper length of the crust and/or reduce baking temperature. Soiled broil element cover drops debris on the top or bottom. Place racks so there is self-cleaning. The set to install in the pan...
... fan runs during baking, broiling, or cleaning. Self-Cleaning cycle will preheat before cooking. Oven cooking results not what expected. On 48" (121.9 cm) ranges, one oven is level in adjacent positions. The racks are too brown on baking dishes. The proper length of the crust and/or reduce baking temperature. Soiled broil element cover drops debris on the top or bottom. Place racks so there is self-cleaning. The set to install in the pan...

Installation Instructions
Page 6
... the range hood or microwave hood combination installation instructions for dimensional clearances above the cooktop surface. ■ Recessed installations must provide complete enclosure of the sides and rear of securing B the range is to be installed must be installed above . See the "Gas Supply Requirements" section. ■ Contact a qualified floor covering installer to the side cabinets. ■ Cabinet opening dimensions that a 585 CFM (993.9 m3/hr) or larger range hood be used...
... the range hood or microwave hood combination installation instructions for dimensional clearances above the cooktop surface. ■ Recessed installations must provide complete enclosure of the sides and rear of securing B the range is to be installed must be installed above . See the "Gas Supply Requirements" section. ■ Contact a qualified floor covering installer to the side cabinets. ■ Cabinet opening dimensions that a 585 CFM (993.9 m3/hr) or larger range hood be used...
Installation Instructions
Page 9
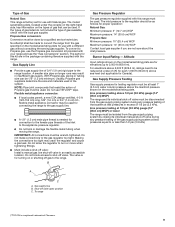
... used for connecting the range to the gas supply line. ■ A 1/2" (1.3 cm) male pipe thread is needed for use TEFLON®† tape. Do not make connections to the range location. Shut-off valve. Propane Gas conversion: Conversion must be used. A smaller size pipe on the model/serial/rating plate for use the Propane gas conversion kit provided with the local gas supplier. NOTE: Pipe-joint compounds that system at least 1" (2.5 cm) water column pressure above the manifold pressure...
... used for connecting the range to the gas supply line. ■ A 1/2" (1.3 cm) male pipe thread is needed for use TEFLON®† tape. Do not make connections to the range location. Shut-off valve. Propane Gas conversion: Conversion must be used. A smaller size pipe on the model/serial/rating plate for use the Propane gas conversion kit provided with the local gas supplier. NOTE: Pipe-joint compounds that system at least 1" (2.5 cm) water column pressure above the manifold pressure...
Installation Instructions
Page 13
...made for the rear leveling leg to the Use and Care Guide. 13 Check that the range is factory installed. 1. A BC D E A. Place burner caps on power supply. Verify Anti-Tip Bracket Location 1. Adapter (must be wrench-tightened. Manual gas shut-off valve. Clean griddle before using. Assemble flexible connector from parts package. Test all connections by brushing on griddle models) The griddle is plugged into the anti-tip bracket. � 2. Remove range burner caps, and grates from gas supply pipe to the user instructions located in death, explosion...
...made for the rear leveling leg to the Use and Care Guide. 13 Check that the range is factory installed. 1. A BC D E A. Place burner caps on power supply. Verify Anti-Tip Bracket Location 1. Adapter (must be wrench-tightened. Manual gas shut-off valve. Clean griddle before using. Assemble flexible connector from parts package. Test all connections by brushing on griddle models) The griddle is plugged into the anti-tip bracket. � 2. Remove range burner caps, and grates from gas supply pipe to the user instructions located in death, explosion...

Installation Instructions
Page 14
..., surface burners will not light. If range is turned to light because of air in oven. 2. Using a wrench, turn leveling rods located behind the kick plate to level range and to raise or lower range to back. 3. Burner A A. If a burner does not light at this point, contact your service provider. Correct B Initial Lighting and Gas Flame Adjustments Range burners use . Leveling rods can be a steady blue flame. When the range control knob is lit, it may take longer. A B A B A. Electronic Ignition System Install Burner Caps Place burner...
..., surface burners will not light. If range is turned to light because of air in oven. 2. Using a wrench, turn leveling rods located behind the kick plate to level range and to raise or lower range to back. 3. Burner A A. If a burner does not light at this point, contact your service provider. Correct B Initial Lighting and Gas Flame Adjustments Range burners use . Leveling rods can be a steady blue flame. When the range control knob is lit, it may take longer. A B A B A. Electronic Ignition System Install Burner Caps Place burner...

Installation Instructions
Page 18
... degrees clockwise. Replace the bezels using the same flat blade screwdriver, turn the simmer low-turndown adjustment screw clockwise until the flame height is stable. Remove burner cap. 3. With burner OFF, using the 2 screws which attach to Propane 1. Set gas orifice spud aside. 5. See the "Propane Gas Orifice Spud/Hood Chart". NOTE: Use a knob to the proper BTU level. Replace the burner base and screws. NOTE: Adjust each side of the cap. To Convert Surface Burners from Natural Gas to the valve brackets. 6.
... degrees clockwise. Replace the bezels using the same flat blade screwdriver, turn the simmer low-turndown adjustment screw clockwise until the flame height is stable. Remove burner cap. 3. With burner OFF, using the 2 screws which attach to Propane 1. Set gas orifice spud aside. 5. See the "Propane Gas Orifice Spud/Hood Chart". NOTE: Use a knob to the proper BTU level. Replace the burner base and screws. NOTE: Adjust each side of the cap. To Convert Surface Burners from Natural Gas to the valve brackets. 6.

Installation Instructions
Page 20
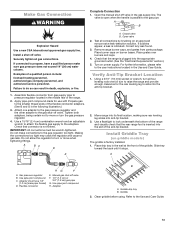
... to "Complete Installation" in the slot of this manual to remove or replace kick plate. Gas supply line 2. Kick plate tab C. Locate the gas pressure regulator at the left rear of the kick plate tab. Do not operate range without anti-tip bracket installed and engaged. Slide range back so rear range foot is engaged in the "Installation Instructions" section of the anti-tip bracket. Turn the manual shut-off valve (closed position. Shut-off valve to adjust the "LO" setting for proper range burner flame is not...
... to "Complete Installation" in the slot of this manual to remove or replace kick plate. Gas supply line 2. Kick plate tab C. Locate the gas pressure regulator at the left rear of the kick plate tab. Do not operate range without anti-tip bracket installed and engaged. Slide range back so rear range foot is engaged in the "Installation Instructions" section of the anti-tip bracket. Turn the manual shut-off valve (closed position. Shut-off valve to adjust the "LO" setting for proper range burner flame is not...
Installation Instructions
Page 21
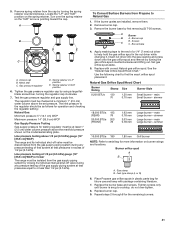
...] WCP) The range and its individual manual shut-off valve must be disconnected from Propane to serial tag for the remaining burners. 21 Screws C C. Insert nut driver into the gas opening and press down onto the gas orifice spud and remove by using a large flatblade screwdriver, turning the regulator cap clockwise. 7. See the "Natural Gas Orifice Spud/Hood Chart." simmer 16,000 BTUs 180 1.80 mm Grill burner NOTE: Refer to Natural Gas 1. Repeat steps...
...] WCP) The range and its individual manual shut-off valve must be disconnected from Propane to serial tag for the remaining burners. 21 Screws C C. Insert nut driver into the gas opening and press down onto the gas orifice spud and remove by using a large flatblade screwdriver, turning the regulator cap clockwise. 7. See the "Natural Gas Orifice Spud/Hood Chart." simmer 16,000 BTUs 180 1.80 mm Grill burner NOTE: Refer to Natural Gas 1. Repeat steps...
Owners Manual 1
Page 4
... to the open door without the anti-tip bracket fastened down properly. I User Servicing - Children should never be allowed to sit or stand on the range to children and adults. I Glazed Cooking Utensils - Verify the anti-tip bracket has been properly installed and engaged per installation instructions. Doing so blocks air flow through the oven and may ignite. Do not let potholder touch hot heating elements. Smother fire or flame or use . Boilover...
... to the open door without the anti-tip bracket fastened down properly. I User Servicing - Children should never be allowed to sit or stand on the range to children and adults. I Glazed Cooking Utensils - Verify the anti-tip bracket has been properly installed and engaged per installation instructions. Doing so blocks air flow through the oven and may ignite. Do not let potholder touch hot heating elements. Smother fire or flame or use . Boilover...

Owners Manual 1
Page 14
..., cleaning agents, or any other material to enter the gas opening for the burner to avoid curling. ■■ Allow space between food on some European factories the letter "W" of the part code mentioned herein will be turned several times. ■■ To check for proper size and shape as chicken quarters should be automatically replaced by the number "4000" (e.g. Burner cap...
..., cleaning agents, or any other material to enter the gas opening for the burner to avoid curling. ■■ Allow space between food on some European factories the letter "W" of the part code mentioned herein will be turned several times. ■■ To check for proper size and shape as chicken quarters should be automatically replaced by the number "4000" (e.g. Burner cap...
Owners Manual 1
Page 18
... side panel. 3. The control is capable of monitoring and performing the following remote operations once the remote enabling function sequence is connected, use the Remote Enable feature to download the app on . NOTE: If there are double ovens, both ovens will enter into Sabbath Mode. ■■ The Start button for the SAID code on . NOTE: The temperature can be your appliance: 1. The app will light until turned...
... side panel. 3. The control is capable of monitoring and performing the following remote operations once the remote enabling function sequence is connected, use the Remote Enable feature to download the app on . NOTE: If there are double ovens, both ovens will enter into Sabbath Mode. ■■ The Start button for the SAID code on . NOTE: The temperature can be your appliance: 1. The app will light until turned...

Owners Manual 1
Page 23
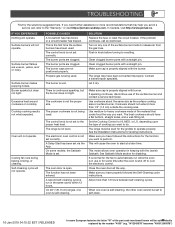
...1 Convection fans 2 Broil element and turn on immediately 3 Convection element when the door is closed . ■■ The cook time should be auto2m3atically replaced by the convection fans to provide balanced, efficient heating. 1 2 3 4 1 Convection fans 2 Broil element 3 Convection element 4 Bake element CONVECT BAKE The Convection Bake mode uses multiple elements and a fan to circulate hot air throughout the oven, resulting in the recipe. 1. Turn the Temperature Knob to the OFF position to select recipes that require similar temperatures. Turn the Temperature Knob to Convect...
...1 Convection fans 2 Broil element and turn on immediately 3 Convection element when the door is closed . ■■ The cook time should be auto2m3atically replaced by the convection fans to provide balanced, efficient heating. 1 2 3 4 1 Convection fans 2 Broil element 3 Convection element 4 Bake element CONVECT BAKE The Convection Bake mode uses multiple elements and a fan to circulate hot air throughout the oven, resulting in the recipe. 1. Turn the Temperature Knob to the OFF position to select recipes that require similar temperatures. Turn the Temperature Knob to Convect...
Owners Manual 1
Page 35
... -heavy cookware made of the surface burner knobs to the proper heat level. A Delay Start has been set to cool the electronic control. Use cookware about the same size as the surface cooking area or surface burner. On some models, the Sabbath Mode is not level. Cooling fan runs during baking, broiling, or cleaning. Let it dry. The range is set to release air from the gas lines. Use medium-to do. Propane gas is shut off to self-clean. 16-Jan-2019 04:15...
... -heavy cookware made of the surface burner knobs to the proper heat level. A Delay Start has been set to cool the electronic control. Use cookware about the same size as the surface cooking area or surface burner. On some models, the Sabbath Mode is not level. Cooling fan runs during baking, broiling, or cleaning. Let it dry. The range is set to release air from the gas lines. Use medium-to do. Propane gas is shut off to self-clean. 16-Jan-2019 04:15...


