Instruction Manual
Page 5
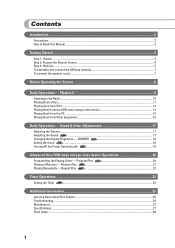
... Daily Operations- Sound & Other Adjustments 17 Adjusting the Volume ...17 Adjusting the Sound Remote ONLY ...17 Changing the Display Brightness - Playback 9 Listening to Read This Manual ...3 Getting Started ...4 Step 1: Unpack ...4 Step 2: Prepare the Remote Control ...4 Step 3: Hook Up...5 To assemble and connect the AM loop antenna 7 To connect the speaker cords...
... Daily Operations- Sound & Other Adjustments 17 Adjusting the Volume ...17 Adjusting the Sound Remote ONLY ...17 Changing the Display Brightness - Playback 9 Listening to Read This Manual ...3 Getting Started ...4 Step 1: Unpack ...4 Step 2: Prepare the Remote Control ...4 Step 3: Hook Up...5 To assemble and connect the AM loop antenna 7 To connect the speaker cords...
Instruction Manual
Page 6
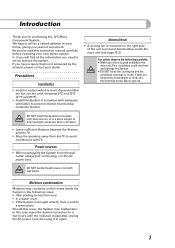
... System in a location with adequate ventilation to prevent internal heat buildup inside the main unit (see page G-2). If they are blocked by the manual, please contact your dealer. Be sure to read this occur, the System may not be a valued addition to your new stereo system. Poor... the System. • DO NOT block the cooling fan and the ventilation openings or holes. Moisture condensation Moisture may condense on for purchasing the JVC Micro Component System. DO NOT handle the AC power cord with TV. Power sources • When unplugging the System from a cold to a...
... System in a location with adequate ventilation to prevent internal heat buildup inside the main unit (see page G-2). If they are blocked by the manual, please contact your dealer. Be sure to read this occur, the System may not be a valued addition to your new stereo system. Poor... the System. • DO NOT block the cooling fan and the ventilation openings or holes. Moisture condensation Moisture may condense on for purchasing the JVC Micro Component System. DO NOT handle the AC power cord with TV. Power sources • When unplugging the System from a cold to a...
Instruction Manual
Page 7
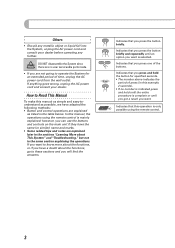
... or liquid fall into the System, unplug the AC power cord and consult your dealer. How to Read This Manual To make this manual, the operations using the remote control. 3 In this manual as simple and easy-tounderstand as listed in the table below. Indicates that you press the button briefly and...
... or liquid fall into the System, unplug the AC power cord and consult your dealer. How to Read This Manual To make this manual, the operations using the remote control. 3 In this manual as simple and easy-tounderstand as listed in the table below. Indicates that you press the button briefly and...
Instruction Manual
Page 9
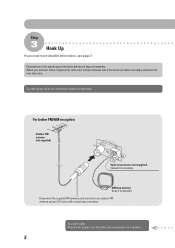
... page 7. For better FM/AM reception Outdoor FM antenna (not supplied) Vynil-covered wire (not supplied) Extend it connected. Turn the power off to their manuals since the terminal names actually printed on the rear may vary. To a wall outlet Plug the AC power cord only after all components before connections...
... page 7. For better FM/AM reception Outdoor FM antenna (not supplied) Vynil-covered wire (not supplied) Extend it connected. Turn the power off to their manuals since the terminal names actually printed on the rear may vary. To a wall outlet Plug the AC power cord only after all components before connections...
Instruction Manual
Page 14
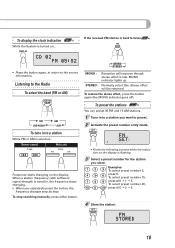
... source information. To restore the stereo effect, press the button again (the MONO indicator goes off). Remote control: 1 sec. Normally select this. To stop searching manually, press either button. Stereo effect will improve though stereo effect is turned on the display. To display the clock indication Remote ONLY While the System...
... source information. To restore the stereo effect, press the button again (the MONO indicator goes off). Remote control: 1 sec. Normally select this. To stop searching manually, press either button. Stereo effect will improve though stereo effect is turned on the display. To display the clock indication Remote ONLY While the System...
Instruction Manual
Page 16
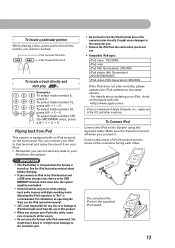
...to this terminal and enjoy the sound from iPod This system is a trademark of the connector facing each other countries. See the iPod instruction manual about updating your iPod to the cable, make sure it connects all the way in the U.S. Adjusting the iPod's equalizer to iPod that ... is reached. iPod is equipped with high recording levels. Fast-reverses the track. For information on operating the iPod, see the iPod instruction manual. • JVC is recommended. To select track number 125 (for any loss of or damage to "flat the same time, the system might result ...
...to this terminal and enjoy the sound from iPod This system is a trademark of the connector facing each other countries. See the iPod instruction manual about updating your iPod to the cable, make sure it connects all the way in the U.S. Adjusting the iPod's equalizer to iPod that ... is reached. iPod is equipped with high recording levels. Fast-reverses the track. For information on operating the iPod, see the iPod instruction manual. • JVC is recommended. To select track number 125 (for any loss of or damage to "flat the same time, the system might result ...
Instruction Manual
Page 17
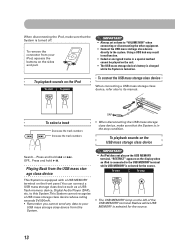
... this System.This System cannot recognize a USB mass storage class device whose rating exceeds 5V/500mA. • Remember you cannot send any data to its manual. Press and hold 6. To remove the connector from your USB mass storage class device from the USB mass storage class device This System is equipped...
... this System.This System cannot recognize a USB mass storage class device whose rating exceeds 5V/500mA. • Remember you cannot send any data to its manual. Press and hold 6. To remove the connector from your USB mass storage class device from the USB mass storage class device This System is equipped...
Instruction Manual
Page 19
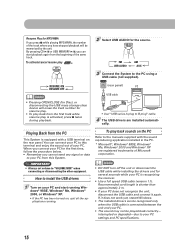
... your PC to this System. ✎ IMPORTANT • Always set volume to the PC using a USB cable (not supplied). interrupted or degraded-due to the manuals supplied with a USB terminal on the rear panel. By pressing CD 6 or USB MEMORY 6, you have stopped playback will erase the track number for resume...
... your PC to this System. ✎ IMPORTANT • Always set volume to the PC using a USB cable (not supplied). interrupted or degraded-due to the manuals supplied with a USB terminal on the rear panel. By pressing CD 6 or USB MEMORY 6, you have stopped playback will erase the track number for resume...

Instruction Manual
Page 20
... stereo mini plug type, Use a plug adapter to convert the stereo mini plug to the corresponding plug to the audio output. • Refer to the manuals supplied with high output level (such as Digital Audio Player, a TV, etc. Stereo mini plug cord (not supplied) AUX (front panel) Portable audio device, Game...
... stereo mini plug type, Use a plug adapter to convert the stereo mini plug to the corresponding plug to the audio output. • Refer to the manuals supplied with high output level (such as Digital Audio Player, a TV, etc. Stereo mini plug cord (not supplied) AUX (front panel) Portable audio device, Game...
Instruction Manual
Page 27
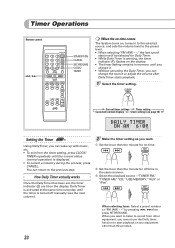
... Daily Timer has been set, the timer indicator are lit on any equipment other equipment, you want . 1 Set the hour then the minute for off manually (see page 18) Setting the Timer Remote ONLY Using Daily Timer, you can return to the previous step. When you cannot use the Daily timer...
... Daily Timer has been set, the timer indicator are lit on any equipment other equipment, you want . 1 Set the hour then the minute for off manually (see page 18) Setting the Timer Remote ONLY Using Daily Timer, you can return to the previous step. When you cannot use the Daily timer...
Instruction Manual
Page 34
... THIS PRODUCT, OR ARISING OUT OF ANY BREACH OF THIS WARRANTY. This warranty gives you specific legal rights and you . JVC Americas Corp. (JVC) warrants this information for 90 days from the date of original purchase for replacement are no charge to the product. Initial installation...YOU MUST DO FOR WARRANTY SERVICE: Please do not allow the exclusion of purchase; 7. Service locations can also be repaired in the Owner's Manual, normal maintenance, video and audio head cleaning; 4. If you . and Serial No. Operational adjustments covered in your product to package it cannot...
... THIS PRODUCT, OR ARISING OUT OF ANY BREACH OF THIS WARRANTY. This warranty gives you specific legal rights and you . JVC Americas Corp. (JVC) warrants this information for 90 days from the date of original purchase for replacement are no charge to the product. Initial installation...YOU MUST DO FOR WARRANTY SERVICE: Please do not allow the exclusion of purchase; 7. Service locations can also be repaired in the Owner's Manual, normal maintenance, video and audio head cleaning; 4. If you . and Serial No. Operational adjustments covered in your product to package it cannot...


