Instructions
Page 2
... use of important operating and maintenance (servicing) instructions in installation such as a bookcase or similar unit. Use of controls, adjustments or the performance of this owner's manual carefully and retain it , discontinue use of this product, please read this owner's manual to plugs, wall outlets, and the point where the cord exits the appliance. That is easily accessible. Overloaded wall outlets, loose or damaged wall outlets, extension cords, frayed power cords...
... use of important operating and maintenance (servicing) instructions in installation such as a bookcase or similar unit. Use of controls, adjustments or the performance of this owner's manual carefully and retain it , discontinue use of this product, please read this owner's manual to plugs, wall outlets, and the point where the cord exits the appliance. That is easily accessible. Overloaded wall outlets, loose or damaged wall outlets, extension cords, frayed power cords...
Instructions
Page 4
... as power-supply cord or plug is damaged, liquid has been spilled or objects have been adhered to protect it from tip-over - The wide blade or the third prong are provided for installation, use instructions should be placed in a built-in any heat sources such as a bookcase or rack unless proper ventilation is operated. 2. Unplug this product will protect...
... as power-supply cord or plug is damaged, liquid has been spilled or objects have been adhered to protect it from tip-over - The wide blade or the third prong are provided for installation, use instructions should be placed in a built-in any heat sources such as a bookcase or rack unless proper ventilation is operated. 2. Unplug this product will protect...
Instructions
Page 5
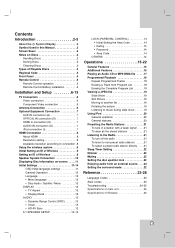
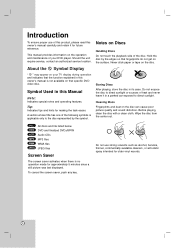
... Display 2 Symbol Used in this Manual 2 Screen Saver 2 Notes on Discs 2 Handling Discs 2 Storing Discs 2 Cleaning Discs 2 Types of Playable Discs 3 Regional Code 3 Front Panel 4 Remote Control 5 Remote Control operation 5 Remote Control Battery installation 5 Installation and Setup 6-13 TV Connection 6 Video connection 6 Component Video connection 6 Antenna Connection 6 Optional Equipment Connection 7 AUX IN connection (A 7 OPTICAL IN connection (O 7 HDMI In connection (H 7 AUDIO IN connection (D 7 iPod connection (I 7 HDMI Connection 8 About HDMI 8 Resolution setting...
... Display 2 Symbol Used in this Manual 2 Screen Saver 2 Notes on Discs 2 Handling Discs 2 Storing Discs 2 Cleaning Discs 2 Types of Playable Discs 3 Regional Code 3 Front Panel 4 Remote Control 5 Remote Control operation 5 Remote Control Battery installation 5 Installation and Setup 6-13 TV Connection 6 Video connection 6 Component Video connection 6 Antenna Connection 6 Optional Equipment Connection 7 AUX IN connection (A 7 OPTICAL IN connection (O 7 HDMI In connection (H 7 AUDIO IN connection (D 7 iPod connection (I 7 HDMI Connection 8 About HDMI 8 Resolution setting...
Instructions
Page 6
... for making the task easier. Hold the disc by the symbol. Never stick paper or tape on the disc can cause poor picture quality and sound distortion. Do not use of your TV display during operation and indicates that specific DVD video disc. Tip: Indicates tips and hints for older vinyl records. 2 To cancel the screen saver, push any key. Symbol Used in this owner's manual...
... for making the task easier. Hold the disc by the symbol. Never stick paper or tape on the disc can cause poor picture quality and sound distortion. Do not use of your TV display during operation and indicates that specific DVD video disc. Tip: Indicates tips and hints for older vinyl records. 2 To cancel the screen saver, push any key. Symbol Used in this owner's manual...
Instructions
Page 7
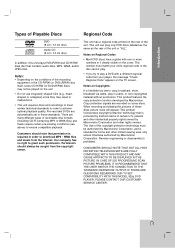
... BE DISPLAYED IN THE PICTURE. Operation Reference 3 Introduction Installation and Setup Types of Playable Discs Regional Code DVD (8 cm / 12 cm disc) Audio CD (8 cm / 12 cm disc) In addition, this copyright protection technology must match your player, the message "Check Regional Code" appears on Regional Codes • Most DVD discs have a globe with a different regional code from the copyright owner. Pre-recorded DVDs are automatically set to download MP3 / WMA files and music from the Internet. This number...
... BE DISPLAYED IN THE PICTURE. Operation Reference 3 Introduction Installation and Setup Types of Playable Discs Regional Code DVD (8 cm / 12 cm disc) Audio CD (8 cm / 12 cm disc) In addition, this copyright protection technology must match your player, the message "Check Regional Code" appears on Regional Codes • Most DVD discs have a globe with a different regional code from the copyright owner. Pre-recorded DVDs are automatically set to download MP3 / WMA files and music from the Internet. This number...
Instructions
Page 9
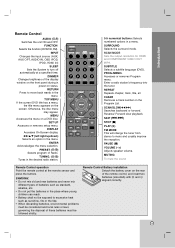
... the menu on the screen. SCAN MODE Sets the output resolution for HDMI and COMPONENT VIDEO OUT jacks. PROG./MEMO. Enter a radio station's frequency into the tuner. PAUSE (X) VOLUME (-/+) Adjusts speaker volume. TOP MENU If the current DVD title has a menu, the title menu appears on a DVD disc. Accesses or removes Program menu. MUTING To mute the sound Remote Control operation Point the remote control at a specified time. FUNCTION Selects the function (DVD/CD, FM) INPUT Changes the input source ( AUX, AUX OPT, AUDIO IN, OSD IPOD, IPOD, HDMI IN) SLEEP Sets the System to...
... the menu on the screen. SCAN MODE Sets the output resolution for HDMI and COMPONENT VIDEO OUT jacks. PROG./MEMO. Enter a radio station's frequency into the tuner. PAUSE (X) VOLUME (-/+) Adjusts speaker volume. TOP MENU If the current DVD title has a menu, the title menu appears on a DVD disc. Accesses or removes Program menu. MUTING To mute the sound Remote Control operation Point the remote control at a specified time. FUNCTION Selects the function (DVD/CD, FM) INPUT Changes the input source ( AUX, AUX OPT, AUDIO IN, OSD IPOD, IPOD, HDMI IN) SLEEP Sets the System to...
Instructions
Page 10
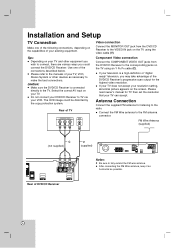
... screen. Do not connect your VCR. Rear of TV COMPONENT VIDEO / PROGRESSIVE SCAN INPUT Y VIDEO INPUT Video connection Connect the MONITOR OUT jack from the DVD/CD Receiver to the radio. Please read owner's manual for the highest video resolution. Select the correct AV input on your resolution setting, abnormal picture appears on the TV using an Y PB PR cable (C). Connect the FM Wire antenna to TV via your DVD/CD Receiver to the FM antenna connector. Component Video connection Connect the COMPONENT VIDEO OUT jacks from the DVD...
... screen. Do not connect your VCR. Rear of TV COMPONENT VIDEO / PROGRESSIVE SCAN INPUT Y VIDEO INPUT Video connection Connect the MONITOR OUT jack from the DVD/CD Receiver to the radio. Please read owner's manual for the highest video resolution. Select the correct AV input on your resolution setting, abnormal picture appears on the TV using an Y PB PR cable (C). Connect the FM Wire antenna to TV via your DVD/CD Receiver to the FM antenna connector. Component Video connection Connect the COMPONENT VIDEO OUT jacks from the DVD...
Instructions
Page 11
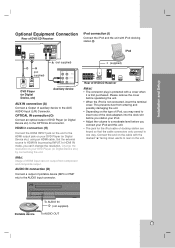
Introduction Installation and Setup Optional Equipment Connection Rear of auxiliary device to the AUX AUDIO Input (L/R) Connector. iPod A (not supplied) OH (not supplied) OUT IN VIDEO AUDIO (L) OPTICAL OUT DVD Player (or Digital Device, etc) AUDIO (R) Auxiliary device AUX IN connection (A) Connect a Output of DVD/CD Receiver iPod connection (I) Connect the iPod and the unit with iPod docking station.(I (supplied) Rear of DVD/CD Receiver Notes: • The connector plug is protected with the marked "v" facing down wards to the HDMI output jack on your DVD Player (or Digital ...
Introduction Installation and Setup Optional Equipment Connection Rear of auxiliary device to the AUX AUDIO Input (L/R) Connector. iPod A (not supplied) OH (not supplied) OUT IN VIDEO AUDIO (L) OPTICAL OUT DVD Player (or Digital Device, etc) AUDIO (R) Auxiliary device AUX IN connection (A) Connect a Output of DVD/CD Receiver iPod connection (I) Connect the iPod and the unit with iPod docking station.(I (supplied) Rear of DVD/CD Receiver Notes: • The connector plug is protected with the marked "v" facing down wards to the HDMI output jack on your DVD Player (or Digital ...
Instructions
Page 12
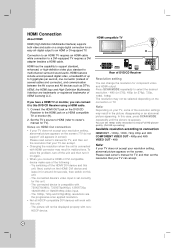
... setting, abnormal picture appears on the screen. HDMI Connection About HDMI HDMI (High Definition Multimedia Interface) supports both video and audio on a single digital connection for component video and HDMI output. The picture will work with HDMI connector may result in the picture disappearing or an abnormal picture appearing. To solve the problem, turn off the HDMI/ DVI device and this unit. - If you have a HDMI TV or monitor, you connect a HDMI or DVI compatible device make sure of several cables...
... setting, abnormal picture appears on the screen. HDMI Connection About HDMI HDMI (High Definition Multimedia Interface) supports both video and audio on a single digital connection for component video and HDMI output. The picture will work with HDMI connector may result in the picture disappearing or an abnormal picture appearing. To solve the problem, turn off the HDMI/ DVI device and this unit. - If you have a HDMI TV or monitor, you connect a HDMI or DVI compatible device make sure of several cables...
Instructions
Page 13
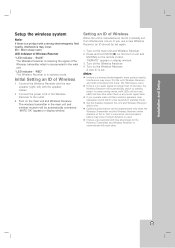
... incorporated in display window. 3. If you use a new Wireless Receiver, an ID should be automatically connected. If an interference occurs or you operate main unit then wireless speakers (rear speakers) sound within a few seconds (and may take longer) for longer than 10 minutes, the Wireless Receiver will turn blue when there is any audio signal back. Turn on the main unit and Wireless Receiver. 2. Turn off the Wireless Receiver. 4. Installation and Setup 9 Setup the wireless system Note: If...
... incorporated in display window. 3. If you use a new Wireless Receiver, an ID should be automatically connected. If an interference occurs or you operate main unit then wireless speakers (rear speakers) sound within a few seconds (and may take longer) for longer than 10 minutes, the Wireless Receiver will turn blue when there is any audio signal back. Turn on the main unit and Wireless Receiver. 2. Turn off the Wireless Receiver. 4. Installation and Setup 9 Setup the wireless system Note: If...
Instructions
Page 14
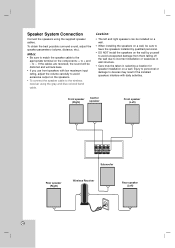
..., adjust the volume carefully to avoid excessive output on the speakers. • To connect the speaker cable to + and - Injury to personnel or damage to -. If the cables are reversed, the sound will lack base. • If you use front speakers with daily activities. Notes: • Be sure to match the speaker cable to the appropriate terminal on a wall. Front speaker (Right) Center speaker Front speaker (Left) Subwoofer Rear speaker (Right) Wireless Receiver Rear speaker...
..., adjust the volume carefully to avoid excessive output on the speakers. • To connect the speaker cable to + and - Injury to personnel or damage to -. If the cables are reversed, the sound will lack base. • If you use front speakers with daily activities. Notes: • Be sure to match the speaker cable to the appropriate terminal on a wall. Front speaker (Right) Center speaker Front speaker (Left) Subwoofer Rear speaker (Right) Wireless Receiver Rear speaker...
Instructions
Page 15
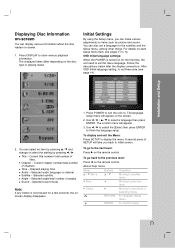
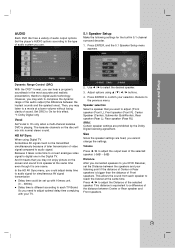
... level or selecting menu RETURN 5.1 Speaker Setup menu ENTER To confirm menu 11 Reference To go to initial screen. Initial Settings By using the Setup menu, you back to the next level: Press B on the screen. 2. Elapsed playing time. Selected sound mode. After OSD Initial language setting, to set a language for the first time, the unit need to turn the unit on -screen. 1. Follow the descriptions below after the display connections. Chapter - You can make various adjustments...
... level or selecting menu RETURN 5.1 Speaker Setup menu ENTER To confirm menu 11 Reference To go to initial screen. Initial Settings By using the Setup menu, you back to the next level: Press B on the screen. 2. Elapsed playing time. Selected sound mode. After OSD Initial language setting, to set a language for the first time, the unit need to turn the unit on -screen. 1. Follow the descriptions below after the display connections. Chapter - You can make various adjustments...
Instructions
Page 17
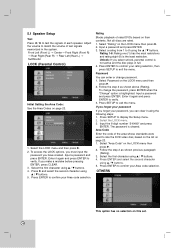
... digital audio technology. Set the player's AUDIO options according to adjust the output level of audio system you may not enjoy picture on the disc will mix into normal stereo sound. Use b / B to the previous menu. Volume Press b / B to the type of the selected speaker. (-5dB ~ 5dB) Distance After you cannot change the settings. Returns to select the desired speaker. 3. The karaoke channels on the screen and sound from each speaker to each TV Brand. Speaker selection Select a speaker that you use. 5.1 Speaker Setup Make...
... digital audio technology. Set the player's AUDIO options according to adjust the output level of audio system you may not enjoy picture on the disc will mix into normal stereo sound. Use b / B to the previous menu. Volume Press b / B to the type of the selected speaker. (-5dB ~ 5dB) Distance After you cannot change the settings. Returns to select the desired speaker. 3. The karaoke channels on the screen and sound from each speaker to each TV Brand. Speaker selection Select a speaker that you use. 5.1 Speaker Setup Make...
Instructions
Page 18
... to display the Setup menu. 2. Press ENTER to confirm your rating selection, then press SETUP to confirm your Area code selection. Select the LOCK menu and then press B. 2. Press ENTER to exit the menu. Area Code Enter the code of the area whose standards were used to test the signals of test signals memorized in full. 4. To change password. 1. Press ENTER and select the second character using the v / V buttons. 5.1 Speaker Setup Test Press b / B to rate the DVD video disc...
... to display the Setup menu. 2. Press ENTER to confirm your rating selection, then press SETUP to confirm your Area code selection. Select the LOCK menu and then press B. 2. Press ENTER to exit the menu. Area Code Enter the code of the area whose standards were used to test the signals of test signals memorized in full. 4. To change password. 1. Press ENTER and select the second character using the v / V buttons. 5.1 Speaker Setup Test Press b / B to rate the DVD video disc...
Instructions
Page 21
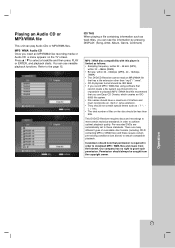
... the Internet. You can play Audio CDs or MP3/WMA files. Pre-recorded DVDs are many different types of recordable disc formats (including CD-R containing MP3 or WMA files) and these standards. There are automatically set to these require certain pre-existing conditions (see the information by pressing DISPLAY. (Song, Artist, Album, Genre, Comment) MP3 / WMA disc compatibility with this player...
... the Internet. You can play Audio CDs or MP3/WMA files. Pre-recorded DVDs are many different types of recordable disc formats (including CD-R containing MP3 or WMA files) and these standards. There are automatically set to these require certain pre-existing conditions (see the information by pressing DISPLAY. (Song, Artist, Album, Genre, Comment) MP3 / WMA disc compatibility with this player...
Instructions
Page 24
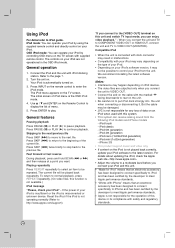
... unit and switch TV input mode, you connect the unit and TV to COMPONENT VIDEO OUT or HDMI OUT, connect the unit and TV to display the list of data on this unit. • "Made for any loss of menu. 5. We recommend installing the latest software version. iPhone 3G • This product support music and video only. • If content on the TV screen with iPod docking station. Turn the...
... unit and switch TV input mode, you connect the unit and TV to COMPONENT VIDEO OUT or HDMI OUT, connect the unit and TV to display the list of data on this unit. • "Made for any loss of menu. 5. We recommend installing the latest software version. iPhone 3G • This product support music and video only. • If content on the TV screen with iPod docking station. Turn the...
Instructions
Page 25
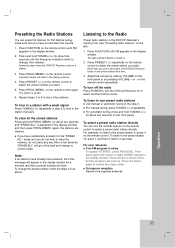
... the remote control. on the remote control. Then press again this button to the preset station 4, press 4 on the remote control repeatedly. The station is noisy To appear "STEREO", press FM MODE.. To turn off the radio Press POWER to normal mode. Adjust the volume by rotating VOLUME on the front panel or by itself and change the preset number, follow the steps 4-5 as above. Press PROG./MEMO. Scanning stops when the DVD/CD Receiver tunes...
... the remote control. on the remote control. Then press again this button to the preset station 4, press 4 on the remote control repeatedly. The station is noisy To appear "STEREO", press FM MODE.. To turn off the radio Press POWER to normal mode. Adjust the volume by rotating VOLUME on the front panel or by itself and change the preset number, follow the steps 4-5 as above. Press PROG./MEMO. Scanning stops when the DVD/CD Receiver tunes...

Instructions
Page 26
... the player will be selected. Enjoying audio form an external source You can change the SOURROUND using SOURROUND. You can enjoy audio form an external source through your unit. Note: This muting doesn't affect the audio output to prevent the disc form being ejected. Setting the disc ejection lock You can enjoy the sound without equalizer effect. AUX, AUX OPT, AUDIO IN, HDMI IN, OSD IPOD, IPOD Setting the surround mode This system has a number of speakers connected...
... the player will be selected. Enjoying audio form an external source You can change the SOURROUND using SOURROUND. You can enjoy audio form an external source through your unit. Note: This muting doesn't affect the audio output to prevent the disc form being ejected. Setting the disc ejection lock You can enjoy the sound without equalizer effect. AUX, AUX OPT, AUDIO IN, HDMI IN, OSD IPOD, IPOD Setting the surround mode This system has a number of speakers connected...
Instructions
Page 28
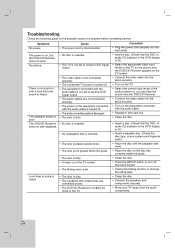
... screen. • Clean the disc. • Press the SETUP button to receive DVD signal output. • The video cable is not connected securely. The power is dirty. There is no sound or only a very low-level sound is heard. • The connected TV power is turned off. • The equipment connected with the audio cable is damaged. The playback picture is • The disc is on the TV. • Select the correct input mode of a problem before contacting service...
... screen. • Clean the disc. • Press the SETUP button to receive DVD signal output. • The video cable is not connected securely. The power is dirty. There is no sound or only a very low-level sound is heard. • The connected TV power is turned off. • The equipment connected with the audio cable is damaged. The playback picture is • The disc is on the TV. • Select the correct input mode of a problem before contacting service...
Instructions
Page 29
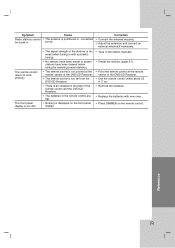
... DVD/CD Receiver. • Use the remote control within about 23 ft (7 m). • Remove the obstacle. • Replace the batteries with new ones. • Press DIMMER on the remote control. Correction • Connect the antenna securely. • Adjust the antennas and connect an external antenna if necessary. Reference 25 The remote control does not work properly. Symptom Cause Radio stations cannot • The antenna is displayed on the front panel display. • Tune in the station manually...
... DVD/CD Receiver. • Use the remote control within about 23 ft (7 m). • Remove the obstacle. • Replace the batteries with new ones. • Press DIMMER on the remote control. Correction • Connect the antenna securely. • Adjust the antennas and connect an external antenna if necessary. Reference 25 The remote control does not work properly. Symptom Cause Radio stations cannot • The antenna is displayed on the front panel display. • Tune in the station manually...


