Instructions
Page 5
... connection (H 7 AUDIO IN connection (D 7 iPod connection (I 7 HDMI Connection 8 About HDMI 8 Resolution setting 8 Available resolution according to connection .8 Setup the wireless system 9 Initial Setting an ID of Wireless 9 Setting an ID of Wireless 9 Speaker System Connection 10 Displaying Disc Information on-screen . . . . .11 Initial Settings 11-14 OSD Initial language settings 11 General Operation 12.... . .22 Setting the surround mode 22 Reference 23-26 Language Codes 23 Area Codes 23 Troubleshooting 24-25 Specifications of main unit 26 Specifications of Wireless 26 1
... connection (H 7 AUDIO IN connection (D 7 iPod connection (I 7 HDMI Connection 8 About HDMI 8 Resolution setting 8 Available resolution according to connection .8 Setup the wireless system 9 Initial Setting an ID of Wireless 9 Setting an ID of Wireless 9 Speaker System Connection 10 Displaying Disc Information on-screen . . . . .11 Initial Settings 11-14 OSD Initial language settings 11 General Operation 12.... . .22 Setting the surround mode 22 Reference 23-26 Language Codes 23 Area Codes 23 Troubleshooting 24-25 Specifications of main unit 26 Specifications of Wireless 26 1
Instructions
Page 13
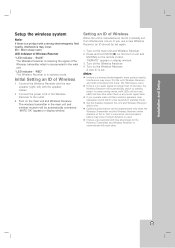
...occur if longer distance is set . If you use a new Wireless Receiver, an ID should be implemented only when the Wireless Transmitter and the Wireless Receiver within 10m. Installation and Setup 9 Put the unit (Wireless Receiver and main unit) away from there. (Ex: Microwave oven... cables. 2 Connect the power cord of Wireless 1 Connect the Wireless Receiver and the rear speaker (right, left) with each other. Optimum performance can be set again. 1. "RED" The Wireless Receiver is incorporated in standby mode. Setup the wireless system Note: If there is a strong electromagnetic ...
...occur if longer distance is set . If you use a new Wireless Receiver, an ID should be implemented only when the Wireless Transmitter and the Wireless Receiver within 10m. Installation and Setup 9 Put the unit (Wireless Receiver and main unit) away from there. (Ex: Microwave oven... cables. 2 Connect the power cord of Wireless 1 Connect the Wireless Receiver and the rear speaker (right, left) with each other. Optimum performance can be set again. 1. "RED" The Wireless Receiver is incorporated in standby mode. Setup the wireless system Note: If there is a strong electromagnetic ...
Instructions
Page 14
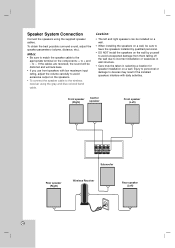
Speaker System Connection Connect the speakers using the gray and blue colored band cable. To obtain the best possible surround sound, adjust the speaker parameters (volume, distance, etc.). to the wireless receiver using the supplied speaker cables. If the cables are reversed, the sound...the volume carefully to avoid excessive output on a wall. Front speaker (Right) Center speaker Front speaker (Left) Subwoofer Rear speaker (Right) Wireless Receiver Rear speaker (Left) 10 Caution: • The left and right speakers can be installed on a wall. • When installing the...
Speaker System Connection Connect the speakers using the gray and blue colored band cable. To obtain the best possible surround sound, adjust the speaker parameters (volume, distance, etc.). to the wireless receiver using the supplied speaker cables. If the cables are reversed, the sound...the volume carefully to avoid excessive output on a wall. Front speaker (Right) Center speaker Front speaker (Left) Subwoofer Rear speaker (Right) Wireless Receiver Rear speaker (Left) 10 Caution: • The left and right speakers can be installed on a wall. • When installing the...
Instructions
Page 31
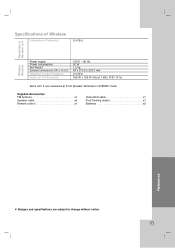
... Frequency 2.4 GHz Transmitter in the main unit Wireless Receiver Power supply Power consumption Net Weight External dimensions (W x H x D) Reception Output Frequency Audio out (for Surround) 120 V ~ 60 Hz 50 W 1.2 kg 64 x 213.6 x 252.3 mm 2.4 ...
... Frequency 2.4 GHz Transmitter in the main unit Wireless Receiver Power supply Power consumption Net Weight External dimensions (W x H x D) Reception Output Frequency Audio out (for Surround) 120 V ~ 60 Hz 50 W 1.2 kg 64 x 213.6 x 252.3 mm 2.4 ...