Instructions
Page 3
... by JVC could void the user's authority to qualified service personnel. 3. If this equipment does cause harmful interference to comply with the limits for help. CAUTION Changes or modifications not approved by turning the equipment off and on a circuit different from earphones or headphones can radiate radio frequency energy and, if not installed and used in a residential installation. For Canada THIS DIGITAL...
... by JVC could void the user's authority to qualified service personnel. 3. If this equipment does cause harmful interference to comply with the limits for help. CAUTION Changes or modifications not approved by turning the equipment off and on a circuit different from earphones or headphones can radiate radio frequency energy and, if not installed and used in a residential installation. For Canada THIS DIGITAL...

Instructions
Page 4
... subwoofer 5 Speaker layout 6 Connecting the antennas 7 Connecting a TV 7 Connecting external components 8 Connecting the AC power cord 9 Basic and common operations 10 Sound and monitor settings 12 Sound settings and adjustments 12 Scanning mode setting 14 Disc/file playback 15 Basic playback 15 Using the disc menu 17 Locating a desired scene or song 17 Changing the playback mode 18 Advanced operations 19 Special playback for System operations Operations from the center unit Operations from the remote control The function can be operated from the TV screen...
... subwoofer 5 Speaker layout 6 Connecting the antennas 7 Connecting a TV 7 Connecting external components 8 Connecting the AC power cord 9 Basic and common operations 10 Sound and monitor settings 12 Sound settings and adjustments 12 Scanning mode setting 14 Disc/file playback 15 Basic playback 15 Using the disc menu 17 Locating a desired scene or song 17 Changing the playback mode 18 Advanced operations 19 Special playback for System operations Operations from the center unit Operations from the remote control The function can be operated from the TV screen...
Instructions
Page 5
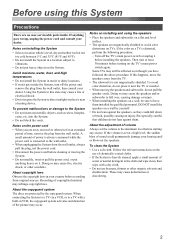
... power and remove the plug from the wall outlet, always pull the plug, not the power cord. • Disconnect the power cord before installing the speakers. Some TVs may cause the speakers and/or subwoofer to direct sunlight or place it before cleaning or moving the speakers and subwoofer, do not place it . If the volume is set the volume to the System • Do not insert any source. When connecting the System...
... power and remove the plug from the wall outlet, always pull the plug, not the power cord. • Disconnect the power cord before installing the speakers. Some TVs may cause the speakers and/or subwoofer to direct sunlight or place it before cleaning or moving the speakers and subwoofer, do not place it . If the volume is set the volume to the System • Do not insert any source. When connecting the System...

Instructions
Page 6
... A USB flash memory device, hard disk drive, multimedia card reader, digital camera, etc. can be used with the "Compact Disc Digital Audio" standard. This System cannot play back finalized +R/+RW (DVD Video format only) discs. DVD-R/-RW: This System does not support "multiborder" discs. This System is possible to the latest version. It is compatible with PAL system. This System supports "multi-session" discs (up to their own Region Code numbers. For details about updating your iPod software to play "packet write" discs. Region code...
... A USB flash memory device, hard disk drive, multimedia card reader, digital camera, etc. can be used with the "Compact Disc Digital Audio" standard. This System cannot play back finalized +R/+RW (DVD Video format only) discs. DVD-R/-RW: This System does not support "multiborder" discs. This System is possible to the latest version. It is compatible with PAL system. This System supports "multi-session" discs (up to their own Region Code numbers. For details about updating your iPod software to play "packet write" discs. Region code...

Instructions
Page 8
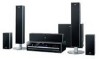
... for iPod - Getting started Checking the supplied accessories Connecting the speakers and subwoofer If anything is missing, contact your dealer immediately. • Remote control (x 1) • Batteries (x 2) • FM antenna (x 1) • AM loop antenna (x 1) • Composite video cord (x 1) • Connector for the System, use speakers of the same speaker impedance (SPEAKER IMPEDANCE) indicated on the rear of the remote control decreases, replace both to the center unit and to one speaker to each speaker.
... for iPod - Getting started Checking the supplied accessories Connecting the speakers and subwoofer If anything is missing, contact your dealer immediately. • Remote control (x 1) • Batteries (x 2) • FM antenna (x 1) • AM loop antenna (x 1) • Composite video cord (x 1) • Connector for the System, use speakers of the same speaker impedance (SPEAKER IMPEDANCE) indicated on the rear of the remote control decreases, replace both to the center unit and to one speaker to each speaker.
Instructions
Page 10
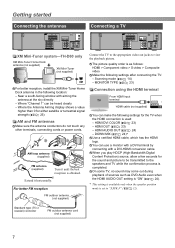
...) connector FM outdoor antenna cord (not supplied) 7 Scanning mode ( 14) - HDMI OUT ( 23) - On some TV, no sound may come out during playback of sources such as follows: HDMI > Component video > S-video > Composite video Make the following location: - Getting started Connecting the antennas Connecting a TV XM Mini-Tuner system-TH-D60 only XM Mini-Tuner Home Dock antenna (not supplied) XM Mini-Tuner (not supplied) For better reception, install the XM Mini-Tuner Home Dock antenna in the following settings after connecting...
...) connector FM outdoor antenna cord (not supplied) 7 Scanning mode ( 14) - HDMI OUT ( 23) - On some TV, no sound may come out during playback of sources such as follows: HDMI > Component video > S-video > Composite video Make the following location: - Getting started Connecting the antennas Connecting a TV XM Mini-Tuner system-TH-D60 only XM Mini-Tuner Home Dock antenna (not supplied) XM Mini-Tuner (not supplied) For better reception, install the XM Mini-Tuner Home Dock antenna in the following settings after connecting...
Instructions
Page 11
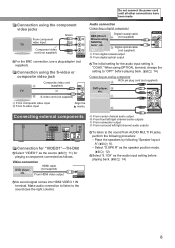
...left/right channel audio outputs C From subwoofer output D From surround left/right channel audio outputs To listen to "OPT" before playing back. ( 14) 8 Select "S.SPK R" as the speaker position mode. ( 12) Select "5.1CH" as follows. Video connection DVD player, etc. Connection using the component video jacks From component video input TV Green Blue Component video cord (not supplied) Red For the BNC connection, use a plug adapter (not supplied). HDMI cable (not supplied) From HDMI video output No sound signal comes into HDMI VIDEO 1 IN terminal. Make audio connection to...
...left/right channel audio outputs C From subwoofer output D From surround left/right channel audio outputs To listen to "OPT" before playing back. ( 14) 8 Select "S.SPK R" as the speaker position mode. ( 12) Select "5.1CH" as follows. Video connection DVD player, etc. Connection using the component video jacks From component video input TV Green Blue Component video cord (not supplied) Red For the BNC connection, use a plug adapter (not supplied). HDMI cable (not supplied) From HDMI video output No sound signal comes into HDMI VIDEO 1 IN terminal. Make audio connection to...
Instructions
Page 12
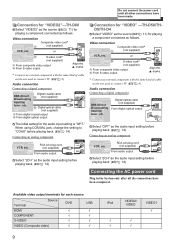
... of cable as follows. RCA pin plug cord (not supplied) From audio output Select "2CH" as the audio input setting before playing back. ( 14) Select "OPT" as the source ( 11) for each source Source Terminal HDMI COMPONENT S-VIDEO VIDEO (Composite video) DVD USB 9 iPod √ √ VIDEO2/ VIDEO √ √ VIDEO1 √ Do not connect the power cord until all the connections have been made. Connection for "VIDEO2"-TH-D60 Select "VIDEO2" as the audio input setting before playing back. ( 14) Connecting the AC power cord Plug in the System...
... of cable as follows. RCA pin plug cord (not supplied) From audio output Select "2CH" as the audio input setting before playing back. ( 14) Select "OPT" as the source ( 11) for each source Source Terminal HDMI COMPONENT S-VIDEO VIDEO (Composite video) DVD USB 9 iPod √ √ VIDEO2/ VIDEO √ √ VIDEO1 √ Do not connect the power cord until all the connections have been made. Connection for "VIDEO2"-TH-D60 Select "VIDEO2" as the audio input setting before playing back. ( 14) Connecting the AC power cord Plug in the System...
Instructions
Page 13
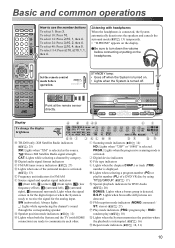
... displayed. B Digital audio signal format indicators C FM/AM tuner source indicators ( 27) D Lights when one of a DVD VR disc by category. PRGR.: Lights when the progressive scanning mode is ready to communicate each other. Be sure to use the number buttons To select 3: Press 3. CAT: Lights while selecting a channel by using TITLE/GROUP. ( 17) N Special playback indicators for the analog input. SW (subwoofer): Always lights. _: Lights while reproducing the channel's sound through the corresponding speaker. Set the remote control mode before connecting...
... displayed. B Digital audio signal format indicators C FM/AM tuner source indicators ( 27) D Lights when one of a DVD VR disc by category. PRGR.: Lights when the progressive scanning mode is ready to communicate each other. Be sure to use the number buttons To select 3: Press 3. CAT: Lights while selecting a channel by using TITLE/GROUP. ( 17) N Special playback indicators for the analog input. SW (subwoofer): Always lights. _: Lights while reproducing the channel's sound through the corresponding speaker. Set the remote control mode before connecting...
Instructions
Page 14
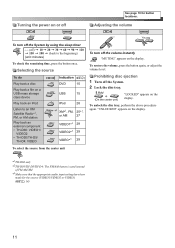
... button is used instead of FM/AM/XM. *3Make sure that the appropriate audio input setting have been made for button locations. "UNLOCKED" appears on or off the System. 2 Lock the disc tray. «Hold (On the center unit) "LOCKED" appears on the display. To restore the volume, press the button again, or adjust the volume level. Prohibiting disc ejection 1 Turn off See page 10 for the source (VIDEO1/VIDEO2 or VIDEO...
... button is used instead of FM/AM/XM. *3Make sure that the appropriate audio input setting have been made for button locations. "UNLOCKED" appears on or off the System. 2 Lock the disc tray. «Hold (On the center unit) "LOCKED" appears on the display. To restore the volume, press the button again, or adjust the volume level. Prohibiting disc ejection 1 Turn off See page 10 for the source (VIDEO1/VIDEO2 or VIDEO...
Instructions
Page 15
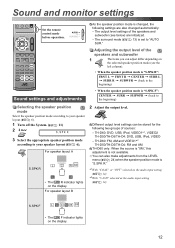
..." selected as the audio input setting ( 14) *2With "5.1CH" selected as the audio input setting ( 14) S.SPK F • The F indicator lights on the display. For speaker layout A S.SPK R • The R indicator lights on the display. 12 TH-D60: DVD, USB, IPod, VIDEO1*1, VIDEO2 TH-D50/TH-D5/TH-D4: DVD, USB, IPod, VIDEO - Adjusting the output level of the speakers and subwoofer 1 The items you can be stored for the following settings are initialized. - For speaker layout B 2 Adjust the output level. Sound and monitor settings Set the remote control mode before operation...
..." selected as the audio input setting ( 14) *2With "5.1CH" selected as the audio input setting ( 14) S.SPK F • The F indicator lights on the display. For speaker layout A S.SPK R • The R indicator lights on the display. 12 TH-D60: DVD, USB, IPod, VIDEO1*1, VIDEO2 TH-D50/TH-D5/TH-D4: DVD, USB, IPod, VIDEO - Adjusting the output level of the speakers and subwoofer 1 The items you can be stored for the following settings are initialized. - For speaker layout B 2 Adjust the output level. Sound and monitor settings Set the remote control mode before operation...
Instructions
Page 16
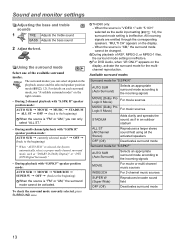
... stereo sound field using all the activated speakers OFF (Off) Deactivates surround mode Surround mode for "S.SPK F" AUTO SUR (Auto Surround) Selects an appropriate surround mode according to the incoming signals MOVIE (Dolby Pro Logic II Movie) For movie sources MUSIC (Dolby Pro Logic II Music) For music sources STADIUM Adds clarity and spreads the sound, as the audio input setting ( 14), the surround mode setting is "FM" or "AM," the surround mode cannot be changed. During playback of the available surround modes. TH-D60 only: - "MULTI...
... stereo sound field using all the activated speakers OFF (Off) Deactivates surround mode Surround mode for "S.SPK F" AUTO SUR (Auto Surround) Selects an appropriate surround mode according to the incoming signals MOVIE (Dolby Pro Logic II Movie) For movie sources MUSIC (Dolby Pro Logic II Music) For music sources STADIUM Adds clarity and spreads the sound, as the audio input setting ( 14), the surround mode setting is "FM" or "AM," the surround mode cannot be changed. During playback of the available surround modes. TH-D60 only: - "MULTI...
Instructions
Page 17
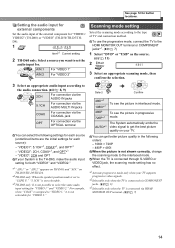
... the HDMI MONITOR OUT terminal or COMPONENT jacks*1. ( 7) 1 Select "DVD" or "USB" as the source. ( 11) 2 «Hold 3 Select an appropriate scanning mode, then confirm the selection. 3 Select an appropriate audio input according to "VIDEO 1," it is assigned to the audio connection. ( 8, 9) 2CH For connection via the AUDIO IN jacks 5.1CH For connection via the AUDIO MULTI IN jacks COAX For connection via the COAXIAL jack OPT For connection via HDMI MONITOR OUT terminal. ( 7) 14 on TH-D60, and...
... the HDMI MONITOR OUT terminal or COMPONENT jacks*1. ( 7) 1 Select "DVD" or "USB" as the source. ( 11) 2 «Hold 3 Select an appropriate scanning mode, then confirm the selection. 3 Select an appropriate audio input according to "VIDEO 1," it is assigned to the audio connection. ( 8, 9) 2CH For connection via the AUDIO IN jacks 5.1CH For connection via the AUDIO MULTI IN jacks COAX For connection via the COAXIAL jack OPT For connection via HDMI MONITOR OUT terminal. ( 7) 14 on TH-D60, and...

Instructions
Page 18
... 1 Connect a USB mass storage class device while the System is displayed for the target function: Initial settings Make the following icons show playback starts. • MP3/WMA/WAV: The file control display appears on a USB mass storage class device Operating the touch sensor panel You can deactivate the screen saver function. ( 23) When several types of these buttons, it lights briefly in blue. For disc playback 4 Start playback. Disc...
... 1 Connect a USB mass storage class device while the System is displayed for the target function: Initial settings Make the following icons show playback starts. • MP3/WMA/WAV: The file control display appears on a USB mass storage class device Operating the touch sensor panel You can deactivate the screen saver function. ( 23) When several types of these buttons, it lights briefly in blue. For disc playback 4 Start playback. Disc...

Instructions
Page 27
... when the speaker position mode is overwritten by using the Registration Code, the System's code is set to "S.SPK F" ( 12). LEVEL DELAY SUBWOOFER Adjust the output level of the speakers. Ex.: FRONT LEFT/RIGHT SPEAKER, CENTER SPEAKER, SURROUND RIGHT/LEFT SPEAKER: Select the Front left setting. 2 ms Center 1 ms Subwoofer Front right 0 ms 2.4 m (8 ft) 3.0 m 2.1 m (10 ft) (7 ft) 2.7 m (9 ft) Surround right 2 ms Make the subwoofer setting. The System has its HDMI terminal, make the setting on the external component. Audio menu (AUDIO) DOWN MIX D. AUTO: Select this to...
... when the speaker position mode is overwritten by using the Registration Code, the System's code is set to "S.SPK F" ( 12). LEVEL DELAY SUBWOOFER Adjust the output level of the speakers. Ex.: FRONT LEFT/RIGHT SPEAKER, CENTER SPEAKER, SURROUND RIGHT/LEFT SPEAKER: Select the Front left setting. 2 ms Center 1 ms Subwoofer Front right 0 ms 2.4 m (8 ft) 3.0 m 2.1 m (10 ft) (7 ft) 2.7 m (9 ft) Surround right 2 ms Make the subwoofer setting. The System has its HDMI terminal, make the setting on the external component. Audio menu (AUDIO) DOWN MIX D. AUTO: Select this to...
Instructions
Page 28
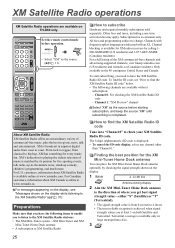
... XM Satellite Radio ID code. All fees and programming subject to coast. For a full listing of commercial-free music, plus the best in sports, news, talk and entertainment. Channel 0: For checking the XM Satellite Radio ID code - Finding the best position for the XM Mini-Tuner Home Dock antenna You can place the XM Mini-Tuner Home Dock antenna optimally by checking the signal strength shown on the display while...
... XM Satellite Radio ID code. All fees and programming subject to coast. For a full listing of commercial-free music, plus the best in sports, news, talk and entertainment. Channel 0: For checking the XM Satellite Radio ID code - Finding the best position for the XM Mini-Tuner Home Dock antenna You can place the XM Mini-Tuner Home Dock antenna optimally by checking the signal strength shown on the display while...
Instructions
Page 31
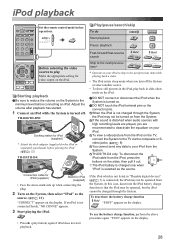
... iPod. ( 32) TH-D5/TH-D4: Skip to play back in "Playable digital devices" ( 3) is turned off the System or select another source. • To show mode on the System to the TV via the composite or S- To use the battery charge function, perform the above procedure again. Starting playback Be sure to reduce the volume on the iPod. iPod playback Set the remote control mode before connecting an iPod. If the sound...
... iPod. ( 32) TH-D5/TH-D4: Skip to play back in "Playable digital devices" ( 3) is turned off the System or select another source. • To show mode on the System to the TV via the composite or S- To use the battery charge function, perform the above procedure again. Starting playback Be sure to reduce the volume on the iPod. iPod playback Set the remote control mode before connecting an iPod. If the sound...
Instructions
Page 34
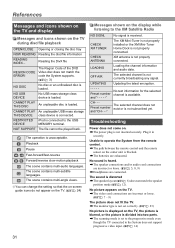
... System supports. ( 3) NO DISC No disc or an unfinalized disc is connected. CANNOT PLAY An unplayable USB mass storage THIS DEVICE class device is loaded. The operation is not properly connected. CHECK XM TUNER The XM Mini-Tuner is not properly installed or the XM Mini-Tuner Home Dock is unacceptable. UPDATING Updating the latest encryption. - - - - No text information for the selected Preset number channel is set correctly. ( 23) No picture is displayed on the center...
... System supports. ( 3) NO DISC No disc or an unfinalized disc is connected. CANNOT PLAY An unplayable USB mass storage THIS DEVICE class device is loaded. The operation is not properly connected. CHECK XM TUNER The XM Mini-Tuner is not properly installed or the XM Mini-Tuner Home Dock is unacceptable. UPDATING Updating the latest encryption. - - - - No text information for the selected Preset number channel is set correctly. ( 23) No picture is displayed on the center...
Instructions
Page 35
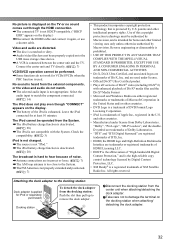
... iPod is used under license from Dolby Laboratories. and other limited viewing uses only unless otherwise authorized by Digital Content Protection, LLC. • XM Ready® is heard from the center unit when attaching/detaching the dock adapter. Attaching the dock adapter to the System. ZThe FM Antenna is not properly extended and positioned. ( 7) • This product incorporates copyright protection technology that is hard to remove the dock adapter...
... iPod is used under license from Dolby Laboratories. and other limited viewing uses only unless otherwise authorized by Digital Content Protection, LLC. • XM Ready® is heard from the center unit when attaching/detaching the dock adapter. Attaching the dock adapter to the System. ZThe FM Antenna is not properly extended and positioned. ( 7) • This product incorporates copyright protection technology that is hard to remove the dock adapter...
Instructions
Page 36
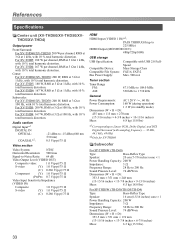
... distortion. For XV-THD4: 167 W per channel, RMS at 3 Ω at 1 kHz, with sampling frequency - 32 kHz, 44.1 kHz, 48 kHz) *2Only for XV-THD60 Subwoofer For SP-THD6W (TH-D60) Type: Speaker: Bass-Reflex Type 20 cm (7-7/8 inches) cone × 1 Power Handling Capacity: 200 W Impedance: 3Ω Frequency Range: 28 Hz to 200 Hz Sound Pressure Level: 74 dB/W•m Dimensions (W ×...
... distortion. For XV-THD4: 167 W per channel, RMS at 3 Ω at 1 kHz, with sampling frequency - 32 kHz, 44.1 kHz, 48 kHz) *2Only for XV-THD60 Subwoofer For SP-THD6W (TH-D60) Type: Speaker: Bass-Reflex Type 20 cm (7-7/8 inches) cone × 1 Power Handling Capacity: 200 W Impedance: 3Ω Frequency Range: 28 Hz to 200 Hz Sound Pressure Level: 74 dB/W•m Dimensions (W ×...


