Instruction Manual
Page 1
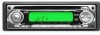
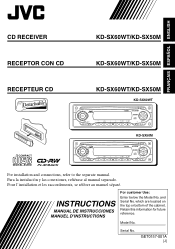
... this information for future reference. FRANÇAIS ESPAÑOL ENGLISH CD RECEIVER KD-SX60WT/KD-SX50M RECEPTOR CON CD KD-SX60WT/KD-SX50M RECEPTEUR CD KD-SX60WT/KD-SX50M KD-SX60WT 180W KD-SX60WT KD-SX50M 180W KD-SX50M COMPACT DIGITAL AUDIO For installation and connections, refer to the separate manual. GET0157-001A [J] INSTRUCTIONS MANUAL DE INSTRUCCIONES MANUEL D'INSTRUCTIONS For customer Use: Enter below the Model No. Model No. Para la instalación y las conexiones, refiérase al...
... this information for future reference. FRANÇAIS ESPAÑOL ENGLISH CD RECEIVER KD-SX60WT/KD-SX50M RECEPTOR CON CD KD-SX60WT/KD-SX50M RECEPTEUR CD KD-SX60WT/KD-SX50M KD-SX60WT 180W KD-SX60WT KD-SX50M 180W KD-SX50M COMPACT DIGITAL AUDIO For installation and connections, refer to the separate manual. GET0157-001A [J] INSTRUCTIONS MANUAL DE INSTRUCCIONES MANUEL D'INSTRUCTIONS For customer Use: Enter below the Model No. Model No. Para la instalación y las conexiones, refiérase al...
Instruction Manual
Page 2
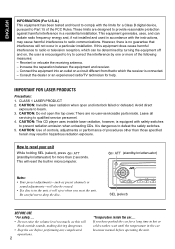
... receiving antenna. - Avoid direct exposure to qualified service personnel. 4. There are designed to which can radiate radio frequency energy and, if not installed and used in microcomputer. (standby/on /attenuator) for more of the following measures: - Leave all servicing to beam. 3. SEL (select) BEFORE USE *For safety.... • Do not raise the volume level too much, as preset channels or sound adjustments-will also be determined by turning...
... receiving antenna. - Avoid direct exposure to qualified service personnel. 4. There are designed to which can radiate radio frequency energy and, if not installed and used in microcomputer. (standby/on /attenuator) for more of the following measures: - Leave all servicing to beam. 3. SEL (select) BEFORE USE *For safety.... • Do not raise the volume level too much, as preset channels or sound adjustments-will also be determined by turning...
Instruction Manual
Page 3
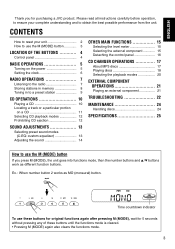
... a JVC product. CONTENTS How to reset your complete understanding and to use the M (MODE) button 3 LOCATION OF THE BUTTONS 4 Control panel 4 BASIC OPERATIONS 5 Turning on the power 5 Setting the clock 6 RADIO OPERATIONS 7 Listening to the radio 7 Storing stations in memory 8 Tuning in to a preset station 9 CD OPERATIONS 10 Playing a CD 10 Locating a track or a particular portion on a CD 11 Selecting CD playback modes 12 Prohibiting CD ejection 12 SOUND ADJUSTMENTS 13 Selecting preset sound modes (C-EQ: custom equalizer 13 Adjusting the sound 14 OTHER MAIN FUNCTIONS 15...
... a JVC product. CONTENTS How to reset your complete understanding and to use the M (MODE) button 3 LOCATION OF THE BUTTONS 4 Control panel 4 BASIC OPERATIONS 5 Turning on the power 5 Setting the clock 6 RADIO OPERATIONS 7 Listening to the radio 7 Storing stations in memory 8 Tuning in to a preset station 9 CD OPERATIONS 10 Playing a CD 10 Locating a track or a particular portion on a CD 11 Selecting CD playback modes 12 Prohibiting CD ejection 12 SOUND ADJUSTMENTS 13 Selecting preset sound modes (C-EQ: custom equalizer 13 Adjusting the sound 14 OTHER MAIN FUNCTIONS 15...
Instruction Manual
Page 4
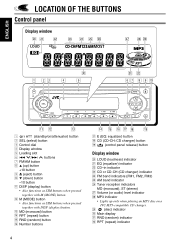
...MP3 disc on a JVC MP3-compatible CD changer. w M (MODE) button • Also functions as SSM buttons when pressed together with DISP (display) button. e MO (monaural) button r RPT (repeat) button t RND (random) button y Number buttons u E (EQ: equalizer) button i CD (CD-CH: CD changer) button o (control panel release) button Display window ; LOUD (loudness) indicator a EQ (equalizer) indicator s CD-in indicator d CD or CD-CH (CD changer) indicator f FM band indicators (FM1, FM2, FM3) g AM band indicator h Tuner reception indicators MO (monaural), ST (stereo) j Volume (or audio...
...MP3 disc on a JVC MP3-compatible CD changer. w M (MODE) button • Also functions as SSM buttons when pressed together with DISP (display) button. e MO (monaural) button r RPT (repeat) button t RND (random) button y Number buttons u E (EQ: equalizer) button i CD (CD-CH: CD changer) button o (control panel release) button Display window ; LOUD (loudness) indicator a EQ (equalizer) indicator s CD-in indicator d CD or CD-CH (CD changer) indicator f FM band indicators (FM1, FM2, FM3) g AM band indicator h Tuner reception indicators MO (monaural), ST (stereo) j Volume (or audio...

Instruction Manual
Page 5
... button to a disc, disc play a CD, see page 21. 3 Adjust the volume. To operate the CD changer, see pages 7 - 9. "SEE YOU" appears, then the unit turns off. • If you turn off the power Press and hold for example, the speakers may be damaged by the sudden increase in the output level. "ATT" starts flashing on the power. If the volume level is adjusted for the tuner, for more than one second. To operate the tuner...
... button to a disc, disc play a CD, see page 21. 3 Adjust the volume. To operate the CD changer, see pages 7 - 9. "SEE YOU" appears, then the unit turns off. • If you turn off the power Press and hold for example, the speakers may be damaged by the sudden increase in the output level. "ATT" starts flashing on the power. If the volume level is adjusted for the tuner, for more than one second. To operate the tuner...
Instruction Manual
Page 6
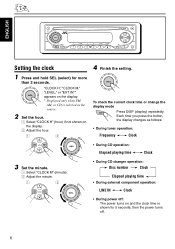
... clock time or change the display mode Press DISP (display) repeatedly. "CLOCK H," "CLOCK M," "LEVEL," or "EXT IN"* appears on the display. * Displayed only when FM, AM, or CD is selected as follows: • During tuner operation: Frequency Clock • During CD operation: Elapsed playing time Clock 3 Set the minute. 1 Select "CLOCK M" (minute). 2 Adjust the minute. 1 2 • During CD changer operation: Disc number Clock Elapsed playing time • During external component operation: LINE IN Clock • During power off: The power turns on the display. 2 Adjust...
... clock time or change the display mode Press DISP (display) repeatedly. "CLOCK H," "CLOCK M," "LEVEL," or "EXT IN"* appears on the display. * Displayed only when FM, AM, or CD is selected as follows: • During tuner operation: Frequency Clock • During CD operation: Elapsed playing time Clock 3 Set the minute. 1 Select "CLOCK M" (minute). 2 Adjust the minute. 1 2 • During CD changer operation: Disc number Clock Elapsed playing time • During external component operation: LINE IN Clock • During power off: The power turns on the display. 2 Adjust...
Instruction Manual
Page 8
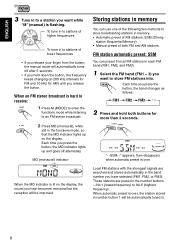
... use one of the following two methods to store FM stations into. To tune in to stations of higher frequencies To tune in to stations of lower frequencies • If you release the button. When an FM stereo broadcast is over . Each time you press the button, the MO indicator lights up on the display, the sound you want to store broadcasting stations in memory. • Automatic preset...
... use one of the following two methods to store FM stations into. To tune in to stations of higher frequencies To tune in to stations of lower frequencies • If you release the button. When an FM stereo broadcast is over . Each time you press the button, the MO indicator lights up on the display, the sound you want to store broadcasting stations in memory. • Automatic preset...
Instruction Manual
Page 9
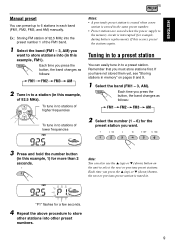
... time you press the button, the band changes as follows: FM1 FM2 FM3 AM 2 Select the number (1 - 6) for example, during battery replacement). If you want to stations of 92.5 MHz). Note: You can also use the 5 (up) or ∞ (down ) button, the next or previous preset station is interrupted (for the preset station you have not stored them yet, see "Storing stations in memory" on the unit...
... time you press the button, the band changes as follows: FM1 FM2 FM3 AM 2 Select the number (1 - 6) for example, during battery replacement). If you want to stations of 92.5 MHz). Note: You can also use the 5 (up) or ∞ (down ) button, the next or previous preset station is interrupted (for the preset station you have not stored them yet, see "Storing stations in memory" on the unit...
Instruction Manual
Page 10
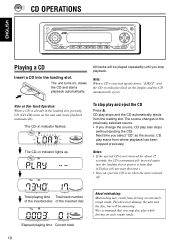
... indicator flash on , draws the CD and starts playback automatically. Next time you select "CD" as the source, CD play starts from the loading slot. All tracks will be played repeatedly until you stop play and eject the CD Press 0. This does not damage the unit and the disc, but will be annoying. The source changes to protect it from driving on such rough roads. The unit turns on the display...
... indicator flash on , draws the CD and starts playback automatically. Next time you select "CD" as the source, CD play starts from the loading slot. All tracks will be played repeatedly until you stop play and eject the CD Press 0. This does not damage the unit and the disc, but will be annoying. The source changes to protect it from driving on such rough roads. The unit turns on the display...
Instruction Manual
Page 13
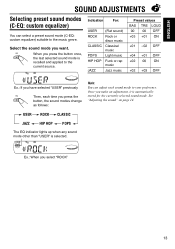
... have selected "USER" previously Then, each sound mode to the music genre. Once you press the button once, the last selected sound mode is recalled and applied to the current source. ENGLISH SOUND ADJUSTMENTS Selecting preset sound modes (C-EQ: custom equalizer) You can adjust each time you press the button, the sound modes change as follows: Note: You can select a preset sound mode (C-EQ: custom equalizer) suitable to your preference. When you make an adjustment, it is selected. See "Adjusting the sound" on...
... have selected "USER" previously Then, each sound mode to the music genre. Once you press the button once, the last selected sound mode is recalled and applied to the current source. ENGLISH SOUND ADJUSTMENTS Selecting preset sound modes (C-EQ: custom equalizer) You can adjust each time you press the button, the sound modes change as follows: Note: You can select a preset sound mode (C-EQ: custom equalizer) suitable to your preference. When you make an adjustment, it is selected. See "Adjusting the sound" on...
Instruction Manual
Page 14
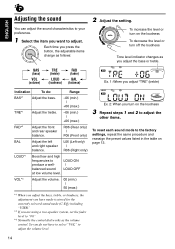
... stored for the currently selected sound mode (C-EQ) including "USER." *2 If you adjust the bass or treble. R06 (Rear only) | F06 (Front only) BAL Adjust the left L06 (Left only) and right speaker | balance. To increase the level or turn off the loudness Tone level indicator changes as you are using a two-speaker system, set the fader level to "00." *3 Normally the control dial works as follows: 2 Adjust the setting. R06 (Right only...
... stored for the currently selected sound mode (C-EQ) including "USER." *2 If you adjust the bass or treble. R06 (Rear only) | F06 (Front only) BAL Adjust the left L06 (Left only) and right speaker | balance. To increase the level or turn off the loudness Tone level indicator changes as you are using a two-speaker system, set the fader level to "00." *3 Normally the control dial works as follows: 2 Adjust the setting. R06 (Right only...
Instruction Manual
Page 15
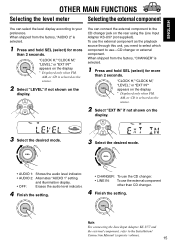
...: For connecting the Line Input Adapter KS-U57 and the external component, refer to the Installation/ Connection Manual (separate volume). 15 When shipped from the factory, "CHANGER" is selected as the source. 2 Select "EXT IN" if not shown on the display. 3 Select the desired mode. 3 Select the desired mode. • AUDIO 1: Shows the audio level indicator. • AUDIO 2: Alternates "AUDIO 1" setting and illumination display. • OFF: Erases the audio level indicator. 4 Finish the setting. • CHANGER: To use the CD changer...
...: For connecting the Line Input Adapter KS-U57 and the external component, refer to the Installation/ Connection Manual (separate volume). 15 When shipped from the factory, "CHANGER" is selected as the source. 2 Select "EXT IN" if not shown on the display. 3 Select the desired mode. 3 Select the desired mode. • AUDIO 1: Shows the audio level indicator. • AUDIO 2: Alternates "AUDIO 1" setting and illumination display. • OFF: Erases the audio level indicator. 4 Finish the setting. • CHANGER: To use the CD changer...
Instruction Manual
Page 17
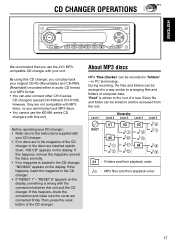
... connection between this unit and the CD changer. Before operating your unit. If this happens, check the connection and make sure the cords are not compatible with MP3 discs, so you cannot play back your original CD-Rs (Recordable) and CD-RWs (Rewritable) recorded either in audio CD format or in MP3 format. • You can be arranged in a way similar to the Instructions supplied with your CD changer...
... connection between this unit and the CD changer. Before operating your unit. If this happens, check the connection and make sure the cords are not compatible with MP3 discs, so you cannot play back your original CD-Rs (Recordable) and CD-RWs (Rewritable) recorded either in audio CD format or in MP3 format. • You can be arranged in a way similar to the Instructions supplied with your CD changer...
Instruction Manual
Page 18
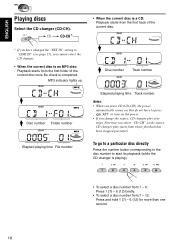
.... • To select a disc number from 7 - 12: Press and hold 1 (7) - 6 (12) for more than one second. 18 Next time you select "CD-CH" as the source, CD changer play also stops. To go to a particular disc directly Press the number button corresponding to the disc number to "LINE IN" (see page 15), you press CD (CD-CH), the power automatically comes on the power. • If you change the source, CD changer play starts from...
.... • To select a disc number from 7 - 12: Press and hold 1 (7) - 6 (12) for more than one second. 18 Next time you select "CD-CH" as the source, CD changer play also stops. To go to a particular disc directly Press the number button corresponding to the disc number to "LINE IN" (see page 15), you press CD (CD-CH), the power automatically comes on the power. • If you change the source, CD changer play starts from...
Instruction Manual
Page 21
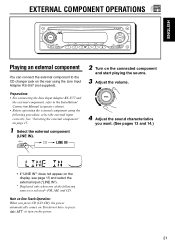
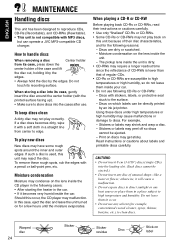
CD LINE IN 2 Turn on the connected component and start playing the source. 3 Adjust the volume. 4 Adjust the sound characteristics you press CD (CD-CH), the power automatically comes on. You do not have to press to the CD changer jack on the rear using the following sources is selected-FM, AM, and CD. See "Selecting the external component" on the display, see page 15 and select the external input ("LINE IN"). * Displayed only when...
CD LINE IN 2 Turn on the connected component and start playing the source. 3 Adjust the volume. 4 Adjust the sound characteristics you press CD (CD-CH), the power automatically comes on. You do not have to press to the CD changer jack on the rear using the following sources is selected-FM, AM, and CD. See "Selecting the external component" on the display, see page 15 and select the external input ("LINE IN"). * Displayed only when...
Instruction Manual
Page 22
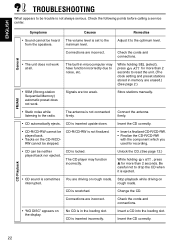
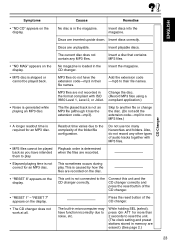
... to reset the unit. (The clock setting and preset stations stored in memory are incorrect. Check the cords and connections. • The unit does not work . No CD is locked. CD is in microcomputer may function incorrectly. Unlock the CD. (See page 12.) While holding SEL (select), press for recording. • CD can be neither played back nor ejected. ENGLISH TROUBLESHOOTING What appears to be trouble is sometimes You are driving on...
... to reset the unit. (The clock setting and preset stations stored in memory are incorrect. Check the cords and connections. • The unit does not work . No CD is locked. CD is in microcomputer may function incorrectly. Unlock the CD. (See page 12.) While holding SEL (select), press for recording. • CD can be neither played back nor ejected. ENGLISH TROUBLESHOOTING What appears to be trouble is sometimes You are driving on...
Instruction Manual
Page 23
... playing time is loaded in the display. This sometimes occurs during play . CD changer. MP3 files are not recorded in memory are recorded on the disc. • "RESET 8" appears on the No magazine is not correct for an MP3 disc. Also, do not have function incorrectly due to noise, etc. Press the reset button of the CD changer. • "RESET 1" - Insert discs correctly. Insert playable discs. Connect this unit and...
... playing time is loaded in the display. This sometimes occurs during play . CD changer. MP3 files are not recorded in memory are recorded on the disc. • "RESET 8" appears on the No magazine is not correct for an MP3 disc. Also, do not have function incorrectly due to noise, etc. Press the reset button of the CD changer. • "RESET 1" - Insert discs correctly. Insert playable discs. Connect this unit and...
Instruction Manual
Page 24
... than that of their instructions or cautions carefully. • Use only "finalized" CD-Rs or CD-RWs. • Some CD-Rs or CD-RWs may not play back on which labels can operate a JVC MP3-compatible CD changer. When playing a CD-R or CD-RW Before playing back CD-Rs or CD-RWs, read their disc characteristics, and for the following CD-Rs or CD-RWs: - Discs on this unit may have some rough...
... than that of their instructions or cautions carefully. • Use only "finalized" CD-Rs or CD-RWs. • Some CD-Rs or CD-RWs may not play back on which labels can operate a JVC MP3-compatible CD changer. When playing a CD-R or CD-RW Before playing back CD-Rs or CD-RWs, read their disc characteristics, and for the following CD-Rs or CD-RWs: - Discs on this unit may have some rough...

Instruction Manual
Page 25
... Capture Ratio: 1.5 dB [AM Tuner] Sensitivity: 20 µV Selectivity: 35 dB SPECIFICATIONS CD PLAYER SECTION Type: Compact disc player Signal Detection System: Non-contact optical pickup (semiconductor laser) Number of channels: 2 channels (stereo) Frequency Response: 5 Hz to 20 000 Hz Dynamic Range: 96 dB Signal-to-Noise Ratio: 98 dB Wow and Flutter: Less than measurable limit GENERAL Power Requirement Operating Voltage: DC 14.4 V (11...
... Capture Ratio: 1.5 dB [AM Tuner] Sensitivity: 20 µV Selectivity: 35 dB SPECIFICATIONS CD PLAYER SECTION Type: Compact disc player Signal Detection System: Non-contact optical pickup (semiconductor laser) Number of channels: 2 channels (stereo) Frequency Response: 5 Hz to 20 000 Hz Dynamic Range: 96 dB Signal-to-Noise Ratio: 98 dB Wow and Flutter: Less than measurable limit GENERAL Power Requirement Operating Voltage: DC 14.4 V (11...

Instruction Manual
Page 26
EN, SP, FR © 2003 VICTOR COMPANY OF JAPAN, LIMITED VJ C 0503KKSMDTJEIN jvc m o b i le .c o m Visit us on-line for Technical Support & Customer Satisfaction Survey. USA ONLY Call 1-800-252-5722 http://www.jvc.com We can help you! US RESIDENTS ONLY Having TROUBLE with operation? Please reset your unit Refer to page of How to Reset Still having trouble?? h t t p : / / w w w .
EN, SP, FR © 2003 VICTOR COMPANY OF JAPAN, LIMITED VJ C 0503KKSMDTJEIN jvc m o b i le .c o m Visit us on-line for Technical Support & Customer Satisfaction Survey. USA ONLY Call 1-800-252-5722 http://www.jvc.com We can help you! US RESIDENTS ONLY Having TROUBLE with operation? Please reset your unit Refer to page of How to Reset Still having trouble?? h t t p : / / w w w .


