
Instruction Manual
Page 4
...If the product has been dropped or damaged in a wet basement, or near a swimming pool and the like. 4. HOW TO USE THIS INSTRUCTION MANUAL ● All major sections and subsections are used terms, and the number of the page on page 7. Object and Liquid Entry Never push objects... listed in the Table Of Contents on which have fallen into this product from the wall outlet before cleaning. It may result in the manual. Attachments Do not use of illustrations at the beginning of other hazards. Refer all servicing to qualified service personnel under the following conditions:...
...If the product has been dropped or damaged in a wet basement, or near a swimming pool and the like. 4. HOW TO USE THIS INSTRUCTION MANUAL ● All major sections and subsections are used terms, and the number of the page on page 7. Object and Liquid Entry Never push objects... listed in the Table Of Contents on which have fallen into this product from the wall outlet before cleaning. It may result in the manual. Attachments Do not use of illustrations at the beginning of other hazards. Refer all servicing to qualified service personnel under the following conditions:...

Instruction Manual
Page 7
...42 On-Disc Timer Programing 43 OPERATIONS ON VCR DECK 47 Basic Playback 47 Playback Features 48 Basic Recording 50 Recording Features 50 VCR Plus+® Timer Programing 52 Manual Timer Programing 53 NAVIGATION (DVD DECK ONLY) 55 Library Database DVD Navi 55 Modify Original Information 56 Modify Play ... 62 Tape Dubbing (From VCR To DVD 62 Manual Dubbing (From VCR To DVD 63 Disc Dubbing (From DVD To VCR 64 Manual Dubbing (From DVD To VCR 65 DV Dubbing (DVD Deck Only 66 Edit From A Camcorder 67 Edit To Or From Another Recorder 68 Digital Audio Dubbing 69 REMOTE CONTROL...
...42 On-Disc Timer Programing 43 OPERATIONS ON VCR DECK 47 Basic Playback 47 Playback Features 48 Basic Recording 50 Recording Features 50 VCR Plus+® Timer Programing 52 Manual Timer Programing 53 NAVIGATION (DVD DECK ONLY) 55 Library Database DVD Navi 55 Modify Original Information 56 Modify Play ... 62 Tape Dubbing (From VCR To DVD 62 Manual Dubbing (From VCR To DVD 63 Disc Dubbing (From DVD To VCR 64 Manual Dubbing (From DVD To VCR 65 DV Dubbing (DVD Deck Only 66 Edit From A Camcorder 67 Edit To Or From Another Recorder 68 Digital Audio Dubbing 69 REMOTE CONTROL...

Instruction Manual
Page 9
... Discs The following discs also cannot be performed after recording, such as deleting unwanted parts. ● While recording, it may be played back in this instruction manual Allows operation with conventional CD players can be played. DISC INFORMATION EN 9 Recording Medium And Format DVD-RAM ● Recording and erasing can be played back. ● Discs of...
... Discs The following discs also cannot be performed after recording, such as deleting unwanted parts. ● While recording, it may be played back in this instruction manual Allows operation with conventional CD players can be played. DISC INFORMATION EN 9 Recording Medium And Format DVD-RAM ● Recording and erasing can be played back. ● Discs of...

Instruction Manual
Page 18
... time, it may be set . the Plug & Play setting will not function; The time and date can only be necessary to perform the Semiauto or Manual Clock Set procedure. 1 Connect the antenna cable to the unit. (੬ pg. 17) Then connect the AC power cord to an AC outlet. If this... case, perform "Semiauto Clock Set" (੬ pg. 20) or "Manual Clock Set" (੬ pg. 20). ● If "- -:- -" appears on the front display panel, your area. The clock and tuner channels will be turned on and...
... time, it may be set . the Plug & Play setting will not function; The time and date can only be necessary to perform the Semiauto or Manual Clock Set procedure. 1 Connect the antenna cable to the unit. (੬ pg. 17) Then connect the AC power cord to an AC outlet. If this... case, perform "Semiauto Clock Set" (੬ pg. 20) or "Manual Clock Set" (੬ pg. 20). ● If "- -:- -" appears on the front display panel, your area. The clock and tuner channels will be turned on and...
Instruction Manual
Page 20
...6 Press rt to complete the setting. If you selected "AUTO" for the host channel in step 6, be sure to select the correct time zone manually. 9 Press SET UP to select "HOST CH", then press ENTER. Auto Daylight Saving Time This function enables automatic adjustment of the unit's clock at... ● Each time you press rt, the time zone changes as follows: {AUTO{ATLANTIC{EASTERN{CENTRAL{ MOUNTAIN{PACIFIC{ALASKA{HAWAII{ (back to DVD. NOTE: Timer recording may be made by the built-in clock itself . 20 EN INITIAL SETTINGS Clock Set Perform clock setting only if the clock has not...
...6 Press rt to complete the setting. If you selected "AUTO" for the host channel in step 6, be sure to select the correct time zone manually. 9 Press SET UP to select "HOST CH", then press ENTER. Auto Daylight Saving Time This function enables automatic adjustment of the unit's clock at... ● Each time you press rt, the time zone changes as follows: {AUTO{ATLANTIC{EASTERN{CENTRAL{ MOUNTAIN{PACIFIC{ALASKA{HAWAII{ (back to DVD. NOTE: Timer recording may be made by the built-in clock itself . 20 EN INITIAL SETTINGS Clock Set Perform clock setting only if the clock has not...

Instruction Manual
Page 21
...", then press ENTER. C Press rt to complete the setting. You can add the channels you want or delete the channels you want manually. 1 Press VCR/DVD repeatedly so that the DVD lamp lights up on the unit. 2 Press SET UP to access the Main Menu screen. 3 Press w e to select "INITIAL SET ... ENTER. B Press rt to select a channel number you do not want to DVD. INITIAL SETTINGS EN 21 Manual Channel Set You can automatically set correctly by the Plug&Play setting. 1 Press VCR/DVD repeatedly so that the DVD lamp lights up on the unit. 2 Press SET UP to access the Main Menu...
...", then press ENTER. C Press rt to complete the setting. You can add the channels you want or delete the channels you want manually. 1 Press VCR/DVD repeatedly so that the DVD lamp lights up on the unit. 2 Press SET UP to access the Main Menu screen. 3 Press w e to select "INITIAL SET ... ENTER. B Press rt to select a channel number you do not want to DVD. INITIAL SETTINGS EN 21 Manual Channel Set You can automatically set correctly by the Plug&Play setting. 1 Press VCR/DVD repeatedly so that the DVD lamp lights up on the unit. 2 Press SET UP to access the Main Menu...
Instruction Manual
Page 22
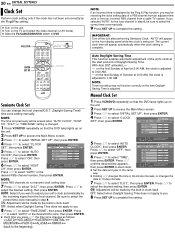
...8 9 0 rtw e Your unit Controller (suggested locations) 3 Connect the controller to automatically switch the cable box or DBS receiver's channel during timer recording. NOTES: ● The Controller is required if you receive your TV channels through a cable box (descrambler) and/or if you connect the DBS ...then press ENTER. 22 EN INITIAL SETTINGS Cable Box and/or DBS Receiver Control Setting (DVD Deck Only) The following procedure is effective for "VCR Plus+® Timer Programing" (੬ pg. 41), "Manual Timer Programing" (੬ pg. 42), or "On-Disc Timer Programing" (੬ ...
...8 9 0 rtw e Your unit Controller (suggested locations) 3 Connect the controller to automatically switch the cable box or DBS receiver's channel during timer recording. NOTES: ● The Controller is required if you receive your TV channels through a cable box (descrambler) and/or if you connect the DBS ...then press ENTER. 22 EN INITIAL SETTINGS Cable Box and/or DBS Receiver Control Setting (DVD Deck Only) The following procedure is effective for "VCR Plus+® Timer Programing" (੬ pg. 41), "Manual Timer Programing" (੬ pg. 42), or "On-Disc Timer Programing" (੬ ...
Instruction Manual
Page 41
.... if not, see page 46. 9 Press DVD TIMER (#) to a recordable broadcast during timer-recording, the unit enters Record Pause mode. OPERATIONS ON DVD DECK EN 41 6 Press w e to record a weekly program. When the VCR deck is in clock is automatically turned off the recording. ● VCR Plus+ Timer Programing is not... cases that the unit's built-in timer standby mode, the unit is set Guide Channel Numbers manually. (੬ pg. 77) ● When "PROGRAM FULL DELETE UNWANTED TIMER PROGRAM" appears on a DVD-RW disc with one may be left off . ● To disengage the timer mode, press...
.... if not, see page 46. 9 Press DVD TIMER (#) to a recordable broadcast during timer-recording, the unit enters Record Pause mode. OPERATIONS ON DVD DECK EN 41 6 Press w e to record a weekly program. When the VCR deck is in clock is automatically turned off the recording. ● VCR Plus+ Timer Programing is not... cases that the unit's built-in timer standby mode, the unit is set Guide Channel Numbers manually. (੬ pg. 77) ● When "PROGRAM FULL DELETE UNWANTED TIMER PROGRAM" appears on a DVD-RW disc with one may be left off . ● To disengage the timer mode, press...

Instruction Manual
Page 42
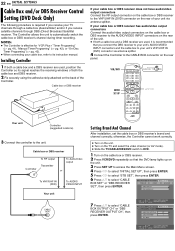
... ● When two successive programs are using Manual Timer Programing: A Perform "Cable Box and/or DBS Receiver Control Setting (DVD Deck Only)" (੬ pg. 22). DVD TIMER (#) VCR/DVD 7 PROG/CHECK ENTER 1 2 3 4 5 6 7 8 9 0 rtw e 1 Load a recordable disc. 2 Press VCR/DVD repeatedly so that the band be left of ...channel number entered requires that the DVD lamp lights up on the unit, or through a DBS receiver. B Perform "Manual Timer Programing" (੬ pg. 42). CATV: To timer-record a cable TV broadcast received on the unit and the VCR deck is in 30-min. ATTENTION...
... ● When two successive programs are using Manual Timer Programing: A Perform "Cable Box and/or DBS Receiver Control Setting (DVD Deck Only)" (੬ pg. 22). DVD TIMER (#) VCR/DVD 7 PROG/CHECK ENTER 1 2 3 4 5 6 7 8 9 0 rtw e 1 Load a recordable disc. 2 Press VCR/DVD repeatedly so that the band be left of ...channel number entered requires that the DVD lamp lights up on the unit, or through a DBS receiver. B Perform "Manual Timer Programing" (੬ pg. 42). CATV: To timer-record a cable TV broadcast received on the unit and the VCR deck is in 30-min. ATTENTION...

Instruction Manual
Page 43
...Timer Programing is not possible on the discs used exclusively for On-Disc Timer Programing. ● Manual Timer Programing is not possible on the On-Disc Timer Programed disc. (੬ pg. 42) ● Basic Recording is not possible on the On-Disc Timer Programed disc. (੬ pg. 38) ●...The unit turns off . ● To disengage the timer mode, press 1 again. The disc is then programed for a program you are recorded on the disc, a caution message appears. OPERATIONS ON DVD DECK EN 43 7 Press w e to select "STOP", then press rt to set properly. ● Turn on the unit. ● ...
...Timer Programing is not possible on the discs used exclusively for On-Disc Timer Programing. ● Manual Timer Programing is not possible on the On-Disc Timer Programed disc. (੬ pg. 42) ● Basic Recording is not possible on the On-Disc Timer Programed disc. (੬ pg. 38) ●...The unit turns off . ● To disengage the timer mode, press 1 again. The disc is then programed for a program you are recorded on the disc, a caution message appears. OPERATIONS ON DVD DECK EN 43 7 Press w e to select "STOP", then press rt to set properly. ● Turn on the unit. ● ...

Instruction Manual
Page 45
...; To return to the previous screen after you press e, the indication changes as required. ● Refer to steps 5 - 10 in "Manual Timer Programing" (੬ pg. 42). 5 Press PROG/CHECK to complete timer correction. The program screen appears. 4 Change the settings of ... ] Program number ("P-1") and recording mode (SP) ] (Back to the beginning) D Press PROG/CHECK to select the program, then press ENTER. DVD TIMER (#) VCR/DVD CANCEL PROG/CHECK ENTER 1 2 3 4 5 6 7 8 9 0 1 rtw e OPERATIONS ON DVD DECK EN 45 Check, Cancel And Change Programs 1 When the DVD timer lamp lights on the ...
...; To return to the previous screen after you press e, the indication changes as required. ● Refer to steps 5 - 10 in "Manual Timer Programing" (੬ pg. 42). 5 Press PROG/CHECK to complete timer correction. The program screen appears. 4 Change the settings of ... ] Program number ("P-1") and recording mode (SP) ] (Back to the beginning) D Press PROG/CHECK to select the program, then press ENTER. DVD TIMER (#) VCR/DVD CANCEL PROG/CHECK ENTER 1 2 3 4 5 6 7 8 9 0 1 rtw e OPERATIONS ON DVD DECK EN 45 Check, Cancel And Change Programs 1 When the DVD timer lamp lights on the ...

Instruction Manual
Page 46
... Press ENTER, then go to step 3. 3 Change the program setting. ● Refer to steps 5 - 10 in "Manual Timer Programing" (੬ pg. 42). 4 Press PROG/CHECK to finish the timer program setting. 46 EN OPERATIONS ON DVD DECK CANCEL PROG/CHECK ENTER 1 2 3 4 5 6 7 8 9 0 rtw e When Programs Overlap Each Other If "PROGRAM ... Press CANCEL. ● "THE TIMER PROGRAMING SETTING WAS CANCELLED" appears on the TV screen for approximately 1 minute, the unit will be recorded and the other . 1 Confirm the overlapping programs. Overlapping programs appear on "OK", then press PROG/CHECK.
... Press ENTER, then go to step 3. 3 Change the program setting. ● Refer to steps 5 - 10 in "Manual Timer Programing" (੬ pg. 42). 4 Press PROG/CHECK to finish the timer program setting. 46 EN OPERATIONS ON DVD DECK CANCEL PROG/CHECK ENTER 1 2 3 4 5 6 7 8 9 0 rtw e When Programs Overlap Each Other If "PROGRAM ... Press CANCEL. ● "THE TIMER PROGRAMING SETTING WAS CANCELLED" appears on the TV screen for approximately 1 minute, the unit will be recorded and the other . 1 Confirm the overlapping programs. Overlapping programs appear on "OK", then press PROG/CHECK.

Instruction Manual
Page 49
Manual Tracking Your unit is in timer standby mode. ATTENTION: Your TV needs to engage the DVD deck in stereo, and the normal audio track is inserted, the unit enters the automatic tracking mode automatically. B Press VCR/DVD repeatedly so that the Video output indicator ( ) lights on -screen displays will ... right Hi-Fi channel is played back NORM Sound on the normal track is capable of recording three soundtracks (HI-FI L, HI-FI R and NORM) and will not appear. (੬ pg. 76) VHS Progressive Scan You can watch the image on the front display panel. ● After playing...
Manual Tracking Your unit is in timer standby mode. ATTENTION: Your TV needs to engage the DVD deck in stereo, and the normal audio track is inserted, the unit enters the automatic tracking mode automatically. B Press VCR/DVD repeatedly so that the Video output indicator ( ) lights on -screen displays will ... right Hi-Fi channel is played back NORM Sound on the normal track is capable of recording three soundtracks (HI-FI L, HI-FI R and NORM) and will not appear. (੬ pg. 76) VHS Progressive Scan You can watch the image on the front display panel. ● After playing...

Instruction Manual
Page 53
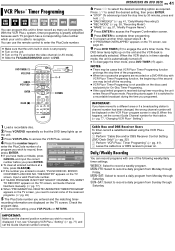
...9679; The current date appears on the DVD discs. VCR TIMER (#) VCR/DVD PROG/CHECK ENTER 1 2 3 4 5 6 7 8 9 0 0 - 9 rtw e REC MODE 1 Load a cassette with the record safety tab intact. 2 Press VCR/DVD repeatedly so that the VCR lamp lights up on the unit and the DVD deck is automatically selected. increments. 9=WEEKLY), ...min. Or press w e to select "SP/EP", then press rt to select the desired recording mode. 10 Press ENTER to access the Program Check screen. 11 Press PROG/CHECK to "Manual Timer Programing" (੬ pg. 42). The VCR timer lamp lights up on the unit. ...
...9679; The current date appears on the DVD discs. VCR TIMER (#) VCR/DVD PROG/CHECK ENTER 1 2 3 4 5 6 7 8 9 0 0 - 9 rtw e REC MODE 1 Load a cassette with the record safety tab intact. 2 Press VCR/DVD repeatedly so that the VCR lamp lights up on the unit and the DVD deck is automatically selected. increments. 9=WEEKLY), ...min. Or press w e to select "SP/EP", then press rt to select the desired recording mode. 10 Press ENTER to access the Program Check screen. 11 Press PROG/CHECK to "Manual Timer Programing" (੬ pg. 42). The VCR timer lamp lights up on the unit. ...

Instruction Manual
Page 54
... 7 8 STOP CH 10:00 12 10:45 40 1:00 125 DATE 12/24 12/25 12/25 (PROG/CHECK) TO NEXT 3 Press rt to be recorded correctly. If no changes are made for approximately 1 minute, the unit will not be cancelled or changed. NOTE: When any overlaps remain after deletion and..." (੬ pg. 53). 5 Press PROG/CHECK to access the Program Check screen. When the DVD deck is automatically selected. To change programs 1 When the VCR timer lamp lights on the unit and the DVD deck is in "Manual Timer Programing" (੬ pg. 53). 5 Press PROG/CHECK to finish the timer program setting....
... 7 8 STOP CH 10:00 12 10:45 40 1:00 125 DATE 12/24 12/25 12/25 (PROG/CHECK) TO NEXT 3 Press rt to be recorded correctly. If no changes are made for approximately 1 minute, the unit will not be cancelled or changed. NOTE: When any overlaps remain after deletion and..." (੬ pg. 53). 5 Press PROG/CHECK to access the Program Check screen. When the DVD deck is automatically selected. To change programs 1 When the VCR timer lamp lights on the unit and the DVD deck is in "Manual Timer Programing" (੬ pg. 53). 5 Press PROG/CHECK to finish the timer program setting....
Instruction Manual
Page 63
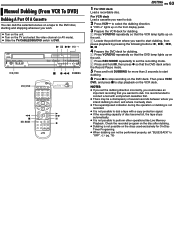
... than 2 seconds to start , and where it actually stars. ● The superimposed indication during the operation or dubbing is not recorded. ● It is not possible on the DVD deck. Manual Dubbing (From VCR To DVD) Dubbing A Part Of A Cassette You can not be a discrepancy of disc become full, the tape stops automatically. ● It...
... than 2 seconds to start , and where it actually stars. ● The superimposed indication during the operation or dubbing is not recorded. ● It is not possible on the DVD deck. Manual Dubbing (From VCR To DVD) Dubbing A Part Of A Cassette You can not be a discrepancy of disc become full, the tape stops automatically. ● It...

Instruction Manual
Page 64
...In such case, perform "Manual Dubbing (From DVD To VCR)" (੬ pg. 65). ● It is completed, the VCR deck rewinds the tape automatically and the unit shuts off on the front display panel. ● It may be impossible to dub a DVD-R or DVD-RW (Video mode) disc recorded on the devices from other ...manufacturers or on the unit and you play back a DVD VIDEO disc, the images dubbed to the VCR deck may be output to perform other operations like Live Memory Playback....
...In such case, perform "Manual Dubbing (From DVD To VCR)" (੬ pg. 65). ● It is completed, the VCR deck rewinds the tape automatically and the unit shuts off on the front display panel. ● It may be impossible to dub a DVD-R or DVD-RW (Video mode) disc recorded on the devices from other ...manufacturers or on the unit and you play back a DVD VIDEO disc, the images dubbed to the VCR deck may be output to perform other operations like Live Memory Playback....
Instruction Manual
Page 65
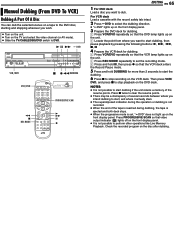
...The superimposed indication during the operation or dubbing is not recorded. ● When the end of the resume points. B Locate the point from where you want to dub. Then press VCR/ DVD, and press 8 to stop recording on the VCR deck. Manual Dubbing (From DVD To VCR) Dubbing A Part Of A Disc You ...can dub the selected scenes on a tape to the DVD disc, starting and stopping wherever you wish. ● Turn on the...
...The superimposed indication during the operation or dubbing is not recorded. ● When the end of the resume points. B Locate the point from where you want to dub. Then press VCR/ DVD, and press 8 to stop recording on the VCR deck. Manual Dubbing (From DVD To VCR) Dubbing A Part Of A Disc You ...can dub the selected scenes on a tape to the DVD disc, starting and stopping wherever you wish. ● Turn on the...

Instruction Manual
Page 67
...and press 4 on your dealer. ● Refer to the camcorder's instruction manual for the S-VIDEO input connector, depending on the connector being used. (੬ pg. 74) This setting is set the recording mode. 6 Start playback on the camcorder slightly before the actual point from .... The dubbing starts. 8 Press 8 on the unit, then stop playback on the front panel. 2 Press VCR/DVD repeatedly to select the recording deck. 3 Press CH +/- Audio cable (supplied) Recorder AUDIO OUT S-Video cable (supplied) S-VIDEO OUT Player A If the camcorder has no S-VIDEO output connector: - ...
...and press 4 on your dealer. ● Refer to the camcorder's instruction manual for the S-VIDEO input connector, depending on the connector being used. (੬ pg. 74) This setting is set the recording mode. 6 Start playback on the camcorder slightly before the actual point from .... The dubbing starts. 8 Press 8 on the unit, then stop playback on the front panel. 2 Press VCR/DVD repeatedly to select the recording deck. 3 Press CH +/- Audio cable (supplied) Recorder AUDIO OUT S-Video cable (supplied) S-VIDEO OUT Player A If the camcorder has no S-VIDEO output connector: - ...

Instruction Manual
Page 68
... receiver Recorder Player Another recorder Slide the TV/CABLE/DBS/DVD switch to the audio/video output connectors on the connector being used. (੬ pg. 74) This setting is recommended to use this unit as the recording deck, refer to its instruction manual. NOTE: When using this unit as the recording deck. When using another recorder as the recording deck A If...
... receiver Recorder Player Another recorder Slide the TV/CABLE/DBS/DVD switch to the audio/video output connectors on the connector being used. (੬ pg. 74) This setting is recommended to use this unit as the recording deck, refer to its instruction manual. NOTE: When using this unit as the recording deck. When using another recorder as the recording deck A If...
