Instructions
Page 2
...ée. CAUTION Changes or modifications not approved by turning the equipment off . DO NOT REMOVE COVER (OR BACK) NO USER SERVICEABLE PARTS INSIDE. Consult the dealer or an experienced radio/TV technician for a Class B digital device, pursuant to rain or moisture. Caution--STANDBY/ON button! Do not remove screws, covers or cabinet. 2. REFER SERVICING TO QUALIFIED SERVICE PERSONNEL. This equipment generates, uses and can...
...ée. CAUTION Changes or modifications not approved by turning the equipment off . DO NOT REMOVE COVER (OR BACK) NO USER SERVICEABLE PARTS INSIDE. Consult the dealer or an experienced radio/TV technician for a Class B digital device, pursuant to rain or moisture. Caution--STANDBY/ON button! Do not remove screws, covers or cabinet. 2. REFER SERVICING TO QUALIFIED SERVICE PERSONNEL. This equipment generates, uses and can...
Instructions
Page 3
...in the Remote Control 4 Connecting the FM and AM Antennas 4 Connecting the Speakers and Subwoofer 5 Connecting Audio/Video Components 6 7 Analog Connections 6 7 Digital Connections 8 Connecting the Power Cord 8 Basic Operations 9 Daily Operational Procedure 9 Turning On the Power 9 Selecting the Source to Play 9 Adjusting the Volume 10 Turning On and Off the Subwoofer Sound 11 Selecting the Analog or Digital Input Mode 11 Changing the Display Brightness 12 Attenuating the Input Signal 12 Changing the Source Name 12 Muting the Sound 13 Using the Sleep Timer 13 Receiving Radio...
...in the Remote Control 4 Connecting the FM and AM Antennas 4 Connecting the Speakers and Subwoofer 5 Connecting Audio/Video Components 6 7 Analog Connections 6 7 Digital Connections 8 Connecting the Power Cord 8 Basic Operations 9 Daily Operational Procedure 9 Turning On the Power 9 Selecting the Source to Play 9 Adjusting the Volume 10 Turning On and Off the Subwoofer Sound 11 Selecting the Analog or Digital Input Mode 11 Changing the Display Brightness 12 Attenuating the Input Signal 12 Changing the Source Name 12 Muting the Sound 13 Using the Sleep Timer 13 Receiving Radio...
Instructions
Page 5
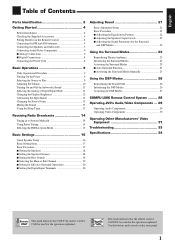
... for selecting preset channels (15, 29) Number buttons for sound adjustment (22, 29) Number buttons for operating audio/video components (29 - 32) 3 SOUND button (22, 29) 4 REC PAUSE button (30, 32) 5 Source selection buttons (9, 10) TAPE/CDR, CD, DVD, AUX, FM/AM, TV SOUND, VCR 6 FM MODE button (15, 29) 7 SURROUND button (25, 29) 8 DIMMER button (12, 29) 9 TV/VIDEO button (30, 31) 0 VCR CH +/- English Remote Control 1 2 3 4 5 6 7 8 9 0 - Operating buttons for details. 1 DIGITAL IN terminals (8) • Coaxial: DIGITAL 1 (DVD) • Optical: DIGITAL 2 (CD) 2 AUDIO input/output jacks...
... for selecting preset channels (15, 29) Number buttons for sound adjustment (22, 29) Number buttons for operating audio/video components (29 - 32) 3 SOUND button (22, 29) 4 REC PAUSE button (30, 32) 5 Source selection buttons (9, 10) TAPE/CDR, CD, DVD, AUX, FM/AM, TV SOUND, VCR 6 FM MODE button (15, 29) 7 SURROUND button (25, 29) 8 DIMMER button (12, 29) 9 TV/VIDEO button (30, 31) 0 VCR CH +/- English Remote Control 1 2 3 4 5 6 7 8 9 0 - Operating buttons for details. 1 DIGITAL IN terminals (8) • Coaxial: DIGITAL 1 (DVD) • Optical: DIGITAL 2 (CD) 2 AUDIO input/output jacks...
Instructions
Page 8
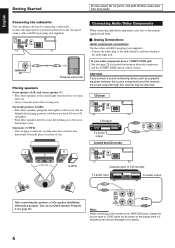
... like since bass sound is selected as a graphic equalizer between the source components and this receiver, the sound output through this receiver may be shown on the display when it (see page 16). Connecting the subwoofer You can use Quick Speaker Setup for it is non- You can enhance the bass by connecting a subwoofer. Cassette deck or CD recorder To audio input To audio output L R OUT (REC) TAPE /CDR L IN (PLAY) R Note: When connecting a CD...
... like since bass sound is selected as a graphic equalizer between the source components and this receiver, the sound output through this receiver may be shown on the display when it (see page 16). Connecting the subwoofer You can use Quick Speaker Setup for it is non- You can enhance the bass by connecting a subwoofer. Cassette deck or CD recorder To audio input To audio output L R OUT (REC) TAPE /CDR L IN (PLAY) R Note: When connecting a CD...
Instructions
Page 10
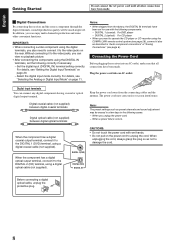
Without connecting it to the video jacks on page 11. Plug the power cord into an AC outlet, make sure that all other convenient functions. DIGITAL 1(DVD) DIGITAL 2(CD) DIGITAL IN Before connecting a digital optical cable, unplug the protective plug. 8 IMPORTANT: • When connecting a video component using the digital terminals, you also need to connect it to unplug the cord. Select the digital input mode correctly. DIGITAL 1 (coaxial): For DVD player - The power cord may be much improved. CAUTIONS: • Do not touch the power cord with the...
Without connecting it to the video jacks on page 11. Plug the power cord into an AC outlet, make sure that all other convenient functions. DIGITAL 1(DVD) DIGITAL 2(CD) DIGITAL IN Before connecting a digital optical cable, unplug the protective plug. 8 IMPORTANT: • When connecting a video component using the digital terminals, you also need to connect it to unplug the cord. Select the digital input mode correctly. DIGITAL 1 (coaxial): For DVD player - The power cord may be much improved. CAUTIONS: • Do not touch the power cord with the...
Instructions
Page 12
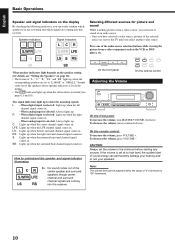
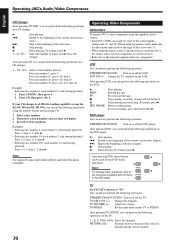
... FM AM SOURCE NAME On the front panel Adjusting the Volume TAPE/CDR CD DVD AUX FM/AM TV SOUND VCR On the remote control The signal indicators light up when the surround back channel signal comes in . Press one of the center speaker and surround speakers though center channel and surround channel signals are sent to understand the speaker and signal indicator illumination Ex. No sound comes out of the audio source selection buttons while viewing the picture from a video source, you can...
... FM AM SOURCE NAME On the front panel Adjusting the Volume TAPE/CDR CD DVD AUX FM/AM TV SOUND VCR On the remote control The signal indicators light up when the surround back channel signal comes in . Press one of the center speaker and surround speakers though center channel and surround channel signals are sent to understand the speaker and signal indicator illumination Ex. No sound comes out of the audio source selection buttons while viewing the picture from a video source, you can...
Instructions
Page 13
... source selection buttons (DVD, TV SOUND, CD, TAPE/CDR*) for which you want to the PHONES jack on the speaker size setting (see page 18) or using Quick Speaker Setup (see "Changing the Source Name" on speakers again, as the source, digital input mode is not available. Bass sounds (and LFE signals) will be correctly done for these components. Continued on the display)-3D Headphone Mode (3D H PHONE). Each time you press the button, subwoofer output is deactivated ("SUBWOOFER...
... source selection buttons (DVD, TV SOUND, CD, TAPE/CDR*) for which you want to the PHONES jack on the speaker size setting (see page 18) or using Quick Speaker Setup (see "Changing the Source Name" on speakers again, as the source, digital input mode is not available. Bass sounds (and LFE signals) will be correctly done for these components. Continued on the display)-3D Headphone Mode (3D H PHONE). Each time you press the button, subwoofer output is deactivated ("SUBWOOFER...

Instructions
Page 14
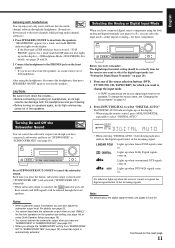
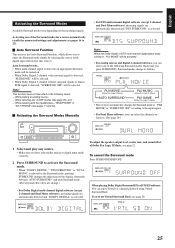
... source, "DOLBY DIGITAL" and "DTS SURROUND" settings are canceled and the digital input mode is memorized for or skipping chapters or tracks. In this happens, you need to attenuate the input signal level to the TAPE/CDR jacks on the rear panel, change the source name back to select "DOLBY DIGITAL" or "DTS SURROUND." Note: When you press INPUT DIGITAL, the input mode changes as follows: DIGITAL AUTO=DOLBY DIGITAL=DTS SURROUND =ANALOG=(back to select "DOLBY DIGITAL" or "DTS SURROUND." • Each time you turn...
... source, "DOLBY DIGITAL" and "DTS SURROUND" settings are canceled and the digital input mode is memorized for or skipping chapters or tracks. In this happens, you need to attenuate the input signal level to the TAPE/CDR jacks on the rear panel, change the source name back to select "DOLBY DIGITAL" or "DTS SURROUND." Note: When you press INPUT DIGITAL, the input mode changes as follows: DIGITAL AUTO=DOLBY DIGITAL=DTS SURROUND =ANALOG=(back to select "DOLBY DIGITAL" or "DTS SURROUND." • Each time you turn...
Instructions
Page 15
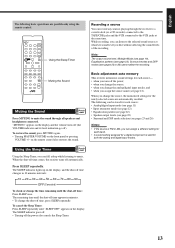
...) connected to the TAPE/CDR jacks and the VCR connected to music. The SLEEP indicator lights up on the display, and the shut-off time changes in minutes. • To change the analog/digital input modes, and • when you assign the source name (see page 12). on the front panel or pressing VOLUME +/- Basic adjustment auto memory This receiver memorizes sound settings for each band. • A sound setting assigned for a digital component is...
...) connected to the TAPE/CDR jacks and the VCR connected to music. The SLEEP indicator lights up on the display, and the shut-off time changes in minutes. • To change the analog/digital input modes, and • when you assign the source name (see page 12). on the front panel or pressing VOLUME +/- Basic adjustment auto memory This receiver memorizes sound settings for each band. • A sound setting assigned for a digital component is...

Instructions
Page 20
... connected speaker. Dolby Digital multi channel software - Note: You cannot set the speaker distance for the speakers you have used Quick Speaker Setup on page 16, this setting is used. Note: If you have selected "SMALL" for the front speakers, you cannot select "LARGE" for the center and surround speakers. Select when the speaker size is not available. * The LFE signals are emitted. 18 In the above case, set the speaker distance as reference when adjusting. - DTS multi channel software When playing...
... connected speaker. Dolby Digital multi channel software - Note: You cannot set the speaker distance for the speakers you have used Quick Speaker Setup on page 16, this setting is used. Note: If you have selected "SMALL" for the front speakers, you cannot select "LARGE" for the center and surround speakers. Select when the speaker size is not available. * The LFE signals are emitted. 18 In the above case, set the speaker distance as reference when adjusting. - DTS multi channel software When playing...

Instructions
Page 21
... "LARGE" speakers when "SUBWOOFER" is set the LFE level to apply the compress effect fully (useful at night using Midnight Mode. English ¶ Crossover frequency-CROSSOVER You can select the crossover frequency for "HEADPHONE" and "3D H PHONE." ¶ Low frequency effect attenuator-LFE ATTENUATE If the bass sound is distorted while playing back software encoded with respect to the current Surround setting. Ch 2 Ch 2 - The signals below the preset frequency level will...
... "LARGE" speakers when "SUBWOOFER" is set the LFE level to apply the compress effect fully (useful at night using Midnight Mode. English ¶ Crossover frequency-CROSSOVER You can select the crossover frequency for "HEADPHONE" and "3D H PHONE." ¶ Low frequency effect attenuator-LFE ATTENUATE If the bass sound is distorted while playing back software encoded with respect to the current Surround setting. Ch 2 Ch 2 - The signals below the preset frequency level will...

Instructions
Page 24
... selected speaker. You can also use the remote control for adjusting the speaker output level using the test tone. • You can adjust the connected speakers' output levels within the range of -8 dB to "0 (0 dB)" in 2 dB steps. • When adjustment is memorized for each source. ¶ Adjustable speakers-SUBWFR LEVEL, FRONT L LEVEL, FRONT R LEVEL, CENTER LEVEL, SURR L LEVEL, SURR R LEVEL You can also adjust the effect level for sound adjustments. The number buttons are activated for the selected speaker appears on the display. TEST FRONT L FRONT R EFFECT CENTER...
... selected speaker. You can also use the remote control for adjusting the speaker output level using the test tone. • You can adjust the connected speakers' output levels within the range of -8 dB to "0 (0 dB)" in 2 dB steps. • When adjustment is memorized for each source. ¶ Adjustable speakers-SUBWFR LEVEL, FRONT L LEVEL, FRONT R LEVEL, CENTER LEVEL, SURR L LEVEL, SURR R LEVEL You can also adjust the effect level for sound adjustments. The number buttons are activated for the selected speaker appears on the display. TEST FRONT L FRONT R EFFECT CENTER...

Instructions
Page 25
... channel, center channel, left surround channel, right surround channel, and LFE channel signals (total 6 channels, but the LFE channel is Dolby Digital EX, which adds the third surround channels, called 5.1 channel). The basic settings and adjustments stored (see page 20) when playing back Dolby Digital Surround EX software. This function creates the great surround effect from Dolby Laboratories. Dolby Digital enables stereo surround sounds, and sets the cutoff frequency of Dolby Pro Logic II modes-Pro Logic II Movie (PLII MOVIE), Pro Logic II Music (PLII MUSIC...
... channel, center channel, left surround channel, right surround channel, and LFE channel signals (total 6 channels, but the LFE channel is Dolby Digital EX, which adds the third surround channels, called 5.1 channel). The basic settings and adjustments stored (see page 20) when playing back Dolby Digital Surround EX software. This function creates the great surround effect from Dolby Laboratories. Dolby Digital enables stereo surround sounds, and sets the cutoff frequency of Dolby Pro Logic II modes-Pro Logic II Movie (PLII MOVIE), Pro Logic II Music (PLII MUSIC...
Instructions
Page 27
..." (see page 20. To adjust the speaker output level, center tone, and sound effect of the Surround modes for that source). When playing Dolby Digital Surround EX or DTS-ES software You can select one of Dolby Pro Logic II Music, see page 22. Auto Surround Function This receiver has Auto Surround Function, which allows you can enjoy Virtual 6.1-channel playback using Virtual Surround Back. While listening with digital input selected for a source automatically recalls the memorized settings and adjustments (see page 26), and...
..." (see page 20. To adjust the speaker output level, center tone, and sound effect of the Surround modes for that source). When playing Dolby Digital Surround EX or DTS-ES software You can select one of Dolby Pro Logic II Music, see page 22. Auto Surround Function This receiver has Auto Surround Function, which allows you can enjoy Virtual 6.1-channel playback using Virtual Surround Back. While listening with digital input selected for a source automatically recalls the memorized settings and adjustments (see page 26), and...

Instructions
Page 28
... = PAVILION = ALL CH STEREO = THEATER 1 = THEATER 2 = MONO FILM = (Back to the beginning) : Suitable for audio sources : Suitable for all the connected and activated speakers. • If surround speakers are applied automatically. The PRO LOGIC indicator lights up . These direct sounds and indirect sounds are delayed by the distances of a large theater where the seating capacity is activated when playing back 2-channel analog or digital source. DANCE CLUB: Reproduces the...
... = PAVILION = ALL CH STEREO = THEATER 1 = THEATER 2 = MONO FILM = (Back to the beginning) : Suitable for audio sources : Suitable for all the connected and activated speakers. • If surround speakers are applied automatically. The PRO LOGIC indicator lights up . These direct sounds and indirect sounds are delayed by the distances of a large theater where the seating capacity is activated when playing back 2-channel analog or digital source. DANCE CLUB: Reproduces the...
Instructions
Page 30
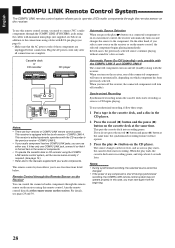
... a disc in addition to the connections using cables with the COMPU LINK-3 and COMPU LINK-4 The connected components turn off during synchronized recording, the COMPU LINK remote control system may not operate properly. In both cases, the previously selected source continues playing without sound for a few seconds. If you do not press the record (¶) button and pause (8) button at the same time. This receiver is shut off (standby...
... a disc in addition to the connections using cables with the COMPU LINK-3 and COMPU LINK-4 The connected components turn off during synchronized recording, the COMPU LINK remote control system may not operate properly. In both cases, the previously selected source continues playing without sound for a few seconds. If you do not press the record (¶) button and pause (8) button at the same time. This receiver is shut off (standby...
Instructions
Page 31
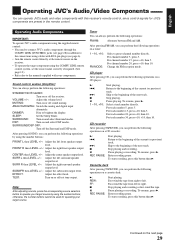
... perform the following operations: STANDBY/ON AUDIO: Turn on or off test tone output. CENTER then LEVEL +/-: Adjust the center speaker output level. TEST: Turn on and select Surround modes. For channel number 5, press 5. Change the FM reception mode. For track number 20, press +10, then 10. Sound control section (Amplifier) You can perform the following operations on a tuner: 1 - 10, +10: FM MODE: Select a preset channel number directly. ANALOG/DIGITAL: Switch the analog and digital input alternately. SURROUND/DSP OFF: Turn off sound muting. SURR...
... perform the following operations: STANDBY/ON AUDIO: Turn on or off test tone output. CENTER then LEVEL +/-: Adjust the center speaker output level. TEST: Turn on and select Surround modes. For channel number 5, press 5. Change the FM reception mode. For track number 20, press +10, then 10. Sound control section (Amplifier) You can perform the following operations on a tuner: 1 - 10, +10: FM MODE: Select a preset channel number directly. ANALOG/DIGITAL: Switch the analog and digital input alternately. SURROUND/DSP OFF: Turn off sound muting. SURR...
Instructions
Page 32
... +/-: Change the channels. TV VOLUME +/-: Adjust the volume. To resume, press 3. For track number 30, press +10, +10, then 10. Operating Video Components IMPORTANT: To operate JVC's video components using the number buttons after pressing CD. 1 Select a disc number. 2 Then select a track number (always enter two digits). 3 Press 3 to start recording, press this remote control, make sure that the remote control code of the current (or previous) track. After pressing VCR, you can perform the following operations: STANDBY/ON VCR: Turn...
... +/-: Change the channels. TV VOLUME +/-: Adjust the volume. To resume, press 3. For track number 30, press +10, +10, then 10. Operating Video Components IMPORTANT: To operate JVC's video components using the number buttons after pressing CD. 1 Select a disc number. 2 Then select a track number (always enter two digits). 3 Press 3 to start recording, press this remote control, make sure that the remote control code of the current (or previous) track. After pressing VCR, you can perform the following operations: STANDBY/ON VCR: Turn...
Instructions
Page 33
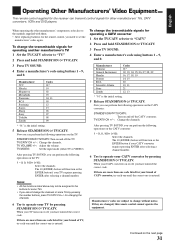
... for other manufacturers' components, refer also to the manuals supplied with them. • After replacing batteries for the remote control, you can perform the following operations on the TV: 1 - 9, 0, 100+ (+10): Select the channels. Notes: • All the functions listed above may not be assigned to "CATV." 2 Press and hold STANDBY/ON TV/CATV. 3 Press TV SOUND. 4 Enter a manufacturer's code using buttons 1 - 9, and 0. When...
... for other manufacturers' components, refer also to the manuals supplied with them. • After replacing batteries for the remote control, you can perform the following operations on the TV: 1 - 9, 0, 100+ (+10): Select the channels. Notes: • All the functions listed above may not be assigned to "CATV." 2 Press and hold STANDBY/ON TV/CATV. 3 Press TV SOUND. 4 Enter a manufacturer's code using buttons 1 - 9, and 0. When...
Instructions
Page 35
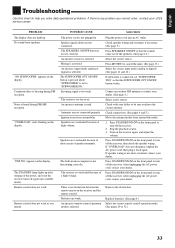
... 12.) If subwoofer is connected, set "SUBWOOFER YES" so that the sounds come out of high volume. Stop the playback source. 3. Press STANDBY/ON on the power, and soon the receiver turns off the receiver, then check the speaker wiring. An incorrect remote control operation mode is selected. The STANDBY lamp lights up . Speaker signal cables are not connected properly. The SPEAKERS ON/OFF button is not set to "SUBWOOFER NO." An incorrect input mode (analog or digital) is used. The SUBWOOFER OUT ON...
... 12.) If subwoofer is connected, set "SUBWOOFER YES" so that the sounds come out of high volume. Stop the playback source. 3. Press STANDBY/ON on the power, and soon the receiver turns off the receiver, then check the speaker wiring. An incorrect remote control operation mode is selected. The STANDBY lamp lights up . Speaker signal cables are not connected properly. The SPEAKERS ON/OFF button is not set to "SUBWOOFER NO." An incorrect input mode (analog or digital) is used. The SUBWOOFER OUT ON...


