
Instructions
Page 5
...will likely mean there are not limited to the following: • Stock-market report bars • Shopping channel logos and pricing displays • Video game patterns or scoreboards • Bright station logos • Internet web sites or other computer-style images. • DVD discs... wish to scan or "surf". Avoiding Ghost Images Displaying fixed images for extended periods of your cable company for their JVC TV remote control to select channels. TV on your cable company. Warnings We have an important note for customers who subscribe to basic cable services (do not have a...
...will likely mean there are not limited to the following: • Stock-market report bars • Shopping channel logos and pricing displays • Video game patterns or scoreboards • Bright station logos • Internet web sites or other computer-style images. • DVD discs... wish to scan or "surf". Avoiding Ghost Images Displaying fixed images for extended periods of your cable company for their JVC TV remote control to select channels. TV on your cable company. Warnings We have an important note for customers who subscribe to basic cable services (do not have a...

Instructions
Page 10
... OUT Y VIDEO VIDEO PB L L L PR R R R Side Panel Diagram POWER INPUT 3 S-VIDEO Y VIDEO PB L PR R INPUT 4 INPUT 5 / INPUT 1 AUDIO AUDIO OUT Y VIDEO VIDEO PB L L L PR R R R 75 Ω (VHF/UHF) DIGITAL AUDIO INPUT 1 OPTICAL OUT INPUT 2 PHOTO VIEWER / SERVICE 75 Ω (VHF/UHF) DIGITAL AUDIO INPUT 1 OPTICAL OUT INPUT 2 PHOTO VIEWER / SERVICE INPUT MENU + CHANNEL - Quick Setup TV Models...
... OUT Y VIDEO VIDEO PB L L L PR R R R Side Panel Diagram POWER INPUT 3 S-VIDEO Y VIDEO PB L PR R INPUT 4 INPUT 5 / INPUT 1 AUDIO AUDIO OUT Y VIDEO VIDEO PB L L L PR R R R 75 Ω (VHF/UHF) DIGITAL AUDIO INPUT 1 OPTICAL OUT INPUT 2 PHOTO VIEWER / SERVICE 75 Ω (VHF/UHF) DIGITAL AUDIO INPUT 1 OPTICAL OUT INPUT 2 PHOTO VIEWER / SERVICE INPUT MENU + CHANNEL - Quick Setup TV Models...

Instructions
Page 13
..., game consoles, etc. Used to connect audio/video devices like the ones illustrated below. Connecting your devices To make video connections with S-Video VCRs, Camcorders and DVD players. S-Video Cable Used to make these connections, you follow these diagrams and the television does not work properly, contact your TV. Quick Setup Step 2 - No VCR Connection...
..., game consoles, etc. Used to connect audio/video devices like the ones illustrated below. Connecting your devices To make video connections with S-Video VCRs, Camcorders and DVD players. S-Video Cable Used to make these connections, you follow these diagrams and the television does not work properly, contact your TV. Quick Setup Step 2 - No VCR Connection...

Instructions
Page 14
... OUT VCR IN OUT Cable or Antenna Output OR Coaxial Cable AUDIO AUDIO AUDIO COMPONENT AUDIO COMPONENT INPUT 3 S-VIDEO Y VIDEO PB L PR R INPUT 4 Y VIDEO INPUT 5 / INPUT 1 AUDIO AUDIO OUT VIDEO PB L L L PR R R R 75 Ω (VHF/UHF) TV Rear Panel DIGITAL AUDIO INPUT 1 OPTICAL OUT INPUT 2 PHOTO VIEWER / SERVICE Green Blue Red Y PB PR OUT AUDIO...
... OUT VCR IN OUT Cable or Antenna Output OR Coaxial Cable AUDIO AUDIO AUDIO COMPONENT AUDIO COMPONENT INPUT 3 S-VIDEO Y VIDEO PB L PR R INPUT 4 Y VIDEO INPUT 5 / INPUT 1 AUDIO AUDIO OUT VIDEO PB L L L PR R R R 75 Ω (VHF/UHF) TV Rear Panel DIGITAL AUDIO INPUT 1 OPTICAL OUT INPUT 2 PHOTO VIEWER / SERVICE Green Blue Red Y PB PR OUT AUDIO...

Instructions
Page 15
Diagram #2 R LV IN OUT VCR IN OUT OR Quick Setup Cable or Antenna Output IN Two-Way Splitter OUT OUT (Not supplied) Coaxial Cable AUDIO AUDIO AUDIO COMPONENT AUDIO COMPONENT INPUT 3 S-VIDEO Y VIDEO PB L PR R INPUT 4 INPUT 5 / INPUT 1 AUDIO AUDIO OUT Y VIDEO VIDEO PB L L L PR R R R 75 Ω (VHF/UHF) TV Rear Panel DIGITAL AUDIO INPUT 1 OPTICAL OUT INPUT 2 PHOTO VIEWER / SERVICE Green Blue Red Y PB PR OUT AUDIO OUT R L DVD Player 15
Diagram #2 R LV IN OUT VCR IN OUT OR Quick Setup Cable or Antenna Output IN Two-Way Splitter OUT OUT (Not supplied) Coaxial Cable AUDIO AUDIO AUDIO COMPONENT AUDIO COMPONENT INPUT 3 S-VIDEO Y VIDEO PB L PR R INPUT 4 INPUT 5 / INPUT 1 AUDIO AUDIO OUT Y VIDEO VIDEO PB L L L PR R R R 75 Ω (VHF/UHF) TV Rear Panel DIGITAL AUDIO INPUT 1 OPTICAL OUT INPUT 2 PHOTO VIEWER / SERVICE Green Blue Red Y PB PR OUT AUDIO OUT R L DVD Player 15

Instructions
Page 16
...mono sound model it to you televison by using the input jacks located on the back of the television. TV Rear Panel CAMCORDER INPUT 3 S-VIDEO Y VIDEO PB L PR R INPUT 4 INPUT 5 / INPUT 1 AUDIO AUDIO OUT Y VIDEO VIDEO PB L L L PR R R R AUDIO AUDIO AUDIO COMPONENT AUDIO COMPONENT 1) Connect a yellow composite cable... from the camcorder VIDEO OUT, into the VIDEO IN on the back of the TV. 2) Connect a white cable from the camcorder LEFT AUDIO OUT, into the LEFT AUDIO IN on the back of the TV. 3) Connect a red cable from the camcorder ...
...mono sound model it to you televison by using the input jacks located on the back of the television. TV Rear Panel CAMCORDER INPUT 3 S-VIDEO Y VIDEO PB L PR R INPUT 4 INPUT 5 / INPUT 1 AUDIO AUDIO OUT Y VIDEO VIDEO PB L L L PR R R R AUDIO AUDIO AUDIO COMPONENT AUDIO COMPONENT 1) Connect a yellow composite cable... from the camcorder VIDEO OUT, into the VIDEO IN on the back of the TV. 2) Connect a white cable from the camcorder LEFT AUDIO OUT, into the LEFT AUDIO IN on the back of the TV. 3) Connect a red cable from the camcorder ...

Instructions
Page 17
Quick Setup Connecting to an External Amplifier TV Rear Panel Speaker Amplifier Speaker INPUT 3 S-VIDEO Y VIDEO PB L PR R INPUT 4 Y VIDEO INPUT 5 / INPUT 1 AUDIO AUDIO OUT VIDEO PB L L L PR R R R AUDIO AUDIO AUDIO COMPONENT AUDIO COMPONENT 1) Connect a white cable from the LEFT AUDIO OUTPUT on the back of the TV to the RIGHT AUDIO INPUT on the back of...
Quick Setup Connecting to an External Amplifier TV Rear Panel Speaker Amplifier Speaker INPUT 3 S-VIDEO Y VIDEO PB L PR R INPUT 4 Y VIDEO INPUT 5 / INPUT 1 AUDIO AUDIO OUT VIDEO PB L L L PR R R R AUDIO AUDIO AUDIO COMPONENT AUDIO COMPONENT 1) Connect a white cable from the LEFT AUDIO OUTPUT on the back of the TV to the RIGHT AUDIO INPUT on the back of...

Instructions
Page 18
...and that if you do the above connection, set "Video-1 Audio" in order to "Analog". AUDIO AUDIO AUDIO COMPONENT AUDIO COMPONENT INPUT 3 S-VIDEO Y VIDEO PB L PR R INPUT 4 INPUT 5 / INPUT 1 AUDIO AUDIO OUT Y VIDEO VIDEO PB L L L PR R R R TV Rear Panel After the connections have been made to ...screw to secure the cables. Quick Setup Connecting to a Digital TV Receiver By connecting a Digital TV Receiver, high definition pictures can only be used with the HDMI INPUT-1. • When setting the "Video-1 Audio - See "Video-1 Audio", page 44. • The Analog Audio input ...
...and that if you do the above connection, set "Video-1 Audio" in order to "Analog". AUDIO AUDIO AUDIO COMPONENT AUDIO COMPONENT INPUT 3 S-VIDEO Y VIDEO PB L PR R INPUT 4 INPUT 5 / INPUT 1 AUDIO AUDIO OUT Y VIDEO VIDEO PB L L L PR R R R TV Rear Panel After the connections have been made to ...screw to secure the cables. Quick Setup Connecting to a Digital TV Receiver By connecting a Digital TV Receiver, high definition pictures can only be used with the HDMI INPUT-1. • When setting the "Video-1 Audio - See "Video-1 Audio", page 44. • The Analog Audio input ...

Instructions
Page 19
... Panel 1) Connect the HDMI Cable from the DIGITAL OUT on the back of your TV in the External Input menu to Digital. HDMI provides and interface between any HDMI compatible device. See "Video-1 Audio", page 44. • Some decoders may not respond depending on the equipment...on your television. HDMI (High Definition Multimedia Interface) is changed (for a short time until the signal becomes stable. • This TV can include DVD players, D-VHS or any audio/video source, such as a digital television (DTV). Notes: • When you do the above connection, set -top box, DVD ...
... Panel 1) Connect the HDMI Cable from the DIGITAL OUT on the back of your TV in the External Input menu to Digital. HDMI provides and interface between any HDMI compatible device. See "Video-1 Audio", page 44. • Some decoders may not respond depending on the equipment...on your television. HDMI (High Definition Multimedia Interface) is changed (for a short time until the signal becomes stable. • This TV can include DVD players, D-VHS or any audio/video source, such as a digital television (DTV). Notes: • When you do the above connection, set -top box, DVD ...

Instructions
Page 24
.... Menu Initial Setup - + Tuner Setup External Input Picture Adjust Sound Adjust Clock/Timers Interactive Plug-in Menu Photo Viewer Auto Demo Front Menu Video Status Aspect Auto Tuner Setup Menu Exit MENU Select Standard Panorama Operate Note: • Menus shown in . If you learn about the features ... The item that appears in orange is plugged in this guide to help you use the MENU button on the TV's side panel instead of the remote, Front Menu screen showing "Video Status", "Aspect", "Auto Tuner Setup" and "Menu" will appear (following (left) main menu will see most frequently ...
.... Menu Initial Setup - + Tuner Setup External Input Picture Adjust Sound Adjust Clock/Timers Interactive Plug-in Menu Photo Viewer Auto Demo Front Menu Video Status Aspect Auto Tuner Setup Menu Exit MENU Select Standard Panorama Operate Note: • Menus shown in . If you learn about the features ... The item that appears in orange is plugged in this guide to help you use the MENU button on the TV's side panel instead of the remote, Front Menu screen showing "Video Status", "Aspect", "Auto Tuner Setup" and "Menu" will appear (following (left) main menu will see most frequently ...

Instructions
Page 26
...Antenna Level Select BACK Operate Back MENU Exit Tuner Setup External Input HDMI Size Video-1 Audio Video Input Label Auto Digital Select BACK Operate Back MENU Exit External Input Picture Adjust 1/2 Video Status Standard Tint 0 Color 0 Picture 0 Bright 0 Detail 0 Energy ...Saver Mode 0 Color Temperature High Select OK BACK Operate Back MENU Exit Picture Adjust 1/2 Picture Adjust 2/2 Video Status Color Management Standard On Dynamic Gamma Off Noise Reduction Off Natural Cinema Off Position Adjustment Reset Select OK BACK Operate ...
...Antenna Level Select BACK Operate Back MENU Exit Tuner Setup External Input HDMI Size Video-1 Audio Video Input Label Auto Digital Select BACK Operate Back MENU Exit External Input Picture Adjust 1/2 Video Status Standard Tint 0 Color 0 Picture 0 Bright 0 Detail 0 Energy ...Saver Mode 0 Color Temperature High Select OK BACK Operate Back MENU Exit Picture Adjust 1/2 Picture Adjust 2/2 Video Status Color Management Standard On Dynamic Gamma Off Noise Reduction Off Natural Cinema Off Position Adjustment Reset Select OK BACK Operate ...
Instructions
Page 29
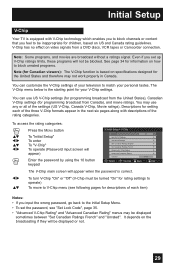
... therefore may use US V-Chip settings (for programming broadcast from the United States), Canadian V-Chip settings (for your personal tastes. Initial Setup V-Chip Your TV is equipped with descriptions of the rating categories. To access the rating categories: Press the MENU button π† √® π† &#... along with V-Chip technology which enables you to block channels or content that you feel to be inappropriate for children, based on video signals from a DVD discs, VCR tapes or Camcorder connection. V-Chip has no effect on US and Canada rating guidelines.
... therefore may use US V-Chip settings (for programming broadcast from the United States), Canadian V-Chip settings (for your personal tastes. Initial Setup V-Chip Your TV is equipped with descriptions of the rating categories. To access the rating categories: Press the MENU button π† √® π† &#... along with V-Chip technology which enables you to block channels or content that you feel to be inappropriate for children, based on video signals from a DVD discs, VCR tapes or Camcorder connection. V-Chip has no effect on US and Canada rating guidelines.

Instructions
Page 33
... realistic depictions of violence will be infrequent, discreet, of the acts. Exempt Exempt programming includes: news, sports, documentaries and other information programming, talk shows, music videos, and variety programming. ❒ C - Depictions of aggressive behavior will show the consequences of low intensity and will be sensitive to exercise discretion in the French...
... realistic depictions of violence will be infrequent, discreet, of the acts. Exempt Exempt programming includes: news, sports, documentaries and other information programming, talk shows, music videos, and variety programming. ❒ C - Depictions of aggressive behavior will show the consequences of low intensity and will be sensitive to exercise discretion in the French...

Instructions
Page 37
...;® To "Font Size", "Font Style", "Text/Edge Opacity", "Background Opacity", "Text Color", "Edge Color" or "Backgrond Color" To select the setting you are playing a video tape. • Most broadcasts containing closed caption channel CC1. Notes: • Closed caption subtitles are licensed from Monotype Imaging Inc.
...;® To "Font Size", "Font Style", "Text/Edge Opacity", "Background Opacity", "Text Color", "Edge Color" or "Backgrond Color" To select the setting you are playing a video tape. • Most broadcasts containing closed caption channel CC1. Notes: • Closed caption subtitles are licensed from Monotype Imaging Inc.
Instructions
Page 40
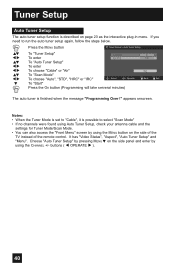
appears onscreen. It has "Video Status", "Aspect", "Auto Tuner Setup" and "Menu". Tuner Setup Auto Tuner Setup The auto tuner setup function is finished when the message "Programming Over !" Choose "... the OK button (Programming will take serveral minutes) Air Auto Start BACK Back MENU Exit The auto tuner is described on the side of the TV instead of the remote control. Notes: • When the Tuner Mode is set to "Cable", it is possible to run the auto tuner setup again...
appears onscreen. It has "Video Status", "Aspect", "Auto Tuner Setup" and "Menu". Tuner Setup Auto Tuner Setup The auto tuner setup function is finished when the message "Programming Over !" Choose "... the OK button (Programming will take serveral minutes) Air Auto Start BACK Back MENU Exit The auto tuner is described on the side of the TV instead of the remote control. Notes: • When the Tuner Mode is set to "Cable", it is possible to run the auto tuner setup again...

Instructions
Page 44
...enter To "HDMI Size" To enter To select "Auto", "Size1" or "Size2" Press the MENU button to finish External Input HDMI Size Video-1 Audio Video Input Label Auto Digital Select BACK Operate Back MENU Exit Notes: • The HDMI Size menu can select "Auto" only when the signal is... 480p picture signal is being input to your TV. π† √® π† √® Press the MENU button To "External Input" To enter To "Video-1 Audio" To select "Analog", "Digital" or "Auto" External Input HDMI Size Video-1 Audio Video Input Label Auto Digital Press the Menu button ...
...enter To "HDMI Size" To enter To select "Auto", "Size1" or "Size2" Press the MENU button to finish External Input HDMI Size Video-1 Audio Video Input Label Auto Digital Select BACK Operate Back MENU Exit Notes: • The HDMI Size menu can select "Auto" only when the signal is... 480p picture signal is being input to your TV. π† √® π† √® Press the MENU button To "External Input" To enter To "Video-1 Audio" To select "Analog", "Digital" or "Auto" External Input HDMI Size Video-1 Audio Video Input Label Auto Digital Press the Menu button ...

Instructions
Page 45
... √® π† √® Press the MENU button To "External Input" To enter To "Video Input Label" To enter To select the desired video input To select the desired preset input label (see chart below) Press the MENU button when finished External Input HDMI... Size Video-1 Audio Video Input Label Auto Digital Select BACK Operate Back MENU Exit External Input > Video Input Label Video-1 Video-2 Video-3 Video-4 Video-5 PVR DVD SAT GAME VCR Reset Select OK BACK Operate Back MENU Exit Preset...
... √® π† √® Press the MENU button To "External Input" To enter To "Video Input Label" To enter To select the desired video input To select the desired preset input label (see chart below) Press the MENU button when finished External Input HDMI... Size Video-1 Audio Video Input Label Auto Digital Select BACK Operate Back MENU Exit External Input > Video Input Label Video-1 Video-2 Video-3 Video-4 Video-5 PVR DVD SAT GAME VCR Reset Select OK BACK Operate Back MENU Exit Preset...
Instructions
Page 46
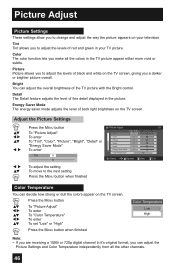
...Tint 0 √ ® π† To adjust the setting To move to the next setting Press the MENU button when finished Picture Adjust 1/2 Video Status Standard Tint 0 Color 0 Picture 0 Bright 0 Detail 0 Energy Saver Mode 0 Color Temperature High Select OK BACK Operate Back MENU Exit Color Temperature ... function lets you make all the other channels. 46 Energy Saver Mode The energy saver mode adjusts the level of the TV picture with the Bright control. Picture Adjust Picture Settings These settings allow you to change and adjust the way the picture appears ...
...Tint 0 √ ® π† To adjust the setting To move to the next setting Press the MENU button when finished Picture Adjust 1/2 Video Status Standard Tint 0 Color 0 Picture 0 Bright 0 Detail 0 Energy Saver Mode 0 Color Temperature High Select OK BACK Operate Back MENU Exit Color Temperature ... function lets you make all the other channels. 46 Energy Saver Mode The energy saver mode adjusts the level of the TV picture with the Bright control. Picture Adjust Picture Settings These settings allow you to change and adjust the way the picture appears ...

Instructions
Page 49
... a moment, and then the settings are reset to the default setting for all the picture adjustments except for Natural Cinema and Position Adjustment. Picture Adjust 2/2 Video Status Color Management Standard On Dynamic Gamma Off Noise Reduction Off Natural Cinema Off Position Adjustment Reset Select OK BACK Operate Back MENU Exit Press...
... a moment, and then the settings are reset to the default setting for all the picture adjustments except for Natural Cinema and Position Adjustment. Picture Adjust 2/2 Video Status Color Management Standard On Dynamic Gamma Off Noise Reduction Off Natural Cinema Off Position Adjustment Reset Select OK BACK Operate Back MENU Exit Press...

Instructions
Page 54
How to start the Photo Viewer". JVC Everio Camera (Example) TV Rear Panel 75 Ω (VHF/UHF) DIGITAL AUDIO INPUT 1 OPTICAL OUT INPUT 2 PHOTO VIEWER / SERVICE USB Cable 5) The TV screen will appear when you start the "How to start the Photo Viewer 1) Turn the power off Disconnect the USB cable Notes: • ...button on remote control to turn the power off on the device containing your photos. 2) Switch to "PHOTO" mode if your device has a mode switch (VIDEO/PHOTO). 3) Turn on your device containing your photos and switch to play mode to view the photos. 4) Connect your device to the...
How to start the Photo Viewer". JVC Everio Camera (Example) TV Rear Panel 75 Ω (VHF/UHF) DIGITAL AUDIO INPUT 1 OPTICAL OUT INPUT 2 PHOTO VIEWER / SERVICE USB Cable 5) The TV screen will appear when you start the "How to start the Photo Viewer 1) Turn the power off Disconnect the USB cable Notes: • ...button on remote control to turn the power off on the device containing your photos. 2) Switch to "PHOTO" mode if your device has a mode switch (VIDEO/PHOTO). 3) Turn on your device containing your photos and switch to play mode to view the photos. 4) Connect your device to the...


