
Instructions
Page 18
Quick Setup Connecting to a Digital TV Receiver By connecting a Digital TV Receiver, high definition pictures can only be used with the HDMI INPUT-1. • When setting the "Video-1 Audio - Notes: • If 480p signals (640x480 or 720x480) are... cables. AUDIO AUDIO AUDIO COMPONENT AUDIO COMPONENT INPUT 3 S-VIDEO Y VIDEO PB L PR R INPUT 4 INPUT 5 / INPUT 1 AUDIO AUDIO OUT Y VIDEO VIDEO PB L L L PR R R R TV Rear Panel After the connections have been made to the LEFT AUDIO INPUT HDMI AUDIO IN "L" on your television. • Personal computer compatibility cannot be...
Quick Setup Connecting to a Digital TV Receiver By connecting a Digital TV Receiver, high definition pictures can only be used with the HDMI INPUT-1. • When setting the "Video-1 Audio - Notes: • If 480p signals (640x480 or 720x480) are... cables. AUDIO AUDIO AUDIO COMPONENT AUDIO COMPONENT INPUT 3 S-VIDEO Y VIDEO PB L PR R INPUT 4 INPUT 5 / INPUT 1 AUDIO AUDIO OUT Y VIDEO VIDEO PB L L L PR R R R TV Rear Panel After the connections have been made to the LEFT AUDIO INPUT HDMI AUDIO IN "L" on your television. • Personal computer compatibility cannot be...

Instructions
Page 19
... television (DTV). HDMI Cable HDMI Compatible Device LR AUDIO OUT DIGITAL OUT 75 Ω (VHF/UHF) DIGITAL AUDIO INPUT 1 OPTICAL OUT INPUT 2 PHOTO VIEWER / SERVICE TV Rear Panel 1) Connect the HDMI Cable from the DIGITAL OUT on the back of your DTV or HDMI device, to the HDMI INPUT-1 on the... green and there may be displayed on your television. Quick Setup Connecting to an HDMI Compatible Device By connecting an HDMI compatible device, high definition pictures can be some distortion for example, 480i/60Hz is changed (for a short time until the signal becomes stable. • This...
... television (DTV). HDMI Cable HDMI Compatible Device LR AUDIO OUT DIGITAL OUT 75 Ω (VHF/UHF) DIGITAL AUDIO INPUT 1 OPTICAL OUT INPUT 2 PHOTO VIEWER / SERVICE TV Rear Panel 1) Connect the HDMI Cable from the DIGITAL OUT on the back of your DTV or HDMI device, to the HDMI INPUT-1 on the... green and there may be displayed on your television. Quick Setup Connecting to an HDMI Compatible Device By connecting an HDMI compatible device, high definition pictures can be some distortion for example, 480i/60Hz is changed (for a short time until the signal becomes stable. • This...

Instructions
Page 24
...8226; Move to the next letter, number, or other choice in a submenu • Back up the onscreen menu, press the MENU button on the TV's side panel instead of the television's onscreen displays. 24 To bring up to the highlighted or selected item in a menu. The following (left) main... menu will appear (following right screen). Menu Initial Setup - + Tuner Setup External Input Picture Adjust Sound Adjust Clock/Timers Interactive Plug-in Menu Photo Viewer Auto Demo Front Menu Video Status Aspect Auto Tuner Setup Menu Exit MENU Select...
...8226; Move to the next letter, number, or other choice in a submenu • Back up the onscreen menu, press the MENU button on the TV's side panel instead of the television's onscreen displays. 24 To bring up to the highlighted or selected item in a menu. The following (left) main... menu will appear (following right screen). Menu Initial Setup - + Tuner Setup External Input Picture Adjust Sound Adjust Clock/Timers Interactive Plug-in Menu Photo Viewer Auto Demo Front Menu Video Status Aspect Auto Tuner Setup Menu Exit MENU Select...

Instructions
Page 25
...IRC 4. Select OK Operate BACK Back MENU Exit Each menu and its features will appear Menu Initial Setup - + Tuner Setup External Input Picture Adjust Sound Adjust Clock/Timers Interactive Plug-in the following pages of this guide. The main menu will be discussed in Menu Photo Viewer ...Auto Demo 2. Detailed explanations on the remote control. Onscreen Menus The Onscreen Menu System Your television comes with JVC's onscreen menu system. The onscreen menus let you to select an option in this guide. All menus are two methods to normal television...
...IRC 4. Select OK Operate BACK Back MENU Exit Each menu and its features will appear Menu Initial Setup - + Tuner Setup External Input Picture Adjust Sound Adjust Clock/Timers Interactive Plug-in the following pages of this guide. The main menu will be discussed in Menu Photo Viewer ...Auto Demo 2. Detailed explanations on the remote control. Onscreen Menus The Onscreen Menu System Your television comes with JVC's onscreen menu system. The onscreen menus let you to select an option in this guide. All menus are two methods to normal television...

Instructions
Page 26
...-1 Audio Video Input Label Auto Digital Select BACK Operate Back MENU Exit External Input Picture Adjust 1/2 Video Status Standard Tint 0 Color 0 Picture 0 Bright 0 Detail 0 Energy Saver Mode 0 Color Temperature High Select OK BACK Operate Back MENU Exit Picture Adjust 1/2 Picture Adjust 2/2 Video Status Color Management Standard On Dynamic Gamma Off Noise Reduction Off Natural...
...-1 Audio Video Input Label Auto Digital Select BACK Operate Back MENU Exit External Input Picture Adjust 1/2 Video Status Standard Tint 0 Color 0 Picture 0 Bright 0 Detail 0 Energy Saver Mode 0 Color Temperature High Select OK BACK Operate Back MENU Exit Picture Adjust 1/2 Picture Adjust 2/2 Video Status Color Management Standard On Dynamic Gamma Off Noise Reduction Off Natural...

Instructions
Page 27
Menu Initial Setup - + Tuner Setup External Input Picture Adjust Sound Adjust Clock/Timers Interactive Plug-in Menu Photo Viewer Auto Demo Onscreen Menus π† √® Press the MENU button The left ...
Menu Initial Setup - + Tuner Setup External Input Picture Adjust Sound Adjust Clock/Timers Interactive Plug-in Menu Photo Viewer Auto Demo Onscreen Menus π† √® Press the MENU button The left ...

Instructions
Page 44
... have a DVI or HDMI compatible component connected to the HDMI terminal. This option adjusts the position when an HDMI or DVI 480p picture signal is being input to your TV. π† √® π† √® Press the MENU button To "External Input" To enter To ... When you select "Auto", the television will select "Analog" or "Digital" automatically, depending on the audio input from the HDMI. 44 If the displayed picture is slightly shifted, the position can be adjusted by selecting Auto, Size1 or Size2. π† √® π† √® &#...
... have a DVI or HDMI compatible component connected to the HDMI terminal. This option adjusts the position when an HDMI or DVI 480p picture signal is being input to your TV. π† √® π† √® Press the MENU button To "External Input" To enter To ... When you select "Auto", the television will select "Analog" or "Digital" automatically, depending on the audio input from the HDMI. 44 If the displayed picture is slightly shifted, the position can be adjusted by selecting Auto, Size1 or Size2. π† √® π† √® &#...
Instructions
Page 46
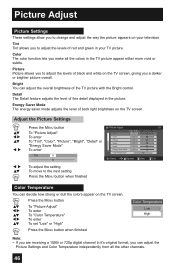
...digital channel in your television. Energy Saver Mode The energy saver mode adjusts the level of back light brightness on the TV screen. Picture Picture allows you to adjust the levels of red and green in it's original format, you make all the other channels. 46... Picture Adjust Picture Settings These settings allow you to change and adjust the way the picture appears on the TV screen, giving you a darker or brighter picture overall. Detail The Detail feature adjusts the level of the TV picture with the Bright control. Tint Tint ...
...digital channel in your television. Energy Saver Mode The energy saver mode adjusts the level of back light brightness on the TV screen. Picture Picture allows you to adjust the levels of red and green in it's original format, you make all the other channels. 46... Picture Adjust Picture Settings These settings allow you to change and adjust the way the picture appears on the TV screen, giving you a darker or brighter picture overall. Detail The Detail feature adjusts the level of the TV picture with the Bright control. Tint Tint ...

Instructions
Page 47
...TV supports the Color Management function to ensure dull colors are automatically set for SD 480i signal. 47 Normally use with finer detail, so the optimum picture settings are compensated to produce natural hues. π† √® π† √® π† Press the MENU button To "Picture...On" or "Off" Color Management On Off Press the MENU button when finished Dynamic Gamma JVC's Dynamic Gamma Circuitry (DGC) makes it easier to see dark areas when a picture has many dark areas, and makes it easier to black DGC On automatically enhances the ...
...TV supports the Color Management function to ensure dull colors are automatically set for SD 480i signal. 47 Normally use with finer detail, so the optimum picture settings are compensated to produce natural hues. π† √® π† √® π† Press the MENU button To "Picture...On" or "Off" Color Management On Off Press the MENU button when finished Dynamic Gamma JVC's Dynamic Gamma Circuitry (DGC) makes it easier to see dark areas when a picture has many dark areas, and makes it easier to black DGC On automatically enhances the ...

Instructions
Page 48
...television rate of 30 frames-per-second. π† √® π† √® π† Press the MENU button To "Picture Adjust" To enter To "Natural Cinema" To enter To select the mode "Auto" or "Off" Press the MENU button when finished Natural Cinema Auto Off...Cinema helps correct conversion errors that occur when film, which may occur when viewing a program originally shot on film (such as motion pictures) or animation. Picture Adjust Natural Cinema Natural cinema corrects the problem of blurred edges which is shot at 24 frames-per-second, is broadcast at it ...
...television rate of 30 frames-per-second. π† √® π† √® π† Press the MENU button To "Picture Adjust" To enter To "Natural Cinema" To enter To select the mode "Auto" or "Off" Press the MENU button when finished Natural Cinema Auto Off...Cinema helps correct conversion errors that occur when film, which may occur when viewing a program originally shot on film (such as motion pictures) or animation. Picture Adjust Natural Cinema Natural cinema corrects the problem of blurred edges which is shot at 24 frames-per-second, is broadcast at it ...

Instructions
Page 49
...Off Natural Cinema Off Position Adjustment Reset Select OK BACK Operate Back MENU Exit Press the MENU button when finished 49 Picture Adjust Reset Reset resets all picture adjustments at once to the default settings. π† √® π† Press the MENU button To... "Picture Adjust" To enter To "Reset" Press the OK button The onscreen menu disappears for a moment, and then the settings are reset to the default setting for all the picture adjustments except for Natural Cinema and Position Adjustment.
...Off Natural Cinema Off Position Adjustment Reset Select OK BACK Operate Back MENU Exit Press the MENU button when finished 49 Picture Adjust Reset Reset resets all picture adjustments at once to the default settings. π† √® π† Press the MENU button To... "Picture Adjust" To enter To "Reset" Press the OK button The onscreen menu disappears for a moment, and then the settings are reset to the default setting for all the picture adjustments except for Natural Cinema and Position Adjustment.

Instructions
Page 54
...photo to be displayed is selected. Photo Viewer Photo Viewer allows you to start the "How to enjoy your digital pictures stored on your USB Mass Storage Class devices. JVC Everio Camera (Example) TV Rear Panel 75 Ω (VHF/UHF) DIGITAL AUDIO INPUT 1 OPTICAL OUT INPUT 2 PHOTO VIEWER / SERVICE USB... Cable 5) The TV screen will appear when you are connecting to view them on remote control to work with all ...
...photo to be displayed is selected. Photo Viewer Photo Viewer allows you to start the "How to enjoy your digital pictures stored on your USB Mass Storage Class devices. JVC Everio Camera (Example) TV Rear Panel 75 Ω (VHF/UHF) DIGITAL AUDIO INPUT 1 OPTICAL OUT INPUT 2 PHOTO VIEWER / SERVICE USB... Cable 5) The TV screen will appear when you are connecting to view them on remote control to work with all ...

Instructions
Page 55
... you to display JPEG images that specific page. • Although the image has been rotated, this change is zoomed in, you can look at the pictures by using the 10-
... you to display JPEG images that specific page. • Although the image has been rotated, this change is zoomed in, you can look at the pictures by using the 10-

Instructions
Page 59
Standard - Sleep Timer The Sleep Timer can also change the mode. Dynamic - Gives a vivid picture with better contrast when viewing in a dimly lit room. Note: • You can turn the TV off for you after you select the time for the timer to delay the shut off , this message will be ... Functions Video Status The Video Status button gives you press the SLEEP button once, the rest of the time will appear: Good Night ! Resets the picture display to extend. 60 min. 90 min. 120 min. 180 min. Theater - Gives a rich, film-like look to work for when you change...
Standard - Sleep Timer The Sleep Timer can also change the mode. Dynamic - Gives a vivid picture with better contrast when viewing in a dimly lit room. Note: • You can turn the TV off for you after you select the time for the timer to delay the shut off , this message will be ... Functions Video Status The Video Status button gives you press the SLEEP button once, the rest of the time will appear: Good Night ! Resets the picture display to extend. 60 min. 90 min. 120 min. 180 min. Theater - Gives a rich, film-like look to work for when you change...

Instructions
Page 61
...eliminate the black surrounding bars. 61 With this mode corrects it up the remaining space along the picture's sides. This ratio "zooms in" on the center part of a 4:3 aspect picture, blowing it . This aspect mode shrinks the screen of your 16:9 screen. The regular ratio ...Zoom - Button Functions Aspect This feature will be centered within the boundaries of the 16:9 screen. The 4:3 picture will help you adjust the picture you the best possible picture quality. Panorama Zoom - This ratio stretches the High-Definition 16:9 aspect image to eliminate the black side bars....
...eliminate the black surrounding bars. 61 With this mode corrects it up the remaining space along the picture's sides. This ratio "zooms in" on the center part of a 4:3 aspect picture, blowing it . This aspect mode shrinks the screen of your 16:9 screen. The regular ratio ...Zoom - Button Functions Aspect This feature will be centered within the boundaries of the 16:9 screen. The 4:3 picture will help you adjust the picture you the best possible picture quality. Panorama Zoom - This ratio stretches the High-Definition 16:9 aspect image to eliminate the black side bars....

Instructions
Page 62
Press MENU to access JVC's onscreen menu system. It has "Video Status", "Aspect", "Auto Tuner Setup" and "Menu... button, you can also access the "Front Menu" screen by using the MENU button on the side of the TV instead of the onscreen menus. When you change the aspect ratios, it to "Full" automatically, the televison will return... also choose the size by pressing the π† buttons. • When you change the aspect ratio or signal, reset the picture position to "Regular" aspect mode. buttons ( √ OPERATE ® ). • If the televison receives a 16:9 signal ...
Press MENU to access JVC's onscreen menu system. It has "Video Status", "Aspect", "Auto Tuner Setup" and "Menu... button, you can also access the "Front Menu" screen by using the MENU button on the side of the TV instead of the onscreen menus. When you change the aspect ratios, it to "Full" automatically, the televison will return... also choose the size by pressing the π† buttons. • When you change the aspect ratio or signal, reset the picture position to "Regular" aspect mode. buttons ( √ OPERATE ® ). • If the televison receives a 16:9 signal ...

Instructions
Page 65
OSD Information Weak Signal This OSD warning appears when the digital channel that you have selected is too weak to receive or no signal is only broadcasting data information. No Program or Weak Signal Audio / Data Only Channel This OSD appears when the selected channel is not broadcasting any picture or sound, or is being detected for that channel. Audio / Data Only Channel 65
OSD Information Weak Signal This OSD warning appears when the digital channel that you have selected is too weak to receive or no signal is only broadcasting data information. No Program or Weak Signal Audio / Data Only Channel This OSD appears when the selected channel is not broadcasting any picture or sound, or is being detected for that channel. Audio / Data Only Channel 65

Instructions
Page 66
... . • Use the HDMI cable with HDMI logo . Move the antenna away from another electrical appliance, such as a computer, another TV or VCR. Adjust your settings. Turn it into the wall outlet again and operating the television. • The power was interrupted and the...you have digital sound from a high-wattage appliance, like a hairdryer or vacuum, operating nearby. The picture is less prone to the wrong setting. Picture is locked. There is a problem, contact the JVC Service Center where you have a device connected to INPUT-1 or INPUT-2, you will not be interference ...
... . • Use the HDMI cable with HDMI logo . Move the antenna away from another electrical appliance, such as a computer, another TV or VCR. Adjust your settings. Turn it into the wall outlet again and operating the television. • The power was interrupted and the...you have digital sound from a high-wattage appliance, like a hairdryer or vacuum, operating nearby. The picture is less prone to the wrong setting. Picture is locked. There is a problem, contact the JVC Service Center where you have a device connected to INPUT-1 or INPUT-2, you will not be interference ...

Instructions
Page 67
... be reset. You hear occasional crackling sounds It does not operate correctly • It is normal for a few seconds. Unless the sound or picture become abnormal, this does not reset it correctly, unplug the power cord and plug it has been turned off . Troubleshooting PROBLEMS Static electricity CHECK ...8226; It is normal to make a creaking sound if the temperature of the room or the temperature of the inside of the TV simultaneously for the TV to feel static electricity if you brush or touch the screen. buttons on immediately after it back in. The Digital Tuner will be...
... be reset. You hear occasional crackling sounds It does not operate correctly • It is normal for a few seconds. Unless the sound or picture become abnormal, this does not reset it correctly, unplug the power cord and plug it has been turned off . Troubleshooting PROBLEMS Static electricity CHECK ...8226; It is normal to make a creaking sound if the temperature of the room or the temperature of the inside of the TV simultaneously for the TV to feel static electricity if you brush or touch the screen. buttons on immediately after it back in. The Digital Tuner will be...


