
Instructions
Page 1
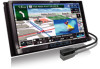
... conexiones, refiérase al manual separado. LVT2276-001A [J] FRANÇAIS ESPAÑOL ENGLISH GPS NAVIGATION SYSTEM SISTEMA DE NAVEGACIÓN GPS SYSTÈME DE NAVIGATION GPS KW-NT800HDT / KW-NT700 This HD Radio receiver enables: Only for KW-NT800HDT Sólo para KW-NT800HDT Uniquement pour le KW-NT800HDT Only for future reference...
... conexiones, refiérase al manual separado. LVT2276-001A [J] FRANÇAIS ESPAÑOL ENGLISH GPS NAVIGATION SYSTEM SISTEMA DE NAVEGACIÓN GPS SYSTÈME DE NAVIGATION GPS KW-NT800HDT / KW-NT700 This HD Radio receiver enables: Only for KW-NT800HDT Sólo para KW-NT800HDT Uniquement pour le KW-NT800HDT Only for future reference...

Instructions
Page 2
... open. FCC NOTE This equipment has been tested and found to comply with Federal Regulations, following are expressly approved in the instruction manual. JVC KENWOOD Corporation 2967-3, ISHIKAWA-MACHI, HACHIOJI-SHI, TOKYO, JAPAN THIS PRODUCT COMPLIES WITH DHHS RULES 21CFR SUBCHAPTER J IN EFFECT AT DATE...the equipment off and on, the user is connected. • Consult the dealer or an experienced radio/TV technician for purchasing a JVC product. Location : Top Panel 2 The user could lose the authority to this equipment does cause harmful interference to radio or television reception...
... open. FCC NOTE This equipment has been tested and found to comply with Federal Regulations, following are expressly approved in the instruction manual. JVC KENWOOD Corporation 2967-3, ISHIKAWA-MACHI, HACHIOJI-SHI, TOKYO, JAPAN THIS PRODUCT COMPLIES WITH DHHS RULES 21CFR SUBCHAPTER J IN EFFECT AT DATE...the equipment off and on, the user is connected. • Consult the dealer or an experienced radio/TV technician for purchasing a JVC product. Location : Top Panel 2 The user could lose the authority to this equipment does cause harmful interference to radio or television reception...

Instructions
Page 5
... the touch panel. • [ ] indicates the buttons on the touch panel. 5 ENGLISH For safety... • Do not raise the volume level too much, as this manual: • Illustrations of KW-NT800HDT are mainly used for accurate navigation.
... the touch panel. • [ ] indicates the buttons on the touch panel. 5 ENGLISH For safety... • Do not raise the volume level too much, as this manual: • Illustrations of KW-NT800HDT are mainly used for accurate navigation.

Instructions
Page 39
..., check the connection of the illumination control lead : The illumination signal is detected. If remains on the screen for KW-NT800HDT) *1 About calibration The calibration is a function conducted in order to the reverse (R) position, the reverse gear ... status changed to , the system will keep learning to make the current position more accurate. 8 Resets the calibration data. For the connection, ☞ Installation/Connection Manual (separate volume). • Driving under various conditions completes the calibration faster. Sensor Status 1 Press 2 - . 1 4 9 2 5 p 3 6 q ...
..., check the connection of the illumination control lead : The illumination signal is detected. If remains on the screen for KW-NT800HDT) *1 About calibration The calibration is a function conducted in order to the reverse (R) position, the reverse gear ... status changed to , the system will keep learning to make the current position more accurate. 8 Resets the calibration data. For the connection, ☞ Installation/Connection Manual (separate volume). • Driving under various conditions completes the calibration faster. Sensor Status 1 Press 2 - . 1 4 9 2 5 p 3 6 q ...

Instructions
Page 40
... the map for the day and night screens. Switches the category by the system. The illumination control lead connection must be completed. (☞Installation/Connection Manual) On: Fixes to show or hide the tracks you turn on the headlights. Press [Delete], then a confirmation message appears. 40
... the map for the day and night screens. Switches the category by the system. The illumination control lead connection must be completed. (☞Installation/Connection Manual) On: Fixes to show or hide the tracks you turn on the headlights. Press [Delete], then a confirmation message appears. 40

Instructions
Page 42
... - It may give guidance different from the roads is allowed) exist on the rotary, the no road to connect reverse signal lead (☞ Installation/Connection Manual); a highway and ordinary road running on a road constructed recently • The route calculated by closely standing trees • Make sure to your car may give...
... - It may give guidance different from the roads is allowed) exist on the rotary, the no road to connect reverse signal lead (☞ Installation/Connection Manual); a highway and ordinary road running on a road constructed recently • The route calculated by closely standing trees • Make sure to your car may give...
Instructions
Page 46
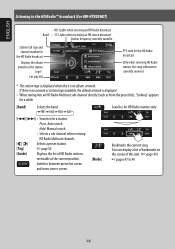
... HD Radio stations only. [4] [¢] • Searches for the HD Radio broadcast Displays the album artwork or the station logo*. Press: Auto search Hold: Manual search • Selects a sub-channel when receiving HD Radio Multicast channels. [ ] [ ] Selects a preset station. [Tag] ☞ page 50 [Guide...] Displays the list of this unit. (☞ page 49) ☞ pages 47 to the HD Radio™ broadcast (For KW-NT800HDT) • HD: Lights when receiving an HD Radio broadcast Band • ST: Lights when receiving an FM stereo broadcast Station frequency currently ...
... HD Radio stations only. [4] [¢] • Searches for the HD Radio broadcast Displays the album artwork or the station logo*. Press: Auto search Hold: Manual search • Selects a sub-channel when receiving HD Radio Multicast channels. [ ] [ ] Selects a preset station. [Tag] ☞ page 50 [Guide...] Displays the list of this unit. (☞ page 49) ☞ pages 47 to the HD Radio™ broadcast (For KW-NT800HDT) • HD: Lights when receiving an HD Radio broadcast Band • ST: Lights when receiving an FM stereo broadcast Station frequency currently ...
Instructions
Page 48
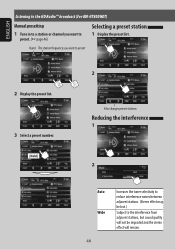
ENGLISH Listening to the HD Radio™ broadcast (For KW-NT800HDT) Manual presetting 1 Tune in to a station or channel you want to the interference from adjacent stations, but sound quality will remain. Band The station frequency you ...
ENGLISH Listening to the HD Radio™ broadcast (For KW-NT800HDT) Manual presetting 1 Tune in to a station or channel you want to the interference from adjacent stations, but sound quality will remain. Band The station frequency you ...

Instructions
Page 52
... [¢]. • During SSM search, all stations including conventional stations are searched and stored automatically. Press: Auto search Hold: Manual search [ ][ ] [Mode] Selects a preset station. ☞ pages 52 to the radio (For KW-NT700) Band The PS (station name) for FM RBDS when PS signal is coming in Buttons for selecting preset stations...
... [¢]. • During SSM search, all stations including conventional stations are searched and stored automatically. Press: Auto search Hold: Manual search [ ][ ] [Mode] Selects a preset station. ☞ pages 52 to the radio (For KW-NT700) Band The PS (station name) for FM RBDS when PS signal is coming in Buttons for selecting preset stations...
Instructions
Page 53
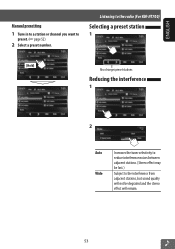
ENGLISH Manual presetting 1 Tune in to a station or channel you want to the interference from adjacent stations, but sound quality will not be degraded and the stereo effect will remain. 53 Listening to the radio (For KW-NT700) Selecting a preset station 1 [Hold] Also changes preset stations Reducing the interference 1 2 Auto Increases the tuner selectivity to reduce interference noises between adjacent stations. (Stereo effect may be lost.) Wide Subject to preset. (☞ page 52) 2 Select a preset number.
ENGLISH Manual presetting 1 Tune in to a station or channel you want to the interference from adjacent stations, but sound quality will not be degraded and the stereo effect will remain. 53 Listening to the radio (For KW-NT700) Selecting a preset station 1 [Hold] Also changes preset stations Reducing the interference 1 2 Auto Increases the tuner selectivity to reduce interference noises between adjacent stations. (Stereo effect may be lost.) Wide Subject to preset. (☞ page 52) 2 Select a preset number.

Instructions
Page 65
... (1st Generation) - iPod touch (3rd Generation) - ENGLISH iPod/iPhone operations Playing back iPod/iPhone 1 Connect iPod/iPhone For connections, refer also to the Installation/ Connection Manual. • Use the following iPod/iPhone models: - iPod nano (3rd Generation) - iPod touch (2nd Generation) - iPhone 3G - iPod nano (6th Generation) - iPod nano (5th Generation...
... (1st Generation) - iPod touch (3rd Generation) - ENGLISH iPod/iPhone operations Playing back iPod/iPhone 1 Connect iPod/iPhone For connections, refer also to the Installation/ Connection Manual. • Use the following iPod/iPhone models: - iPod nano (3rd Generation) - iPod touch (2nd Generation) - iPhone 3G - iPod nano (6th Generation) - iPod nano (5th Generation...

Instructions
Page 67
.../iPhones are under Head mode (☞ page 66). Hold: Reverse/forward search. [ [List] Displays the Music menu on the screen of audio books. In this manual are connected. * To cancel random or repeat mode, press the button repeatedly until the indicator disappears. • When playing back a track containing Artwork, operating buttons... it is shown if the song contains the Artwork. X1 X2 X1/2 ] Selects the iPod/iPhone to the music in this case, visit the following JVC web site: (English website only) 67
.../iPhones are under Head mode (☞ page 66). Hold: Reverse/forward search. [ [List] Displays the Music menu on the screen of audio books. In this manual are connected. * To cancel random or repeat mode, press the button repeatedly until the indicator disappears. • When playing back a track containing Artwork, operating buttons... it is shown if the song contains the Artwork. X1 X2 X1/2 ] Selects the iPod/iPhone to the music in this case, visit the following JVC web site: (English website only) 67

Instructions
Page 77
... bottom of the SiriusXM Tuner unit. • You can then be tuned to the expansion port on the rear of the unit. (☞ Installation/Connection Manual) Activating subscription 1 Select "SiriusXM" as the source. Once activated, the unit can also display the Radio ID on the internet at www.siriusxm.com/activatenow...
... bottom of the SiriusXM Tuner unit. • You can then be tuned to the expansion port on the rear of the unit. (☞ Installation/Connection Manual) Activating subscription 1 Select "SiriusXM" as the source. Once activated, the unit can also display the Radio ID on the internet at www.siriusxm.com/activatenow...

Instructions
Page 82
AV-IN audio screen AV-IN video screen The following buttons appear while playing video with selected as the source. 2 Turn on . (☞ page 86) 82 ENGLISH Using other external components You can connect an external component to the LINE IN/VIDEO IN jacks. (☞ Installation/Connection Manual) 1 Select as the source. [ ] Hides/displays the operating buttons on the screen. [ ] Adjusts the picture. (☞ page 84) • Select an appropriate setting on the connected component and start playing the source.
AV-IN audio screen AV-IN video screen The following buttons appear while playing video with selected as the source. 2 Turn on . (☞ page 86) 82 ENGLISH Using other external components You can connect an external component to the LINE IN/VIDEO IN jacks. (☞ Installation/Connection Manual) 1 Select as the source. [ ] Hides/displays the operating buttons on the screen. [ ] Adjusts the picture. (☞ page 84) • Select an appropriate setting on the connected component and start playing the source.

Instructions
Page 85
... than when the system was turned off . Att.: Attenuates AV source sound when navigation voice guidance starts. Initial +5 (when Dimmer is required. (☞ Installation/ Connection Manual) Adjust the display brightness. -5 to +5; Off: Cancels muting or attenuation. Off: Cancels. • The illumination control lead connection is On: Initial +1) Display 85 Off, Min...
... than when the system was turned off . Att.: Attenuates AV source sound when navigation voice guidance starts. Initial +5 (when Dimmer is required. (☞ Installation/ Connection Manual) Adjust the display brightness. -5 to +5; Off: Cancels muting or attenuation. Off: Cancels. • The illumination control lead connection is On: Initial +1) Display 85 Off, Min...

Instructions
Page 86
... AV component such as an antitheft measure. This setting will be deactivated and disappear from the menu when the System detects the first car movement. Manual: Allows user to turn on/off as a camcorder. ENGLISH Others Connection System settings items Menu items Antenna Remote Camera Input AV Input Beep Shortcut Button...
... AV component such as an antitheft measure. This setting will be deactivated and disappear from the menu when the System detects the first car movement. Manual: Allows user to turn on/off as a camcorder. ENGLISH Others Connection System settings items Menu items Antenna Remote Camera Input AV Input Beep Shortcut Button...

Instructions
Page 105
... a phone number from phone book 1 3 2 Display the first character of the phone book memories copied 5 Operate the target mobile phone. • Refer to the instruction manual supplied with your mobile phone. • To cancel the transfer, press [Finish]. 6 Finish the procedure. ENGLISH Copying the phone book You can copy the phone...
... a phone number from phone book 1 3 2 Display the first character of the phone book memories copied 5 Operate the target mobile phone. • Refer to the instruction manual supplied with your mobile phone. • To cancel the transfer, press [Finish]. 6 Finish the procedure. ENGLISH Copying the phone book You can copy the phone...

Instructions
Page 109
...: Cancels. On: The connection is automatically established with the last connected Bluetooth device when the unit is turned on the Bluetooth device. Answer the calls manually. 109 Shows the MAC address of the unit. • To change the PIN code, press [Change], enter a new PIN code, then press... [OK]. (☞ page 102) Shows the device name (JVC Navi) to be shown on . ENGLISH Bluetooth device settings 1 Press . 3 2 Menu items Phone Connection Audio Connection PIN Code Device Name Device Address BT ...
...: Cancels. On: The connection is automatically established with the last connected Bluetooth device when the unit is turned on the Bluetooth device. Answer the calls manually. 109 Shows the MAC address of the unit. • To change the PIN code, press [Change], enter a new PIN code, then press... [OK]. (☞ page 102) Shows the device name (JVC Navi) to be shown on . ENGLISH Bluetooth device settings 1 Press . 3 2 Menu items Phone Connection Audio Connection PIN Code Device Name Device Address BT ...

Instructions
Page 110
... view camera 1 Press - - - . 2 Displaying the picture from the rear view camera The rear view screen is required. For connecting a rear view camera, ☞ Installation/Connection Manual. Caution message [ ] Hides/displays the operating buttons on the screen. [ ] Adjusts the picture. (☞ page 84) [Bottom][Top] Adjusts the position of the caution message...
... view camera 1 Press - - - . 2 Displaying the picture from the rear view camera The rear view screen is required. For connecting a rear view camera, ☞ Installation/Connection Manual. Caution message [ ] Hides/displays the operating buttons on the screen. [ ] Adjusts the picture. (☞ page 84) [Bottom][Top] Adjusts the position of the caution message...
Instructions
Page 115
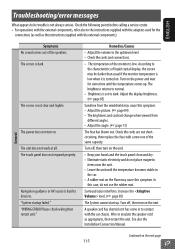
... brightness. (☞ page 85) Sunshine from different angles. • Adjust the angle. (☞ page 13) The fuse has blown out. See also the Installation/Connection Manual. Continued on the power and wait for the connections (as well as appropriate, then restart the unit. General ENGLISH Troubleshooting/error messages What appears to...
... brightness. (☞ page 85) Sunshine from different angles. • Adjust the angle. (☞ page 13) The fuse has blown out. See also the Installation/Connection Manual. Continued on the power and wait for the connections (as well as appropriate, then restart the unit. General ENGLISH Troubleshooting/error messages What appears to...