Instructions
Page 3
.... it may move slowly. If you are used to drop the disc when it off). • When the temperature is used to indicate the variable screens/ menus/operations/settings that contains mercury. Touch the buttons on the touch panel with high precision, but it may be sure to direct sunlight. •...
.... it may move slowly. If you are used to drop the disc when it off). • When the temperature is used to indicate the variable screens/ menus/operations/settings that contains mercury. Touch the buttons on the touch panel with high precision, but it may be sure to direct sunlight. •...
Instructions
Page 4
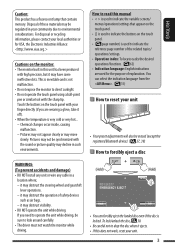
...-R/-RW) VCD (Video CD) • ISO 9660 level 1, level 2, Romeo, Joliet MPEG1/MPEG2 JPEG MP3/WMA/WAV AAC/DivX/MPEG4 *1 If you insert a DVD Video disc of an incorrect Region Code, "Region code error" appears on the screen. *2 DVD-R recorded in multi-border format is also playable (except for DualDisc playback The Non...
...-R/-RW) VCD (Video CD) • ISO 9660 level 1, level 2, Romeo, Joliet MPEG1/MPEG2 JPEG MP3/WMA/WAV AAC/DivX/MPEG4 *1 If you insert a DVD Video disc of an incorrect Region Code, "Region code error" appears on the screen. *2 DVD-R recorded in multi-border format is also playable (except for DualDisc playback The Non...
Instructions
Page 5
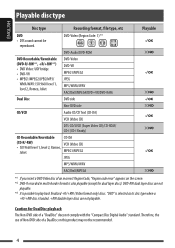
...-RK252).... 9 Preparation 12 AV MENU AV Menu operations 13 OPERATIONS Listening to the radio 29 Disc operations 30 • Operation buttons on the screen 32 • Operations using the remote controller (RM-RK252 33 USB operations 37 EXTERNAL DEVICES Using the Bluetooth® devices 38 • Connecting... a new Bluetooth device 38 • Using the Bluetooth cellular phone 39 • Using the Bluetooth audio player 41 Listening to the CD changer 41 Listening to the satellite radio 42 • Tuning in to a channel you want 43 Listening to ...
...-RK252).... 9 Preparation 12 AV MENU AV Menu operations 13 OPERATIONS Listening to the radio 29 Disc operations 30 • Operation buttons on the screen 32 • Operations using the remote controller (RM-RK252 33 USB operations 37 EXTERNAL DEVICES Using the Bluetooth® devices 38 • Connecting... a new Bluetooth device 38 • Using the Bluetooth cellular phone 39 • Using the Bluetooth audio player 41 Listening to the CD changer 41 Listening to the satellite radio 42 • Tuning in to a channel you want 43 Listening to ...

Instructions
Page 6
... turn off if no operation is done for about 10 seconds (depends on the setting). ( 18) 7 Motion sensor 8 Displays screen. 9 • Selects the source.*3 TUNER/HD Radio = SAT = DISC (DVD/VCD/CD) = USB/ iPod = CD-CH/iPod/EXT-IN = Bluetooth PHONE = Bluetooth AUDIO = AV-IN = (back to the ...beginning) • Bluetooth PHONE : Displays the screen. (Hold)*4 p • Selects "USB/ iPod" as the source. • Switches the setting between "HEAD...
... turn off if no operation is done for about 10 seconds (depends on the setting). ( 18) 7 Motion sensor 8 Displays screen. 9 • Selects the source.*3 TUNER/HD Radio = SAT = DISC (DVD/VCD/CD) = USB/ iPod = CD-CH/iPod/EXT-IN = Bluetooth PHONE = Bluetooth AUDIO = AV-IN = (back to the ...beginning) • Bluetooth PHONE : Displays the screen. (Hold)*4 p • Selects "USB/ iPod" as the source. • Switches the setting between "HEAD...

Instructions
Page 7
.... • Turned on the setting. ( 18) • Turned off: When no operation is done for Bluetooth cellular phone). - When screen is displayed. - You can also select the source using the touch panel. Lower the volume before playing these digital sources to . When you...sources depend on the touch panel, it functions in • Always turned on the touch panel as touching [5 / ∞ / 4 / ¢]. When screen is displayed. - w Monitor panel *1 Available display information varies among the playback sources. ( 53) *2 This adjustment does not affect the volume level of the...
.... • Turned on the setting. ( 18) • Turned off: When no operation is done for Bluetooth cellular phone). - When screen is displayed. - You can also select the source using the touch panel. Lower the volume before playing these digital sources to . When you...sources depend on the touch panel, it functions in • Always turned on the touch panel as touching [5 / ∞ / 4 / ¢]. When screen is displayed. - w Monitor panel *1 Available display information varies among the playback sources. ( 53) *2 This adjustment does not affect the volume level of the...

Instructions
Page 8
Initialize Normal Proximity/Motion Proxi/Motion-LCD Touch Panel Touch Panel - LCD Displays menu. ( 17) Displays menu. ( 21) Back The corresponding screen is displayed. 8 Displays menu. ( 18) Changes the sound mode. ( 19) Turns on or off Track/Chapter Repeat. ( 22) Displays menu. ( 15) Activates function. ( 26) Displays ...
Initialize Normal Proximity/Motion Proxi/Motion-LCD Touch Panel Touch Panel - LCD Displays menu. ( 17) Displays menu. ( 21) Back The corresponding screen is displayed. 8 Displays menu. ( 18) Changes the sound mode. ( 19) Turns on or off Track/Chapter Repeat. ( 22) Displays menu. ( 15) Activates function. ( 26) Displays ...
Instructions
Page 10
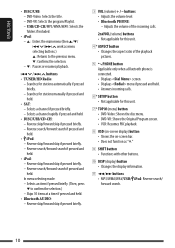
... for this unit. 7* TOP M (menu) button • DVD-Video: Shows the disc menu. • DVD-VR: Shows the Original Program screen. • VCD: Resumes PBC playback. 8 OSD (on-screen display) button • Shows the on-screen bar. * • Does not function as menu selecting buttons.)...button • Changes the aspect ratio of the playback pictures. 5 PHONE button Applicable only when a Bluetooth phone is connected. • Displays screen. • Displays menu if pressed and held. • Answers incoming calls. 6* SETUP button • Not applicable for stations automatically if ...
... for this unit. 7* TOP M (menu) button • DVD-Video: Shows the disc menu. • DVD-VR: Shows the Original Program screen. • VCD: Resumes PBC playback. 8 OSD (on-screen display) button • Shows the on-screen bar. * • Does not function as menu selecting buttons.)...button • Changes the aspect ratio of the playback pictures. 5 PHONE button Applicable only when a Bluetooth phone is connected. • Displays screen. • Displays menu if pressed and held. • Answers incoming calls. 6* SETUP button • Not applicable for stations automatically if ...
Instructions
Page 11
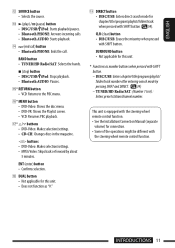
... • Not applicable for this unit. * Functions as "#." u* %/fi buttons • DVD-Video: Makes selection/settings. • CD-CH: Changes discs in the magazine. @/# buttons • DVD-Video: Makes selection/settings. • MPEG Video: Skips back or forward by pressing SHIFT and ...) button • Confirms selection. ENGLISH w SOURCE button • Selects the source. y* MENU button • DVD-Video: Shows the disc menu. • DVD-VR: Shows the Playlist screen. • VCD: Resumes PBC playback. i DUAL button • Not applicable for this unit. • Does...
... • Not applicable for this unit. * Functions as "#." u* %/fi buttons • DVD-Video: Makes selection/settings. • CD-CH: Changes discs in the magazine. @/# buttons • DVD-Video: Makes selection/settings. • MPEG Video: Skips back or forward by pressing SHIFT and ...) button • Confirms selection. ENGLISH w SOURCE button • Selects the source. y* MENU button • DVD-Video: Shows the disc menu. • DVD-VR: Shows the Playlist screen. • VCD: Resumes PBC playback. i DUAL button • Not applicable for this unit. • Does...

Instructions
Page 12
Display screen. Back 12 INTRODUCTIONS Setup Demonstration Wall Paper Color Scroll Dimmer Dimmer Time Set Back Bright Blue Once Auto Auto 6 PM 7 AM or BAND ! Setup Demonstration ...]. AV Menu ⁄ Cancel the demonstration. ENGLISH Preparation Canceling the display demonstration and setting the clock ~ Turn on the power. @ Set the clock. Ÿ Display screen.
Display screen. Back 12 INTRODUCTIONS Setup Demonstration Wall Paper Color Scroll Dimmer Dimmer Time Set Back Bright Blue Once Auto Auto 6 PM 7 AM or BAND ! Setup Demonstration ...]. AV Menu ⁄ Cancel the demonstration. ENGLISH Preparation Canceling the display demonstration and setting the clock ~ Turn on the power. @ Set the clock. Ÿ Display screen.

Instructions
Page 13
... Auto Auto 6 PM 7 AM Returns to perform the desired operations/settings. Press the desired icon/item to the previous Indicates the remaining screen. or BAND ! time before the current screen exit automatically. AV Menu Setup : Equalizer : Sound : Mode : List : Bluetooth : 14 - 18 19 20 21 - 23 ...24 - 25 26 - 28 Continued on the power. Ÿ Display screen. Moves to the succeeding menu page • Some of the operations and settings. The following these steps unless mentioned otherwise. ~ Turn on the next page...
... Auto Auto 6 PM 7 AM Returns to perform the desired operations/settings. Press the desired icon/item to the previous Indicates the remaining screen. or BAND ! time before the current screen exit automatically. AV Menu Setup : Equalizer : Sound : Mode : List : Bluetooth : 14 - 18 19 20 21 - 23 ...24 - 25 26 - 28 Continued on the power. Ÿ Display screen. Moves to the succeeding menu page • Some of the operations and settings. The following these steps unless mentioned otherwise. ~ Turn on the next page...
Instructions
Page 14
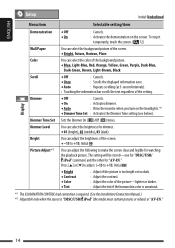
... of the setting. ♦ Off : Cancels. ♦ On : Activates dimmer. ♦ Auto : Dims the monitor when you turn on the screen. The setting will be stored-one for "DISC/USB/ iPod" (common) and the other for watching the playback picture. Press [5] or [∞] ...; Once : Scrolls the displayed information once. ♦ Auto : Repeats scrolling (at 5-second intervals). • Touching the information bar scrolls the text regardless of the screen. ♦ -15 to +15; Sets the Dimmer On ( )/Off ( ) times. Initial 00) ♦ Bright ♦ Contrast ♦ Color ♦ ...
... of the setting. ♦ Off : Cancels. ♦ On : Activates dimmer. ♦ Auto : Dims the monitor when you turn on the screen. The setting will be stored-one for "DISC/USB/ iPod" (common) and the other for watching the playback picture. Press [5] or [∞] ...; Once : Scrolls the displayed information once. ♦ Auto : Repeats scrolling (at 5-second intervals). • Touching the information bar scrolls the text regardless of the screen. ♦ -15 to +15; Sets the Dimmer On ( )/Off ( ) times. Initial 00) ♦ Bright ♦ Contrast ♦ Color ♦ ...
Instructions
Page 15
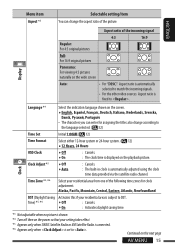
...time. *3 Not adjustable when no picture is shown. *4 Turn off then on the power so that your residential area is displayed on the wide screen Auto: • For "DISC": Aspect ratio is automatically selected to DST. Time Zone *5, *6 Select your residential area from one of the picture... setting/item You can enter for assigning the titles also change the aspect ratio of the following time zones for clock adjustment. Continued on the screen. ♦ English, Español, Français, Deutsch, Italiano, Nederlands, Svenska, Dansk, Руccĸий, Portugu&#...
...time. *3 Not adjustable when no picture is shown. *4 Turn off then on the power so that your residential area is displayed on the wide screen Auto: • For "DISC": Aspect ratio is automatically selected to DST. Time Zone *5, *6 Select your residential area from one of the picture... setting/item You can enter for assigning the titles also change the aspect ratio of the following time zones for clock adjustment. Continued on the screen. ♦ English, Español, Français, Deutsch, Italiano, Nederlands, Svenska, Dansk, Руccĸий, Portugu&#...

Instructions
Page 16
...only for each source- File Type *7 Select the playback file type when a disc/USB contains different types of the external (Letterbox)/ monitor is displayed on -screen bar. ( 36) ♦ 1 : Higher position. ♦ 2 : Lower position. Initial English ( 54) Select the subtitle language or erase the...files and MPEG1/MPEG2 files. Initial English ( 54) Select the audio language; Initial Off ( 54) Select the monitor type to watch a wide screen picture on the external monitor. ♦ 16:9 : Select when the aspect ratio of the external monitor is 16:9. ♦ 4:3LB : ...
...only for each source- File Type *7 Select the playback file type when a disc/USB contains different types of the external (Letterbox)/ monitor is displayed on -screen bar. ( 36) ♦ 1 : Higher position. ♦ 2 : Lower position. Initial English ( 54) Select the subtitle language or erase the...files and MPEG1/MPEG2 files. Initial English ( 54) Select the audio language; Initial Off ( 54) Select the monitor type to watch a wide screen picture on the external monitor. ♦ 16:9 : Select when the aspect ratio of the external monitor is 16:9. ♦ 4:3LB : ...
Instructions
Page 17
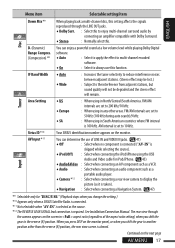
...♦ Audio&Video : Select when connecting an AV component such as a VCR. ♦ Audio : Select when connecting an audio component such as a portable audio player. ♦ Camera *12 : Select when connecting a rear view camera to display the picture (as it is taken). ♦ Navigation : Select when connecting a.../item ENGLISH Down Mix *9 When playing back a multi-channel disc, this setting affects the signals reproduced through the camera appears on the screen in aspect ratio (regardless of LINE IN and VIDEO IN jacks. ( 47) ♦ Off : Select when no component is connected ...
...♦ Audio&Video : Select when connecting an AV component such as a VCR. ♦ Audio : Select when connecting an audio component such as a portable audio player. ♦ Camera *12 : Select when connecting a rear view camera to display the picture (as it is taken). ♦ Navigation : Select when connecting a.../item ENGLISH Down Mix *9 When playing back a multi-channel disc, this setting affects the signals reproduced through the camera appears on the screen in aspect ratio (regardless of LINE IN and VIDEO IN jacks. ( 47) ♦ Off : Select when no component is connected ...

Instructions
Page 18
... panel. See Installation/Connection Manual. 18 Proximity/Motion: Lights up when your hand moves close to the buttons. Always lights. Touch Panel-LCD: Lights up when your Lights up when your Always lights. Lights up when your hand moves close to the buttons. buttons or touch ... External Input *13, *14 For connecting an external component to the CD changer jack on the monitor panel Screen Normal: Always lights. Illumination You can turn off the screen and the light of the buttons on the monitor panel while turning on the unit. ( 7) Others Buttons ...
... panel. See Installation/Connection Manual. 18 Proximity/Motion: Lights up when your hand moves close to the buttons. Always lights. Touch Panel-LCD: Lights up when your Lights up when your Always lights. Lights up when your hand moves close to the buttons. buttons or touch ... External Input *13, *14 For connecting an external component to the CD changer jack on the monitor panel Screen Normal: Always lights. Illumination You can turn off the screen and the light of the buttons on the monitor panel while turning on the unit. ( 7) Others Buttons ...

Instructions
Page 19
... 00 00 00 00 00 00 00 AV MENU 19 Equalizer or BAND 2 Display screen. User Store User1 User2 User3 Back Ex.: When storing into , , and . 1 Perform steps 1 and 2 above to enter the screen. ENGLISH Selects a preset sound mode suitable to the other 6 sound modes. Equalizer Back... Edit Moves to the music genre. ♦ Flat (Initial), Hard Rock, R&B, Pop, Jazz, Dance, Country, Reggae, Classic, User1, User2, User3 1 Display screen. 2 Adjust the settings, then store. Ex.: When is selected Storing your own adjustments You can store your adjustments into 3 Select a sound mode.
... 00 00 00 00 00 00 00 AV MENU 19 Equalizer or BAND 2 Display screen. User Store User1 User2 User3 Back Ex.: When storing into , , and . 1 Perform steps 1 and 2 above to enter the screen. ENGLISH Selects a preset sound mode suitable to the other 6 sound modes. Equalizer Back... Edit Moves to the music genre. ♦ Flat (Initial), Hard Rock, R&B, Pop, Jazz, Dance, Country, Reggae, Classic, User1, User2, User3 1 Display screen. 2 Adjust the settings, then store. Ex.: When is selected Storing your own adjustments You can store your adjustments into 3 Select a sound mode.
Instructions
Page 22
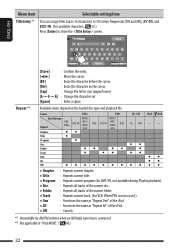
...(up to 16 characters) to 30 station frequencies (FM and AM), AV-IN, and EXT-IN. (For available characters, 52.) Press [Enter] to show the screen. @ ; / Back [Store] : Confirm the entry. [2/3] : Move the cursor. [BS] : Erase the character before the cursor. [Del] : Erase ...Disc ♦ Folder ♦ Track ♦ One ♦ All ♦ Off : Repeats current chapter. : Repeats current title. : Repeats current program (for DVD-VR, not available during Playlist playback). : Repeats all tracks of the current disc. : Repeats all tracks of the current folder. : Repeats current track. (For...
...(up to 16 characters) to 30 station frequencies (FM and AM), AV-IN, and EXT-IN. (For available characters, 52.) Press [Enter] to show the screen. @ ; / Back [Store] : Confirm the entry. [2/3] : Move the cursor. [BS] : Erase the character before the cursor. [Del] : Erase ...Disc ♦ Folder ♦ Track ♦ One ♦ All ♦ Off : Repeats current chapter. : Repeats current title. : Repeats current program (for DVD-VR, not available during Playlist playback). : Repeats all tracks of the current disc. : Repeats all tracks of the current folder. : Repeats current track. (For...

Instructions
Page 26
... you have not sent. ♦ Sent : Messages you have sent. • The number of the missed calls. ♦ Phone Number : Shows the phone number entry screen. ENGLISH Select "Bluetooth PHONE" or "Bluetooth AUDIO" as the source for "Bluetooth PHONE." *2 Selectable only when the source is "Bluetooth PHONE" and the connected cellular...
... you have not sent. ♦ Sent : Messages you have sent. • The number of the missed calls. ♦ Phone Number : Shows the phone number entry screen. ENGLISH Select "Bluetooth PHONE" or "Bluetooth AUDIO" as the source for "Bluetooth PHONE." *2 Selectable only when the source is "Bluetooth PHONE" and the connected cellular...

Instructions
Page 27
... Number)*3. • You can use the device through the unit. *3 Some devices have their own PIN code. is selected. Continued on the screen. Search Now connection is established and you want to connect. 3 Enter the specific PIN code of them. (If no available device is selected....Bluetooth device to connect while "Connecting..." ENGLISH Menu item Open Selectable setting/item Preparation: • Operate the Bluetooth device to turn on the screen. is displayed on its Bluetooth function. • Make sure "NEW DEVICE" is displayed on the next page AV MENU 27 Use or ...
... Number)*3. • You can use the device through the unit. *3 Some devices have their own PIN code. is selected. Continued on the screen. Search Now connection is established and you want to connect. 3 Enter the specific PIN code of them. (If no available device is selected....Bluetooth device to connect while "Connecting..." ENGLISH Menu item Open Selectable setting/item Preparation: • Operate the Bluetooth device to turn on the screen. is displayed on its Bluetooth function. • Make sure "NEW DEVICE" is displayed on the next page AV MENU 27 Use or ...
Instructions
Page 29
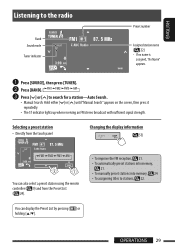
... into memory, 24. • To assignning titles to search for a station-Auto Search. • Manual Search: Hold either [ ]or [ ] until "Manual Search" appears on the screen, then press it repeatedly. • The ST indicator lights up when receiving an FM stereo broadcast with sufficient signal strength. OPERATIONS 29 Press [ ] or [ ] to...
... into memory, 24. • To assignning titles to search for a station-Auto Search. • Manual Search: Hold either [ ]or [ ] until "Manual Search" appears on the screen, then press it repeatedly. • The ST indicator lights up when receiving an FM stereo broadcast with sufficient signal strength. OPERATIONS 29 Press [ ] or [ ] to...


