Instructions
Page 2
... limits are expressly approved in a particular installation. However, there is made. If this equipment if an unauthorized change or modification is no guarantee that to which can radiate radio frequency energy and, if 1 not installed and used in accordance with the limits for a Class B digital device, pursuant to part 15 of the following measures: Reorient or relocate the receiving antenna.
... limits are expressly approved in a particular installation. However, there is made. If this equipment if an unauthorized change or modification is no guarantee that to which can radiate radio frequency energy and, if 1 not installed and used in accordance with the limits for a Class B digital device, pursuant to part 15 of the following measures: Reorient or relocate the receiving antenna.

Instructions
Page 5
... be working properly, turn the receiver off, wait 10 seconds, replace the battery and then turn the power off immediately, and disconnect the receiver from functioning properly in the installation instructions which accompany each accessory kit. Be sure the receiver and accessories are subject to any restrictions or limitations that may prevent the airbag from any power source. The installation and use suggestions contained in this unit...
... be working properly, turn the receiver off, wait 10 seconds, replace the battery and then turn the power off immediately, and disconnect the receiver from functioning properly in the installation instructions which accompany each accessory kit. Be sure the receiver and accessories are subject to any restrictions or limitations that may prevent the airbag from any power source. The installation and use suggestions contained in this unit...

Instructions
Page 6
Index Package Contents 7 Optional Accessories (Sold Separately 9 Installation for Car Use 12 "Professional" Installation 12 "Do it Yourself" Installation 15 Installation for Home Use 18 Connecting the Cigarette Lighter Adapter 19 Controls ...20 Getting to Know Your HD Radio Receiver 20 Getting to Know Your Remote Control 23 On-Screen Information 26 During HD Radio Mode 26 During FM/AM Mode 27 Menu Options 28 5
Index Package Contents 7 Optional Accessories (Sold Separately 9 Installation for Car Use 12 "Professional" Installation 12 "Do it Yourself" Installation 15 Installation for Home Use 18 Connecting the Cigarette Lighter Adapter 19 Controls ...20 Getting to Know Your HD Radio Receiver 20 Getting to Know Your Remote Control 23 On-Screen Information 26 During HD Radio Mode 26 During FM/AM Mode 27 Menu Options 28 5
Instructions
Page 8
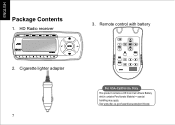
Package Contents 1. Remote control with battery 2. Cigarette lighter adapter 7 For USA-California Only This product contains a CR Coin Cell Lithium Battery which contains Perchlorate Material special handling may apply. See www.dtsc.ca.gov/hazardouswaste/perchlorate HD Radio receiver 3.
Package Contents 1. Remote control with battery 2. Cigarette lighter adapter 7 For USA-California Only This product contains a CR Coin Cell Lithium Battery which contains Perchlorate Material special handling may apply. See www.dtsc.ca.gov/hazardouswaste/perchlorate HD Radio receiver 3.

Instructions
Page 9
... it may explode. You will need to purchase an additional Home or Car installation kit to avoid risk of it in fire. -Do not leave the battery with other than CR2025 or its equivalent; To prevent the battery from over-heating, cracking, or... starting a fire; -Do not recharge, short, disassemble, heat the battery, or dispose of accident. Store the battery in a place where children cannot reach to use your KT-HDP1...
... it may explode. You will need to purchase an additional Home or Car installation kit to avoid risk of it in fire. -Do not leave the battery with other than CR2025 or its equivalent; To prevent the battery from over-heating, cracking, or... starting a fire; -Do not recharge, short, disassemble, heat the battery, or dispose of accident. Store the battery in a place where children cannot reach to use your KT-HDP1...

Instructions
Page 13
..." installation. "Professional " Installation- "Professional" Installation Professional installation requires an experienced technician to install this product in front or rear of the antenna, and routing all the necessary wires and cables. Type (A) Professional installation-type (A) is in your vehicle, and provides advice for car radios with an AUX-IN (audio input) function. Installation for Car Use There are two ways for installation: "Professional" installation and "Do it is for selecting a suitable mounting location, installation of the car radio...
..." installation. "Professional " Installation- "Professional" Installation Professional installation requires an experienced technician to install this product in front or rear of the antenna, and routing all the necessary wires and cables. Type (A) Professional installation-type (A) is in your vehicle, and provides advice for car radios with an AUX-IN (audio input) function. Installation for Car Use There are two ways for installation: "Professional" installation and "Do it is for selecting a suitable mounting location, installation of the car radio...

Instructions
Page 15
Type (B) Professional installation-type (B) is for car radios without Aux-in (audio input) and is using wired FM Transmitter's function. 14 "Professional " Installation-
Type (B) Professional installation-type (B) is for car radios without Aux-in (audio input) and is using wired FM Transmitter's function. 14 "Professional " Installation-
Instructions
Page 16
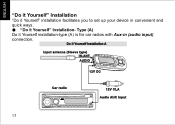
Type (A) Do it Yourself" installation facilitates you to set up your device in (audio input) connection. 15 "Do it Yourself" Installation "Do it Yourself installation-type (A) is for car radios with Aux-in convenient and quick ways. "Do it Yourself" Installation-
Type (A) Do it Yourself" installation facilitates you to set up your device in (audio input) connection. 15 "Do it Yourself" Installation "Do it Yourself installation-type (A) is for car radios with Aux-in convenient and quick ways. "Do it Yourself" Installation-

Instructions
Page 17
Do it Yourself installation-type (B) is for FM signal reception. 16 Type (B) Do it Yourself installation-type (B) uses a sleeve type of antenna for car radios without Aux-in (audio input) and uses a wireless FM Transmitter connection. "Do it Yourself " Installation-
Do it Yourself installation-type (B) is for FM signal reception. 16 Type (B) Do it Yourself installation-type (B) uses a sleeve type of antenna for car radios without Aux-in (audio input) and uses a wireless FM Transmitter connection. "Do it Yourself " Installation-
Instructions
Page 20
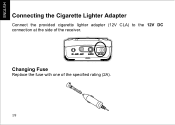
Changing Fuse Replace the fuse with one of the receiver. Connecting the Cigarette Lighter Adapter Connect the provided cigarette lighter adapter (12V CLA) to the 12V DC connection at the side of the specified rating (2A). 19
Changing Fuse Replace the fuse with one of the receiver. Connecting the Cigarette Lighter Adapter Connect the provided cigarette lighter adapter (12V CLA) to the 12V DC connection at the side of the specified rating (2A). 19
Instructions
Page 22
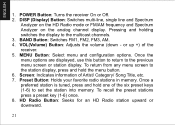
... set the station into memory. Screen: Indicates information of the receiver. 5. HD Radio Button: Seeks for an HD Radio station upward or downward. 21 MENU Button: Select menu and configuration options. Once a preferred station is tuned, press and hold the menu button. 6. BAND Button: Switches FM1, FM2, FM3, AM. 4. POWER Button: Turns the receiver On or Off. 2. VOL(Volume) Button: Adjusts the volume (down - To recall the preset stations press a preset key (1-6) once. 8. Preset Button: Holds your favorite radio stations in memory. Once the menu options are displayed, use...
... set the station into memory. Screen: Indicates information of the receiver. 5. HD Radio Button: Seeks for an HD Radio station upward or downward. 21 MENU Button: Select menu and configuration options. Once a preferred station is tuned, press and hold the menu button. 6. BAND Button: Switches FM1, FM2, FM3, AM. 4. POWER Button: Turns the receiver On or Off. 2. VOL(Volume) Button: Adjusts the volume (down - To recall the preset stations press a preset key (1-6) once. 8. Preset Button: Holds your favorite radio stations in memory. Once the menu options are displayed, use...

Instructions
Page 24
or up +) of the receiver. 23 POWER Button: Turns the receiver On or Off. 2. Getting to Know Your Remote Control 1. VOL (Volume) Button: Adjusts the volume (down -
or up +) of the receiver. 23 POWER Button: Turns the receiver On or Off. 2. Getting to Know Your Remote Control 1. VOL (Volume) Button: Adjusts the volume (down -
Instructions
Page 25
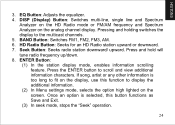
... Button: Adjusts the equalizer. 4. Seek Button: Seeks radio station downward/ upward. If song, artist or any other information is selected, this function to scroll and view additional information characters. HD Radio Button: Seeks for an HD Radio station upward or downward. 7. Press and hold will tune radio frequency up/down. 8. ENTER Button: (1) In the station display mode, enables information scrolling feature. Press the ENTER button to display the additional information. (2) In Menu settings mode, selects the option high lighted...
... Button: Adjusts the equalizer. 4. Seek Button: Seeks radio station downward/ upward. If song, artist or any other information is selected, this function to scroll and view additional information characters. HD Radio Button: Seeks for an HD Radio station upward or downward. 7. Press and hold will tune radio frequency up/down. 8. ENTER Button: (1) In the station display mode, enables information scrolling feature. Press the ENTER button to display the additional information. (2) In Menu settings mode, selects the option high lighted...

Instructions
Page 27
On-Screen Information During HD Radio Mode When your HD Radio receiver receives a digital (HD Radio) signal, the following information is indicated: Source indicator Frequency Station name HD indicator Digital signal indicator Artist Program Type Song title Equalizer Preset radio station 26
On-Screen Information During HD Radio Mode When your HD Radio receiver receives a digital (HD Radio) signal, the following information is indicated: Source indicator Frequency Station name HD indicator Digital signal indicator Artist Program Type Song title Equalizer Preset radio station 26
Instructions
Page 28
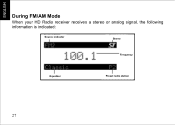
During FM/AM Mode When your HD Radio receiver receives a stereo or analog signal, the following information is indicated: Source indicator Stereo Frequency Equalizer Preset radio station 27
During FM/AM Mode When your HD Radio receiver receives a stereo or analog signal, the following information is indicated: Source indicator Stereo Frequency Equalizer Preset radio station 27
Instructions
Page 29
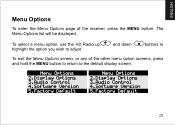
To select a menu option, use the HD Radio up highlight the option you wish to To exit the Menu Options screen, or any of the receiver, press the MENU button. Menu Options To enter the Menu Options page of the other menu option screens, press and hold the MENU button to return to the default display screen. 28 and down buttons to adjust. The Menu Options list will be displayed.
To select a menu option, use the HD Radio up highlight the option you wish to To exit the Menu Options screen, or any of the receiver, press the MENU button. Menu Options To enter the Menu Options page of the other menu option screens, press and hold the MENU button to return to the default display screen. 28 and down buttons to adjust. The Menu Options list will be displayed.
Instructions
Page 30
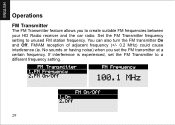
No sounds or having noise) when you to create suitable FM frequencies between your HD Radio receiver and the car radio. You can also turn the FM transmitter On and Off. Set the FM Transmitter frequency setting to unused FM station frequency. FM/AM reception of adjacent frequency (+/- 0.2 MHz) could cause interference (ie. If interference is experienced, set the FM transmitter at a certain frequency. Operations FM Transmitter The FM Transmitter feature allows you set the FM Transmitter to a different frequency setting. 29
No sounds or having noise) when you to create suitable FM frequencies between your HD Radio receiver and the car radio. You can also turn the FM transmitter On and Off. Set the FM Transmitter frequency setting to unused FM station frequency. FM/AM reception of adjacent frequency (+/- 0.2 MHz) could cause interference (ie. If interference is experienced, set the FM transmitter at a certain frequency. Operations FM Transmitter The FM Transmitter feature allows you set the FM Transmitter to a different frequency setting. 29
Instructions
Page 31
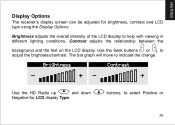
Brightness adjusts the overall intensity of the LCD display to indicate the change. The bar graph will move to help with viewing in different lighting conditions. buttons, to adjust the brightness/contrast. Use the Seek buttons ( or ), to select Positive or 30 Contrast adjusts the relationship between the background and the text on the LCD display. Use the HD Radio up and down Negative for brightness, contrast and LCD type using the Display Options. Display Options The receiver's display screen can be adjusted for LCD display Type.
Brightness adjusts the overall intensity of the LCD display to indicate the change. The bar graph will move to help with viewing in different lighting conditions. buttons, to adjust the brightness/contrast. Use the Seek buttons ( or ), to select Positive or 30 Contrast adjusts the relationship between the background and the text on the LCD display. Use the HD Radio up and down Negative for brightness, contrast and LCD type using the Display Options. Display Options The receiver's display screen can be adjusted for LCD display Type.

Instructions
Page 33
Use the Seek buttons ( or ) to indicate the change Bass or Treble level. Tone Control You can define the equalizer level between -7 and +3. The default value is 0. The bar graph will move to change . 32 Equalizer While choosing "User", users can adjust Bass and Treble for Tone Control settings.
Use the Seek buttons ( or ) to indicate the change Bass or Treble level. Tone Control You can define the equalizer level between -7 and +3. The default value is 0. The bar graph will move to change . 32 Equalizer While choosing "User", users can adjust Bass and Treble for Tone Control settings.
Instructions
Page 35
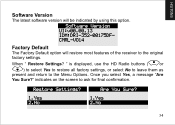
" is displayed, use the HD Radio buttons ( or ) to select Yes to restore all factory settings, or select No to leave them as present and return to ask for final confirmation. 34 Once you select Yes, a message "Are You Sure?" indicates on the screen to the Menu Options. Software Version The latest software version will restore most features of the receiver to the original factory settings. When " Restore Settings? Factory Default The Factory Default option will be indicated by using this option.
" is displayed, use the HD Radio buttons ( or ) to select Yes to restore all factory settings, or select No to leave them as present and return to ask for final confirmation. 34 Once you select Yes, a message "Are You Sure?" indicates on the screen to the Menu Options. Software Version The latest software version will restore most features of the receiver to the original factory settings. When " Restore Settings? Factory Default The Factory Default option will be indicated by using this option.


