
Instructions
Page 2
... laser radiation when open the top cover. Caution: Changes or modifications not approved by turning the equipment off and on a circuit different from the unit. leave all instructions carefully...; Stop the car before operating the unit. 2 Increase the separation between the equipment and receiver. - Do not stare into an outlet on , the user is no user serviceable parts... provide reasonable protection against harmful interference in accordance with the instructions, may be determined by JVC could void the user's authority to which can radiate radio frequency energy and, if not...
... laser radiation when open the top cover. Caution: Changes or modifications not approved by turning the equipment off and on a circuit different from the unit. leave all instructions carefully...; Stop the car before operating the unit. 2 Increase the separation between the equipment and receiver. - Do not stare into an outlet on , the user is no user serviceable parts... provide reasonable protection against harmful interference in accordance with the instructions, may be determined by JVC could void the user's authority to which can radiate radio frequency energy and, if not...

Instructions
Page 4
...change the display and button illumination (see "Menu operations" on page 24). 4 For more features, see page 14. *2 You cannot select these sources if they are not ready or not connected. *4 Also known as "Control dial" in the Menu (see "COLOR" on page 26). *3... • Enter list operations. • Enter Menu setting [Hold]. 5 • Control the volume or selection [Turn].*4 • Confirm the selection [Press].*4 • FM/HD Radio: Enter SSM preset mode [Hold].*4 • CD/CD-CH/IPOD: Enter playback mode [Hold].*4 6 Loading slot 7 Display window 8 Eject disc. 9 Select the sound ...
...change the display and button illumination (see "Menu operations" on page 24). 4 For more features, see page 14. *2 You cannot select these sources if they are not ready or not connected. *4 Also known as "Control dial" in the Menu (see "COLOR" on page 26). *3... • Enter list operations. • Enter Menu setting [Hold]. 5 • Control the volume or selection [Turn].*4 • Confirm the selection [Press].*4 • FM/HD Radio: Enter SSM preset mode [Hold].*4 • CD/CD-CH/IPOD: Enter playback mode [Hold].*4 6 Loading slot 7 Display window 8 Eject disc. 9 Select the sound ...

Instructions
Page 6
... - Selects an item if pressed briefly. (Then, press D ∞ to an Apple iPod: - ENGLISH 1 • Turns the power on if pressed briefly or attenuates the sound when the power is equipped with the steering wheel remote control function. &#...Now 5 U/D ∞/2 R/F 3 work as dashboards) exposed to the previous menu. Enters the main menu with D ∞. - KD-A305 is on. • Turns the power off if pressed and held. 2 • Changes the tuner/HD Radio preset stations. • Changes the folder of it... the MP3/WMA. • While playing an MP3 disc on an MP3-compatible CD changer: -
... - Selects an item if pressed briefly. (Then, press D ∞ to an Apple iPod: - ENGLISH 1 • Turns the power on if pressed briefly or attenuates the sound when the power is equipped with the steering wheel remote control function. &#...Now 5 U/D ∞/2 R/F 3 work as dashboards) exposed to the previous menu. Enters the main menu with D ∞. - KD-A305 is on. • Turns the power off if pressed and held. 2 • Changes the tuner/HD Radio preset stations. • Changes the folder of it... the MP3/WMA. • While playing an MP3 disc on an MP3-compatible CD changer: -

Instructions
Page 7
... appear. *4 "****-FM" or "****" appears when no Call Sign is received. *5 "NO TEXT" appears when no title is received. *6 Only for SIRIUS Satellite radio. Set the clock Select "CLOCK" = "CLOCK SET." When the power is turned off: Check the current clock time when "CLOCK DISP" is set to... the display demonstration and set the clock • See also page 23. 1 Turn on : Change the display information of the current source FM/AM CD/CD-CH Station name*1 = Frequency = Clock = (back to the beginning) Audio CD/CD Text: Disc title/performer*2 = Track title*2 = Current track number with the ...
... appear. *4 "****-FM" or "****" appears when no Call Sign is received. *5 "NO TEXT" appears when no title is received. *6 Only for SIRIUS Satellite radio. Set the clock Select "CLOCK" = "CLOCK SET." When the power is turned off: Check the current clock time when "CLOCK DISP" is set to... the display demonstration and set the clock • See also page 23. 1 Turn on : Change the display information of the current source FM/AM CD/CD-CH Station name*1 = Frequency = Clock = (back to the beginning) Audio CD/CD Text: Disc title/performer*2 = Track title*2 = Current track number with the ...
Instructions
Page 8
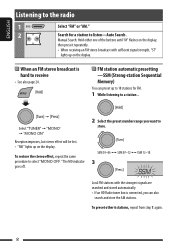
...store the AM stations. To preset other 6 stations, repeat from step 1 again. 8 To restore the stereo effect, repeat the same procedure to receive • See also page 24. Local FM stations with sufficient signal strength, "ST" lights up on the display. ENGLISH Listening to the radio... 1 Select "FM" or "AM." 2 Search for FM. 1 While listening to a station... [Turn] = [Press] Select "TUNER" = "MONO" = "MONO ON" Reception improves, but stereo effect will be lost. • "MO" lights up on the display....
...store the AM stations. To preset other 6 stations, repeat from step 1 again. 8 To restore the stereo effect, repeat the same procedure to receive • See also page 24. Local FM stations with sufficient signal strength, "ST" lights up on the display. ENGLISH Listening to the radio... 1 Select "FM" or "AM." 2 Search for FM. 1 While listening to a station... [Turn] = [Press] Select "TUNER" = "MONO" = "MONO ON" Reception improves, but stereo effect will be lost. • "MO" lights up on the display....

Instructions
Page 9
.... Ex.: Storing FM station of 92.50 MHz into preset number "04." 1 2 Select preset number "04." 3 Selecting preset station or [Turn] = [Press] Disc operations 1 2 Turn on the next page OPERATIONS 9 Press SRC to listen to 18 stations for FM and 6 stations for AM. Continued on the power. Insert ...a disc. Prohibiting disc ejection Selecting a track/folder [Turn] = [Press] To cancel the prohibition, repeat the same procedure. • For MP3/WMA discs, select the desired folder, then the desired track ...
.... Ex.: Storing FM station of 92.50 MHz into preset number "04." 1 2 Select preset number "04." 3 Selecting preset station or [Turn] = [Press] Disc operations 1 2 Turn on the next page OPERATIONS 9 Press SRC to listen to 18 stations for FM and 6 stations for AM. Continued on the power. Insert ...a disc. Prohibiting disc ejection Selecting a track/folder [Turn] = [Press] To cancel the prohibition, repeat the same procedure. • For MP3/WMA discs, select the desired folder, then the desired track ...

Instructions
Page 10
...track [Hold] Reverse/fast-forward track Selecting the playback modes You can use only one device can be connected at a time. 1 2 [Turn] = [Press] REPEAT Ô RANDOM 3 [Turn] = [Press] REPEAT TRACK RPT : Repeats current track FOLDER RPT : MP3/WMA: Repeats current folder RANDOM FOLDER RND : MP3/WMA: Randomly... unit. To use the Bluetooth® function. Connection is required to connect the Bluetooth adapter (KS-BTA200) (separately purchased) to the CD changer jack on the rear of next folders ALL RND : Randomly plays all tracks • To cancel repeat play or random play, select...
...track [Hold] Reverse/fast-forward track Selecting the playback modes You can use only one device can be connected at a time. 1 2 [Turn] = [Press] REPEAT Ô RANDOM 3 [Turn] = [Press] REPEAT TRACK RPT : Repeats current track FOLDER RPT : MP3/WMA: Repeats current folder RANDOM FOLDER RND : MP3/WMA: Randomly... unit. To use the Bluetooth® function. Connection is required to connect the Bluetooth adapter (KS-BTA200) (separately purchased) to the CD changer jack on the rear of next folders ALL RND : Randomly plays all tracks • To cancel repeat play or random play, select...
Instructions
Page 11
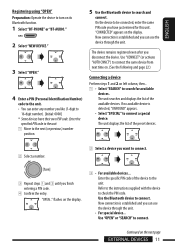
"OPEN.." ENGLISH Registering using "OPEN" Preparation: Operate the device to turn on its Bluetooth function. 1 Select "BT-PHONE" or "BT-AUDIO." 2 Select "NEW DEVICE." 3 Select "OPEN." 4 Enter a PIN (Personal Identification Number) code to the unit. • ...
"OPEN.." ENGLISH Registering using "OPEN" Preparation: Operate the device to turn on its Bluetooth function. 1 Select "BT-PHONE" or "BT-AUDIO." 2 Select "NEW DEVICE." 3 Select "OPEN." 4 Enter a PIN (Personal Identification Number) code to the unit. • ...
Instructions
Page 12
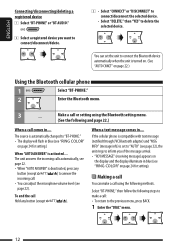
... registered device you of the message arrival. • "RCV MESSAGE" (receiving message) appears on the display and the display illuminate in blue (see "RING COLOR" on page 24 for setting.) When "AUTO ANSWER" is automatically changed...press any button (except / /0). If the cellular phone is compatible with text message (notified through JVC Bluetooth adapter) and "MSG INFO" (message info) is set the unit to make a call... You can set to "AUTO" (see page 22. • When "AUTO ANSWER" is turned on. (See "AUTO CNNCT" on page 24 for setting). The unit answers the incoming calls ...
... registered device you of the message arrival. • "RCV MESSAGE" (receiving message) appears on the display and the display illuminate in blue (see "RING COLOR" on page 24 for setting.) When "AUTO ANSWER" is automatically changed...press any button (except / /0). If the cellular phone is compatible with text message (notified through JVC Bluetooth adapter) and "MSG INFO" (message info) is set the unit to make a call... You can set to "AUTO" (see page 22. • When "AUTO ANSWER" is turned on. (See "AUTO CNNCT" on page 24 for setting). The unit answers the incoming calls ...

Instructions
Page 14
...Radio™ Broadcast ENGLISH Before operating, connect HD Radio tuner box, KT-HD300 (separately purchased) to the CD changer jack on the rear of programming. HD Radio Technology can also receive conventional analog broadcasts. • Many HD Radio stations also offer more than one channel of the unit. ... high-quality digital sound-AM digital will have FM-like quality (in stereo) and FM digital will have CD-like quality-with AUTO, change to another station, or if you turned off the power. • This setting cannot take effect for HD Radio stations only What is broadcast...
...Radio™ Broadcast ENGLISH Before operating, connect HD Radio tuner box, KT-HD300 (separately purchased) to the CD changer jack on the rear of programming. HD Radio Technology can also receive conventional analog broadcasts. • Many HD Radio stations also offer more than one channel of the unit. ... high-quality digital sound-AM digital will have FM-like quality (in stereo) and FM digital will have CD-like quality-with AUTO, change to another station, or if you turned off the power. • This setting cannot take effect for HD Radio stations only What is broadcast...

Instructions
Page 15
...on the rear of the discs in the "SRC SELECT" = "EXT IN" setting, see page 26. 1 Select "CD-CH." 2 Enter the list mode. 3 Select a disc, folder, then the track. [Turn] = [Press] Playback starts automatically. • If there is selected in the magazine • To cancel repeat play... or random play conventional CDs (including CD Text) and MP3 discs. Preparation: Make sure "CH / IPOD" is no disc on the selected tray, the unit beeps. • To select a desired folder/track to use a JVC MP3-compatible CD changer (separately purchased) with your unit.
...on the rear of the discs in the "SRC SELECT" = "EXT IN" setting, see page 26. 1 Select "CD-CH." 2 Enter the list mode. 3 Select a disc, folder, then the track. [Turn] = [Press] Playback starts automatically. • If there is selected in the magazine • To cancel repeat play... or random play conventional CDs (including CD Text) and MP3 discs. Preparation: Make sure "CH / IPOD" is no disc on the selected tray, the unit beeps. • To select a desired folder/track to use a JVC MP3-compatible CD changer (separately purchased) with your unit.

Instructions
Page 17
... While selecting "XM," select "Channel 0." Storing channels in memory You can select all channels of all categories now (including non- Selecting SIRIUS/XM preset station 3 [Turn] = [Press] EXTERNAL DEVICES 17 XM: If you want to listen. • Holding the button changes the channels rapidly. • While searching, invalid and unsubscribed channels...
... While selecting "XM," select "Channel 0." Storing channels in memory You can select all channels of all categories now (including non- Selecting SIRIUS/XM preset station 3 [Turn] = [Press] EXTERNAL DEVICES 17 XM: If you want to listen. • Holding the button changes the channels rapidly. • While searching, invalid and unsubscribed channels...

Instructions
Page 18
... menu 1 Enter the main menu. Pause playback • To resume playback, press the button again. [Press] Select tracks [Hold] Reverse/fast-forward track 2 [Turn] = [Press] REPEAT Ô RANDOM 3 [Turn] = [Press] REPEAT ONE RPT ALL RPT : Functions the same as "Repeat One" of the iPod. : Functions the same as "Shuffle Songs" of the... automatically. PLAYLISTS Ô ARTISTS Ô ALBUMS Ô SONGS Ô GENRES Ô COMPOSERS Ô (back to the beginning) 3 Confirm the selection. • To return to the CD changer jack on the rear of the unit.
... menu 1 Enter the main menu. Pause playback • To resume playback, press the button again. [Press] Select tracks [Hold] Reverse/fast-forward track 2 [Turn] = [Press] REPEAT Ô RANDOM 3 [Turn] = [Press] REPEAT ONE RPT ALL RPT : Functions the same as "Repeat One" of the iPod. : Functions the same as "Shuffle Songs" of the... automatically. PLAYLISTS Ô ARTISTS Ô ALBUMS Ô SONGS Ô GENRES Ô COMPOSERS Ô (back to the beginning) 3 Confirm the selection. • To return to the CD changer jack on the rear of the unit.

Instructions
Page 19
... "AUX ON" is selected in the "SRC SELECT" = "AUX IN" setting, see page 26. 1 Select "EXT INPUT" or "AUX IN." 2 - Turn on the control panel. Connecting an external component to : • CD changer jack on the rear of this unit using the following adapters: -Line Input Adapter, KS-U57 (separately purchsed) -AUX...
... "AUX ON" is selected in the "SRC SELECT" = "AUX IN" setting, see page 26. 1 Select "EXT INPUT" or "AUX IN." 2 - Turn on the control panel. Connecting an external component to : • CD changer jack on the rear of this unit using the following adapters: -Line Input Adapter, KS-U57 (separately purchsed) -AUX...
Instructions
Page 20
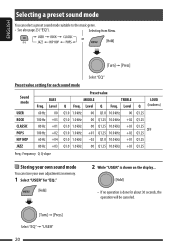
... 60 Hz 00 100 Hz +03 80 Hz +01 100 Hz +02 60 Hz +04 80 Hz +03 Preset value MIDDLE TREBLE LOUD Q Freq. or [Turn] = [Press] Select "EQ" Preset value setting for about 30 seconds, the operation will be canceled...
... 60 Hz 00 100 Hz +03 80 Hz +01 100 Hz +02 60 Hz +04 80 Hz +03 Preset value MIDDLE TREBLE LOUD Q Freq. or [Turn] = [Press] Select "EQ" Preset value setting for about 30 seconds, the operation will be canceled...

Instructions
Page 21
... frequency. 2 Adjust the level. 3 Adjust the Q-slope. SETTINGS 21 To erase the entire title In step 2 above... ENGLISH 3 Select a tone. [Turn] = [Press] 4 Adjust the sound elements of the selected tone. [Turn] = [Press] Title assignment You can assign titles to the next (or previous) character position. 3 Repeat steps 1 and 2 until you finish entering...
... frequency. 2 Adjust the level. 3 Adjust the Q-slope. SETTINGS 21 To erase the entire title In step 2 above... ENGLISH 3 Select a tone. [Turn] = [Press] 4 Adjust the sound elements of the selected tone. [Turn] = [Press] Title assignment You can assign titles to the next (or previous) character position. 3 Repeat steps 1 and 2 until you finish entering...
Instructions
Page 22
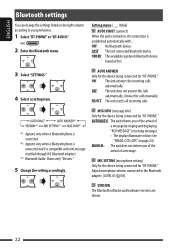
ENGLISH Bluetooth settings You can change the settings listed on , the connection is established automatically with text message (notified through JVC Bluetooth adapter). *3 Bluetooth Audio: Shows only "Version." 5 Change the setting accordingly. LAST: The last connected Bluetooth device. ...connected and it is turned on the right column according to the Bluetooth adapter, [LEVEL 01/02/03]. AUTOMATIC: The unit informs you of the arrival of a message by ringing and displaying "RCV MESSAGE" (receiving message). • The display illuminate in blue (see "RING COLOR" on page 24). ...
ENGLISH Bluetooth settings You can change the settings listed on , the connection is established automatically with text message (notified through JVC Bluetooth adapter). *3 Bluetooth Audio: Shows only "Version." 5 Change the setting accordingly. LAST: The last connected Bluetooth device. ...connected and it is turned on the right column according to the Bluetooth adapter, [LEVEL 01/02/03]. AUTOMATIC: The unit informs you of the arrival of a message by ringing and displaying "RCV MESSAGE" (receiving message). • The display illuminate in blue (see "RING COLOR" on page 24). ...

Instructions
Page 23
... Scroll • SCROLL ONCE : Scrolls the displayed information once. • SCROLL AUTO : Repeats scrolling (at all times when the power is turned off. : Cancels; Initial: Underlined Category Menu items Selectable settings, [reference page] DEMO DEMO Display demonstration • DEMO ON • DEMO ...• SCROLL OFF : Cancels. USER, ROCK, CLASSIC, POPS, HIP HOP, JAZZ DIMMER Dimmer • DIMMER ON : Dims the display and button illumination. • DIMMER OFF : Cancels. CLOCK DISP*1 • CLOCK ON Clock display • CLOCK OFF : Clock time is subject to "AUTO." ...
... Scroll • SCROLL ONCE : Scrolls the displayed information once. • SCROLL AUTO : Repeats scrolling (at all times when the power is turned off. : Cancels; Initial: Underlined Category Menu items Selectable settings, [reference page] DEMO DEMO Display demonstration • DEMO ON • DEMO ...• SCROLL OFF : Cancels. USER, ROCK, CLASSIC, POPS, HIP HOP, JAZZ DIMMER Dimmer • DIMMER ON : Dims the display and button illumination. • DIMMER OFF : Cancels. CLOCK DISP*1 • CLOCK ON Clock display • CLOCK OFF : Clock time is subject to "AUTO." ...

Instructions
Page 26
...ON." 1 2 Select "COLOR" = "USER." [Turn] = [Press] 3 While "USER" is shown on the display... 4 [Turn] = [Press] 5 Select a primary color. [Turn] = [Press] 6 Adjust the level (00 to 31) of the following sources is selected-FM, AM, CD, Bluetooth, HD Radio, ...Color settings Creating your own color -USER Color You can create your own colors-"DAY COLOR" or "NIGHT COLOR." NIGHT COLOR: Used when "DIMMER" is set to the CD changer jack, [19]. • AUX OFF • AUX ON : Disable "AUX IN" in source selection. : Enable "AUX IN" in source selection, [4]. • CH / IPOD : To use a JVC CD...
...ON." 1 2 Select "COLOR" = "USER." [Turn] = [Press] 3 While "USER" is shown on the display... 4 [Turn] = [Press] 5 Select a primary color. [Turn] = [Press] 6 Adjust the level (00 to 31) of the following sources is selected-FM, AM, CD, Bluetooth, HD Radio, ...Color settings Creating your own color -USER Color You can create your own colors-"DAY COLOR" or "NIGHT COLOR." NIGHT COLOR: Used when "DIMMER" is set to the CD changer jack, [19]. • AUX OFF • AUX ON : Disable "AUX IN" in source selection. : Enable "AUX IN" in source selection, [4]. • CH / IPOD : To use a JVC CD...
Instructions
Page 27
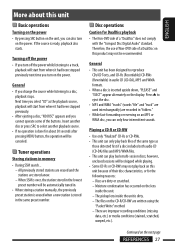
... where it had been stopped previously. • After ejecting a disc, "NO DISC" appears and you turn on this product may not be skipped while playing. • Some CD-Rs or CD-RWs may not play back multi-session discs; Moisture condensation has occurred on the unit, you can only ... operations Caution for the following reasons: - Next time you select "CD" as those detected first if a disc includes both audio CD (CD-DA) files and MP3/WMA files. • This unit can also turn off the power • If you turn on the display. Insert another playback source. • If no ...
... where it had been stopped previously. • After ejecting a disc, "NO DISC" appears and you turn on this product may not be skipped while playing. • Some CD-Rs or CD-RWs may not play back multi-session discs; Moisture condensation has occurred on the unit, you can only ... operations Caution for the following reasons: - Next time you select "CD" as those detected first if a disc includes both audio CD (CD-DA) files and MP3/WMA files. • This unit can also turn off the power • If you turn on the display. Insert another playback source. • If no ...


