Instructions
Page 2
... harmful interference, and (2) this equipment does cause harmful interference to persons. For U.S.A. This equipment generates, uses and can be remote controlled. REFER SERVICING TO QUALIFIED SERVICE PERSONNEL. Le commutateur STANDBY/ON (attente/sous tension) ne coupe jamais complètement la... within an equilateral triangle is encouraged to try to correct the interference by JVC could void the user's authority to part 15 of Conformity Model Number: HX-C6 Trade Name: JVC Responsible Party: JVC Americas Corp. The STANDBY/ON button in a particular installation. If this ...
... harmful interference, and (2) this equipment does cause harmful interference to persons. For U.S.A. This equipment generates, uses and can be remote controlled. REFER SERVICING TO QUALIFIED SERVICE PERSONNEL. Le commutateur STANDBY/ON (attente/sous tension) ne coupe jamais complètement la... within an equilateral triangle is encouraged to try to correct the interference by JVC could void the user's authority to part 15 of Conformity Model Number: HX-C6 Trade Name: JVC Responsible Party: JVC Americas Corp. The STANDBY/ON button in a particular installation. If this ...
Instructions
Page 4
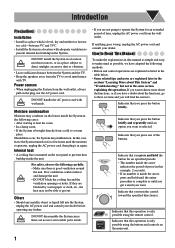
...unit. • DO NOT block the cooling fan and the ventilation openings or holes. Indicate that this operation is only possible using the remote control. Others • Should any further. If you want is selected. Moisture condensation Moisture may condense on the main unit. 1 If... Install in a place which is level, dry and neither too hot nor too cold-between 5°C and 35°C. • Install the System in a location with adequate ventilation to prevent internal heat buildup in a place subject to direct sunlight, excessive dust or vibration. • Leave sufficient...
...unit. • DO NOT block the cooling fan and the ventilation openings or holes. Indicate that this operation is only possible using the remote control. Others • Should any further. If you want is selected. Moisture condensation Moisture may condense on the main unit. 1 If... Install in a place which is level, dry and neither too hot nor too cold-between 5°C and 35°C. • Install the System in a location with adequate ventilation to prevent internal heat buildup in a place subject to direct sunlight, excessive dust or vibration. • Leave sufficient...

Instructions
Page 5
Contents Introduction 1 Precautions 1 How to Read This Manual 1 Getting Started 3 Step 1: Unpack 3 Step 2: Prepare the Remote Control 3 Step 3: Hook Up 4 Before Operating the System 6 Parts Index 6 Daily Operations-Playback 8 Listening to the Radio 9 Playing Back a Disc 10 Playing Back from the PC 12 Daily Operations-Sound and Other Adjustments ... Ejection-Tray Lock 17 Timer Operations 18 Turning Off the Power Automatically 18 Setting the Daily Timer 18 Additional Information 20 Learning More about This System 20 Maintenance 21 Troubleshooting 21 Specifications 22 2
Contents Introduction 1 Precautions 1 How to Read This Manual 1 Getting Started 3 Step 1: Unpack 3 Step 2: Prepare the Remote Control 3 Step 3: Hook Up 4 Before Operating the System 6 Parts Index 6 Daily Operations-Playback 8 Listening to the Radio 9 Playing Back a Disc 10 Playing Back from the PC 12 Daily Operations-Sound and Other Adjustments ... Ejection-Tray Lock 17 Timer Operations 18 Turning Off the Power Automatically 18 Setting the Daily Timer 18 Additional Information 20 Learning More about This System 20 Maintenance 21 Troubleshooting 21 Specifications 22 2
Instructions
Page 6
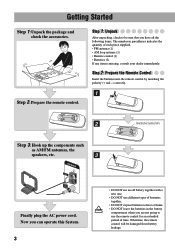
Step 2: Prepare the Remote Control Insert the batteries into the remote control by matching the polarity (+ and -) correctly. 1 2 R6(SUM-3)/AA(15F) Step 3: Hook up the components such as AM/FM antennas, the speakers, etc. 3 Finally plug the AC power cord. Now you can operate this System. 3 • DO... NOT use an old battery together with a new one. • DO NOT use the remote control for an extended period of each piece supplied. • FM antenna (1) • AM loop...
Step 2: Prepare the Remote Control Insert the batteries into the remote control by matching the polarity (+ and -) correctly. 1 2 R6(SUM-3)/AA(15F) Step 3: Hook up the components such as AM/FM antennas, the speakers, etc. 3 Finally plug the AC power cord. Now you can operate this System. 3 • DO... NOT use an old battery together with a new one. • DO NOT use the remote control for an extended period of each piece supplied. • FM antenna (1) • AM loop...

Instructions
Page 9
Remote control 14, 18 18 9, 11, 15 14, 16, 18, 19 9, 11, 14, 16, 19 13 13 14 11, 15 10, 17 10, 15 8, 12, 19 9, 11 8, 13 9, 14, 19 10, 16 14 8, 13 13 8 - 10, 12 16 14 Main unit Remote sensor 8, 10 8, 19 Standby lamp 10, 14, 16, 17 10 10, 17 10 8, 13 14 9 13, 21 8 7 9 8, 9 8, 12 11 13 8 12 5 6 Before Operating the System Parts Index Refer to the pages to see how to use the buttons and controls.
Remote control 14, 18 18 9, 11, 15 14, 16, 18, 19 9, 11, 14, 16, 19 13 13 14 11, 15 10, 17 10, 15 8, 12, 19 9, 11 8, 13 9, 14, 19 10, 16 14 8, 13 13 8 - 10, 12 16 14 Main unit Remote sensor 8, 10 8, 19 Standby lamp 10, 14, 16, 17 10 10, 17 10 8, 13 14 9 13, 21 8 7 9 8, 9 8, 12 11 13 8 12 5 6 Before Operating the System Parts Index Refer to the pages to see how to use the buttons and controls.
Instructions
Page 11
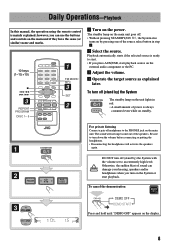
.... • Without pressing STANDBY/ON , the System also turns on the external audio component or the PC. π Adjust the volume. [ Operate the target source as explained later. Be sure to an extremely high level; DO NOT turn off (stand by ) the System with the volume set to turn on the... headphones to start playback. Daily Operations-Playback In this manual, the operation using the remote control is always consumed even while on standby. The standby lamp on the main unit goes off (stand by ) the System The standby lamp on the unit lights in step ø. ø Select the ...
.... • Without pressing STANDBY/ON , the System also turns on the external audio component or the PC. π Adjust the volume. [ Operate the target source as explained later. Be sure to an extremely high level; DO NOT turn off (stand by ) the System with the volume set to turn on the... headphones to start playback. Daily Operations-Playback In this manual, the operation using the remote control is always consumed even while on standby. The standby lamp on the main unit goes off (stand by ) the System The standby lamp on the unit lights in step ø. ø Select the ...
Instructions
Page 12
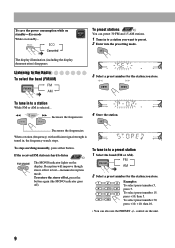
... tune in to a station While FM or AM is tuned in to the Radio To select the band (FM/AM) FM AM To preset stations Remote ONLY You can also use the PRESET +/- When a station (frequency) with sufficient signal strength is selected... 2 sec. If the received FM station is lost-monaural... number 30, press +10, +10, then 10. • You can preset 30 FM and 15 AM stations. 1 Tune in to a station you want to listen Remote ONLY The MONO indicator lights on the unit. 9 Examples: To select preset number 5, press 5. To select preset number 15, press +10, then 5.
... tune in to a station While FM or AM is tuned in to the Radio To select the band (FM/AM) FM AM To preset stations Remote ONLY You can also use the PRESET +/- When a station (frequency) with sufficient signal strength is selected... 2 sec. If the received FM station is lost-monaural... number 30, press +10, +10, then 10. • You can preset 30 FM and 15 AM stations. 1 Tune in to a station you want to listen Remote ONLY The MONO indicator lights on the unit. 9 Examples: To select preset number 5, press 5. To select preset number 15, press +10, then 5.

Instructions
Page 13
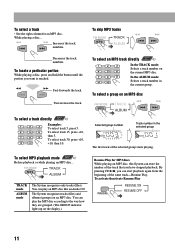
... up the same control (0) again. ALL DISC 1 DISC All the loaded discs are played once. 10 Playback of the disc tray. To select a playback disc Remote control: 1 2 3 4 5 Main unit: Ex.: To select DISC 1 • When using an 8 cm disc, place it on page 11. Main unit: To release ... starts. • When you can play is selected. Playing Back a Disc This System can play back the following discs-regular CD and CD-R/RW (recorded in the audio CD format and in sequence. To pause playback Remote control: To insert discs Main Unit ONLY To release it , press CD #. See...
... up the same control (0) again. ALL DISC 1 DISC All the loaded discs are played once. 10 Playback of the disc tray. To select a playback disc Remote control: 1 2 3 4 5 Main unit: Ex.: To select DISC 1 • When using an 8 cm disc, place it on page 11. Main unit: To release ... starts. • When you can play is selected. Playing Back a Disc This System can play back the following discs-regular CD and CD-R/RW (recorded in the audio CD format and in sequence. To pause playback Remote control: To insert discs Main Unit ONLY To release it , press CD #. See...
Instructions
Page 14
... track of the track that you can play an MP3 disc like an Audio CD. To select MP3 playback mode Remote ONLY Before playback or while playing an MP3 disc... TRACK ALBUM TRACK mode ALBUM mode The System recognizes only tracks (files). While playing a disc... By pressing CD 6,... you have stopped playback. To select an MP3 track directly Remote ONLY In the TRACK mode: Selects a track number on an MP3 disc....
... track of the track that you can play an MP3 disc like an Audio CD. To select MP3 playback mode Remote ONLY Before playback or while playing an MP3 disc... TRACK ALBUM TRACK mode ALBUM mode The System recognizes only tracks (files). While playing a disc... By pressing CD 6,... you have stopped playback. To select an MP3 track directly Remote ONLY In the TRACK mode: Selects a track number on an MP3 disc....
Instructions
Page 16
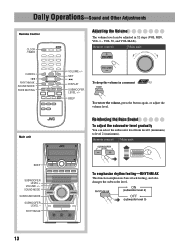
... SURROUND MODE SUBWOOFER LEVEL - RHYTHM AX To emphasize rhythm feeling-RHYTHM AX This function emphasizes bass attack feeling, and also changes the subwoofer level. Remote control: Main unit: BEEP SUBWOOFER LEVEL + VOLUME +/- ON (subwoofer level 2) OFF (subwoofer level 0) 13 VOL 30, and VOL MAX). ...level gradually You can be adjusted in a moment ONLY To restore the volume, press the button again, or adjust the volume level. Remote control: Main unit: CANCEL 4 RHYTHM AX SOUND MODE FADE MUTING Main unit VOLUME +/- SET ¢ DISPLAY SUBWOOFER LEVEL +/- Daily Operations-Sound...
... SURROUND MODE SUBWOOFER LEVEL - RHYTHM AX To emphasize rhythm feeling-RHYTHM AX This function emphasizes bass attack feeling, and also changes the subwoofer level. Remote control: Main unit: BEEP SUBWOOFER LEVEL + VOLUME +/- ON (subwoofer level 2) OFF (subwoofer level 0) 13 VOL 30, and VOL MAX). ...level gradually You can be adjusted in a moment ONLY To restore the volume, press the button again, or adjust the volume level. Remote control: Main unit: CANCEL 4 RHYTHM AX SOUND MODE FADE MUTING Main unit VOLUME +/- SET ¢ DISPLAY SUBWOOFER LEVEL +/- Daily Operations-Sound...
Instructions
Page 17
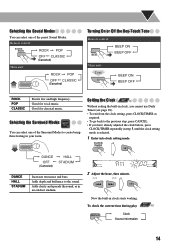
...Good for classical music. Good for vocal music. Now the built-in step 1, until the clock setting mode is selected. 1 Enter into clock setting mode. Remote control: ROCK POP OFF CLASSIC (Canceled) Main unit: ROCK POP OFF CLASSIC (Canceled) Turning On or Off the Key-Touch Tone... play ONLY Clock Source information 14 Selecting the Surround Modes Main Unit ONLY You can select one of the preset Sound Modes. Setting the Clock Remote ONLY Without setting the built-in clock, you have already adjusted the clock before, press CLOCK/TIMER repeatedly in clock starts working. Selecting the...
...Good for classical music. Good for vocal music. Now the built-in step 1, until the clock setting mode is selected. 1 Enter into clock setting mode. Remote control: ROCK POP OFF CLASSIC (Canceled) Main unit: ROCK POP OFF CLASSIC (Canceled) Turning On or Off the Key-Touch Tone... play ONLY Clock Source information 14 Selecting the Surround Modes Main Unit ONLY You can select one of the preset Sound Modes. Setting the Clock Remote ONLY Without setting the built-in clock, you have already adjusted the clock before, press CLOCK/TIMER repeatedly in clock starts working. Selecting the...

Instructions
Page 18
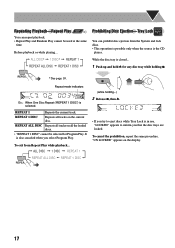
...order you want for MP3 discs. 1 Before starting playback, activate Program Play. To select track 15, press +10, then 5. Advanced Disc Operations Remote Control 10 keys (1-10,+10) CANCEL ¢/4 REPEAT PROGRAM DISC 1 - 5 Main unit 7 0 SET 7 CD 3/8 RANDOM Programming the Playing Order... Track number 4 Repeat steps 2 and 3 until you program all tracks you have programmed. • When all the programmed tracks played, the System exits from Program Play. 15 PROGRAM PROGRAM Canceled PROGRAM indicator 2 Select a disc. 1 2 3 4 5 3 Select tracks you want . 5 Start playback.
...order you want for MP3 discs. 1 Before starting playback, activate Program Play. To select track 15, press +10, then 5. Advanced Disc Operations Remote Control 10 keys (1-10,+10) CANCEL ¢/4 REPEAT PROGRAM DISC 1 - 5 Main unit 7 0 SET 7 CD 3/8 RANDOM Programming the Playing Order... Track number 4 Repeat steps 2 and 3 until you program all tracks you have programmed. • When all the programmed tracks played, the System exits from Program Play. 15 PROGRAM PROGRAM Canceled PROGRAM indicator 2 Select a disc. 1 2 3 4 5 3 Select tracks you want . 5 Start playback.

Instructions
Page 19
... add steps in the reverse order. To exit from again. To pause: To stop : To release it , press the button The System exits from Random Play while playback... in the programmed order. Random Play. To modify the program While the PROGRAM indicator lights on the display... and before playback... To skip: Playback skips to the next track selected randomly. RANDOM RANDOM Canceled RANDOM indicator Remote To check the programmed contents ONLY While the PROGRAM indicator lights on the display and before playback... To pause: To stop : To release...
... add steps in the reverse order. To exit from again. To pause: To stop : To release it , press the button The System exits from Random Play while playback... in the programmed order. Random Play. To modify the program While the PROGRAM indicator lights on the display... and before playback... To skip: Playback skips to the next track selected randomly. RANDOM RANDOM Canceled RANDOM indicator Remote To check the programmed contents ONLY While the PROGRAM indicator lights on the display and before playback... To pause: To stop : To release...
Instructions
Page 20
...the loaded discs. • "REPEAT 1 DISC" cannot be used at the same time. REPEAT 1 Repeats the current track. To exit from the System and lock discs. • This operation is possible only when the source is the CD player. "UN LOCKED" appears on the current disc. Repeating ...Playback-Repeat Play Remote ONLY You can prohibit disc ejection from Repeat Play while playback... ALL DISC* 1 DISC* REPEAT 1 REPEAT ALL DISC REPEAT 1 DISC Prohibiting Disc ...
...the loaded discs. • "REPEAT 1 DISC" cannot be used at the same time. REPEAT 1 Repeats the current track. To exit from the System and lock discs. • This operation is possible only when the source is the CD player. "UN LOCKED" appears on the current disc. Repeating ...Playback-Repeat Play Remote ONLY You can prohibit disc ejection from Repeat Play while playback... ALL DISC* 1 DISC* REPEAT 1 REPEAT ALL DISC REPEAT 1 DISC Prohibiting Disc ...
Instructions
Page 21
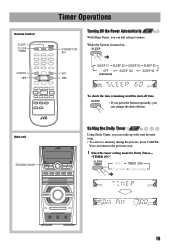
... System is turned on... SLEEP 10 SLEEP 20 SLEEP 30 SLEEP 60 OFF SLEEP 120 SLEEP 90 SET (Canceled) ¢ To check the time remaining until the shut-off time. DAILY TIMER (ON) Canceled Clock setting 18 You can return to music. Setting the Daily Timer Remote ONLY...with your favorite song. • To correct a misentry during the process, press CANCEL. Remote Control SLEEP CLOCK /TIMER CANCEL 4 Main unit STANDBY/ON Timer Operations STANDBY/ON Turning Off the Power Automatically Remote ONLY With Sleep Timer, you can fall asleep to the previous step. 1 Select the timer...
... System is turned on... SLEEP 10 SLEEP 20 SLEEP 30 SLEEP 60 OFF SLEEP 120 SLEEP 90 SET (Canceled) ¢ To check the time remaining until the shut-off time. DAILY TIMER (ON) Canceled Clock setting 18 You can return to music. Setting the Daily Timer Remote ONLY...with your favorite song. • To correct a misentry during the process, press CANCEL. Remote Control SLEEP CLOCK /TIMER CANCEL 4 Main unit STANDBY/ON Timer Operations STANDBY/ON Turning Off the Power Automatically Remote ONLY With Sleep Timer, you can fall asleep to the previous step. 1 Select the timer...
Instructions
Page 24
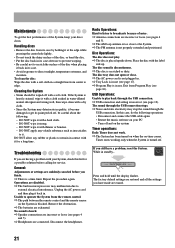
... lightly. • Do not touch the shiny surface of the System, keep your discs clean. In this case, do the following : - While in a straight line from the remote control. ] The path between the remote control and the remote sensor on -time comes. Maintenance To get its paint peeled off..., wipe it with a cloth soaked in water-diluted neutral detergent and wrung well, then wipe clean with a dry cloth. • Since the System may deteriorate in microprocessor may stop the sound through the USB connection. ] USB connection and setting is heard. ] Speaker connections are having a problem...
... lightly. • Do not touch the shiny surface of the System, keep your discs clean. In this case, do the following : - While in a straight line from the remote control. ] The path between the remote control and the remote sensor on -time comes. Maintenance To get its paint peeled off..., wipe it with a cloth soaked in water-diluted neutral detergent and wrung well, then wipe clean with a dry cloth. • Since the System may deteriorate in microprocessor may stop the sound through the USB connection. ] USB connection and setting is heard. ] Speaker connections are having a problem...


