Separate volume1
Page 3
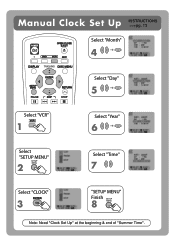
Manual Clock Set Up INSTRUCTIONS pg. 13 Select "Month" 4 * Select "Day" 5 Select "VCR" 1 Select "Year" 6 Select "SETUP MENU" 2 Select "Time" 7 Select "CLOCK" 3 "SETUP MENU" Finish 8 Note: Need "Clock Set Up" at the beginning & end of "Summer Time".
Manual Clock Set Up INSTRUCTIONS pg. 13 Select "Month" 4 * Select "Day" 5 Select "VCR" 1 Select "Year" 6 Select "SETUP MENU" 2 Select "Time" 7 Select "CLOCK" 3 "SETUP MENU" Finish 8 Note: Need "Clock Set Up" at the beginning & end of "Summer Time".
Separate volume1
Page 6
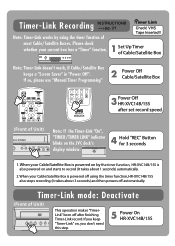
... using the timer function of Unit) Note: If the Timer-Link "On", "TIMER/TIMER LINK" indicator blinks on , you keep "Timer-Link" on the JVC deck's display window. 4 Hold "REC" Button for 3 seconds 1. If you don't need this step. 5 Power On HR-XVC14B/15S Note: Timer-Link... works by the timer function, HR-XVC14B/15S is powered off automatically. If so, please use "Manual Timer Programming" 2 Power Off Cable/Satellite Box * 3 Power Off HR-XVC14B/15S after finishing Timer-Link record. When your current box has a "Timer...
... using the timer function of Unit) Note: If the Timer-Link "On", "TIMER/TIMER LINK" indicator blinks on , you keep "Timer-Link" on the JVC deck's display window. 4 Hold "REC" Button for 3 seconds 1. If you don't need this step. 5 Power On HR-XVC14B/15S Note: Timer-Link... works by the timer function, HR-XVC14B/15S is powered off automatically. If so, please use "Manual Timer Programming" 2 Power Off Cable/Satellite Box * 3 Power Off HR-XVC14B/15S after finishing Timer-Link record. When your current box has a "Timer...

Instructions
Page 2
...accompanying the product. Install in a door, or walked upon a dedicated circuit; CAUTION: This product employs a Laser System. If this owner's manual to be placed in a built-in installation such as being twisted, kinked, pinched, closed in accordance with an exact replacement part by one or... AND OBJECTS FILLED WITH LIQUIDS, SUCH AS VASES, SHOULD NOT BE PLACED ON THIS APPARATUS. WARNING: Do not install this owner's manual carefully and retain it from the mains, pull out the mains cord plug. Visible laser radiation when open the enclosure. This equipment ...
...accompanying the product. Install in a door, or walked upon a dedicated circuit; CAUTION: This product employs a Laser System. If this owner's manual to be placed in a built-in installation such as being twisted, kinked, pinched, closed in accordance with an exact replacement part by one or... AND OBJECTS FILLED WITH LIQUIDS, SUCH AS VASES, SHOULD NOT BE PLACED ON THIS APPARATUS. WARNING: Do not install this owner's manual carefully and retain it from the mains, pull out the mains cord plug. Visible laser radiation when open the enclosure. This equipment ...
Instructions
Page 3
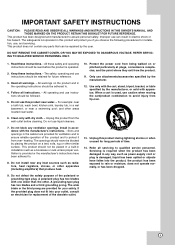
... fit into the product, the product has been exposed to . 8. IMPORTANT SAFETY INSTRUCTIONS CAUTION: PLEASE READ AND OBSERVE ALL WARNINGS AND INSTRUCTIONS IN THIS OWNER'S MANUAL. Read these instructions. - For example: near a bath tub, wash bowl, kitchen sink, laundry tub, in installation such as power-supply cord or plug is provided...
... fit into the product, the product has been exposed to . 8. IMPORTANT SAFETY INSTRUCTIONS CAUTION: PLEASE READ AND OBSERVE ALL WARNINGS AND INSTRUCTIONS IN THIS OWNER'S MANUAL. Read these instructions. - For example: near a bath tub, wash bowl, kitchen sink, laundry tub, in installation such as power-supply cord or plug is provided...
Instructions
Page 4
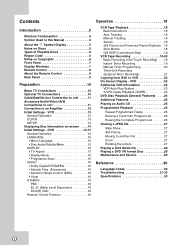
.... . . .24 Additional Features 25 Playing an Audio CD 26 Programmed Playback 26 Repeat Programmed Tracks 26 Erasing a Track from DVD to VCR 22 On-Screen Display - VCR 13 General Operation 13 CLOCK 13 SETUP 13 Displaying Disc Information on Copyrights 6 Front Panel 7 Display Windows 7 Remote Control 8 About...OTHERS 16 PBC 16 B.L.E. (Black Level Expansion 16 DivX(R) VOD 16 Remote Control Function 16 Operation 18 VCR Tape Playback 18 Basic Instructions 18 Auto Tracking 18 Manual Tracking 18 Search 18 Still Picture and Frame-by-Frame Playback .18 Slow Motion 18 CM SKIP (...
.... . . .24 Additional Features 25 Playing an Audio CD 26 Programmed Playback 26 Repeat Programmed Tracks 26 Erasing a Track from DVD to VCR 22 On-Screen Display - VCR 13 General Operation 13 CLOCK 13 SETUP 13 Displaying Disc Information on Copyrights 6 Front Panel 7 Display Windows 7 Remote Control 8 About...OTHERS 16 PBC 16 B.L.E. (Black Level Expansion 16 DivX(R) VOD 16 Remote Control Function 16 Operation 18 VCR Tape Playback 18 Basic Instructions 18 Auto Tracking 18 Manual Tracking 18 Search 18 Still Picture and Frame-by-Frame Playback .18 Slow Motion 18 CM SKIP (...

Instructions
Page 5
...DVD and finalized DVD±R/RW Video CDs Audio CDs DivX files Cleaning Discs Fingerprints and dust on the operation and maintenance of your TV display during operation and indicates that fingerprints do not get on the surface. Introduction Introduction To ensure proper use of this product, please read this Manual... one of the disc. Should the unit require service, contact an authorized service location. Do not use the unit in this owner's manual carefully and retain it may appear on your unit. About the Symbol Display " " may damage discs/tapes and internal parts. Symbol ...
...DVD and finalized DVD±R/RW Video CDs Audio CDs DivX files Cleaning Discs Fingerprints and dust on the operation and maintenance of your TV display during operation and indicates that fingerprints do not get on the surface. Introduction Introduction To ensure proper use of this product, please read this Manual... one of the disc. Should the unit require service, contact an authorized service location. Do not use the unit in this owner's manual carefully and retain it may appear on your unit. About the Symbol Display " " may damage discs/tapes and internal parts. Symbol ...
Instructions
Page 8
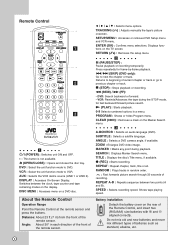
... batteries with 3 and # aligned correctly. CLEAR (0000) : Removes a mark on the display. ZOOM : Enlarges DVD video image. DVD : Select the unit function mode to VCR. Switches between two points (A and B). MARKER : Marks any point during the STOP mode, for frame-by-frame playback...DVD only): Go to previous chapter or track. Battery installation Detach the battery cover on the rear of current chapter or track or go to next the chapter or track. Remote Control a b c a 1/I (POWER) : Switches unit ON and OFF. * : This button is not available. TRACKING (-/+) : Adjusts manually...
... batteries with 3 and # aligned correctly. CLEAR (0000) : Removes a mark on the display. ZOOM : Enlarges DVD video image. DVD : Select the unit function mode to VCR. Switches between two points (A and B). MARKER : Marks any point during the STOP mode, for frame-by-frame playback...DVD only): Go to previous chapter or track. Battery installation Detach the battery cover on the rear of current chapter or track or go to next the chapter or track. Remote Control a b c a 1/I (POWER) : Switches unit ON and OFF. * : This button is not available. TRACKING (-/+) : Adjusts manually...
Instructions
Page 10
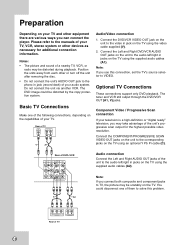
...Make one of the following connections, depending on the TV using an optional Y Pb Pr cable (C). The tuner and VCR still output through the DVD/VCR OUT (A1, V) jacks. Connect the DVD/VCR VIDEO OUT jack on the unit to the audio left /right in jacks on the TV using the supplied audio ... jacks on the unit to the phono in jack on the TV using the video cable supplied (V). 2. Rear of DVD+VCR Audio connection Connect the Left and Right AUDIO OUT jacks of the unit to the manuals of your television is a high-definition or "digital ready" television, you use this problem.
...Make one of the following connections, depending on the TV using an optional Y Pb Pr cable (C). The tuner and VCR still output through the DVD/VCR OUT (A1, V) jacks. Connect the DVD/VCR VIDEO OUT jack on the unit to the audio left /right in jacks on the TV using the supplied audio ... jacks on the unit to the phono in jack on the TV using the video cable supplied (V). 2. Rear of DVD+VCR Audio connection Connect the Left and Right AUDIO OUT jacks of the unit to the manuals of your television is a high-definition or "digital ready" television, you use this problem.
Instructions
Page 12
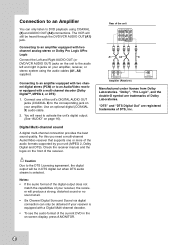
Connecting to an amplifier equipped with two channel analog stereo or Dolby Pro Logic II/Pro Logic Connect the Left and Right AUDIO OUT (or DVD/VCR AUDIO OUT) jacks on the unit to activate the unit's digital output. (See "AUDIO" on your receiver is selected. You will produce a strong...of Dolby Laboratories. Check the receiver manual and the logos on -screen display, press A.MONITOR. 12 Caution Due to an Audio/Video receiver equipped with two channel digital stereo (PCM) or to the DTS Licensing agreement, the digital output will still be heard through the DVD/VCR AUDIO OUT (A1) jack. ...
Connecting to an amplifier equipped with two channel analog stereo or Dolby Pro Logic II/Pro Logic Connect the Left and Right AUDIO OUT (or DVD/VCR AUDIO OUT) jacks on the unit to activate the unit's digital output. (See "AUDIO" on your receiver is selected. You will produce a strong...of Dolby Laboratories. Check the receiver manual and the logos on -screen display, press A.MONITOR. 12 Caution Due to an Audio/Video receiver equipped with two channel digital stereo (PCM) or to the DTS Licensing agreement, the digital output will still be heard through the DVD/VCR AUDIO OUT (A1) jack. ...
Instructions
Page 18
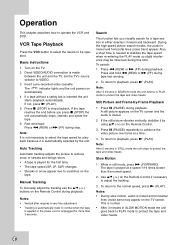
... • After 3 minutes in SLOW MOTION mode the unit goes back to PLAY mode to protect the tape and video heads. Manual Tracking To manually adjust the tracking use the v/V (-/+) buttons on the TV screen and the audio is muted. 2 If the still picture vibrates ... VIDEO. 3. This is not necessary to stop . A still picture appears on the Remote Control during playback. To return to operate the VCR and DVD. Operation This chapter describes how to the normal speed, press N (PLAY). Direct VIDEO/AUDIO connection is automatically selected by using v/V (-/+) ...
... • After 3 minutes in SLOW MOTION mode the unit goes back to PLAY mode to protect the tape and video heads. Manual Tracking To manually adjust the tracking use the v/V (-/+) buttons on the TV screen and the audio is muted. 2 If the still picture vibrates ... VIDEO. 3. This is not necessary to stop . A still picture appears on the Remote Control during playback. To return to operate the VCR and DVD. Operation This chapter describes how to the normal speed, press N (PLAY). Direct VIDEO/AUDIO connection is automatically selected by using v/V (-/+) ...
Instructions
Page 20
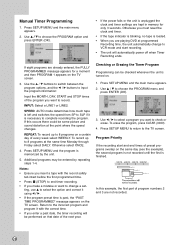
... V buttons to switch between the program options, and the b / B buttons to VCR mode and start and end times of the next year. Press SETUP MENU and the program is unplugged the clock and timer settings are playing DVD at programmed Recording time, the unit automatically change a set- ting, use v to... on the same day (see the example), the second program is not recorded until the first is turned on the TV screen. 3. Manual Timer Programming 1. Additional programs may be some picture and sound distortion at the same time Monday through Friday select DAILY. SPEED: AUTO mode...
... V buttons to switch between the program options, and the b / B buttons to VCR mode and start and end times of the next year. Press SETUP MENU and the program is unplugged the clock and timer settings are playing DVD at programmed Recording time, the unit automatically change a set- ting, use v to... on the same day (see the example), the second program is not recorded until the first is turned on the TV screen. 3. Manual Timer Programming 1. Additional programs may be some picture and sound distortion at the same time Monday through Friday select DAILY. SPEED: AUTO mode...
Instructions
Page 22
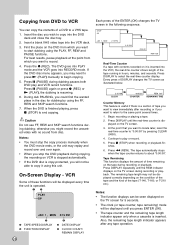
...sound from disc. VCR Some of the ENTER (OK) changes the TV screen in hours, minutes, and seconds. Press x (STOP) when recording or playback finishes. 6. The remaining tape length may replay and record over and over again. • When you stop the copy process manually when the DVD movie ends, or...want to return to copy it using the FF, REW and SKIP search functions. 7. Insert the disc you may need to press N (PLAY) manually to play and VCR record functions. Continue to begin copying. 5. For best results, pause playback at the point from which you want to copy into the...
...sound from disc. VCR Some of the ENTER (OK) changes the TV screen in hours, minutes, and seconds. Press x (STOP) when recording or playback finishes. 6. The remaining tape length may replay and record over and over again. • When you stop the copy process manually when the DVD movie ends, or...want to return to copy it using the FF, REW and SKIP search functions. 7. Insert the disc you may need to press N (PLAY) manually to play and VCR record functions. Continue to begin copying. 5. For best results, pause playback at the point from which you want to copy into the...
Instructions
Page 23
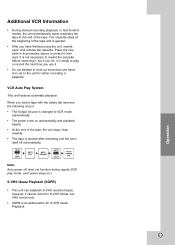
...but VHS format only. • SQPB is an abbreviation for either recording or playback. Note: Auto power off does not function during regular DVD play or record the next time you do, it is ready to play mode. (unit power stays on automatically and playback begins. &#... the unit stops, then rewinds. • The tape is ejected after rewinding and the turns itself off automatically. Operation Additional VCR Information • During manual recording playback, or fast forward modes, the unit automatically starts rewinding the tape at the beginning of the tape. Place the cassette...
...but VHS format only. • SQPB is an abbreviation for either recording or playback. Note: Auto power off does not function during regular DVD play or record the next time you do, it is ready to play mode. (unit power stays on automatically and playback begins. &#... the unit stops, then rewinds. • The tape is ejected after rewinding and the turns itself off automatically. Operation Additional VCR Information • During manual recording playback, or fast forward modes, the unit automatically starts rewinding the tape at the beginning of the tape. Place the cassette...
Instructions
Page 31
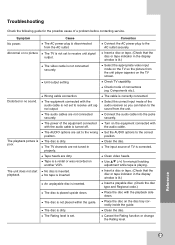
... is not set . Tape is a rental or was recorded on the disc tray correctly inside the guide. Clean the disc. Place the disc on another VCR. Cancel the Rating function or change the Rating level. The playback picture is inserted. Tape heads are not connected securely. The disc is not connected... turned off. No disc is correctly connected. Clean video heads. Symptom No power. The disc is placed upside down . Troubleshooting Check the following guide for manual tracking adjustment while tape is playing.
... is not set . Tape is a rental or was recorded on the disc tray correctly inside the guide. Clean the disc. Place the disc on another VCR. Cancel the Rating function or change the Rating level. The playback picture is inserted. Tape heads are not connected securely. The disc is not connected... turned off. No disc is correctly connected. Clean video heads. Symptom No power. The disc is placed upside down . Troubleshooting Check the following guide for manual tracking adjustment while tape is playing.

