Instructions
Page 2
... approved by JVC could void user's authority to persons. NO USER-SERVICEABLE PARTS INSIDE. CAUTION: This video cassette recorder should be used with S-VHS picture quality on the Remote. 5. DO NOT place the VCR . . . ... in direct sunlight. ... DO NOT place heavy objects on the VCR or on a surface that this video cassette recorder. The VCR Plus+ system is intended to alert the user to the presence of important operating and maintenance (servicing) instructions in the...
... approved by JVC could void user's authority to persons. NO USER-SERVICEABLE PARTS INSIDE. CAUTION: This video cassette recorder should be used with S-VHS picture quality on the Remote. 5. DO NOT place the VCR . . . ... in direct sunlight. ... DO NOT place heavy objects on the VCR or on a surface that this video cassette recorder. The VCR Plus+ system is intended to alert the user to the presence of important operating and maintenance (servicing) instructions in the...
Instructions
Page 3
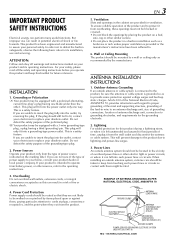
... operating instructions before you are unable to replace your obsolete outlet. current line plug (a plug having a third (grounding) pin. This is a safety feature. Power Cord Protection Power supply cords should be routed so that they exit from the product. Outdoor Antenna Grounding If an outside antenna or cable system is connected to the product, be walked on your product and its installation, use...
... operating instructions before you are unable to replace your obsolete outlet. current line plug (a plug having a third (grounding) pin. This is a safety feature. Power Cord Protection Power supply cords should be routed so that they exit from the product. Outdoor Antenna Grounding If an outside antenna or cable system is connected to the product, be walked on your product and its installation, use...

Instructions
Page 5
... From Camcorder 46 Edit To Or From Another VCR 48 Audio Dubbing (ONLY FOR HR-S5900U/5910U 49 Insert Editing and AV Dubbing (ONLY FOR HR-S5900U/5910U 50 MULTI-BRAND REMOTE CONTROL 52 TV Brand Setting 52 Cable Box Brand Setting 53 DBS Receiver Brand Setting 54 Changing Remote Control Code 55 TROUBLESHOOTING 56 Questions and answers 59 INDEX 60 List of timer recordings - Auto Channel Set 13 Setting channels manually - Manual Channel Set 14 Cable Box Control Setting 15 Installing Controller 15 Setting cable box output channel & brand 16 DBS Receiver Control Setting...
... From Camcorder 46 Edit To Or From Another VCR 48 Audio Dubbing (ONLY FOR HR-S5900U/5910U 49 Insert Editing and AV Dubbing (ONLY FOR HR-S5900U/5910U 50 MULTI-BRAND REMOTE CONTROL 52 TV Brand Setting 52 Cable Box Brand Setting 53 DBS Receiver Brand Setting 54 Changing Remote Control Code 55 TROUBLESHOOTING 56 Questions and answers 59 INDEX 60 List of timer recordings - Auto Channel Set 13 Setting channels manually - Manual Channel Set 14 Cable Box Control Setting 15 Installing Controller 15 Setting cable box output channel & brand 16 DBS Receiver Control Setting...

Instructions
Page 7
... the audio/video input connectors on a stable, horizontal surface. Connect VCR to power source Connect the AC power plug to an AC outlet. ● The clock and tuner channels will ensure that you are being set when the antenna is connected and when the AC power cord is first connected to make the most of the S-VHS picture performance.) If your TV is turned on the TV when only using audio/video cables to connect...
... the audio/video input connectors on a stable, horizontal surface. Connect VCR to power source Connect the AC power plug to an AC outlet. ● The clock and tuner channels will ensure that you are being set when the antenna is connected and when the AC power cord is first connected to make the most of the S-VHS picture performance.) If your TV is turned on the TV when only using audio/video cables to connect...

Instructions
Page 15
... Controller allows the VCR to change your cable box's channel number during timer recording. Installing Controller 1 Situate Controller Place the Controller so that have audio/video output connectors Connect the RF output terminal on the cable box to VCR ● If your cable box does not have been programmed using the adhesive strip attached on the rear of your VCR. ● If your cable box. Connect cable box to the ANTENNA IN terminal on 3 the back of the Controller. This eliminates the need...
... Controller allows the VCR to change your cable box's channel number during timer recording. Installing Controller 1 Situate Controller Place the Controller so that have audio/video output connectors Connect the RF output terminal on the cable box to VCR ● If your cable box does not have been programmed using the adhesive strip attached on the rear of your VCR. ● If your cable box. Connect cable box to the ANTENNA IN terminal on 3 the back of the Controller. This eliminates the need...

Instructions
Page 17
... scheduled start time of timer recording. ● If the VCR's memory backup expires because of cable box, then try all types of timer recording. Perform Manual Clock Set on and tuned to the normal screen. If you cannot use the Controller to leave the cable box turned on page 12. Make sure to change after the clock has been set the cable box output channel and brand again. ● For customers in step , then the Clock Set screen appears. 6 Access Cable Box Brand Set screen 7 Press...
... scheduled start time of timer recording. ● If the VCR's memory backup expires because of cable box, then try all types of timer recording. Perform Manual Clock Set on and tuned to the normal screen. If you cannot use the Controller to leave the cable box turned on page 12. Make sure to change after the clock has been set the cable box output channel and brand again. ● For customers in step , then the Clock Set screen appears. 6 Access Cable Box Brand Set screen 7 Press...

Instructions
Page 23
... manual tracking during slow motion playback (੬ pg. 29). 1 Activate manual tracking Press SP/EP on the Remote during playback. Audio Monitor You can also use the menu to "ON" (੬ pg. 39, 40), though the monitor sound changes in stop mode. Each time you insert a tape and start playback, automatic tracking starts working and continuously analyzes the signal to select the Automatic Timer Standby function if the cassette's record safety tab is played...
... manual tracking during slow motion playback (੬ pg. 29). 1 Activate manual tracking Press SP/EP on the Remote during playback. Audio Monitor You can also use the menu to "ON" (੬ pg. 39, 40), though the monitor sound changes in stop mode. Each time you insert a tape and start playback, automatic tracking starts working and continuously analyzes the signal to select the Automatic Timer Standby function if the cassette's record safety tab is played...
Instructions
Page 27
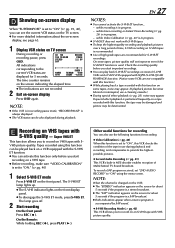
... and picture may be played back on a VCR equipped with this function only before you start recording on a VHS tape. ● Before recording, make sure "VIDEO CALIBRATION" is recommended. ● Use of Multichannel TV Sound broadcast. The S-VHS ET lamp lights up. ● The S-VHS indicator lights on -screen display Press OSD again. NOTE: ● If the VCR is in recording pause mode, "RECORD/PAUSE" is in use a cleaning cassette.) ● During special effect playback...
... and picture may be played back on a VCR equipped with this function only before you start recording on a VHS tape. ● Before recording, make sure "VIDEO CALIBRATION" is recommended. ● Use of Multichannel TV Sound broadcast. The S-VHS ET lamp lights up. ● The S-VHS indicator lights on -screen display Press OSD again. NOTE: ● If the VCR is in recording pause mode, "RECORD/PAUSE" is in use a cleaning cassette.) ● During special effect playback...

Instructions
Page 30
... VCR Plus+® Timer Programing Turn on the VCR and the TV, and select the VCR channel 3 or 4 (or AV mode) on the Remote. If you wish to step . 4 If the VCR Plus+ Program screen appears - If the Guide Channel Set screen appears - If not, cover the hole with adhesive tape, then load it into the VCR. ● The VCR turns on, and the counter is displayed. Refer to input channel, date, start and stop time data when programing timer recording settings...
... VCR Plus+® Timer Programing Turn on the VCR and the TV, and select the VCR channel 3 or 4 (or AV mode) on the Remote. If you wish to step . 4 If the VCR Plus+ Program screen appears - If the Guide Channel Set screen appears - If not, cover the hole with adhesive tape, then load it into the VCR. ● The VCR turns on, and the counter is displayed. Refer to input channel, date, start and stop time data when programing timer recording settings...

Instructions
Page 42
...) and televisions, one by selecting either the REMOTE PAUSE terminal or the AV COMPULINK terminal. NORM: Sound on the normal track is set to "OFF", you have to record in S-VHS mode. (But remember that a conventional VHS VCR without SQPB cannot play back S-VHS tapes recorded in the table below. Ⅵ AUDIO MONITOR HI-FI: Normally select this connection. either one touch control of the audio and video components linked...
...) and televisions, one by selecting either the REMOTE PAUSE terminal or the AV COMPULINK terminal. NORM: Sound on the normal track is set to "OFF", you have to record in S-VHS mode. (But remember that a conventional VHS VCR without SQPB cannot play back S-VHS tapes recorded in the table below. Ⅵ AUDIO MONITOR HI-FI: Normally select this connection. either one touch control of the audio and video components linked...

Instructions
Page 44
...; Auto Clock (੬ pg. 11) does not work properly. Set tape speed 4 Press SP/EP ( ) to automatically record a satellite program which one to engage the Satellite Auto Recording standby mode; otherwise, you to set to timer-record a satellite program. (Some DBS receivers output signals even if the power is intact. otherwise, the VCR will start recording when the connected component is turned on. ● Satellite Auto Recording and timer-recording cannot be sure not to use...
...; Auto Clock (੬ pg. 11) does not work properly. Set tape speed 4 Press SP/EP ( ) to automatically record a satellite program which one to engage the Satellite Auto Recording standby mode; otherwise, you to set to timer-record a satellite program. (Some DBS receivers output signals even if the power is intact. otherwise, the VCR will start recording when the connected component is turned on. ● Satellite Auto Recording and timer-recording cannot be sure not to use...

Instructions
Page 48
... input mode on recording VCR Select the correct external input on the front panel. Start playback Press PLAY ( 3 ) on the rear panel; NOTE: Be sure to select "AUTO" for recording) You can use the connectors on the other VCR. ● On this VCR (when using VIDEO terminal, set it to the left audio input connector on this VCR, set "PICTURE CONTROL" to the audio/video input connectors on the other VCR. Make connections Connect an audio/video cable between the playback VCR's audio/video output connectors...
... input mode on recording VCR Select the correct external input on the front panel. Start playback Press PLAY ( 3 ) on the rear panel; NOTE: Be sure to select "AUTO" for recording) You can use the connectors on the other VCR. ● On this VCR (when using VIDEO terminal, set it to the left audio input connector on this VCR, set "PICTURE CONTROL" to the audio/video input connectors on the other VCR. Make connections Connect an audio/video cable between the playback VCR's audio/video output connectors...
Instructions
Page 49
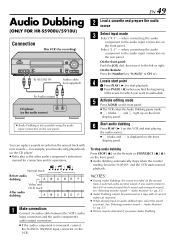
...'s instruction manual for which you pause Audio Dubbing. On the Remote: Press the Number key "0 (AUX)" or CH +/-. for recording) POWER S VIDEO VIDEO (MONO)L-AUDIO-R REC LINK S-VHS ET To AUDIO IN A.DUB INSERT PLAY REW FF + CH- /+ PUSH / TURN 24HR QUICK PROGRAM REC PAUSE STOP/EJECT Audio cable (not supplied) To Audio output CD player (as the monitor sound. Normal track Before audio dubbing After audio dubbing Video and Hi-Fi track 1 Make connections Connect an audio cable between the VCR's audio input connectors and the audio component's audio output...
...'s instruction manual for which you pause Audio Dubbing. On the Remote: Press the Number key "0 (AUX)" or CH +/-. for recording) POWER S VIDEO VIDEO (MONO)L-AUDIO-R REC LINK S-VHS ET To AUDIO IN A.DUB INSERT PLAY REW FF + CH- /+ PUSH / TURN 24HR QUICK PROGRAM REC PAUSE STOP/EJECT Audio cable (not supplied) To Audio output CD player (as the monitor sound. Normal track Before audio dubbing After audio dubbing Video and Hi-Fi track 1 Make connections Connect an audio cable between the VCR's audio input connectors and the audio component's audio output...

Instructions
Page 53
... cable box brand code 2 Follow the example shown below. 1 Press and hold CABLE/DBS. 2 Press MBR SET. 3 Press the Number keys to enter your cable box and a DBS receiver at a time. (Ex.) To set the Remote control to enter a channel number. ● To change the VCR's channels only.) NOTES: ● Depending on the cable box or its Remote. or the Number keys. (The CH +/- button can be operated using the Power button on the type of the cable boxes listed...
... cable box brand code 2 Follow the example shown below. 1 Press and hold CABLE/DBS. 2 Press MBR SET. 3 Press the Number keys to enter your cable box and a DBS receiver at a time. (Ex.) To set the Remote control to enter a channel number. ● To change the VCR's channels only.) NOTES: ● Depending on the cable box or its Remote. or the Number keys. (The CH +/- button can be operated using the Power button on the type of the cable boxes listed...
Instructions
Page 55
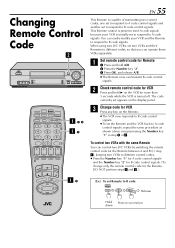
... control codes. ● Press the Number key "1" for A code control signals and the Number key "2" for B code control signals. (To change only the remote control code for the Remote, DO NOT perform steps 2 and 3 .) 3 3 1 - (Ex.) To set appears on the VCR for Remote 123 1 Press and hold A/B. Changing Remote Control Code 2 POWER S VIDEO VIDEO (MONO)L-AUDIO-R REC LINK S-VHS ET A.DUB INSERT PLAY REW - The code currently set Remote to A code signals. You can transmit B code control signals. FF + CH- /+ PUSH / TURN 24HR QUICK PROGRAM...
... control codes. ● Press the Number key "1" for A code control signals and the Number key "2" for B code control signals. (To change only the remote control code for the Remote, DO NOT perform steps 2 and 3 .) 3 3 1 - (Ex.) To set appears on the VCR for Remote 123 1 Press and hold A/B. Changing Remote Control Code 2 POWER S VIDEO VIDEO (MONO)L-AUDIO-R REC LINK S-VHS ET A.DUB INSERT PLAY REW - The code currently set Remote to A code signals. You can transmit B code control signals. FF + CH- /+ PUSH / TURN 24HR QUICK PROGRAM...
Instructions
Page 56
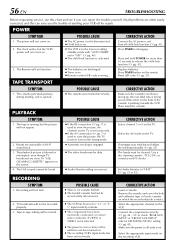
... channel on the TV. Make sure the power to -tape editing will not come on. 2. Small problems are discharged. ● Timer is on. ● Remote control A/B code is pointing towards the VCR. The Remote will not start. 2. Press TIMER to "HI-FI" (੬ pg. 23 or 42). The tape is on. Recording will not function. The clock works, but the picture will not appear. 2. Turn off for HR-S5900U/5910U) setting...
... channel on the TV. Make sure the power to -tape editing will not come on. 2. Small problems are discharged. ● Timer is on. ● Remote control A/B code is pointing towards the VCR. The Remote will not start. 2. Press TIMER to "HI-FI" (੬ pg. 23 or 42). The tape is on. Recording will not function. The clock works, but the picture will not appear. 2. Turn off for HR-S5900U/5910U) setting...

Instructions
Page 57
Remove the cassette and cover its hole with adhesive tape, or replace it finishes. Connect the Controller correctly (੬ pg. 18). After confirming your cable box's output channel number, re-access the Cable Box Set screen and select the correct number (੬ pg. 16). Re-perform the Changing VCR Plus+ Setting procedure (੬ pg. 32). "PROGRAM FULL" is displayed on before timer recording starts. Re-perform the set again if necessary, then press TIMER again. Next time be performed...
Remove the cassette and cover its hole with adhesive tape, or replace it finishes. Connect the Controller correctly (੬ pg. 18). After confirming your cable box's output channel number, re-access the Cable Box Set screen and select the correct number (੬ pg. 16). Re-perform the Changing VCR Plus+ Setting procedure (੬ pg. 32). "PROGRAM FULL" is displayed on before timer recording starts. Re-perform the set again if necessary, then press TIMER again. Next time be performed...

Instructions
Page 60
...19 Installing Controller 18 Output channel 19 E Editing From a camcorder 46 From another VCR 48 To another VCR 48 Express timer programing 34 F FRONT AUX INPUT 43 Function Set screen 39 G Guide channel 32 H Host channel 8 I Index Search 24 Instant Review 24 Instant Timer Recording (ITR) 26 L Language setting 9 M Manual tracking 23 Multi-Brand Remote Setting cable box brand 53 Setting DBS receiver brand 54 Setting TV brand 52 N Next Function Memory 23 O On-screen display 27 P PBS channel 8 PICTURE CONTROL 40 Playback 21 Plug & Play 8 R REAR AUX INPUT 43 Recording 25 Repeat play 22 S S-VHS MODE...
...19 Installing Controller 18 Output channel 19 E Editing From a camcorder 46 From another VCR 48 To another VCR 48 Express timer programing 34 F FRONT AUX INPUT 43 Function Set screen 39 G Guide channel 32 H Host channel 8 I Index Search 24 Instant Review 24 Instant Timer Recording (ITR) 26 L Language setting 9 M Manual tracking 23 Multi-Brand Remote Setting cable box brand 53 Setting DBS receiver brand 54 Setting TV brand 52 N Next Function Memory 23 O On-screen display 27 P PBS channel 8 PICTURE CONTROL 40 Playback 21 Plug & Play 8 R REAR AUX INPUT 43 Recording 25 Repeat play 22 S S-VHS MODE...

Instructions
Page 65
...) head helical scan system : 45 dB : 230 lines : 400 lines : 70 Hz to 10,000 Hz : 20 Hz to 60°C (-4°F to140°F) Operating position : Horizontal only Dimensions (W x H x D) : 400 x 94 x 283 mm Weight : 3.3 kg Format : S-VHS/VHS NTSC standard Maximum recording time SP : 210 min. with S-VHS picture quality on VHS cassettes on regular VHS and Super VHS cassettes. ACCESSORIES Provided accessories : Infrared remote control unit, "AA" battery x 2, S-video cable (4-pin), RF cable (F-type) Specifications shown are for timer...
...) head helical scan system : 45 dB : 230 lines : 400 lines : 70 Hz to 10,000 Hz : 20 Hz to 60°C (-4°F to140°F) Operating position : Horizontal only Dimensions (W x H x D) : 400 x 94 x 283 mm Weight : 3.3 kg Format : S-VHS/VHS NTSC standard Maximum recording time SP : 210 min. with S-VHS picture quality on VHS cassettes on regular VHS and Super VHS cassettes. ACCESSORIES Provided accessories : Infrared remote control unit, "AA" battery x 2, S-video cable (4-pin), RF cable (F-type) Specifications shown are for timer...
Instructions
Page 67
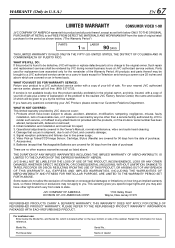
... RETAIL to be FREE FROM DEFECTIVE MATERIALS AND WORKMANSHIP from the date of original retail purchase for the period as listed above which are covered for 90 days from the date of purchase; 7. Batteries (except that occurs in shipment, due to line power surge; 6. If you by JVC does not cover: 1. Operational adjustments covered in the Owner's Manual, normal maintenance, video and audio head cleaning; 4. FOR DETAILS...
... RETAIL to be FREE FROM DEFECTIVE MATERIALS AND WORKMANSHIP from the date of original retail purchase for the period as listed above which are covered for 90 days from the date of purchase; 7. Batteries (except that occurs in shipment, due to line power surge; 6. If you by JVC does not cover: 1. Operational adjustments covered in the Owner's Manual, normal maintenance, video and audio head cleaning; 4. FOR DETAILS...


