Instruction Manual
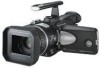
Page 2
... USER-SERVICEABLE PARTS INSIDE. CAUTION (applies to the Index (੬ pg. 84 - 87) and familiarize yourself with NTSC-type color television signals. The AA-V40U AC Power Adapter/Charger should be used with button locations, etc. SAFETY PRECAUTIONS CAUTION RISK OF ELECTRIC SHOCK DO NOT OPEN CAUTION: TO REDUCE THE RISK OF ELECTRIC SHOCK, DO NOT REMOVE COVER (OR BACK). CAUTIONS: ● This camcorder...
... USER-SERVICEABLE PARTS INSIDE. CAUTION (applies to the Index (੬ pg. 84 - 87) and familiarize yourself with NTSC-type color television signals. The AA-V40U AC Power Adapter/Charger should be used with button locations, etc. SAFETY PRECAUTIONS CAUTION RISK OF ELECTRIC SHOCK DO NOT OPEN CAUTION: TO REDUCE THE RISK OF ELECTRIC SHOCK, DO NOT REMOVE COVER (OR BACK). CAUTIONS: ● This camcorder...
Instruction Manual
Page 4
... built-up static charges. This product has been engineered and manufactured to replace your product dealer or local power company. ATTENTION: Follow and obey all the safety and operating instructions before you are not sure of the type of the National Electrical Code, ANSI/NFPA 70, provides information with a 3-wire grounding-type plug, a plug having one way. INSTALLATION 1. This is a safety...
... built-up static charges. This product has been engineered and manufactured to replace your product dealer or local power company. ATTENTION: Follow and obey all the safety and operating instructions before you are not sure of the type of the National Electrical Code, ANSI/NFPA 70, provides information with a 3-wire grounding-type plug, a plug having one way. INSTALLATION 1. This is a safety...
Instruction Manual
Page 12
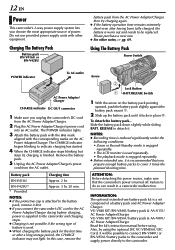
... conditions: • Zoom or Record-Standby mode is engaged repeatedly. • The LCD monitor is used . ● When charging the battery pack for the first time or after having been fully charged, the battery is finished. Failure to the camcorder and charging stops. ● Charging is not possible if the wrong type of power. Remove the battery pack. 5 Unplug the AC Power Adapter/Charger's power cord from the AC Power Adapter/Charger. 2 Plug the AC Power Adapter/Charger's power cord into an...
... conditions: • Zoom or Record-Standby mode is engaged repeatedly. • The LCD monitor is used . ● When charging the battery pack for the first time or after having been fully charged, the battery is finished. Failure to the camcorder and charging stops. ● Charging is not possible if the wrong type of power. Remove the battery pack. 5 Unplug the AC Power Adapter/Charger's power cord from the AC Power Adapter/Charger. 2 Plug the AC Power Adapter/Charger's power cord into an...
Instruction Manual
Page 16
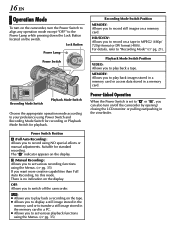
...Playback Mode Switch Position VIDEO: Allows you to record still images on a tape in the memory card to a PC. ● Allows you to set various playback functions using NO special effects or manual adjustments. MEMORY: Allows you to record on a memory card. OFF: Allows you to record using the Menus. (੬ pg. 35) Recording Mode Switch Position MEMORY: Allows you to play back images stored in a memory card or access data stored in the viewfinder. Lock Button Power Lamp Power Switch MEMORY Recording Mode Switch Playback Mode Switch Choose the appropriate operation mode...
...Playback Mode Switch Position VIDEO: Allows you to record still images on a tape in the memory card to a PC. ● Allows you to set various playback functions using NO special effects or manual adjustments. MEMORY: Allows you to record on a memory card. OFF: Allows you to record using the Menus. (੬ pg. 35) Recording Mode Switch Position MEMORY: Allows you to play back images stored in a memory card or access data stored in the viewfinder. Lock Button Power Lamp Power Switch MEMORY Recording Mode Switch Playback Mode Switch Choose the appropriate operation mode...

Instruction Manual
Page 17
... camcorder's internal clock continues to operate. AUTO T I GHT ON SCREEN - When this occurs, first connect the camcorder to an AC outlet using the AC Power Adapter/Charger for over 24 hours to input the day, year, hour and CLOCK ADJ . When you finish setting the minute and press the MENU Wheel in the camcorder. Date/Time Settings The date/time is recorded onto the tape at all times, but its display can be turned on...
... camcorder's internal clock continues to operate. AUTO T I GHT ON SCREEN - When this occurs, first connect the camcorder to an AC outlet using the AC Power Adapter/Charger for over 24 hours to input the day, year, hour and CLOCK ADJ . When you finish setting the minute and press the MENU Wheel in the camcorder. Date/Time Settings The date/time is recorded onto the tape at all times, but its display can be turned on...

Instruction Manual
Page 21
... at "HD". 3 Slide the Recording Mode Switch to change the position of 16:9. The camcorder records signals in MPEG2 format (720p). The image will be recorded in an aspect ratio of the Recording Mode Switch from "DV" to "MEMORY". 1 Slide the Recording Mode Switch to record on a wide-screen TV or high definition TV. The DV mode is suitable for playback on a tape in the interlace scan mode (half of a second). Yes...
... at "HD". 3 Slide the Recording Mode Switch to change the position of 16:9. The camcorder records signals in MPEG2 format (720p). The image will be recorded in an aspect ratio of the Recording Mode Switch from "DV" to "MEMORY". 1 Slide the Recording Mode Switch to record on a wide-screen TV or high definition TV. The DV mode is suitable for playback on a tape in the interlace scan mode (half of a second). Yes...

Instruction Manual
Page 27
...) Or, press DISPLAY on the remote control to turn on/off the date indication. ● Time Code Set "TIME CODE" to "ON" or "OFF". (੬ pg. 35, 42) ● Indications other than date/time and time code Set "ON SCREEN" to "OFF", "LCD" or "LCD/TV". (੬ pg. 35, 42) EN 27 NOTES: ● It is recommended to use the AC Power Adapter/ Charger as shown in HD mode, the images may be squeezed...
...) Or, press DISPLAY on the remote control to turn on/off the date indication. ● Time Code Set "TIME CODE" to "ON" or "OFF". (੬ pg. 35, 42) ● Indications other than date/time and time code Set "ON SCREEN" to "OFF", "LCD" or "LCD/TV". (੬ pg. 35, 42) EN 27 NOTES: ● It is recommended to use the AC Power Adapter/ Charger as shown in HD mode, the images may be squeezed...

Instruction Manual
Page 33
... and File names Each time shooting takes place, a file name is displayed. 5 Press the MENU Wheel in . Even if you delete an image file with a number in the middle of the selected still images automatically. ● To print images recorded on a tape, first dub them to a memory card. (੬ pg. 57) To Print All Still Images (One Print For Each) 1 Load a memory card. (੬ pg. 19) 2 Set the Playback Mode Switch to "MEMORY". 3 Set the Power Switch...
... and File names Each time shooting takes place, a file name is displayed. 5 Press the MENU Wheel in . Even if you delete an image file with a number in the middle of the selected still images automatically. ● To print images recorded on a tape, first dub them to a memory card. (੬ pg. 57) To Print All Still Images (One Print For Each) 1 Load a memory card. (੬ pg. 19) 2 Set the Playback Mode Switch to "MEMORY". 3 Set the Power Switch...

Instruction Manual
Page 36
... (Factory-preset: MANUAL) 5SEC / 15SEC / 30SEC / 60SEC: The captured image is stored in the LP mode on this camcorder be played back on this case, using the memory card with no picture brightness adjustment. MANUAL: Enables thumbnail images to "HD" or "MEMORY". Sound mode DV SOUND (Factory-preset: 12 bit) 12 bit: Enables video recording of stereo sound on your preference. Gain up a lot of previous models) RECORDING MENUS Zooming ZOOM (Factory-preset: 40X) 10X: When set the recording mode...
... (Factory-preset: MANUAL) 5SEC / 15SEC / 30SEC / 60SEC: The captured image is stored in the LP mode on this camcorder be played back on this case, using the memory card with no picture brightness adjustment. MANUAL: Enables thumbnail images to "HD" or "MEMORY". Sound mode DV SOUND (Factory-preset: 12 bit) 12 bit: Enables video recording of stereo sound on your preference. Gain up a lot of previous models) RECORDING MENUS Zooming ZOOM (Factory-preset: 40X) 10X: When set the recording mode...
Instruction Manual
Page 55
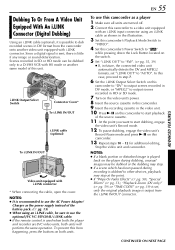
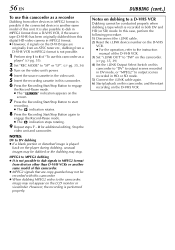
.... 3 Set this camcorder's Playback Mode Switch to "VIDEO". 4 Set this camcorder's Power Switch to "P" while pressing down the Lock Button located on the player during dubbing, unusual images may be dubbed or the dubbing may stop . ● If a scene which has been paused during recording is dubbed to use the optional JVC VC-VDV204U i.LINK cable. ● If the remote control is used when both the player and recorder are turned off. 2 Connect this camcorder...
.... 3 Set this camcorder's Playback Mode Switch to "VIDEO". 4 Set this camcorder's Power Switch to "P" while pressing down the Lock Button located on the player during dubbing, unusual images may be dubbed or the dubbing may stop . ● If a scene which has been paused during recording is dubbed to use the optional JVC VC-VDV204U i.LINK cable. ● If the remote control is used when both the player and recorder are turned off. 2 Connect this camcorder...
Instruction Manual
Page 56
... "To use this camcorder as a player" (੬ pg. 55). 2 Set "REC MODE" to "SP" or "LP". (੬ pg. 35, 36) 3 Turn on the video unit's power. 4 Insert the source cassette in the video unit. 5 Insert the recording cassette in this camcorder. 6 Press the Recording Start/Stop Button to engage the Record-Pause mode. ● The " i.LINK IN " indication appears on the screen. 7 Press the Recording Start/Stop Button to start recording on the D-VHS VCR...
... "To use this camcorder as a player" (੬ pg. 55). 2 Set "REC MODE" to "SP" or "LP". (੬ pg. 35, 36) 3 Turn on the video unit's power. 4 Insert the source cassette in the video unit. 5 Insert the recording cassette in this camcorder. 6 Press the Recording Start/Stop Button to engage the Record-Pause mode. ● The " i.LINK IN " indication appears on the screen. 7 Press the Recording Start/Stop Button to start recording on the D-VHS VCR...

Instruction Manual
Page 68
... Recording Start/Stop Button. Refer to your PC using Microsoft Windows® Messenger®. For details, refer to use the camcorder for video conference over the Internet by using the USB cable. ● " " appears on the screen. ● If the PC is not powered on, the camcorder does not enter the Web Camera mode. 5 When finished, turn off the PC first, then the camcorder. USB-equipped PC * When connecting the cable, open...
... Recording Start/Stop Button. Refer to your PC using Microsoft Windows® Messenger®. For details, refer to use the camcorder for video conference over the Internet by using the USB cable. ● " " appears on the screen. ● If the PC is not powered on, the camcorder does not enter the Web Camera mode. 5 When finished, turn off the PC first, then the camcorder. USB-equipped PC * When connecting the cable, open...

Instruction Manual
Page 70
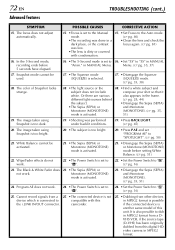
...-controlled device. protection tab to "REC". • The Recording Mode Switch (੬ pg. 18) is set to "A" "P" or "OFF". For D.S.C. vertical lines appear. direct sunlight during shooting, the screen becomes red or - For Video Recording - • The tape's erase protection • Set the tape's erase tab is set to 2. • Set the Power Switch to "SAVE". illuminated by bright light, high contrast, and is not with new cassette. During recording, the date/ time does not appear. 5. • "DATE/TIME" is set to "MEMORY". - Adapter/Charger...
...-controlled device. protection tab to "REC". • The Recording Mode Switch (੬ pg. 18) is set to "A" "P" or "OFF". For D.S.C. vertical lines appear. direct sunlight during shooting, the screen becomes red or - For Video Recording - • The tape's erase protection • Set the tape's erase tab is set to 2. • Set the Power Switch to "SAVE". illuminated by bright light, high contrast, and is not with new cassette. During recording, the date/ time does not appear. 5. • "DATE/TIME" is set to "MEMORY". - Adapter/Charger...
Instruction Manual
Page 72
... Power Switch is set to the Manual mode. • The recording was low. • The lens is not compatible with condensation. 15. • Set Focus to the i.LINK IN/OUT connector. 25. • The connected device is dirty or covered with this camcorder. 25. • Dubbing from this unit. Cannot record signals from a device which is connected to the Auto mode. (੬ pg. 46) • Clean the lens and check the focus...
... Power Switch is set to the Manual mode. • The recording was low. • The lens is not compatible with condensation. 15. • Set Focus to the i.LINK IN/OUT connector. 25. • The connected device is dirty or covered with this camcorder. 25. • Dubbing from this unit. Cannot record signals from a device which is connected to the Auto mode. (੬ pg. 46) • Clean the lens and check the focus...
Instruction Manual
Page 73
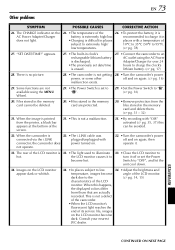
... Power Adapter/Charger battery is set the Power become hot. REFERENCES CONTINUED ON NEXT PAGE Other problems EN 73 SYMPTOM POSSIBLE CAUSES CORRECTIVE ACTION 26. "SET DATE/TIME!" appears. 27. • The built-in does not light. • Charging is 33. • The light used to illuminate 33. • Close the LCD monitor to turn it . 33. There is no picture. 28. • The camcorder is erased. 27. • Connect...
... Power Adapter/Charger battery is set the Power become hot. REFERENCES CONTINUED ON NEXT PAGE Other problems EN 73 SYMPTOM POSSIBLE CAUSES CORRECTIVE ACTION 26. "SET DATE/TIME!" appears. 27. • The built-in does not light. • Charging is 33. • The light used to illuminate 33. • Close the LCD monitor to turn it . 33. There is no picture. 28. • The camcorder is erased. 27. • Connect...

Instruction Manual
Page 75
... REQUIRED USE CLEANING CASSETTE CONDENSATION OPERATION PAUSED PLEASE WAIT Appears if condensation occurs. TAPE END Appears when the tape ends during recording. (੬ pg. 21) INVALID DATA! Appears when you attempt to nil, the battery indicator blinks. EN 75 Warning Indications Indications Meaning Displays the battery remaining power. Remaining power level: high Remaining power level: exhausted As the battery power comes close to change the recording mode during recording or playback. (੬ pg. 69) SET DATE/TIME! ●...
... REQUIRED USE CLEANING CASSETTE CONDENSATION OPERATION PAUSED PLEASE WAIT Appears if condensation occurs. TAPE END Appears when the tape ends during recording. (੬ pg. 21) INVALID DATA! Appears when you attempt to nil, the battery indicator blinks. EN 75 Warning Indications Indications Meaning Displays the battery remaining power. Remaining power level: high Remaining power level: exhausted As the battery power comes close to change the recording mode during recording or playback. (੬ pg. 69) SET DATE/TIME! ●...
Instruction Manual
Page 77
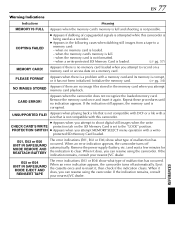
... attempt to shoot digital still images when the write CHECK CARD'S WRITE protection tab on a memory card. If the indication still appears, the memory card is not formatted. - UNSUPPORTED FILE! Appears when playing back a file that is not compatible with DCF or a file with a size that is not compatible with a memory card and its memory is a problem with this camcorder is being used as a recorder. ● Appears in the memory card when you attempt MEMORY SELECT menu operation with...
... attempt to shoot digital still images when the write CHECK CARD'S WRITE protection tab on a memory card. If the indication still appears, the memory card is not formatted. - UNSUPPORTED FILE! Appears when playing back a file that is not compatible with DCF or a file with a size that is not compatible with a memory card and its memory is a problem with this camcorder is being used as a recorder. ● Appears in the memory card when you attempt MEMORY SELECT menu operation with...
Instruction Manual
Page 79
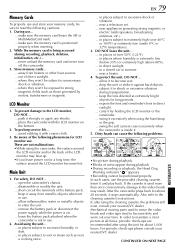
... magnetic or electric fields (speakers, broadcasting antennas, etc.). ... near a television set. ... keep the lens directed at all times, periodic check-ups are not malfunctions: • While using the camcorder, the surface around the LCD monitor becomes hot. carry it stops automatically. never unload the memory card and never turn off the camcorder. 3. away from metallic objects when not in places subject to soot...
... magnetic or electric fields (speakers, broadcasting antennas, etc.). ... near a television set. ... keep the lens directed at all times, periodic check-ups are not malfunctions: • While using the camcorder, the surface around the LCD monitor becomes hot. carry it stops automatically. never unload the memory card and never turn off the camcorder. 3. away from metallic objects when not in places subject to soot...

Instruction Manual
Page 82
... 6.3 V (Using AC Power Adapter/Charger) DC 7.2 V (Using battery pack) Approx. 6.8 W (DV)/8.0 W (HD, SD) Approx. 8.5 W (DV)/9.7 W (HD, SD) 105.5 mm x 99 mm x 241 mm (4-3/16" x 3-15/16" x 9-1/2") (with 0.44" color LCD Monaural For Digital Video Camera Signal format Cassette Tape speed Maximum recording time (using 80 min. cassette) : NTSC standard : Mini DV cassette : SP: 18.8 mm/s LP: 12.5 mm/s : SP: 80 min. LP: 120 min. For Digital Still Camera Storage media : SD Memory Card/MultiMediaCard Compression system : JPEG (compatible) File size : 2 modes (1280...
... 6.3 V (Using AC Power Adapter/Charger) DC 7.2 V (Using battery pack) Approx. 6.8 W (DV)/8.0 W (HD, SD) Approx. 8.5 W (DV)/9.7 W (HD, SD) 105.5 mm x 99 mm x 241 mm (4-3/16" x 3-15/16" x 9-1/2") (with 0.44" color LCD Monaural For Digital Video Camera Signal format Cassette Tape speed Maximum recording time (using 80 min. cassette) : NTSC standard : Mini DV cassette : SP: 18.8 mm/s LP: 12.5 mm/s : SP: 80 min. LP: 120 min. For Digital Still Camera Storage media : SD Memory Card/MultiMediaCard Compression system : JPEG (compatible) File size : 2 modes (1280...

Instruction Manual
Page 88
... Battery .....17 C Changing The Menu Settings 35 Channels (Left/Right 41 Charging The Battery Pack 12 Cleaning The Camcorder 81 Clock adjustment (CLOCK ADJ 17 Component video output setting (Y/Pb/Pr 26 Connections Charging 12 Dubbing 54 - 57 Random Assemble Editing 62 - 66 To A PC 67 To A TV Or VCR 26 WebCam 68 D Date/Time Display (DATE/TIME 39, 42 Settings 17 DCF (Design rule for Camera File system) .....28, 29 Deleting Files (DELETE 32 Deleting thumbnail images...
... Battery .....17 C Changing The Menu Settings 35 Channels (Left/Right 41 Charging The Battery Pack 12 Cleaning The Camcorder 81 Clock adjustment (CLOCK ADJ 17 Component video output setting (Y/Pb/Pr 26 Connections Charging 12 Dubbing 54 - 57 Random Assemble Editing 62 - 66 To A PC 67 To A TV Or VCR 26 WebCam 68 D Date/Time Display (DATE/TIME 39, 42 Settings 17 DCF (Design rule for Camera File system) .....28, 29 Deleting Files (DELETE 32 Deleting thumbnail images...


