
Instructions
Page 2
... prevent electric shock do not use this TV set for USA) This product has a High Intensity Discharge (HID) lamp that may be sure to disconnect both the power plug from the power source specified on the unit. 2. Do not allow objects or liquid into the cabinet openings. 5. Avoid damaging the AC plug and power cord. 3. Do not remove cover (or back).
... prevent electric shock do not use this TV set for USA) This product has a High Intensity Discharge (HID) lamp that may be sure to disconnect both the power plug from the power source specified on the unit. 2. Do not allow objects or liquid into the cabinet openings. 5. Avoid damaging the AC plug and power cord. 3. Do not remove cover (or back).
Instructions
Page 6
... front panel blinks in orange at their full brightness. Once the screen is dark, cooling is pressed, the Lamp LED indicator blinks in order to the safe use of the highest quality and most technologically advanced televisions available today. The lamp must be operated while the cooling is a consumable item Replace the lamp when it . This is one minute for purchasing JVC's model HD-61Z585 , HD-52Z585, HD-61Z575 or HD-52Z575 HDTV-ready projection television...
... front panel blinks in orange at their full brightness. Once the screen is dark, cooling is pressed, the Lamp LED indicator blinks in order to the safe use of the highest quality and most technologically advanced televisions available today. The lamp must be operated while the cooling is a consumable item Replace the lamp when it . This is one minute for purchasing JVC's model HD-61Z585 , HD-52Z585, HD-61Z575 or HD-52Z575 HDTV-ready projection television...
Instructions
Page 7
... element characteristics Do not project still pictures or pictures that have still segments for more than 24 hours consecutively. If the television is still present, the picture may seem distorted, and the inside of the screen may lead to cool down, there is a danger of time. Do not open the rear cabinet. 13. Do not turn the power on and off repeatedly in...
... element characteristics Do not project still pictures or pictures that have still segments for more than 24 hours consecutively. If the television is still present, the picture may seem distorted, and the inside of the screen may lead to cool down, there is a danger of time. Do not open the rear cabinet. 13. Do not turn the power on and off repeatedly in...
Instructions
Page 8
... Panel Lock 43 V1 Smart Input 44 Video Input Label 44 Position Adjustment 45 Power Indicator 45 TV Speaker 46 Audio Out 46 Digital-In 47 Digital-In Audio 47 Center CH Input 47 Picture Adjust 48 Picture Settings 48 Adjust Picture Settings 48 Color Temperature 48 Digital Noise Clear 49 Natural Cinema 49 Color Management 49 Dynamic Gamma 50 Reset 50 8 Table of Contents Sound Adjust 51 Sound Settings 51 Adjust Sound Settings 51 MTS (Multi-channel Sound 51 Reset 51 Clock Timers 52 Set Clock 52 On/Off Timer...
... Panel Lock 43 V1 Smart Input 44 Video Input Label 44 Position Adjustment 45 Power Indicator 45 TV Speaker 46 Audio Out 46 Digital-In 47 Digital-In Audio 47 Center CH Input 47 Picture Adjust 48 Picture Settings 48 Adjust Picture Settings 48 Color Temperature 48 Digital Noise Clear 49 Natural Cinema 49 Color Management 49 Dynamic Gamma 50 Reset 50 8 Table of Contents Sound Adjust 51 Sound Settings 51 Adjust Sound Settings 51 MTS (Multi-channel Sound 51 Reset 51 Clock Timers 52 Set Clock 52 On/Off Timer...
Instructions
Page 9
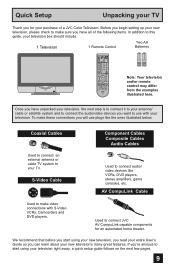
... this guide, your entire User's Guide so you will use with S-Video VCRs, Camcorders and DVD players. We recommend that before you start using your new television, you read your television box should include: 1 Television 1 Remote Control Two AA Batteries AA Alkaline AA Alkaline TV CATV VCR DVD POWER ASPECT TWIN MULTI SCREEN INDEX FREEZE SWAP SELECT INPUT 1 V1 1 2 3 INPUT 2 V2 4 5 6 INPUT 3 V3 7 8 9 INPUT 4 V4 TUNE RETURN+ 0 TV THEATER DIGITAL-IN PRO D-IN VIDEO STATUS SLEEP TIMER DISPLAY SOUND LIGHT...
... this guide, your entire User's Guide so you will use with S-Video VCRs, Camcorders and DVD players. We recommend that before you start using your new television, you read your television box should include: 1 Television 1 Remote Control Two AA Batteries AA Alkaline AA Alkaline TV CATV VCR DVD POWER ASPECT TWIN MULTI SCREEN INDEX FREEZE SWAP SELECT INPUT 1 V1 1 2 3 INPUT 2 V2 4 5 6 INPUT 3 V3 7 8 9 INPUT 4 V4 TUNE RETURN+ 0 TV THEATER DIGITAL-IN PRO D-IN VIDEO STATUS SLEEP TIMER DISPLAY SOUND LIGHT...
Instructions
Page 10
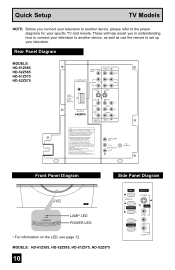
... BBE Sound, Inc. under USP4638258, 4482866 and 5510752. Quick Setup TV Models NOTE: Before you in understanding how to connect your television to another device, please refer to the proper diagrams for your television. Rear Panel Diagram MODELS: HD-61Z585 HD-52Z585 HD-61Z575 HD-52Z575 CENTER CHANNEL INPUT INPUT-2 Y VIDEO AV COMPULINK III VIDEO (DIGITAL) AUDIO (DIGITAL) DIGITAL IN L AUDIO R S-VIDEO Pb Pr S-VIDEO L AUDIO R OVER VIDEO L I AUDIO I R OVER Y VIDEO L Pb I AUDIO I R Pr INPUT-3 INPUT-1 UNPLUG THE POWER CORD FROM AC OUTLET BEFORE REMOVING THE REAR COVER...
... BBE Sound, Inc. under USP4638258, 4482866 and 5510752. Quick Setup TV Models NOTE: Before you in understanding how to connect your television to another device, please refer to the proper diagrams for your television. Rear Panel Diagram MODELS: HD-61Z585 HD-52Z585 HD-61Z575 HD-52Z575 CENTER CHANNEL INPUT INPUT-2 Y VIDEO AV COMPULINK III VIDEO (DIGITAL) AUDIO (DIGITAL) DIGITAL IN L AUDIO R S-VIDEO Pb Pr S-VIDEO L AUDIO R OVER VIDEO L I AUDIO I R OVER Y VIDEO L Pb I AUDIO I R Pr INPUT-3 INPUT-1 UNPLUG THE POWER CORD FROM AC OUTLET BEFORE REMOVING THE REAR COVER...
Instructions
Page 13
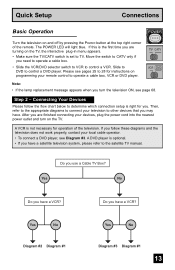
... when you have a VCR? Yes No Do you turn on the TV, the interactive plug-in menu appears. • Make sure the TV/CATV switch is right for operation of the remote. If this is the first time you are turning on the TV. After you are finished connecting your local cable operator. • To connect a DVD player, see page 68. Do you use a Cable TV Box? The POWER LED will light blue. Step 2 -
... when you have a VCR? Yes No Do you turn on the TV, the interactive plug-in menu appears. • Make sure the TV/CATV switch is right for operation of the remote. If this is the first time you are turning on the TV. After you are finished connecting your local cable operator. • To connect a DVD player, see page 68. Do you use a Cable TV Box? The POWER LED will light blue. Step 2 -
Instructions
Page 16
.... If the tab is in place, automatic switching will switch the TV to input 1. • Refer to connect. At the same time, using VCR A code will occur when you push the VCR's PLAY button. • If your JVC brand VCR has "A code/B code remote control switching" (see your VCR's instruction book), using the AV CompuLink, the VCR or DVD player sends a signal to the television telling it is compatible with the...
.... If the tab is in place, automatic switching will switch the TV to input 1. • Refer to connect. At the same time, using VCR A code will occur when you push the VCR's PLAY button. • If your JVC brand VCR has "A code/B code remote control switching" (see your VCR's instruction book), using the AV CompuLink, the VCR or DVD player sends a signal to the television telling it is compatible with the...
Instructions
Page 17
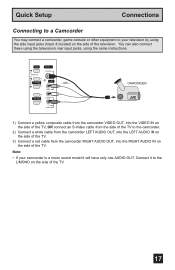
INPUT 4 S-VIDEO OVER VIDEO + VOLUME - MENU OPERATE + CHANNEL - Quick Setup Connections Connecting to a Camcorder You may connect a camcorder, game console or other equipment to your camcorder is a mono sound model it to the camcorder. 2) Connect a white cable from the camcorder LEFT AUDIO OUT, into the LEFT AUDIO IN on the side of the TV. 3) Connect a red cable from the camcorder RIGHT AUDIO OUT, into the RIGHT AUDIO IN on the side of the TV. L/MONO R AUDIO - CAMCORDER...
INPUT 4 S-VIDEO OVER VIDEO + VOLUME - MENU OPERATE + CHANNEL - Quick Setup Connections Connecting to a Camcorder You may connect a camcorder, game console or other equipment to your camcorder is a mono sound model it to the camcorder. 2) Connect a white cable from the camcorder LEFT AUDIO OUT, into the LEFT AUDIO IN on the side of the TV. 3) Connect a red cable from the camcorder RIGHT AUDIO OUT, into the RIGHT AUDIO IN on the side of the TV. L/MONO R AUDIO - CAMCORDER...
Instructions
Page 19
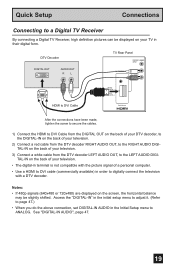
... be displayed on the back of a personal computer. • Use a HDMI to DVI cable (commercially available) in order to digitally connect the television with a DTV decoder. Access the "DIGITAL-IN" in the initial setup menu to adjust it. (Refer to page 47.) • When you do the above connection, set DIGITAL-IN AUDIO in their digital form. DTV Decoder DIGITAL OUT AUDIO OUT RL TV Rear Panel CENTER CHANNEL INPUT AV COMPULINK III L AUDIO R VIDEO (DIGITAL) AUDIO (DIGITAL) HDMI to DVI Cable DIGITAL IN...
... be displayed on the back of a personal computer. • Use a HDMI to DVI cable (commercially available) in order to digitally connect the television with a DTV decoder. Access the "DIGITAL-IN" in the initial setup menu to adjust it. (Refer to page 47.) • When you do the above connection, set DIGITAL-IN AUDIO in their digital form. DTV Decoder DIGITAL OUT AUDIO OUT RL TV Rear Panel CENTER CHANNEL INPUT AV COMPULINK III L AUDIO R VIDEO (DIGITAL) AUDIO (DIGITAL) HDMI to DVI Cable DIGITAL IN...
Instructions
Page 20
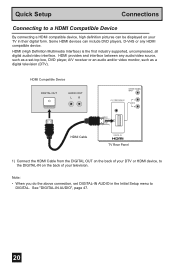
HDMI (High Definition Multimedia Interface) is the first industry supported, uncompressed, all digital audio/video interface. HDMI Compatible Device DIGITAL OUT AUDIO OUT LR HDMI Cable CENTER CHANNEL INPUT AV COMPULINK III L AUDIO R VIDEO (DIGITAL) AUDIO (DIGITAL) DIGITAL IN TV Rear Panel 1) Connect the HDMI Cable from the DIGITAL OUT on the back of your TV in the Initial Setup menu to DIGITAL. Note: • When you do the above connection, set -top box, DVD player, A/V receiver or an audio and/or video monitor, such as a set DIGITAL-IN AUDIO in their digital form...
HDMI (High Definition Multimedia Interface) is the first industry supported, uncompressed, all digital audio/video interface. HDMI Compatible Device DIGITAL OUT AUDIO OUT LR HDMI Cable CENTER CHANNEL INPUT AV COMPULINK III L AUDIO R VIDEO (DIGITAL) AUDIO (DIGITAL) DIGITAL IN TV Rear Panel 1) Connect the HDMI Cable from the DIGITAL OUT on the back of your TV in the Initial Setup menu to DIGITAL. Note: • When you do the above connection, set -top box, DVD player, A/V receiver or an audio and/or video monitor, such as a set DIGITAL-IN AUDIO in their digital form...
Instructions
Page 21
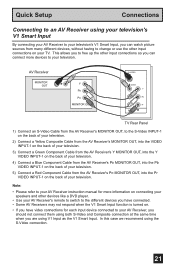
... AV Receiver instruction manual for each input device connected to your AV Receiver, you should not connect them using both S-Video and Composite connection at the same time when you are using the S-Video connection. 21 AV Receiver MONITOR OUT Y PB PR MONITOR OUT S-VIDEO OVER Y VIDEO L Pb I AUDIO I R Pr INPUT-1 TV Rear Panel 1) Connect an S-Video Cable from the AV Receiver's MONITOR OUT, to the S-Video INPUT-1 on the back of your television. 2) Connect a Yellow Composite Cable from the AV Receiver's MONITOR OUT, into the VIDEO INPUT-1 on...
... AV Receiver instruction manual for each input device connected to your AV Receiver, you should not connect them using both S-Video and Composite connection at the same time when you are using the S-Video connection. 21 AV Receiver MONITOR OUT Y PB PR MONITOR OUT S-VIDEO OVER Y VIDEO L Pb I AUDIO I R Pr INPUT-1 TV Rear Panel 1) Connect an S-Video Cable from the AV Receiver's MONITOR OUT, to the S-Video INPUT-1 on the back of your television. 2) Connect a Yellow Composite Cable from the AV Receiver's MONITOR OUT, into the VIDEO INPUT-1 on...
Instructions
Page 23
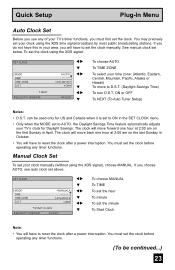
... have to reset the clock after a power interruption. You must first set the clock. SET CLOCK MODE TIME TIME ZONE D.S.T. If you must set the clock before operating any timer functions. (To be used only for Daylight Savings. Quick Setup Plug-In Menu Auto Clock Set Before you use any of your TV's timer functions, you choose AUTO, see auto clock set above. See manual clock set your clock manually (without using the XDS signal), choose MANUAL.
... have to reset the clock after a power interruption. You must first set the clock. SET CLOCK MODE TIME TIME ZONE D.S.T. If you must set the clock before operating any timer functions. (To be used only for Daylight Savings. Quick Setup Plug-In Menu Auto Clock Set Before you use any of your TV's timer functions, you choose AUTO, see auto clock set above. See manual clock set your clock manually (without using the XDS signal), choose MANUAL.
Instructions
Page 30
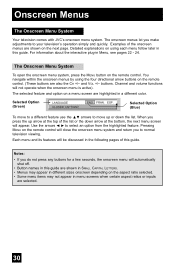
...; ® to your television's operation simply and quickly. Onscreen Menus The Onscreen Menu System Your television comes with JVC's onscreen menu system. Detailed explanations on using the four directional arrow buttons on a menu screen are also the CH +/- and VOL +/- The selected feature and option on the remote control. (These buttons are highlighted in this guide. Channel and volume functions will close the onscreen menu system and return you...
...; ® to your television's operation simply and quickly. Onscreen Menus The Onscreen Menu System Your television comes with JVC's onscreen menu system. Detailed explanations on using the four directional arrow buttons on a menu screen are also the CH +/- and VOL +/- The selected feature and option on the remote control. (These buttons are highlighted in this guide. Channel and volume functions will close the onscreen menu system and return you...
Instructions
Page 31
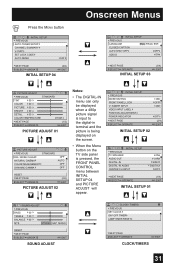
... OFF AUTO OFF OFF RESET NEXT PAGE SELECT OPERATE (2/2) MENU EXIT PICTURE ADJUST 02 Notes: • The DIGITAL-IN menu can only be displayed when a 480p picture signal is input to the digital-in terminal and the picture is being displayed on the screen. • When the Menu button on the TV side panel is pressed, the FRONT PANEL CONTROL menu between INITIAL SETUP 04 and PICTURE ADJUST will appear. Press the MENU button INITIAL SETUP PREVIOUS AUTO TUNER SETUP CHANNEL SUMMARY V-CHIP SET LOCK CODE AUTO DEMO...
... OFF AUTO OFF OFF RESET NEXT PAGE SELECT OPERATE (2/2) MENU EXIT PICTURE ADJUST 02 Notes: • The DIGITAL-IN menu can only be displayed when a 480p picture signal is input to the digital-in terminal and the picture is being displayed on the screen. • When the Menu button on the TV side panel is pressed, the FRONT PANEL CONTROL menu between INITIAL SETUP 04 and PICTURE ADJUST will appear. Press the MENU button INITIAL SETUP PREVIOUS AUTO TUNER SETUP CHANNEL SUMMARY V-CHIP SET LOCK CODE AUTO DEMO...
Instructions
Page 47
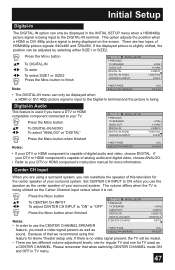
... a HDMI or DVI 480p picture signal is being utilized as sound. Press the MENU button π† √® To DIGITAL-IN AUDIO To select "ANALOG" or "DIGITAL" Press the Menu button when finished Notes: INITIAL SETUP PREVIOUS TV SPEAKER AUDIO OUT DIGITAL-IN DIGITAL-IN AUDIO CENTER CH INPUT NEXT PAGE SELECT OPERATE ON VARI SIZE1 DIGITAL OFF (1/4) MENU EXIT • If your DTV or HDMI component's instruction manual for TV used if you use the CENTER CHANNEL SPEAKER...
... a HDMI or DVI 480p picture signal is being utilized as sound. Press the MENU button π† √® To DIGITAL-IN AUDIO To select "ANALOG" or "DIGITAL" Press the Menu button when finished Notes: INITIAL SETUP PREVIOUS TV SPEAKER AUDIO OUT DIGITAL-IN DIGITAL-IN AUDIO CENTER CH INPUT NEXT PAGE SELECT OPERATE ON VARI SIZE1 DIGITAL OFF (1/4) MENU EXIT • If your DTV or HDMI component's instruction manual for TV used if you use the CENTER CHANNEL SPEAKER...

Instructions
Page 48
... red and green in the TV picture appear either more vivid or subtle. DETAIL The Detail feature adjusts the level of the TV picture with the Bright control. PICTURE Picture allows you to adjust the levels of black and white on the TV screen, giving you to the next setting Press the MENU button when finished PICTURE ADJUST PREVIOUS STANDARD TINT 00 COLOR 00 PICTURE 00 BRIGHT 00 DETAIL 00 COLOR TEMPERATURE HIGH NEXT PAGE (1/2) SELECT OPERATE MENU...
... red and green in the TV picture appear either more vivid or subtle. DETAIL The Detail feature adjusts the level of the TV picture with the Bright control. PICTURE Picture allows you to adjust the levels of black and white on the TV screen, giving you to the next setting Press the MENU button when finished PICTURE ADJUST PREVIOUS STANDARD TINT 00 COLOR 00 PICTURE 00 BRIGHT 00 DETAIL 00 COLOR TEMPERATURE HIGH NEXT PAGE (1/2) SELECT OPERATE MENU...

Instructions
Page 54
THE LAMP TIMER IS RESET SUCCESSFULLY. NEXT PAGE SELECT OPERATE MENU EXIT Press the OK button while the above message appears on lamp replacement. 54 Note: • You can use the Lamp Timer Reset only after replacing the lamp. • See Page 68 for instructions on the television screen. After you replace the lamp, you need to change the lamp. Clock/Timers Lamp Timer Reset The lamp replacement message will appear when you need to reset the timer which is built into...
THE LAMP TIMER IS RESET SUCCESSFULLY. NEXT PAGE SELECT OPERATE MENU EXIT Press the OK button while the above message appears on lamp replacement. 54 Note: • You can use the Lamp Timer Reset only after replacing the lamp. • See Page 68 for instructions on the television screen. After you replace the lamp, you need to change the lamp. Clock/Timers Lamp Timer Reset The lamp replacement message will appear when you need to reset the timer which is built into...
Instructions
Page 65
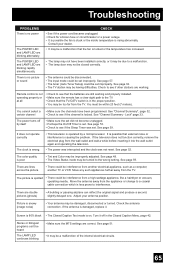
... a high-wattage appliance, like a hairdryer or vacuum, operating nearby. See page 59. Check the antenna connection. Screen is 80% black • The Closed Caption Text mode is damaged, replace it into the wall outlet again and operating the television. • The power was interrupted and the clock was set . Stereo or bilingual programs can reflect the original signal and produce a second, slightly delayed one. The POWER LED and LAMP LED are...
... a high-wattage appliance, like a hairdryer or vacuum, operating nearby. See page 59. Check the antenna connection. Screen is 80% black • The Closed Caption Text mode is damaged, replace it into the wall outlet again and operating the television. • The power was interrupted and the clock was set . Stereo or bilingual programs can reflect the original signal and produce a second, slightly delayed one. The POWER LED and LAMP LED are...
Instructions
Page 69
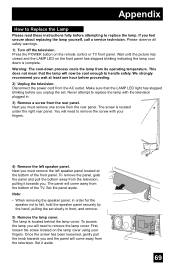
... warnings. 1) Turn off the television. The screw is located behind the lamp cover. The lamp is located under the right rear panel. Set it towards you feel unsure about replacing the lamp yourself, call a service technician. Wait until the picture has closed and the LAMP LED on the front panel has stopped blinking indicating the lamp cool down process cools the lamp from the rear panel. We strongly recommend you . You will need to remove the screw...
... warnings. 1) Turn off the television. The screw is located behind the lamp cover. The lamp is located under the right rear panel. Set it towards you feel unsure about replacing the lamp yourself, call a service technician. Wait until the picture has closed and the LAMP LED on the front panel has stopped blinking indicating the lamp cool down process cools the lamp from the rear panel. We strongly recommend you . You will need to remove the screw...


