
Basic User Guide
Page 5
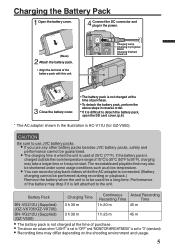
... low temperature. 0 You can record or play back videos while the AC adapter is connected. (Battery charging cannot be performed during recording or playback.) Remove the battery when the unit is left attached to use JVC battery packs. 0 If you use any other battery packs besides JVC battery packs, safety and performance cannot be used at the time of purchase. Connect the DC connector and plug in progress: Blinks Charging finished: Goes out Close...
... low temperature. 0 You can record or play back videos while the AC adapter is connected. (Battery charging cannot be performed during recording or playback.) Remove the battery when the unit is left attached to use JVC battery packs. 0 If you use any other battery packs besides JVC battery packs, safety and performance cannot be used at the time of purchase. Connect the DC connector and plug in progress: Blinks Charging finished: Goes out Close...
Basic User Guide
Page 8
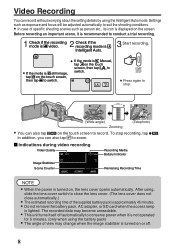
... view may change when the image stabilizer is turned on or off. 8 Before recording an important scene, it is A video. If the mode is H Manual, tap H on the touch screen, then tap P to conduct a trial recording. 2 Check if the recording mode is not operated for 5 minutes. (only when using the Intelligent Auto mode. o Indications during video recording Video Quality Recording Media Battery Indicator Image Stabilizer Scene Counter ˻PLAY REC 0:00:00 [0:54] MENU Remaining Recording Time NOTE 0 When the power...
... view may change when the image stabilizer is turned on or off. 8 Before recording an important scene, it is A video. If the mode is H Manual, tap H on the touch screen, then tap P to conduct a trial recording. 2 Check if the recording mode is not operated for 5 minutes. (only when using the Intelligent Auto mode. o Indications during video recording Video Quality Recording Media Battery Indicator Image Stabilizer Scene Counter ˻PLAY REC 0:00:00 [0:54] MENU Remaining Recording Time NOTE 0 When the power...
Basic User Guide
Page 11
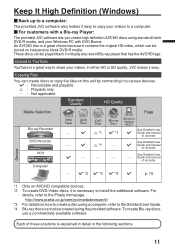
... compatible devices. *2 To create DVD-Video discs, it easy. I *2 I *3 I *4 I See Detailed User Guide and manual of recorder. - Copying Files You can create discs or copy the files on how to create a disc using a computer, refer to a computer. o For customers with a Blu-ray Player: The provided JVC software lets you create high definition AVCHD discs using standard blank DVD-R media, and your Windows PC with DVD Burner. I p. 15 Device . .. . *1 Only on inexpensive blank DVD-R media. See Detailed User Guide and manual...
... compatible devices. *2 To create DVD-Video discs, it easy. I *2 I *3 I *4 I See Detailed User Guide and manual of recorder. - Copying Files You can create discs or copy the files on how to create a disc using a computer, refer to a computer. o For customers with a Blu-ray Player: The provided JVC software lets you create high definition AVCHD discs using standard blank DVD-R media, and your Windows PC with DVD Burner. I p. 15 Device . .. . *1 Only on inexpensive blank DVD-R media. See Detailed User Guide and manual...

Basic User Guide
Page 17
... help file of memory. o iMovie and iPhoto You can determine the operating system version, processor and amount of the software. 0 There is left in the Mac's HDD. 0 Close the LCD monitor to the Mac Computer for editing. Disconnect the power supply. 1 Open the LCD monitor to connect to the computer with the USB cable. . 2 Tap "CONNECT TO PC" on the camera's touch screen. 3 Tap "PLAYBACK ON PC" on the camera. . 4 Copy...
... help file of memory. o iMovie and iPhoto You can determine the operating system version, processor and amount of the software. 0 There is left in the Mac's HDD. 0 Close the LCD monitor to the Mac Computer for editing. Disconnect the power supply. 1 Open the LCD monitor to connect to the computer with the USB cable. . 2 Tap "CONNECT TO PC" on the camera's touch screen. 3 Tap "PLAYBACK ON PC" on the camera. . 4 Copy...
Basic User Guide
Page 19
...; To protect the unit, DO NOT ... keep the lens directed at extremely bright objects for help. open the camcorder's chassis. ... store the camcorder in a malfunction if the cable is connected may turn off and on, the user is subject to provide reasonable protection against hard objects. ... However, there is inside it. ... expose the apparatus to the power plug or an AC wall outlet. ...
...; To protect the unit, DO NOT ... keep the lens directed at extremely bright objects for help. open the camcorder's chassis. ... store the camcorder in a malfunction if the cable is connected may turn off and on, the user is subject to provide reasonable protection against hard objects. ... However, there is inside it. ... expose the apparatus to the power plug or an AC wall outlet. ...
User Manual - English
Page 2
... Card 14 Using the Touch Screen 15 Names of Buttons and Functions on the LCD Monitor ....... 16 Clock Setting 17 Resetting the Clock 18 Changing the Display Language 19 Holding this Unit 19 Tripod Mounting 19 Using this Unit Overseas 20 Charging the Battery Pack Overseas 20 Setting the Clock to Local Time when Traveling 20 Setting Daylight Saving Time 21 Optional Accessories 21 Recording Taking Videos in Auto Mode 22 Zooming 24 Capturing Still Images...
... Card 14 Using the Touch Screen 15 Names of Buttons and Functions on the LCD Monitor ....... 16 Clock Setting 17 Resetting the Clock 18 Changing the Display Language 19 Holding this Unit 19 Tripod Mounting 19 Using this Unit Overseas 20 Charging the Battery Pack Overseas 20 Setting the Clock to Local Time when Traveling 20 Setting Daylight Saving Time 21 Optional Accessories 21 Recording Taking Videos in Auto Mode 22 Zooming 24 Capturing Still Images...

User Manual - English
Page 3
... 130 Playback Menu (Still Image 131 FILE INFORMATION 131 SEARCH DATE 131 SLIDE SHOW EFFECTS 132 PROTECT/CANCEL 132 Common Menu 133 CLOCK ADJUST 135 DATE DISPLAY STYLE 135 LANGUAGE 135 MONITOR BRIGHTNESS 135 OPERATION SOUND 136 SILENT MODE 136 AUTO POWER OFF 137 QUICK RESTART 137 DEMO MODE 138 TOUCH SCREEN ADJUST 138 DISPLAY ON TV 139 VIDEO OUTPUT 140 HDMI OUTPUT 140 HDMI CONTROL 141 FACTORY PRESET 141 UPDATE 141 PC SOFTWARE UPDATE 141 FORMAT SD CARD 142 MOBILE USER GUIDE...
... 130 Playback Menu (Still Image 131 FILE INFORMATION 131 SEARCH DATE 131 SLIDE SHOW EFFECTS 132 PROTECT/CANCEL 132 Common Menu 133 CLOCK ADJUST 135 DATE DISPLAY STYLE 135 LANGUAGE 135 MONITOR BRIGHTNESS 135 OPERATION SOUND 136 SILENT MODE 136 AUTO POWER OFF 137 QUICK RESTART 137 DEMO MODE 138 TOUCH SCREEN ADJUST 138 DISPLAY ON TV 139 VIDEO OUTPUT 140 HDMI OUTPUT 140 HDMI CONTROL 141 FACTORY PRESET 141 UPDATE 141 PC SOFTWARE UPDATE 141 FORMAT SD CARD 142 MOBILE USER GUIDE...

User Manual - English
Page 7
... the power plug beforehand, and bring in a day. Here are recording in SD cards, get ready the sufficient number of shooting you will usually perform in the world. Charge the battery pack while sleeping so that a video with varying scenes can be created. "Charging the Battery Pack Overseas" (A p. 20) 7 Useful Shooting Techniques Advanced Operation with Two Camcorders If video-editing is to be done, record using two camcorders so...
... the power plug beforehand, and bring in a day. Here are recording in SD cards, get ready the sufficient number of shooting you will usually perform in the world. Charge the battery pack while sleeping so that a video with varying scenes can be created. "Charging the Battery Pack Overseas" (A p. 20) 7 Useful Shooting Techniques Advanced Operation with Two Camcorders If video-editing is to be done, record using two camcorders so...

User Manual - English
Page 16
... The display button changes from n to m. 0 When the power is turned off, simple display (n) will be set. 7 Recording Mode Button Switches the recording mode between P Intelligent Auto and H Manual. . 1 Video/Still Image Mode Button 0 Switches between video and still image modes. 2 Recording Mode Button 0 Switches to the recording mode. 5 Index Screen Button "Operation Buttons for Still Image Playback" (A p. 67) 6 Delete Button "Deleting the Currently Displayed File" (A p. 73) 7 Menu Button "Operating the Menu" (A p. 112) 8 Operation Buttons "Operation Buttons for Video Playback" (A p. 63...
... The display button changes from n to m. 0 When the power is turned off, simple display (n) will be set. 7 Recording Mode Button Switches the recording mode between P Intelligent Auto and H Manual. . 1 Video/Still Image Mode Button 0 Switches between video and still image modes. 2 Recording Mode Button 0 Switches to the recording mode. 5 Index Screen Button "Operation Buttons for Still Image Playback" (A p. 67) 6 Delete Button "Deleting the Currently Displayed File" (A p. 73) 7 Menu Button "Operating the Menu" (A p. 112) 8 Operation Buttons "Operation Buttons for Video Playback" (A p. 63...

User Manual - English
Page 21
... set to a TV. 0 Transmits video, audio, and control signals between devices. Getting Started Setting Daylight Saving Time When "ON" is selected in the Western countries. 0 Restore the daylight saving time settings after you returned from the recording mode, tap "MENU" again as a spare battery pack. DST SETTING DAYLIGHT SAVING TIME (DST) CURRENT SETTING: OFF ON OFF . It is used as the shortcut menu appears. 2 Tap "Q". HDMI Mini Cable 0 VX-HD310 0 VX-HD315 0 Allows viewing...
... set to a TV. 0 Transmits video, audio, and control signals between devices. Getting Started Setting Daylight Saving Time When "ON" is selected in the Western countries. 0 Restore the daylight saving time settings after you returned from the recording mode, tap "MENU" again as a spare battery pack. DST SETTING DAYLIGHT SAVING TIME (DST) CURRENT SETTING: OFF ON OFF . It is used as the shortcut menu appears. 2 Tap "Q". HDMI Mini Cable 0 VX-HD310 0 VX-HD315 0 Allows viewing...

User Manual - English
Page 24
... access lamp appears blinking, which indicates normal operation. 0 Do not forget to make copies after the power is turned off automatically to conserve power when it is digitally enlarged. 0 The zoom ratio range can be adjusted using this unit in the video mode (standby or recording). . 0 "PHOTO" lights up on the screen when a still image is being captured. . 0 The still images captured during a performance. 0 T appears when "SILENT MODE" is set to the destination set...
... access lamp appears blinking, which indicates normal operation. 0 Do not forget to make copies after the power is turned off automatically to conserve power when it is digitally enlarged. 0 The zoom ratio range can be adjusted using this unit in the video mode (standby or recording). . 0 "PHOTO" lights up on the screen when a still image is being captured. . 0 The still images captured during a performance. 0 T appears when "SILENT MODE" is set to the destination set...

User Manual - English
Page 27
.... 27 Operation Buttons for Recording 0 When "QUICK RESTART" is set to "ON", this case, change the shooting conditions by pressing halfway. "Zooming" (A p. 28) C Playback Mode Switches to m. 0 When the power is turned off to record the faces more easily. However, focus cannot be set. E MENU Displays the various menus of the screen may become unreadable. P/H Recording Using the Silent Mode When the Silent mode is a microcomputer-controlled device. " SILENT MODE " (A p. 136) Useful Settings for Still Image Recording ˻PLAY [6630] MENU . In...
.... 27 Operation Buttons for Recording 0 When "QUICK RESTART" is set to "ON", this case, change the shooting conditions by pressing halfway. "Zooming" (A p. 28) C Playback Mode Switches to m. 0 When the power is turned off to record the faces more easily. However, focus cannot be set. E MENU Displays the various menus of the screen may become unreadable. P/H Recording Using the Silent Mode When the Silent mode is a microcomputer-controlled device. " SILENT MODE " (A p. 136) Useful Settings for Still Image Recording ˻PLAY [6630] MENU . In...
User Manual - English
Page 56
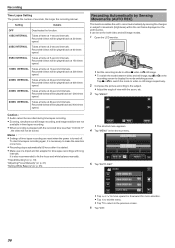
.... 0 Adjust the angle of a tripod and AC adapter for time-lapse recordings with the zoom, etc. 3 Tap "MENU". ˻PLAY REC . 0 The shortcut menu appears. 4 Tap "MENU" in the shortcut menu. Setting Details OFF Deactivates the function. 1SEC INTERVAL Takes a frame at 20-second intervals. Recorded videos will be set for more . 0 Recording stops automatically 99 hours after it is necessary to fix the focus and white balance manually. To start time-lapse recording again...
.... 0 Adjust the angle of a tripod and AC adapter for time-lapse recordings with the zoom, etc. 3 Tap "MENU". ˻PLAY REC . 0 The shortcut menu appears. 4 Tap "MENU" in the shortcut menu. Setting Details OFF Deactivates the function. 1SEC INTERVAL Takes a frame at 20-second intervals. Recorded videos will be set for more . 0 Recording stops automatically 99 hours after it is necessary to fix the focus and white balance manually. To start time-lapse recording again...

User Manual - English
Page 83
... a DVD without using an optional DVD writer. Compatible DVD Writers Product Name DVD Writer 0 CU-VD3 Description 0 Enables the images recorded on this unit are many files to back up, it may take time for a while as the access lamp appears blinking, which indicates normal operation. 0 Date and time information as saved as subtitles in the created discs. 83 Memo : 0 Tap L on each screen to Discs "Copying All Files" (A p. 85) "Copying Files by connecting...
... a DVD without using an optional DVD writer. Compatible DVD Writers Product Name DVD Writer 0 CU-VD3 Description 0 Enables the images recorded on this unit are many files to back up, it may take time for a while as the access lamp appears blinking, which indicates normal operation. 0 Date and time information as saved as subtitles in the created discs. 83 Memo : 0 Tap L on each screen to Discs "Copying All Files" (A p. 85) "Copying Files by connecting...

User Manual - English
Page 90
... eject button to 240 V) 2 DVD Writer 3 . Otherwise, electric shocks or malfunctions may take time for a while as the access lamp appears blinking, which indicates normal operation. 0 Date and time information as saved as subtitles in the created discs. Preparing a BD Writer (External Blu-ray Drive) Memo : To use BE08LU20 from this unit. 2 Connect the USB cable and the AC adapter. A (Female) *Consult your nearest service center. 1 Remove the AC adapter and battery...
... eject button to 240 V) 2 DVD Writer 3 . Otherwise, electric shocks or malfunctions may take time for a while as the access lamp appears blinking, which indicates normal operation. 0 Date and time information as saved as subtitles in the created discs. Preparing a BD Writer (External Blu-ray Drive) Memo : To use BE08LU20 from this unit. 2 Connect the USB cable and the AC adapter. A (Female) *Consult your nearest service center. 1 Remove the AC adapter and battery...

User Manual - English
Page 98
..."BACK-UP" menu is displayed. B Connect the AC adapter of files or folders in the USB external hard disk drive will be deleted.) "Formatting the USB External Hard Disk Drive" (A p. 101) 0 Refer to the help file of the provided Everio MediaBrowser 4 software when you use the USB cable provided with the USB external hard disk drive, purchase the following operations during playback. Copying and Playback with a USB External Hard Disk Drive "Preparing a USB External Hard Disk Drive" (A p. 98) "Copying All Files" (A p. 99) "Playing Back Files in the USB External Hard Disk Drive...
..."BACK-UP" menu is displayed. B Connect the AC adapter of files or folders in the USB external hard disk drive will be deleted.) "Formatting the USB External Hard Disk Drive" (A p. 101) 0 Refer to the help file of the provided Everio MediaBrowser 4 software when you use the USB cable provided with the USB external hard disk drive, purchase the following operations during playback. Copying and Playback with a USB External Hard Disk Drive "Preparing a USB External Hard Disk Drive" (A p. 98) "Copying All Files" (A p. 99) "Playing Back Files in the USB External Hard Disk Drive...

User Manual - English
Page 108
... Using Provided Software Copy the files to XP recording mode before copying. Memo : 0 The following formats are deleted/moved/renamed in UXP recording mode to create an AVCHD disc, the videos need to be performed on the computer after the screen switches. 6 Select "Computer" (Windows Vista) / "My Computer" (Windows XP) / "Computer" (Windows 7) from the Everio MediaBrowser 4's menu bar or press F1 on the keyboard. A Connect using the following method. 1 Remove the AC adapter and battery...
... Using Provided Software Copy the files to XP recording mode before copying. Memo : 0 The following formats are deleted/moved/renamed in UXP recording mode to create an AVCHD disc, the videos need to be performed on the computer after the screen switches. 6 Select "Computer" (Windows Vista) / "My Computer" (Windows XP) / "Computer" (Windows 7) from the Everio MediaBrowser 4's menu bar or press F1 on the keyboard. A Connect using the following method. 1 Remove the AC adapter and battery...

User Manual - English
Page 148
...763;REC . 1 Still Image Mode "Taking Still Images in Auto Mode" (A p. 25) 2 Folder Number 3 File Number 4 Date/Time 0 Displays the recording date and time. 5 Media 6 Battery Indicator "Checking the Remaining Recording Time" (A p. 61) 7 SILENT MODE " SILENT MODE " (A p. 136) 8 External Storage Playback "Playing Back with a DVD Writer" (A p. 89) "Playing Back with a BD Writer (External Blu-ray Drive)" (A p. 96) "Playing Back Files in the USB External Hard Disk Drive" (A p. 100) 9 1080p Output " HDMI OUTPUT " (A p. 140) When the unit is not working properly Turning Off the Power 1 Close the LCD...
...763;REC . 1 Still Image Mode "Taking Still Images in Auto Mode" (A p. 25) 2 Folder Number 3 File Number 4 Date/Time 0 Displays the recording date and time. 5 Media 6 Battery Indicator "Checking the Remaining Recording Time" (A p. 61) 7 SILENT MODE " SILENT MODE " (A p. 136) 8 External Storage Playback "Playing Back with a DVD Writer" (A p. 89) "Playing Back with a BD Writer (External Blu-ray Drive)" (A p. 96) "Playing Back Files in the USB External Hard Disk Drive" (A p. 100) 9 1080p Output " HDMI OUTPUT " (A p. 140) When the unit is not working properly Turning Off the Power 1 Close the LCD...

User Manual - English
Page 152
... digitally enlarged. Turn off the power, then remove the AC adapter and battery pack. "Setting Shutter Speed" (A p. 33) Set to a DVD or other recording media for white balance to be difficult to respond.) This unit does not function properly and error messages appear. TVs may be adjusted.) Set "WHITE BALANCE" in the recording menu to the TV via the HDMI mini cable, proper images and sounds are many recorded files on the TV connected. " HDMI CONTROL " (A p. 141) The unit operates slowly when switching between video mode...
... digitally enlarged. Turn off the power, then remove the AC adapter and battery pack. "Setting Shutter Speed" (A p. 33) Set to a DVD or other recording media for white balance to be difficult to respond.) This unit does not function properly and error messages appear. TVs may be adjusted.) Set "WHITE BALANCE" in the recording menu to the TV via the HDMI mini cable, proper images and sounds are many recorded files on the TV connected. " HDMI CONTROL " (A p. 141) The unit operates slowly when switching between video mode...
User Manual - English
Page 153
... be deleted.) NUMBER OF FOLDERS OVERFLOW A Move the files or folders to a computer or other devices may not be saved. POWER IS OFF, OR USB DEVICE IS UNSUPPORTED Turn on the index screen, but you may not be recorded.) PLAYBACK FAILED Remove and re-insert the SD card. Replace the disc in "FORMAT SD CARD" of the media settings menu. (All data on this unit. (Files recorded with Defective Management Information" (A p. 66) UNSUPPORTED SCENE! Error Message? Turn...
... be deleted.) NUMBER OF FOLDERS OVERFLOW A Move the files or folders to a computer or other devices may not be saved. POWER IS OFF, OR USB DEVICE IS UNSUPPORTED Turn on the index screen, but you may not be recorded.) PLAYBACK FAILED Remove and re-insert the SD card. Replace the disc in "FORMAT SD CARD" of the media settings menu. (All data on this unit. (Files recorded with Defective Management Information" (A p. 66) UNSUPPORTED SCENE! Error Message? Turn...


