
User Guide
Page 1
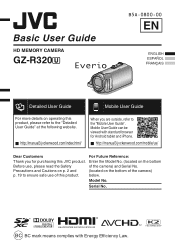
Basic User Guide HD MEMORY CAMERA GZ-R320A B5A-0800-00 EN Detailed User Guide . o http://manual3.jvckenwood.com/index.html/ . Model No. Mobile User Guide can be viewed with Energy Efficiency Law. BC BC mark means complies with standard browser for purchasing this JVC product. Mobile User Guide When you for Android tablet and iPhone. Enter the Model No. (located on the bottom Before use of...
Basic User Guide HD MEMORY CAMERA GZ-R320A B5A-0800-00 EN Detailed User Guide . o http://manual3.jvckenwood.com/index.html/ . Model No. Mobile User Guide can be viewed with Energy Efficiency Law. BC BC mark means complies with standard browser for purchasing this JVC product. Mobile User Guide When you for Android tablet and iPhone. Enter the Model No. (located on the bottom Before use of...

User Guide
Page 2
.... CAUTION: The mains plug shall remain readily operable. 0 Remove the mains plug immediately if the camcorder functions abnormally. 2 EN NOTES: 0 The rating plate and safety caution are on the cables will cause this unit by the LCD monitor can cause eye injuries, as well as direct sunlight, fire or the like. NO USER-SERVICEABLE PARTS INSIDE. WARNING: The camcorder with arrowhead symbol, within...
.... CAUTION: The mains plug shall remain readily operable. 0 Remove the mains plug immediately if the camcorder functions abnormally. 2 EN NOTES: 0 The rating plate and safety caution are on the cables will cause this unit by the LCD monitor can cause eye injuries, as well as direct sunlight, fire or the like. NO USER-SERVICEABLE PARTS INSIDE. WARNING: The camcorder with arrowhead symbol, within...
User Guide
Page 3
... plug adapter, consult your important recorded data to 240 V. No license is granted or shall be implied for long periods of time. Additional information may be obtained from the apparatus. 9. Heed all instructions. 5. Use only with the cart, stand, tripod, bracket, or table specified by the manufacturer. Clean only with dry cloth. 6. USING HOUSEHOLD AC PLUG ADAPTER In case of connecting the unit's power cord...
... plug adapter, consult your important recorded data to 240 V. No license is granted or shall be implied for long periods of time. Additional information may be obtained from the apparatus. 9. Heed all instructions. 5. Use only with the cart, stand, tripod, bracket, or table specified by the manufacturer. Clean only with dry cloth. 6. USING HOUSEHOLD AC PLUG ADAPTER In case of connecting the unit's power cord...
User Guide
Page 4
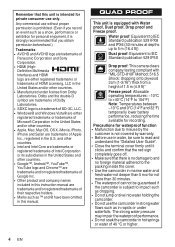
...battery performance, reducing the time available for not more than 30 minutes. 0 The waterproof cannot be sure to read and understand the "Detailed User Guide". 0 Close the terminal cover firmly until it clicks and confirm that the red sign completely goes off. 0 Make sure that you record... (16.4 ft)) Dust proof: Equivalent to the packing inside the cover. 0 Use the camcorder in this instruction manual are trademarks of Apple Inc., registered in the United States and other countries. 0 Apple, Mac, Mac OS, OS X, iMovie, iPhoto, iPhone and Safari are trademarks and/or registered ...
...battery performance, reducing the time available for not more than 30 minutes. 0 The waterproof cannot be sure to read and understand the "Detailed User Guide". 0 Close the terminal cover firmly until it clicks and confirm that the red sign completely goes off. 0 Make sure that you record... (16.4 ft)) Dust proof: Equivalent to the packing inside the cover. 0 Use the camcorder in this instruction manual are trademarks of Apple Inc., registered in the United States and other countries. 0 Apple, Mac, Mac OS, OS X, iMovie, iPhoto, iPhone and Safari are trademarks and/or registered ...
User Guide
Page 5
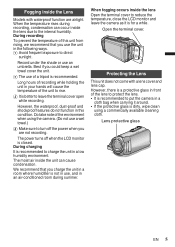
... temperature, close the LCD monitor and leave the camera as it around. 0 If the protective glass is better to leave the terminal cover open while recording. A Avoid frequent exposure to rise. Protecting the Lens This unit does not come with waterproof function are not recording. Record under the shade or use an umbrella. Best if you charge the unit in...
... temperature, close the LCD monitor and leave the camera as it around. 0 If the protective glass is better to leave the terminal cover open while recording. A Avoid frequent exposure to rise. Protecting the Lens This unit does not come with waterproof function are not recording. Record under the shade or use an umbrella. Best if you charge the unit in...
User Guide
Page 7
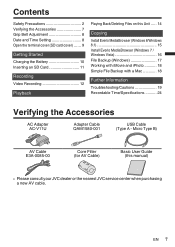
... Belt Adjustment 8 Date and Time Setting 8 Open the terminal cover (SD card cover) ...... 9 Getting Started Charging the Battery 10 Inserting an SD Card 11 Recording Video Recording 12 Playback Playing Back/Deleting Files on this manual) . . . 0 Please consult your JVC dealer or the nearest JVC service center when purchasing a new AV cable. Micro Type B) . AV Cable E3A-0085-00 . Basic User Guide (this Unit ..... 14 Copying Install Everio MediaBrowser (Windows 8/Windows 8.1 15 Install Everio MediaBrowser (Windows 7 / Windows Vista 16 File Backup (Windows 17 Working...
... Belt Adjustment 8 Date and Time Setting 8 Open the terminal cover (SD card cover) ...... 9 Getting Started Charging the Battery 10 Inserting an SD Card 11 Recording Video Recording 12 Playback Playing Back/Deleting Files on this manual) . . . 0 Please consult your JVC dealer or the nearest JVC service center when purchasing a new AV cable. Micro Type B) . AV Cable E3A-0085-00 . Basic User Guide (this Unit ..... 14 Copying Install Everio MediaBrowser (Windows 8/Windows 8.1 15 Install Everio MediaBrowser (Windows 7 / Windows Vista 16 File Backup (Windows 17 Working...
User Guide
Page 9
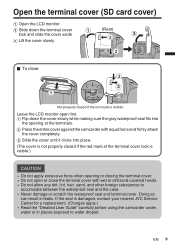
... if the red mark is visible.) CAUTION 0 Do not apply excessive force when opening at the terminal cover lock is visible! . If the seal is damaged, contact your nearest JVC Service Center for a replacement. (Charges apply.) 0 Read the "Detailed User Guide" carefully before using the camcorder under water or... the cover until it clicks into the opening or closing the terminal cover. 0 Do not open first. Leave the LCD monitor open or close the terminal cover with equal force and firmly attach the cover completely. Open the terminal cover (SD card cover) A Open the LCD monitor.
... if the red mark is visible.) CAUTION 0 Do not apply excessive force when opening at the terminal cover lock is visible! . If the seal is damaged, contact your nearest JVC Service Center for a replacement. (Charges apply.) 0 Read the "Detailed User Guide" carefully before using the camcorder under water or... the cover until it clicks into the opening or closing the terminal cover. 0 Do not open first. Leave the LCD monitor open or close the terminal cover with equal force and firmly attach the cover completely. Open the terminal cover (SD card cover) A Open the LCD monitor.
User Guide
Page 10
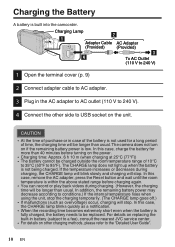
... JVC service center. 0 For details on the unit. Charging Lamp B A Adapter Cable AC Adapter (Provided) (Provided) C D To AC Outlet (110 V to 240 V) . 1 Open the terminal cover (p. 9) 2 Connect adapter cable to AC adapter. 3 Plug in case of 10°C to 35°C (50°F to the "Detailed User Guide". 10 EN The CHARGE lamp does not light up when the battery is within the above stated range before turning...
... JVC service center. 0 For details on the unit. Charging Lamp B A Adapter Cable AC Adapter (Provided) (Provided) C D To AC Outlet (110 V to 240 V) . 1 Open the terminal cover (p. 9) 2 Connect adapter cable to AC adapter. 3 Plug in case of 10°C to 35°C (50°F to the "Detailed User Guide". 10 EN The CHARGE lamp does not light up when the battery is within the above stated range before turning...
User Guide
Page 11
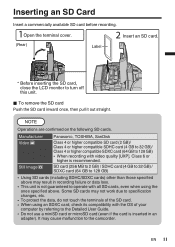
... recording failure or data loss. 0 This unit is not guaranteed to operate with the OS of your computer by referring to the Detailed User Guide. 0 Do not use a miniSD card or microSD card (even if the card is recommended. SD card (256 MB to 2 GB) / SDHC card (4 GB to 32 GB) / SDXC card (64 GB to turn off this unit. . EN 11 Manufacturer Video...
... recording failure or data loss. 0 This unit is not guaranteed to operate with the OS of your computer by referring to the Detailed User Guide. 0 Do not use a miniSD card or microSD card (even if the card is recommended. SD card (256 MB to 2 GB) / SDHC card (4 GB to 32 GB) / SDXC card (64 GB to turn off this unit. . EN 11 Manufacturer Video...
User Guide
Page 12
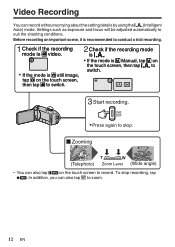
... focus will be adjusted automatically to conduct a trial recording. Press again to stop recording, tap 7. In addition, you can record without worrying about the setting details by using the P (Intelligent Auto) mode. Video Recording You can also tap D to zoom. 12 EN Check if the recording mode is A video. A C PH Start recording. Check if the recording mode is P. Before recording an important scene, it is H Manual, tap H on the touch screen, then tap P to switch. Zooming T W (Telephoto) Zoom...
... focus will be adjusted automatically to conduct a trial recording. Press again to stop recording, tap 7. In addition, you can record without worrying about the setting details by using the P (Intelligent Auto) mode. Video Recording You can also tap D to zoom. 12 EN Check if the recording mode is A video. A C PH Start recording. Check if the recording mode is P. Before recording an important scene, it is H Manual, tap H on the touch screen, then tap P to switch. Zooming T W (Telephoto) Zoom...
User Guide
Page 13
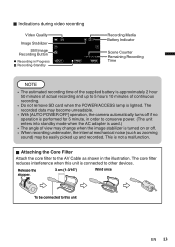
... operation is performed for 5 minute, in order to conserve power. (The unit enters into standby mode when the AC adapter is used.) 0 The angle of continuous recording. 0 Do not remove SD card when the POWER/ACCESS lamp is turned on or off. 0 When recording underwater, the internal mechanical noise (such as shown in Progress ˻PLAY Recording-Standby REC 0:00:00 [0:54] MENU Recording Media Battery Indicator Scene Counter Remaining Recording Time...
... operation is performed for 5 minute, in order to conserve power. (The unit enters into standby mode when the AC adapter is used.) 0 The angle of continuous recording. 0 Do not remove SD card when the POWER/ACCESS lamp is turned on or off. 0 When recording underwater, the internal mechanical noise (such as shown in Progress ˻PLAY Recording-Standby REC 0:00:00 [0:54] MENU Recording Media Battery Indicator Scene Counter Remaining Recording Time...
User Guide
Page 14
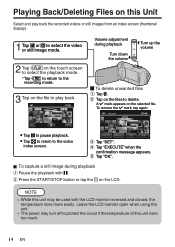
... message appears. NOTE 0 While this Unit Select and play back. Tap E to return to play back the recorded videos or still images from an index screen (thumbnail display). . Tap "OK". Turn down W the volume Tap F on the file to the recording mode. Tap on this unit may turn off to pause playback. Playing Back/Deleting Files on the files to select the playback mode. SEL ALL REL ALL SET QUIT Tap "SET". o To capture a still image...
... message appears. NOTE 0 While this Unit Select and play back. Tap E to return to play back the recorded videos or still images from an index screen (thumbnail display). . Tap "OK". Turn down W the volume Tap F on the file to the recording mode. Tap on this unit may turn off to pause playback. Playing Back/Deleting Files on the files to select the playback mode. SEL ALL REL ALL SET QUIT Tap "SET". o To capture a still image...
User Guide
Page 15
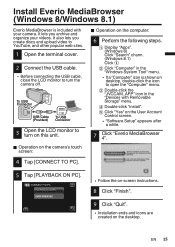
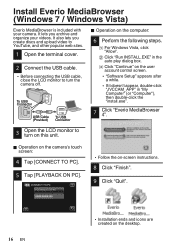
.... (Windows 8.1) Click F. E Click "Yes" on the desktop. It lets you create discs and upload video to YouTube, and other popular web sites. 1 Open the terminal cover. 2 Connect the USB cable. 0 Before connecting the USB cable, close the LCD monitor to turn the camera off. CONNECT TO PC PLAYBACK ON PC . 0 Follow the on-screen instructions. 8 Click "Finish". 9 Click "Quit". . 0 Installation ends and icons are created on the User Account Control screen. 0 "Software Setup" appears...
.... (Windows 8.1) Click F. E Click "Yes" on the desktop. It lets you create discs and upload video to YouTube, and other popular web sites. 1 Open the terminal cover. 2 Connect the USB cable. 0 Before connecting the USB cable, close the LCD monitor to turn the camera off. CONNECT TO PC PLAYBACK ON PC . 0 Follow the on-screen instructions. 8 Click "Finish". 9 Click "Quit". . 0 Installation ends and icons are created on the User Account Control screen. 0 "Software Setup" appears...
User Guide
Page 16
... steps. It lets you create discs and upload video to YouTube, and other popular web sites. 1 Open the terminal cover. 2 Connect the USB cable. 0 Before connecting the USB cable, close the LCD monitor to turn the camera off. o Operation on the user account control screen. 0 "Software Setup" appears after a while. 0 If it doesn't appear, double-click "JVCCAM_APP" in the auto play dialog box. A For Windows Vista, click "Allow". o Operation on the desktop. It...
... steps. It lets you create discs and upload video to YouTube, and other popular web sites. 1 Open the terminal cover. 2 Connect the USB cable. 0 Before connecting the USB cable, close the LCD monitor to turn the camera off. o Operation on the user account control screen. 0 "Software Setup" appears after a while. 0 If it doesn't appear, double-click "JVCCAM_APP" in the auto play dialog box. A For Windows Vista, click "Allow". o Operation on the desktop. It...
User Guide
Page 17
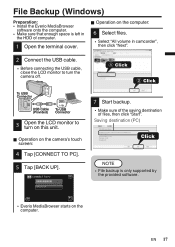
... cover. NOTE 0 File backup is left in camcorder", then click "Next". 2 Connect the USB cable. 0 Before connecting the USB cable, close the LCD monitor to turn the camera off. 1 Click 2 Click To USB Connector USB Cable To USB (Provided) Connector . 3 Open the LCD monitor to turn on the camera's touch screen: 4 Tap [CONNECT TO PC]. 5 Tap [BACK UP]. o Operation on this unit. Saving destination (PC) Click . File Backup (Windows) Preparation: 0 Install the Everio MediaBrowser software onto the...
... cover. NOTE 0 File backup is left in camcorder", then click "Next". 2 Connect the USB cable. 0 Before connecting the USB cable, close the LCD monitor to turn the camera off. 1 Click 2 Click To USB Connector USB Cable To USB (Provided) Connector . 3 Open the LCD monitor to turn on the camera's touch screen: 4 Tap [CONNECT TO PC]. 5 Tap [BACK UP]. o Operation on this unit. Saving destination (PC) Click . File Backup (Windows) Preparation: 0 Install the Everio MediaBrowser software onto the...
User Guide
Page 18
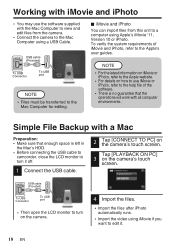
... camera's touch screen. To USB port 0 Then open the LCD monitor to turn it . 18 EN USB cable (Provided) To USB Connector To USB port NOTE 0 Files must be transferred to the Apple's user guides. Working with iMovie and iPhoto 0 You may use iMovie or iPhoto, refer to the help file of iMovie and iPhoto, refer to the Mac Computer for editing. o iMovie and iPhoto You can import files from the camera. 0 Connect...
... camera's touch screen. To USB port 0 Then open the LCD monitor to turn it . 18 EN USB cable (Provided) To USB Connector To USB port NOTE 0 Files must be transferred to the Apple's user guides. Working with iMovie and iPhoto 0 You may use iMovie or iPhoto, refer to the help file of iMovie and iPhoto, refer to the Mac Computer for editing. o iMovie and iPhoto You can import files from the camera. 0 Connect...
User Guide
Page 19
... pressing the reset button, close the LCD monitor to turn off . ... Cooler temperatures require longer charging time, or in some cases stop charging at all. ... http://manual3.jvckenwood.com/ index.html/ 2. In such a case, reset the unit. do not solve the problem, consult your nearest JVC dealer or JVC service center. remove the AC adapter from a TV, a radio, etc.) might prevent it at a 30% battery level (i). ... If...
... pressing the reset button, close the LCD monitor to turn off . ... Cooler temperatures require longer charging time, or in some cases stop charging at all. ... http://manual3.jvckenwood.com/ index.html/ 2. In such a case, reset the unit. do not solve the problem, consult your nearest JVC dealer or JVC service center. remove the AC adapter from a TV, a radio, etc.) might prevent it at a 30% battery level (i). ... If...
User Guide
Page 20
... the metal parts. 0 When erasing data using the camcorder, the data won't be erased completely. When handing over your recorded data. 0 Do not bend or drop the recording medium, or subject it to strong pressure, jolts or vibrations. 0 Do not splash the recording medium with water. 0 Do not use, replace, or store the recording medium in locations that are recommended to the power plug or an...
... the metal parts. 0 When erasing data using the camcorder, the data won't be erased completely. When handing over your recorded data. 0 Do not bend or drop the recording medium, or subject it to strong pressure, jolts or vibrations. 0 Do not splash the recording medium with water. 0 Do not use, replace, or store the recording medium in locations that are recommended to the power plug or an...

User Guide
Page 21
... in a particular installation. Refer all servicing to direct sunlight. ... 0 To protect the unit, DO NOT ... subject it excessively when using the camcorder with the instructions, may cause undesired operation. When a child uses the unit, there must accept any way, such as powersupply cord or plug is encouraged to try to correct the interference by JVC could void the user's authority to radio...
... in a particular installation. Refer all servicing to direct sunlight. ... 0 To protect the unit, DO NOT ... subject it excessively when using the camcorder with the instructions, may cause undesired operation. When a child uses the unit, there must accept any way, such as powersupply cord or plug is encouraged to try to correct the interference by JVC could void the user's authority to radio...
User Guide
Page 24
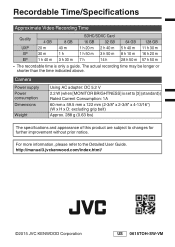
... to the Detailed User Guide. http://manual3.jvckenwood.com/index.html/ ©2015 JVC KENWOOD Corporation 24 EN US 0615TOH-SW-VM The actual recording time may be longer or shorter than the time indicated above. For more information, please refer to changes for further improvement without prior notice. Camera Power supply Power consumption Dimensions Weight Using AC adapter: DC 5.2 V 2.2 W (when [MONITOR...
... to the Detailed User Guide. http://manual3.jvckenwood.com/index.html/ ©2015 JVC KENWOOD Corporation 24 EN US 0615TOH-SW-VM The actual recording time may be longer or shorter than the time indicated above. For more information, please refer to changes for further improvement without prior notice. Camera Power supply Power consumption Dimensions Weight Using AC adapter: DC 5.2 V 2.2 W (when [MONITOR...


